merry christmas contest - Mega Miniatures
merry christmas contest - Mega Miniatures
merry christmas contest - Mega Miniatures

You also want an ePaper? Increase the reach of your titles
YUMPU automatically turns print PDFs into web optimized ePapers that Google loves.
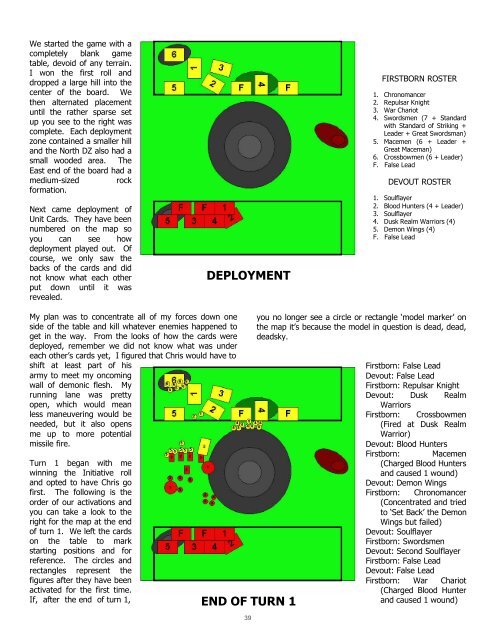
We started the game with a<br />
completely blank game<br />
table, devoid of any terrain.<br />
I won the first roll and<br />
dropped a large hill into the<br />
center of the board. We<br />
then alternated placement<br />
until the rather sparse set<br />
up you see to the right was<br />
complete. Each deployment<br />
zone contained a smaller hill<br />
and the North DZ also had a<br />
small wooded area. The<br />
East end of the board had a<br />
medium-sized rock<br />
formation.<br />
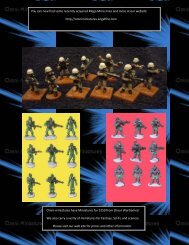
Next came deployment of<br />
Unit Cards. They have been<br />
numbered on the map so<br />
you can see how<br />
deployment played out. Of<br />
course, we only saw the<br />
backs of the cards and did<br />
not know what each other<br />
put down until it was<br />
revealed.<br />
DEPLOYMENT<br />
FIRSTBORN ROSTER<br />
1. Chronomancer<br />
2. Repulsar Knight<br />
3. War Chariot<br />
4. Swordsmen (7 + Standard<br />
with Standard of Striking +<br />
Leader + Great Swordsman)<br />
5. Macemen (6 + Leader +<br />
Great Maceman)<br />
6. Crossbowmen (6 + Leader)<br />
F. False Lead<br />
DEVOUT ROSTER<br />
1. Soulflayer<br />
2. Blood Hunters (4 + Leader)<br />
3. Soulflayer<br />
4. Dusk Realm Warriors (4)<br />
5. Demon Wings (4)<br />
F. False Lead<br />
My plan was to concentrate all of my forces down one<br />
side of the table and kill whatever enemies happened to<br />
get in the way. From the looks of how the cards were<br />
deployed, remember we did not know what was under<br />
each other’s cards yet, I figured that Chris would have to<br />
shift at least part of his<br />
army to meet my oncoming<br />
wall of demonic flesh. My<br />
running lane was pretty<br />
open, which would mean<br />
less maneuvering would be<br />
needed, but it also opens<br />
me up to more potential<br />
missile fire.<br />
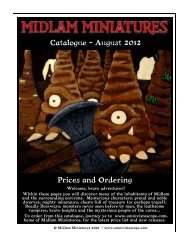
Turn 1 began with me<br />
winning the Initiative roll<br />
and opted to have Chris go<br />
first. The following is the<br />
order of our activations and<br />
you can take a look to the<br />
right for the map at the end<br />
of turn 1. We left the cards<br />
on the table to mark<br />
starting positions and for<br />
reference. The circles and<br />
rectangles represent the<br />
figures after they have been<br />
activated for the first time.<br />
If, after the end of turn 1,<br />
END OF TURN 1<br />
39<br />
you no longer see a circle or rectangle ‘model marker’ on<br />
the map it’s because the model in question is dead, dead,<br />
deadsky.<br />
Firstborn: False Lead<br />
Devout: False Lead<br />
Firstborn: Repulsar Knight<br />
Devout: Dusk Realm<br />
Warriors<br />
Firstborn: Crossbowmen<br />
(Fired at Dusk Realm<br />
Warrior)<br />
Devout: Blood Hunters<br />
Firstborn: Macemen<br />
(Charged Blood Hunters<br />
and caused 1 wound)<br />
Devout: Demon Wings<br />
Firstborn: Chronomancer<br />
(Concentrated and tried<br />
to ‘Set Back’ the Demon<br />
Wings but failed)<br />
Devout: Soulflayer<br />
Firstborn: Swordsmen<br />
Devout: Second Soulflayer<br />
Firstborn: False Lead<br />
Devout: False Lead<br />
Firstborn: War Chariot<br />
(Charged Blood Hunter<br />
and caused 1 wound)