wire rope safety - Bridon
wire rope safety - Bridon
wire rope safety - Bridon

You also want an ePaper? Increase the reach of your titles
YUMPU automatically turns print PDFs into web optimized ePapers that Google loves.
General Technical Information<br />
Retain the Certificate in a safe place for identification of the<br />
<strong>rope</strong> when carrying out subsequent periodic statutory<br />
examinations in service. (Refer to statutory requirements)<br />
3. Handling and Installation<br />
3.1 Handling and installation of the <strong>rope</strong> should be<br />
carried out in accordance with a detailed plan and<br />
should be supervised by a competent person.<br />
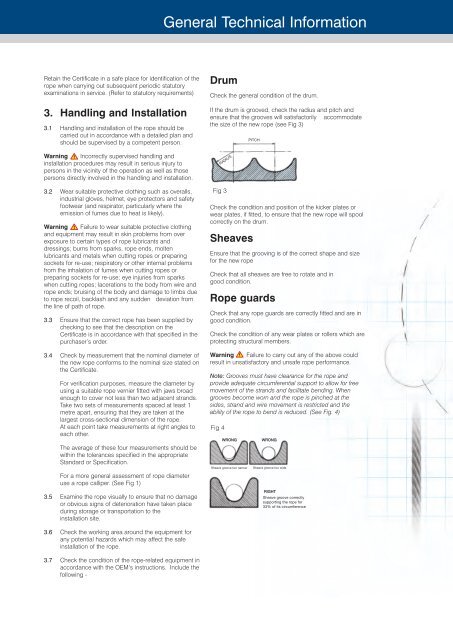
Drum<br />
Check the general condition of the drum.<br />
If the drum is grooved, check the radius and pitch and<br />
ensure that the grooves will satisfactorily accommodate<br />
the size of the new <strong>rope</strong> (see Fig 3)<br />
PITCH<br />
Warning Incorrectly supervised handling and<br />
installation procedures may result in serious injury to<br />
persons in the vicinity of the operation as well as those<br />
persons directly involved in the handling and installation.<br />
RADIUS<br />
3.2 Wear suitable protective clothing such as overalls,<br />
industrial gloves, helmet, eye protectors and <strong>safety</strong><br />
footwear (and respirator, particularly where the<br />
emission of fumes due to heat is likely).<br />
Warning Failure to wear suitable protective clothing<br />
and equipment may result in skin problems from over<br />
exposure to certain types of <strong>rope</strong> lubricants and<br />
dressings; burns from sparks, <strong>rope</strong> ends, molten<br />
lubricants and metals when cutting <strong>rope</strong>s or preparing<br />
sockets for re-use; respiratory or other internal problems<br />
from the inhalation of fumes when cutting <strong>rope</strong>s or<br />
preparing sockets for re-use; eye injuries from sparks<br />
when cutting <strong>rope</strong>s; lacerations to the body from <strong>wire</strong> and<br />
<strong>rope</strong> ends; bruising of the body and damage to limbs due<br />
to <strong>rope</strong> recoil, backlash and any sudden deviation from<br />
the line of path of <strong>rope</strong>.<br />
3.3 Ensure that the correct <strong>rope</strong> has been supplied by<br />
checking to see that the description on the<br />
Certificate is in accordance with that specified in the<br />
purchaser’s order.<br />
3.4 Check by measurement that the nominal diameter of<br />
the new <strong>rope</strong> conforms to the nominal size stated on<br />
the Certificate.<br />
For verification purposes, measure the diameter by<br />
using a suitable <strong>rope</strong> vernier fitted with jaws broad<br />
enough to cover not less than two adjacent strands.<br />
Take two sets of measurements spaced at least 1<br />
metre apart, ensuring that they are taken at the<br />
largest cross-sectional dimension of the <strong>rope</strong>.<br />
At each point take measurements at right angles to<br />
each other.<br />
The average of these four measurements should be<br />
within the tolerances specified in the appropriate<br />
Standard or Specification.<br />
For a more general assessment of <strong>rope</strong> diameter<br />
use a <strong>rope</strong> calliper. (See Fig 1)<br />
3.5 Examine the <strong>rope</strong> visually to ensure that no damage<br />
or obvious signs of deterioration have taken place<br />
during storage or transportation to the<br />
installation site.<br />
Fig 3<br />
Check the condition and position of the kicker plates or<br />
wear plates, if fitted, to ensure that the new <strong>rope</strong> will spool<br />
correctly on the drum.<br />
Sheaves<br />
Ensure that the grooving is of the correct shape and size<br />
for the new <strong>rope</strong><br />
Check that all sheaves are free to rotate and in<br />
good condition.<br />
Rope guards<br />
Check that any <strong>rope</strong> guards are correctly fitted and are in<br />
good condition.<br />
Check the condition of any wear plates or rollers which are<br />
protecting structural members.<br />
Warning Failure to carry out any of the above could<br />
result in unsatisfactory and unsafe <strong>rope</strong> performance.<br />
Note: Grooves must have clearance for the <strong>rope</strong> and<br />
provide adequate circumferential support to allow for free<br />
movement of the strands and facilitate bending. When<br />
grooves become worn and the <strong>rope</strong> is pinched at the<br />
sides, strand and <strong>wire</strong> movement is restricted and the<br />
ability of the <strong>rope</strong> to bend is reduced. (See Fig. 4)<br />
Fig 4<br />
WRONG<br />
Sheave groove too narrow<br />
WRONG<br />
Sheave groove too wide<br />
RIGHT<br />
Sheave groove correctly<br />
supporting the <strong>rope</strong> for<br />
33% of its circumference<br />
3.6 Check the working area around the equipment for<br />
any potential hazards which may affect the safe<br />
installation of the <strong>rope</strong>.<br />
3.7 Check the condition of the <strong>rope</strong>-related equipment in<br />
accordance with the OEM’s instructions. Include the<br />
following -