wire rope safety - Bridon
wire rope safety - Bridon
wire rope safety - Bridon

Create successful ePaper yourself
Turn your PDF publications into a flip-book with our unique Google optimized e-Paper software.
General Technical Information<br />
Check that the new <strong>rope</strong> is spooling correctly on the<br />
drum and that no slack or cross laps develop. Apply<br />
a back tension in the order of 2% to 5% of the<br />
strength of the <strong>rope</strong> in order to acheive tight and<br />
even coiling especially on the first layer..<br />
Where multi-layer coiling is unavoidable, succeeding<br />
layers should coil evenly on the preceding layers<br />
of <strong>rope</strong>.<br />
Warning Irregular coiling usually results in severe<br />
surface wear and <strong>rope</strong> malformation, which in turn is likely<br />
to cause premature <strong>rope</strong> failure.<br />
3.19 Ensure that the as-manufactured condition of the<br />
<strong>rope</strong> is maintained throughout the whole of the<br />
handling and installation operation.<br />
3.20 If samples are required to be taken from the <strong>rope</strong> for<br />
subsequent testing and/or evaluation, it is essential<br />
that the condition of the <strong>rope</strong> is not disturbed. Refer<br />
to the instructions given in 3.12 and, depending on<br />
the <strong>rope</strong> type and construction, any other special<br />
manufacturer’s instructions.<br />
4. In Service<br />
4.1 Inspect the <strong>rope</strong> and related equipment at the<br />
beginning of every work period and particularly<br />
following any incident which could have damaged<br />
the <strong>rope</strong> or installation.<br />
Fig 13<br />
The entire length of <strong>rope</strong> should be inspected and<br />
particular attention paid to those sections that<br />
experience has proven to be the main areas of<br />
deterioration. Excessive wear, broken <strong>wire</strong>s,<br />
distortion and corrosion are the usual signs of<br />
deterioration. For a more detailed examination<br />
special tools are necessary (see Fig. 13) which will<br />
also facilitate internal inspection (see Fig. 14.)<br />
There are however, mixed feeling about the wisdom<br />
of opening up <strong>rope</strong>s. Not withstanding this, not all<br />
<strong>rope</strong>s can be opened up due to there size and<br />
construction. In any case, the decision as to whether<br />
a <strong>rope</strong> should be opened up should be left to the<br />
discretion of the competent person.<br />
In the case of <strong>rope</strong>s working over drums or sheaves<br />
it is particularly necessary to examine those areas<br />
entering or leaving the grooves when maximum<br />
loads (i.e. shock loads) are experienced, or those<br />
areas which remain for long periods in exposed<br />
places such as over a jib head sheave.<br />
On some running <strong>rope</strong>s, but particularly relevant to<br />
standing <strong>rope</strong>s (e.g. pendant <strong>rope</strong>s) the areas<br />
adjacent to terminations should be given special<br />
attention (see Fig. 14).<br />
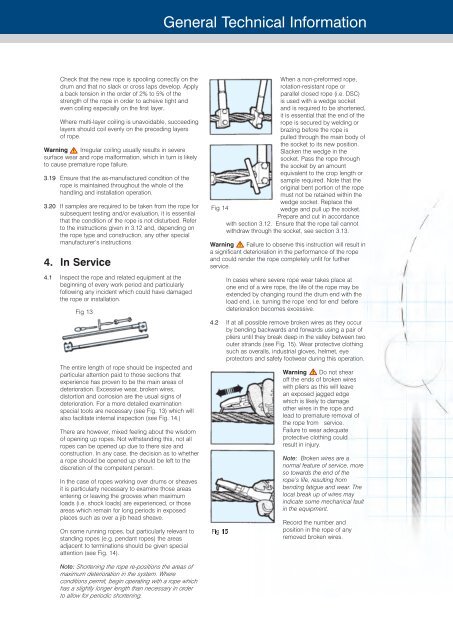
When a non-preformed <strong>rope</strong>,<br />
rotation-resistant <strong>rope</strong> or<br />
parallel closed <strong>rope</strong> (i.e. DSC)<br />
is used with a wedge socket<br />
and is required to be shortened,<br />
it is essential that the end of the<br />
<strong>rope</strong> is secured by welding or<br />
brazing before the <strong>rope</strong> is<br />
pulled through the main body of<br />
the socket to its new position.<br />
Slacken the wedge in the<br />
socket. Pass the <strong>rope</strong> through<br />
the socket by an amount<br />
equivalent to the crop length or<br />
sample required. Note that the<br />
original bent portion of the <strong>rope</strong><br />
must not be retained within the<br />
wedge socket. Replace the<br />
Fig 14<br />
wedge and pull up the socket.<br />
Prepare and cut in accordance<br />
with section 3.12. Ensure that the <strong>rope</strong> tail cannot<br />
withdraw through the socket, see section 3.13.<br />
Warning Failure to observe this instruction will result in<br />
a significant deterioration in the performance of the <strong>rope</strong><br />
and could render the <strong>rope</strong> completely unfit for further<br />
service.<br />
In cases where severe <strong>rope</strong> wear takes place at<br />
one end of a <strong>wire</strong> <strong>rope</strong>, the life of the <strong>rope</strong> may be<br />
extended by changing round the drum end with the<br />
load end, i.e. turning the <strong>rope</strong> ‘end for end’ before<br />
deterioration becomes excessive.<br />
4.2 If at all possible remove broken <strong>wire</strong>s as they occur<br />
by bending backwards and forwards using a pair of<br />
pliers until they break deep in the valley between two<br />
outer strands (see Fig. 15). Wear protective clothing<br />
such as overalls, industrial gloves, helmet, eye<br />
protectors and <strong>safety</strong> footwear during this operation.<br />
Fig 15<br />
Warning Do not shear<br />
off the ends of broken <strong>wire</strong>s<br />
with pliers as this will leave<br />
an exposed jagged edge<br />
which is likely to damage<br />
other <strong>wire</strong>s in the <strong>rope</strong> and<br />
lead to premature removal of<br />
the <strong>rope</strong> from service.<br />
Failure to wear adequate<br />
protective clothing could<br />
result in injury.<br />
Note: Broken <strong>wire</strong>s are a<br />
normal feature of service, more<br />
so towards the end of the<br />
<strong>rope</strong>’s life, resulting from<br />
bending fatigue and wear. The<br />
local break up of <strong>wire</strong>s may<br />
indicate some mechanical fault<br />
in the equipment.<br />
Record the number and<br />
position in the <strong>rope</strong> of any<br />
removed broken <strong>wire</strong>s.<br />
Note: Shortening the <strong>rope</strong> re-positions the areas of<br />
maximum deterioration in the system. Where<br />
conditions permit, begin operating with a <strong>rope</strong> which<br />
has a slightly longer length than necessary in order<br />
to allow for periodic shortening.