VE Qe-60+ LXi Print - Cut Workflow Tutorial - Signwarehouse.com
VE Qe-60+ LXi Print - Cut Workflow Tutorial - Signwarehouse.com
VE Qe-60+ LXi Print - Cut Workflow Tutorial - Signwarehouse.com

Create successful ePaper yourself
Turn your PDF publications into a flip-book with our unique Google optimized e-Paper software.
2614 Texoma Drive Denison, TX 75020<br />
Ph; 903-462-7700 Toll Free: 800-699-5514<br />
Fax: 903-462-7702 Toll Free: 800-966-6834<br />
<strong>VE</strong> <strong>Qe</strong>-<strong>60+</strong> <strong>LXi</strong> <strong>Print</strong> - <strong>Cut</strong> <strong>Workflow</strong> <strong>Tutorial</strong><br />
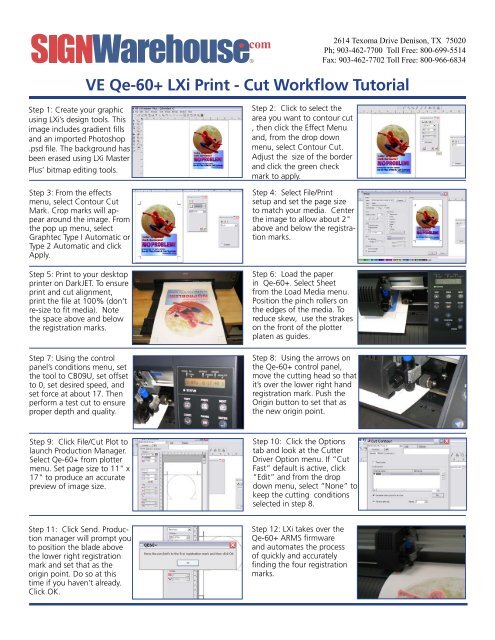
Step 1: Create your graphic<br />
using <strong>LXi</strong>’s design tools. This<br />
image includes gradient fills<br />
and an imported Photoshop<br />
.psd file. The background has<br />
been erased using <strong>LXi</strong> Master<br />
Plus’ bitmap editing tools.<br />
Step 3: From the effects<br />
menu, select Contour <strong>Cut</strong><br />
Mark. Crop marks will appear<br />
around the image. From<br />
the pop up menu, select<br />
Graphtec Type I Automatic or<br />
Type 2 Automatic and click<br />
Apply.<br />
Step 5: <strong>Print</strong> to your desktop<br />
printer on DarkJET. To ensure<br />
print and cut alignment,<br />
print the file at 100% (don’t<br />
re-size to fit media). Note<br />
the space above and below<br />
the registration marks.<br />
Step 7: Using the control<br />
panel’s conditions menu, set<br />
the tool to CB09U, set offset<br />
to 0, set desired speed, and<br />
set force at about 17. Then<br />
perform a test cut to ensure<br />
proper depth and quality.<br />
Step 2: Click to select the<br />
area you want to contour cut<br />
, then click the Effect Menu<br />
and, from the drop down<br />
menu, select Contour <strong>Cut</strong>.<br />
Adjust the size of the border<br />
and click the green check<br />
mark to apply.<br />
Step 4: Select File/<strong>Print</strong><br />
setup and set the page size<br />
to match your media. Center<br />
the image to allow about 2"<br />
above and below the registration<br />
marks.<br />
Step 6: Load the paper<br />
in <strong>Qe</strong>-<strong>60+</strong>. Select Sheet<br />
from the Load Media menu.<br />
Position the pinch rollers on<br />
the edges of the media. To<br />
reduce skew, use the strakes<br />
on the front of the plotter<br />
platen as guides.<br />
Step 8: Using the arrows on<br />
the <strong>Qe</strong>-<strong>60+</strong> control panel,<br />
move the cutting head so that<br />
it’s over the lower right hand<br />
registration mark. Push the<br />
Origin button to set that as<br />
the new origin point.<br />
Step 9: Click File/<strong>Cut</strong> Plot to<br />
launch Production Manager.<br />
Select <strong>Qe</strong>-<strong>60+</strong> from plotter<br />
menu. Set page size to 11" x<br />
17" to produce an accurate<br />
preview of image size.<br />
Step 10: Click the Options<br />
tab and look at the <strong>Cut</strong>ter<br />
Driver Option menu. If “<strong>Cut</strong><br />
Fast” default is active, click<br />
“Edit” and from the drop<br />
down menu, select “None” to<br />
keep the cutting conditions<br />
selected in step 8.<br />
Step 11: Click Send. Production<br />
manager will prompt you<br />
to position the blade above<br />
the lower right registration<br />
mark and set that as the<br />
origin point. Do so at this<br />
time if you haven’t already.<br />
Click OK.<br />
Step 12: <strong>LXi</strong> takes over the<br />
<strong>Qe</strong>-<strong>60+</strong> ARMS firmware<br />
and automates the process<br />
of quickly and accurately<br />
finding the four registration<br />
marks.
<strong>VE</strong> <strong>Qe</strong>-<strong>60+</strong> <strong>LXi</strong> <strong>Print</strong> - <strong>Cut</strong> <strong>Workflow</strong> <strong>Tutorial</strong><br />
Step13: Once the registration<br />
marks have been<br />
located, the <strong>Qe</strong>-<strong>60+</strong> immediately<br />
begins cutting<br />
the contour path set in <strong>LXi</strong>,<br />
using the speed and force<br />
set in the conditions menu.<br />
Step 15: Mask the weeded<br />
graphic using a high<br />
tack transfer tape. This<br />
will be<strong>com</strong>e the liner for<br />
applying the graphic to<br />
the garment on the heat<br />
press. Siser ColorMask<br />
works particularly well.<br />
Step 17: Pull the tape upward<br />
(or flip the graphic<br />
over and gently remove<br />
the liner by pulling it<br />
away from the masked<br />
graphic). Now your<br />
masked graphic is ready<br />
for the heat press.<br />
Step 14: Remove the<br />
graphic from the plotter<br />
and weed it by pulling the<br />
unwanted DarkJET from<br />
the release liner. This is<br />
easy to do if you begin<br />
by tearing the corner to<br />
separate the face film from<br />
the liner.<br />
Step 16: If you use Color-<br />
Mask, remove the white<br />
liner before masking the<br />
graphic. Apply the clear<br />
tape in a smooth motion,<br />
taking care to avoid getting<br />
wrinkles in the tape.<br />
Squeegee with firm pressure.<br />
Step 18: Place the weeded,<br />
masked graphic on your<br />
garment of choice on a<br />
heat press capable of producing<br />
350°F. We are using<br />
a Knight DK20-AR clamshell<br />
press with an advanced<br />
auto release feature.<br />
Step 19: Preheat the garment<br />
by pressing it for a<br />
few seconds. Then press<br />
for 20 seconds at 350°F<br />
with moderate pressure.<br />
A Teflon sheet is re<strong>com</strong>mended<br />
to ensure even<br />
heat distribution.<br />
Finished!<br />
You now have a full color contour-cut graphic on a dark shirt.<br />
Step 20: Allow the graphic<br />
to cool to room temperature<br />
before removing the<br />
ColorMask liner. Peel<br />
in one smooth motion.<br />
You may want to repress<br />
under the Teflon sheet<br />
for a few seconds to reset<br />
adhesive.<br />
Cost and R.O.I. Information *<br />
11" X 17" media size<br />
Average ink cost: $2.24<br />
DarkJET sheet cost: $2.46<br />
Average shirt cost: $2.29<br />
Total cost: $6.99/shirt<br />
Market value: $15.00<br />
8.5" X 11" media size<br />
Average ink cost: $1.12<br />
DarkJET sheet cost: $1.28<br />
Average shirt cost: $2.29<br />
Total cost: $4.69/shirt<br />
Market value: $12.00<br />
Gross Profit / shirt: $8.01 Gross Profit / shirt: $7.31<br />
* Projections based on wholesale cost of DarkJET thermal transfer media,<br />
RICOH gel ink cartridges, and black cotton t-shirts. DarkJET inkjet media is <strong>com</strong>patible<br />
with Sawgrass ChromaBlast ink or any standard inkjet printer using aqueous dye or<br />
pigment inks. Other printers may yield lower ink costs.<br />
Care instructions: It is re<strong>com</strong>mended that you wait at least 24 hours before laundering<br />
the garment. For the initial wash, turn garment inside out and wash separately in cool<br />
water. Remove immediately from washing machine and dry on warm. If left wet in the<br />
washing machine, the ink may bleed. Never use bleach. Do not iron the transfer.<br />
August 2012<br />
Phone: • Local: 903-462-7700 • Toll Free: 800-699-5514 • Fax: 800-966-6834<br />
Hours: • Monday - Friday 7am - 11pm. • Saturday 9am - 4pm • Sunday 1 - 5pm CST