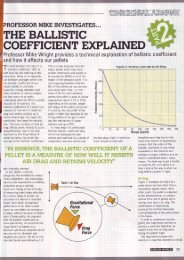
February 2012 Issue - Target Shooter Magazine
February 2012 Issue - Target Shooter Magazine
February 2012 Issue - Target Shooter Magazine

Create successful ePaper yourself
Turn your PDF publications into a flip-book with our unique Google optimized e-Paper software.
Bergara & their new...<br />
No Gunsmithing Barrels...<br />
this job in ‘slow motion’, taking the ultimate care<br />
and attention to detail in all machining stages, never<br />
needing to ‘cut corners’ to match the time/money<br />
criteria laid down by professional gunsmiths.<br />
He explained to me how the time and hence fee<br />
charged by various gunsmiths often varies widely,<br />
purely down to some of this balance and one other<br />
quite surprising facts – including the action being<br />
re-barrelled. Much as he tried to avoid the issue (I<br />
know Vince loves Remingtons for the way they are the<br />
access route for many, including me, into this sport<br />
of ours) but, as the consummate precision shooter,<br />
engineer and machinist, he winces at the thought of<br />
working with one. Had it been a BAT or Stolle, I’m<br />
sure his eyes would have glazed over and I now know<br />
partly why. I LOVE Remington 700s, at 50 years old<br />
this year they are the granddaddy of nearly all modern<br />
precision rifles with their footprints and design<br />
ethos but, they are as individual as women – in that<br />
no two are exactly the same - and in the same way,<br />
individually unique and challenging if a precision job is<br />
to result.<br />
A love/hate relationship<br />
If you are working on a £1000 BAT action or<br />
something similar, the significant measurements, to<br />
within one ten thousandth of an inch, are all carefully<br />
laid down in the technical specification of the action<br />
- consistent from one action to its brother three<br />
years from now. The action-face is square to the<br />
bolt raceway which is central to the barrel-threads –<br />
exactly as it should be! When working with a factory<br />
rifle, such as the common old Remington 700 used<br />
here, all the measurements to do with the thread on<br />
the barrel tenon, bolt nose clearance and headspacing<br />
of the cartridge must be done after taking careful<br />
measurements off the actual action being used –<br />
some are good and some are not so good! With the<br />
threading/chambering job on the BAT or Stolle - you<br />
don’t even need to have the action in the room.<br />
With a Remmy (much as I adore them) the action is<br />
continually measured and offered up to its barrelthread<br />
to check fit and tolerances at all stages. I know<br />
any factory-made mechanical component has a plus or<br />
minus tolerance on it but these are all unique. I have<br />
renewed respect and understanding for those who do<br />
this job day in and day out and, if the same machining<br />
care and attention is given to both actions during a rebarrel<br />
job, the Remington WILL take longer, if done to<br />
the same standard.<br />
Anyway, from back in September, the precise numbers<br />
of threads per inch and tenon diameter evade me<br />
but the barrel tenon (the section that screws into<br />
the action) is threaded and has a shoulder cut into it<br />
that will meet the face of the closed bolt with a few<br />
thousands of an inch to spare.<br />
Being a Remington, the face of the barrel, before<br />
chambering, needs to incorporate a bolt nose recess<br />
(part of the iconic `three rings of steel`) and allowance<br />
must also be made for the thickness of the recoil lug,<br />
in this case a precision ground custom stainless-steel<br />
one from Brownells.<br />
Machining techniques and styles are often<br />
personalised with experience but, there are certain<br />
unbreakable rules associated with thread pitches,<br />
angles and feed-rates for standards as near as perfect<br />
to be achieved. Vince had a few well thumbed,<br />
beautifully oil and fingerprint stained `bibles`<br />
of equipment settings and records of previously<br />
worked-on actions to ensure correct specifications for<br />
subsequent barrels. He has the time to be confident<br />
in his exclusion of all considered variables and if this<br />
means slowing down the work rate, so be it.<br />
So, we now have a threaded barrel that fits the action<br />
and mates to the bolt with the correct bolt-nose<br />
clearance - the next stage is to cut the chamber. This<br />
is where real patience comes in, as we were not using<br />
a roughing-reamer to rip out 95% the chamber but a<br />
finishing reamer that must be driven more carefully<br />
to maintain the finish and of course, not destroy this<br />
precision tool.<br />
As most of Vince’s reamers are tight-neck or wildcats<br />
of some description, we had to borrow our standard<br />
243 reamer from Osprey Rifles. The reamer is<br />
attached to the tailstock of the lathe via a floating<br />
reamer-holder that allows the tail of the tool to<br />
position itself precisely to the last ‘n’th degree whilst<br />
it is guided from its tip by a ‘pilot’ - carefully selected<br />
Checking headspace with the ‘go’ gauge<br />
Job done – the recess is peculiar to Remington – their<br />
‘third ring of steel’<br />
from a set that will closely and snugly slide into the<br />
rifling. This guides the reamer accurately along the<br />
bore centreline and hopefully, we end up with a<br />
chamber with negligible ‘run-out’.<br />
At this point we also fitted the muzzle-flush nozzle<br />
to the muzzle end of the barrel (not yet finished or<br />
crowned). This will drive a pressurised stream of<br />
cutting fluid back towards the reamer and ensure that<br />
cutting was well lubricated and all swarf flushed back<br />
along the flutes of the reamer to exit the barrel at the<br />
breech end. This prevents any swarf accumulating in<br />
the reamer flutes and scoring of the chamber.<br />
About to feed in the reamer. Once cutting starts we<br />
will increase the flushing oil pressure<br />
The reamer is driven into the bore extremely slowly<br />
and smoothly and regularly withdrawn completely<br />
to inspect it and the chamber and ensure the flutes<br />
were clean with no build-up of metal on the cutting<br />
edge. Now, during this withdrawal and re-insertion of<br />
the reamer, the cutting fluid pump must be turned off<br />
and on - with careful timing – otherwise it can have a<br />
tendency to spray everywhere...!<br />
Bergara & their new...<br />
No Gunsmithing Barrels...<br />
Under Vince’s guidance, I took it very slowly and<br />
eventually I was able to ‘feel’ how the reamer was<br />
cutting. During machining, the swarf produced is a<br />
good sign to the machinist of machining quality, if<br />
he can speed up or slow down the feedrates and is<br />
also a good indicator of the barrel steel quality and<br />
consistency.<br />
STOP!<br />
Coming to the end of the chamber reaming process,<br />
we need to start checking where we need to STOP,<br />
i.e. set our headspace or in simplistic terms, the size<br />
of the chamber, relative to the shoulder and bolt-face.<br />
To do this we use `go` and `no-go` gauges, which are<br />
specific to our cartridge.<br />
Basically, we want to continue cutting until when<br />
the barrel, recoil-lug and action are screwed tightly<br />
together, the bolt will close on the `go` gauge but not<br />
with the `no-go`. It sounds simple but you have to<br />
anticipate the amount that the barrel will nip up into<br />
the action when fully tightened so how many `thou`<br />
to leave spare to take this into account as there is<br />
only a few thou. difference in the two gauges. Again,<br />
when working with a custom action, the ‘nip up’<br />
will be negligible but with a factory action it can be<br />
significant.<br />
This is a critical stage as, if you go too deep, there is<br />
only one cure, that is to re-cut the barrel shoulder and<br />
trim a bit off the tenon which means adjusting the<br />
bolt-nose clearance and is undesirable in terms of both<br />
time and physically, metal that has been removed<br />
cannot be glued back on. I doubt you will ever find<br />
a gunsmith who wants to be disturbed to any extent<br />
during these processes, all critical to 0.001 inches,<br />
never mind explaining it and teaching it along the way<br />
and, bless Vince’s patience, I buggered it up!<br />
Vince is a true gent and basically returned back to the<br />
start to tweak a few details but eventually everything<br />
was perfect, a job we were both technically happy<br />
with - concentric chamber, perfect headspace and<br />
thus complete at the action/chamber end of the<br />
barrel. To finish the job, we removed the blank and<br />
turned it all round so that after once more re-clocking<br />
36 37