Google Docs Basics
Google Docs Basics
Google Docs Basics

You also want an ePaper? Increase the reach of your titles
YUMPU automatically turns print PDFs into web optimized ePapers that Google loves.
<strong>Google</strong> <strong>Docs</strong> <strong>Basics</strong><br />
USF College of Education Laptop Initiative<br />
EDU 252, Email: laptoplounge@coedu.usf.edu<br />
Website: http://fcit.usf.edu/laptop//<br />
<strong>Google</strong> <strong>Docs</strong> is a free web-based office suite that allows you to store documents online<br />
so you can access them from any computer with an internet connection. With <strong>Google</strong><br />
<strong>Docs</strong> you can share a document with other people so that everyone can work on it at<br />
the same time. You can even track revisions to see the edits made by everyone who<br />
has been invited to work on the document. <strong>Google</strong> <strong>Docs</strong> supports many of the features<br />
of stand-alone word processing and spreadsheet programs, including the ability to add<br />
images, tables, and more. To get started with <strong>Google</strong> <strong>Docs</strong>, all you need is a free <strong>Google</strong><br />
account.<br />
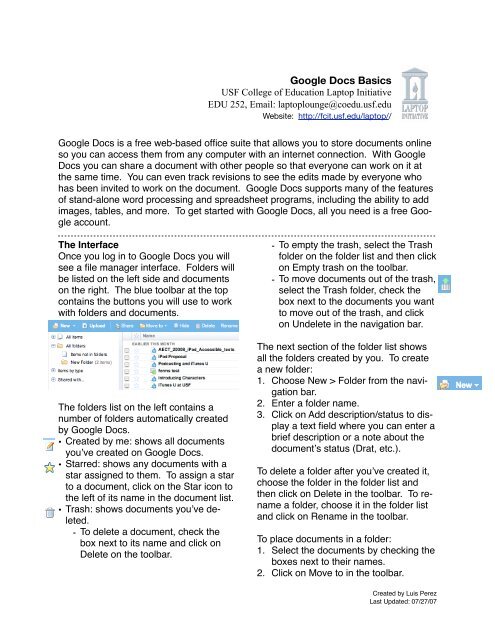
The Interface<br />
Once you log in to <strong>Google</strong> <strong>Docs</strong> you will<br />
see a file manager interface. Folders will<br />
be listed on the left side and documents<br />
on the right. The blue toolbar at the top<br />
contains the buttons you will use to work<br />
with folders and documents.<br />
The folders list on the left contains a<br />
number of folders automatically created<br />
by <strong>Google</strong> <strong>Docs</strong>.<br />
• Created by me: shows all documents<br />
you’ve created on <strong>Google</strong> <strong>Docs</strong>.<br />
• Starred: shows any documents with a<br />
star assigned to them. To assign a star<br />
to a document, click on the Star icon to<br />
the left of its name in the document list.<br />
• Trash: shows documents you’ve deleted.<br />
- To delete a document, check the<br />
box next to its name and click on<br />
Delete on the toolbar.<br />
- To empty the trash, select the Trash<br />
folder on the folder list and then click<br />
on Empty trash on the toolbar.<br />
- To move documents out of the trash,<br />
select the Trash folder, check the<br />
box next to the documents you want<br />
to move out of the trash, and click<br />
on Undelete in the navigation bar.<br />
The next section of the folder list shows<br />
all the folders created by you. To create<br />
a new folder:<br />
1. Choose New > Folder from the navigation<br />
bar.<br />
2. Enter a folder name.<br />
3. Click on Add description/status to display<br />
a text field where you can enter a<br />
brief description or a note about the<br />
document’s status (Drat, etc.).<br />
To delete a folder after you’ve created it,<br />
choose the folder in the folder list and<br />
then click on Delete in the toolbar. To rename<br />
a folder, choose it in the folder list<br />
and click on Rename in the toolbar.<br />
To place documents in a folder:<br />
1. Select the documents by checking the<br />
boxes next to their names.<br />
2. Click on Move to in the toolbar.<br />
Created by Luis Perez<br />
Last Updated: 07/27/07
3. Click on the name of the folder where<br />
you want to place the documents.<br />
4. Click on Move to folder.<br />
To move documents out of a folder:<br />
1. Select the folder on the folder list.<br />
2. On the right side, check the box next<br />
to the name of each document you<br />
want to move out of the folder.<br />
3. Click on Move to in the toolbar.<br />
4. Choose Remove from current folder.<br />
5. Click on the Remove from current<br />
folder button.<br />
The bottom section of the folder list allows<br />
you to view your documents by type.<br />
You can also view a list of people you’ve<br />
shared documents with along with the<br />
number of documents you’re sharing with<br />
each person.<br />
Creating a New Document<br />
There are two ways to create a new<br />
document in <strong>Google</strong> <strong>Docs</strong>:<br />
1. To create it from scratch in <strong>Google</strong><br />
<strong>Docs</strong>, click on New on the toolbar and<br />
select Document or Spreadsheet.<br />
The new document or spreadsheet<br />
will open in a separate window.<br />
2. To upload a document you’ve already<br />
created with another program (such<br />
as Microsoft Word, Excel or Power-<br />
Point), click on Upload in the toolbar.<br />
Click on Browse and locate the file<br />
you want to upload. Enter a name for<br />
it and click on Upload File.<br />
To edit a document from the <strong>Google</strong> <strong>Docs</strong><br />
file manager, click on its name in the<br />
documents list. The document will open<br />
in a separate window.<br />
<strong>Google</strong> <strong>Docs</strong> saves your open document<br />
at regular intervals. You can also save a<br />
document by clicking on the Save or<br />
Save and close buttons. Click on Discard<br />
changes to close your document without<br />
saving changes.<br />
<strong>Google</strong> <strong>Docs</strong><br />
Formatting<br />
Once you type some text into your new<br />
document, you can select it and use the<br />
buttons in the toolbar to format it:<br />
• Make text bold<br />
• Change text to italics<br />
• Underline text<br />
• Choose the font<br />
• Change the text size<br />
The Style drop-down menu has additional<br />
formatting options, such as superscript,<br />
subscript, and strikeout. To create headings,<br />
select the text you want for the<br />
heading and choose one of the three<br />
heading types in the Style drop-down<br />
menu.<br />
To remove all formatting from the selected<br />
text, click on the Remove Formatting<br />
button.<br />
Editing<br />
On the left size of the toolbar are the editing<br />
buttons, which you can use to copy<br />
and paste text:<br />
• Undo last change<br />
• Redo last change<br />
• Cut<br />
• Copy<br />
• Paste<br />
Alignment and Spacing<br />
To change how text is aligned, click on<br />
one of the align buttons in the toolbar:<br />
Created by Luis Perez<br />
Last Updated: 07/27/07
To justify text, choose Style > Justify after<br />
you’ve selected the text.<br />
To change the line spacing, choose Style<br />
> Page Spacing to bring up the Document<br />
Settings window, then choose a different<br />
setting from the line-spacing dropdown<br />
menu (Normal, Single, 1.5, Double,<br />
or Triple).<br />
Lists and Indentation<br />
To create a list:<br />
1. Place the cursor where you want the<br />
list to start.<br />
2. Click on one of the list type buttons in<br />
the toolbar (numbered or bulleted).<br />
3. Press Enter or Return after you’ve<br />
added an item to add the next one in<br />
the list. To go to the next line without<br />
adding a new item, hold down the<br />
Shift key and press Enter or Return.<br />
4. To end the list, click on the list type<br />
button in the toolbar again.<br />
To indent a line of text, place your cursor<br />
at the beginning of the line of text and<br />
click on the Indent More button in the<br />
toolbar (click on Indent Less to undo the<br />
indentation). To create a blockquote (indented<br />
on both sides) select a block of<br />
text and click on the Quote button.<br />
Bookmarks and Links<br />
Bookmarks are markers that can be used<br />
to navigate on long documents. To create<br />
a new bookmark:<br />
1. Place your cursor where you want to<br />
insert the bookmark.<br />
2. Click on the Insert tab in the toolbar<br />
and choose Bookmark.<br />
3. Enter a name for the bookmark.<br />
4. Click on OK.<br />
You can then create links at the top of<br />
your document that will take you to each<br />
bookmark.<br />
To add a link:<br />
1. Select the text you wan to make into a<br />
link.<br />
2. Click on the link button in the toolbar.<br />
3. Choose a link type:<br />
• URL: enter the address of a website in<br />
the URL field.<br />
• Document: choose another document in<br />
<strong>Google</strong> <strong>Docs</strong> from the pulldown menu.<br />
• Bookmark: choose a bookmark from the<br />
pulldown menu.<br />
• E-mail address: enter the email address<br />
in the E-mail to: field.<br />
Images<br />
To add an image to your document:<br />
1. Click on the Insert tab in the toolbar<br />
and choose Image.<br />
2. Choose whether you want to use a<br />
computer stored on your computer or<br />
to use the URL of an image that’s already<br />
online.<br />
3. Click on Browse to locate an image on<br />
your computer, or paste the URL of<br />
the image if it’s already online.<br />
4. Click on the plus sign next to More<br />
image options to change the alignment<br />
and wrapping. You can also resize<br />
your image by choosing a preset<br />
from the Size pulldown menu.<br />
5. Click on OK.<br />
You can use the handles that appear<br />
when you click on an image to resize it.<br />
You can also drag and drop the image to<br />
change its location in the document.<br />
Tables<br />
To add a table:<br />
1. Place your cursor where you want to<br />
add the table.<br />
Created by Luis Perez<br />
Last Updated: 07/27/07
2. Click on the Insert tab and choose Table.<br />
3. Enter the number of rows and columns<br />
for your table.<br />
4. Choose a width and height.<br />
5. Set other options, such as background<br />
color, padding, spacing, and<br />
whether a border is displayed or not<br />
and the color of that border.<br />
6. Click on Insert.<br />
7. To add additional rows or columns,<br />
click inside a cell and use the controls<br />
on the cell’s edge. The arrow determines<br />
where the cell or column will be<br />
added (above or below). Click on the<br />
X to delete the current column or row.<br />
8. You can use the handles to resize the<br />
table.<br />
9. To delete the table, right-click and<br />
choose Delete table.<br />
Exporting and Printing<br />
<strong>Google</strong> <strong>Docs</strong> allows you to download<br />
your document to your computer using a<br />
number of formats (choose File > Export<br />
as):<br />
• HTML (saves your document in a zip<br />
file that includes a web page and a<br />
folder with any images used in the<br />
page).<br />
• Word or OpenOffice<br />
• PDF<br />
• Text (exports a plain text version).<br />
You don’t have to open a document to<br />
export it. To export documents from the<br />
file manager, check the box next to their<br />
names, then click on More actions in the<br />
toolbar and choose Save as and the format<br />
you want to save the documents to.<br />
To print your document, click on the Print<br />
button above the toolbar or choose File ><br />
Print. This will bring up the print dialog<br />
box where you can set options such as<br />
the number of pages, etc. Click on Print<br />
or OK to print your document.<br />
Publishing<br />
You can publish your documents and<br />
<strong>Google</strong> <strong>Docs</strong> will create a unique URL<br />
you can share with others so they can<br />
view it online.<br />
To publish an open document:<br />
1. Click on the Publish tab above the<br />
toolbar.<br />
2. Click on Publish document.<br />
3. Right-click on the URL provided by<br />
<strong>Google</strong> <strong>Docs</strong> and copy and paste it<br />
into an email or use it to create a link<br />
on a web page.<br />
4. To publish a document to a blog (a<br />
quick way to post a blog entry), click<br />
on Post to blog. You will be asked to<br />
provide your Blog information (blog<br />
type, user name, and password) the<br />
first time you try to post to your blog<br />
from <strong>Google</strong> <strong>Docs</strong>.<br />
To publish a document from the file manager,<br />
select the document and then<br />
choose Publish by clicking on the More<br />
actions button in the toolbar.<br />
Sharing<br />
You can invite other people to collaborate<br />
on the same document.<br />
To share an open document for collaboration:<br />
1. Click on the Share tab above the toolbar.<br />
2. Select whether you want to invite the<br />
other people as collaborators or viewers<br />
(they will be able to access the<br />
document, but not change it).<br />
3. Enter the email addresses of everyone<br />
you want to invite, separated by a<br />
comma.<br />
Created by Luis Perez<br />
Last Updated: 07/27/07
4. Set Advanced permissions at the bottom<br />
(you can allow the people you invite<br />
to in turn invite other people they<br />
know, or you can allow the use of<br />
mailing lists - everyone must have a<br />
<strong>Google</strong> account) .<br />
5. Click on Invite collaborators.<br />
6. When the email window pops up, enter<br />
a Subject and Message, then click<br />
on Send.<br />
Revisions<br />
<strong>Google</strong> <strong>Docs</strong> automatically tracks the<br />
changes made to your document by everyone<br />
who works on it.<br />
To view a list of all revisions made on a<br />
document, click on the Revisions tab.<br />
You should see a list of revisions, each<br />
with a sequential number, the time when<br />
it was last edited, who did the edit, and a<br />
summary of the changes.<br />
To view an individual revision, click on the<br />
link for it. This will show you what your<br />
document looked like when the revision<br />
was saved. If you want to save the revision<br />
as the latest version of your document,<br />
click on Revert to this one.<br />
You can keep track of the revisions on<br />
your documents using RSS feeds. To<br />
view the RSS feed for a document, click<br />
on the Share tab and then click on the<br />
View RSS feed link on the right. The<br />
RSS feed will be displayed in your web<br />
browser. You can copy the URL and use<br />
it to subscribe to the feed using a service<br />
such as Bloglines.<br />
<strong>Google</strong> Spreadsheets<br />
Formatting Cells<br />
<strong>Google</strong> Spreadsheets includes many of<br />
the same formatting options as <strong>Google</strong><br />
<strong>Docs</strong>. There are a few options that are<br />
specific to working with a spreadsheet:<br />
• Format: use this pulldown menu to<br />
change the formatting of the numbers in<br />
a cell (rounding, currency, percents,<br />
etc.).<br />
• Background color: changes the color of<br />
the selected cells.<br />
• Border: adds a border to the selected<br />
cells.<br />
• Align: changes the vertical as well as<br />
horizontal alignment of the selected<br />
cell’s contents.<br />
• Insert and Delete: add and delete rows<br />
and columns.<br />
• Merge across: merge several cells into<br />
one cell.<br />
Sorting and Freezing<br />
The first row in a <strong>Google</strong> spreadsheet is a<br />
header row. Below the header row is a<br />
separator bar. A quick way to sort a column’s<br />
cells is to click on this separator<br />
bar until a Sort label appears. By clicking<br />
on the disclosure triangle you can alternate<br />
between ascending and descending<br />
sort order.<br />
To freeze rows or columns, click on the<br />
Sort tab, then choose Freeze header<br />
rows or Freeze columns.<br />
Formulas<br />
To perform calculations using a formula:<br />
1. Select a range of cells.<br />
2. Click on the Formulas tab.<br />
3. Click on one of the formulas on the<br />
right (Sum, Count, Average, Min, Max,<br />
etc.) Click on the more>> link to view<br />
more advanced formulas supported<br />
by <strong>Google</strong> Spreadsheets.<br />
4. The formula will be shown in the same<br />
cell where the results will be displayed<br />
once you press Enter<br />
or Return on your keyboard.<br />
Created by Luis Perez<br />
Last Updated: 07/27/07
5. To edit a formula, double-click on the<br />
cell with the results (the formula will<br />
be shown in the blue area above the<br />
column headings), then press Enter or<br />
Return once you’re done editing it.<br />
Charts<br />
To create a chart:<br />
1. Enter your data into two rows or columns.<br />
2. Select the cells with data on them.<br />
3. Click on the Chart button in the toolbar.<br />
4. Choose a chart type and subtype by<br />
clicking on one of the buttons.<br />
5. Enter labels for the chart title and the<br />
horizontal and vertical axis, and<br />
choose where the legend will be displayed.<br />
6. Once the preview shows the chart<br />
with the options you want, click on<br />
Save chart.<br />
7. Drag the chart where you want it to<br />
display in your spreadsheet.<br />
8. To save the chart as an image, click<br />
on the Chart pulldown menu at the top<br />
of the chart and choose Save image.<br />
To edit the chart once it has been created,<br />
choose Edit chart from this<br />
menu. To delete the chart, choose<br />
Delete chart. To add the chart to a<br />
webpage, choose Publish chart, then<br />
copy the the HTML code and paste it<br />
into your web page.<br />
Export Data<br />
To export your data so you can use it in<br />
another program:<br />
1. Choose File > Export.<br />
2. Choose a format from the submenu:<br />
• .csv, .txt, and .html - the current sheet<br />
will open in a separate window so you<br />
can copy the data.<br />
• .xls (Excel) - a window will pop up,<br />
prompting you to save the data as a<br />
new file.<br />
<strong>Google</strong> Presentations<br />
Creating a Presentation<br />
To create a new presentation:<br />
1. Click on New in the file manager’s<br />
toolbar.<br />
2. Choose Presentation.<br />
3. Choose File > Rename when the new<br />
presentation opens and enter the<br />
name you want to use for your presentation.<br />
4. Click on the Save button on the right<br />
to save your presentation (<strong>Google</strong><br />
saves it at regular intervals as well).<br />
5. To add a new slide, click on the New<br />
slide button in the toolbar, then<br />
choose a slide layout by clicking on<br />
the appropriate thumbnail.<br />
6. The next two buttons in the toolbar<br />
allow you to duplicate and delete<br />
slides.<br />
7. The slides in your presentation will be<br />
listed in a slide sorter on the left, with<br />
a preview of the slide on the right.<br />
You can use the Prev and Next buttons<br />
above the sorter to navigate your<br />
presentation. You can rearrange<br />
slides by dragging and dropping to<br />
change their order in the slide sorter.<br />
8. To change the look of your slides,<br />
click on Change theme and choose a<br />
different theme.<br />
Another way to create a <strong>Google</strong> <strong>Docs</strong><br />
presentation is by uploading an existing<br />
PowerPoint file:<br />
1. Click on Upload in the file manager<br />
toolbar (or choose File > Upload a file<br />
after you’ve created a new presentation<br />
in <strong>Google</strong> <strong>Docs</strong>).<br />
2. Click on Choose File, then locate the<br />
PowerPoint presentation you want to<br />
upload on your computer.<br />
3. Click on Upload File.<br />
Created by Luis Perez<br />
Last Updated: 07/27/07
If you want to import individual slides<br />
from an existing PowerPoint presentation:<br />
1. Choose File > Import slides after<br />
you’ve created a new <strong>Google</strong> <strong>Docs</strong><br />
presentation.<br />
2. Click on Browse to locate the Power-<br />
Point presentation on your computer.<br />
3. Choose the slides you want to import<br />
by checking the box next to their slide<br />
number.<br />
4. Click on Import.<br />
Adding Content<br />
Each slide layout includes one or more<br />
text placeholders. You can replace these<br />
placeholders with your own text by clicking<br />
on them and entering the text you<br />
want to appear on the slide. Once you<br />
add the text, you can apply any of the<br />
formatting options available in the toolbar.<br />
In addition to the placeholder text, you<br />
can also add:<br />
• Images: Click on Insert image in the<br />
toolbar, then on Browse to find the image<br />
on your computer and click on Ok.<br />
You can also drag images from other<br />
browser windows directly into your<br />
slides.<br />
• Text Boxes: Click on Insert text in the<br />
toolbar, then use the handles to resize<br />
or reposition the text box. Click inside<br />
the box and type in the text you want.<br />
• Shapes: Click on Insert shape and<br />
choose a callout or arrow to add it to<br />
your slide.<br />
Sharing a Presentation<br />
There are three ways you can share a<br />
presentation (click on the appropriate tab<br />
on the right side of the window):<br />
• Email: Opens up a new window where<br />
you can address a message and include<br />
a link to the presentation.<br />
• Share: This invites other people so<br />
they can edit the presentation online.<br />
The process for sharing a presentation<br />
is similar to sharing a document or<br />
spreadsheet.<br />
• Publish: This option provides you with<br />
some HTML code you can place on a<br />
web page to display the presentation<br />
inside a frame.<br />
`<br />
Playing the Presentation<br />
To play a presentation, click on the Start<br />
presentation link on the right side of the<br />
<strong>Google</strong> <strong>Docs</strong> window. This will open the<br />
presentation in a new window with navigation<br />
controls in the lower left corner of<br />
the window. To exit the presentation,<br />
click on the X in the lower right corner.<br />
<strong>Google</strong> <strong>Docs</strong> also allows you to collaborate<br />
on a presentation created online.<br />
When you play a presentation, on the<br />
right side of the window you will see a<br />
chat area. This area can be used to<br />
share comments about a presentation<br />
using instant messaging. Above the chat<br />
area is a button which allows you to take<br />
control of the presentation. When you<br />
take control, the other people in the session<br />
cannot advance the slides.<br />
Printing and Exporting as PDF<br />
To print an open presentation:<br />
1. Choose File > Print to open the Print<br />
Preview dialog box.<br />
2. Choose the number of slides you want<br />
to include in each page using the<br />
Layout pulldown menu.<br />
3. Uncheck the Show background button<br />
if you want to save ink by only printing<br />
out the text in your slides.<br />
4. Click on Print at the bottom of the dialog<br />
box.<br />
There are two ways to save a PDF version<br />
of an open presentation:<br />
• Choose File > Save as PDF. This will<br />
download a PDF version of your pres-<br />
Created by Luis Perez<br />
Last Updated: 07/27/07
entation and open it with your default<br />
program for opening PDFs (usually<br />
Preview on the Mac, Adobe Acrobat<br />
Reader on Windows).<br />
• Choose File > Print to bring up the Print<br />
Preview dialog box, then click on Save<br />
as PDF at the bottom of the dialog box.<br />
Miscellaneous<br />
<strong>Google</strong> <strong>Docs</strong><br />
• Insert a comment: click on the Insert<br />
tab and choose Comment. Type your<br />
comment and press Enter or Return.<br />
• Insert special symbols: click on the Insert<br />
tab and choose Special character.<br />
Click on a character to insert it into your<br />
document.<br />
• Count the number of words: choose File<br />
> Word count.<br />
• Add a page break: Choose Insert ><br />
Separator > Page break (a dotted line<br />
will show you where the new page<br />
starts).<br />
<strong>Google</strong> Spreadsheets<br />
• Chat: You can have a text chat with<br />
everyone who’s working on a document.<br />
To start a chat, click on the Discuss<br />
tab.<br />
• Embedding: When you publish a<br />
spreadsheet, you can choose to embed<br />
it in a web page so that it automatically<br />
updates when changes are made in<br />
<strong>Google</strong> <strong>Docs</strong> and Spreadsheets.<br />
To embed a spreadsheet:<br />
1. Click on Publish.<br />
2. Click on More publishing options.<br />
3. Under File format, choose HTML to<br />
embed in a webpage.<br />
4. Click on Generate URL.<br />
5. Copy and paste the code and it it to<br />
your web page’s code where you want<br />
the embedded spreadsheet to appear.<br />
Classroom Ideas<br />
• Book Reports: have two students read<br />
the same book and then collaborate on<br />
a final book report using <strong>Google</strong> <strong>Docs</strong>.<br />
• Science Experiment: partner with another<br />
class (or even another school)<br />
and run the same experiment. Compare<br />
the data using <strong>Google</strong> spreadsheets.<br />
• Story Writing: have students take turns<br />
writing a chapter of a story. Use the revisions<br />
feature to see whose turn it is.<br />
• Visual Essays: assign groups of students<br />
with the task of creating a visual<br />
essay about their school or community<br />
using <strong>Google</strong> <strong>Docs</strong> presentations and<br />
digital images.<br />
• Economics: use <strong>Google</strong> <strong>Docs</strong> spreadsheets<br />
to have students track their investment<br />
portfolios as part of a stock<br />
market game.<br />
• Reflections: use <strong>Google</strong> <strong>Docs</strong> as a<br />
place for students to keep weekly study<br />
journals where they reflect on their<br />
work.<br />
(http://docs.google.com)<br />
Created by Luis Perez<br />
Last Updated: 07/27/07