MOTORISED HOE - Benassi
MOTORISED HOE - Benassi
MOTORISED HOE - Benassi

You also want an ePaper? Increase the reach of your titles
YUMPU automatically turns print PDFs into web optimized ePapers that Google loves.
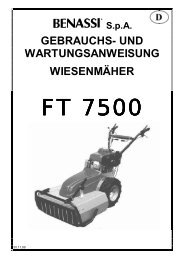
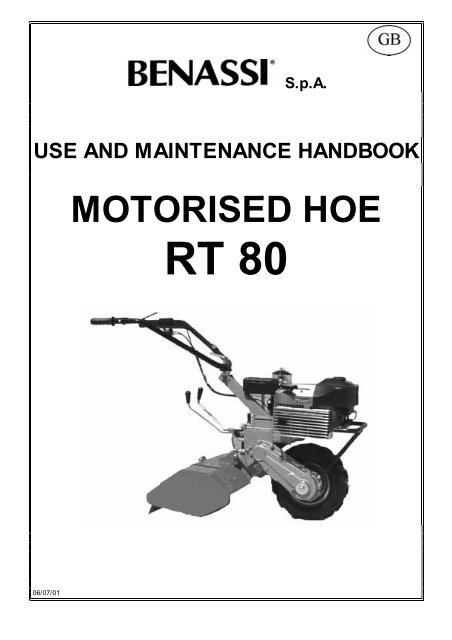
S.p.A.<br />
USE AND MAINTENANCE HANDBOOK<br />
<strong>MOTORISED</strong> <strong>HOE</strong><br />
RT 80<br />
06/07/01
S.p.A. RT 80<br />
1) Introduction<br />
2) After-sales service and Warranty<br />
3) Technical details<br />
4) Packing and transport<br />
5) Accessories<br />
6) Safety rules and limits on use<br />
7) Starting and stopping<br />
CONTENTS<br />
8) Operating and regulating the machine<br />
9) Mill assembling<br />
10) Maintenance and lubrication<br />
11) End-of season servicing<br />
12) Possible problems and solutions<br />
13) Instructions for a good operation of the<br />
machine<br />
1 -INTRODUCTION<br />
We are pleased that you chose a machine built by BENASSI SPA.<br />
This booklet provides the information and data needed to preserve and use the machine properly.<br />
The more you get to know your farming machine, the better you will work. Therefore we strongly suggest that before starting work, you carefully read and<br />
understand this "USER AND MAINTENANCE" booklet.<br />
You will find important information on using the machine which will allow you to get the most of its technical capacities. You will also find precious<br />
information on how to care for it and service it, in terms of safety, and a guide on running and servicing it in the best possible way during the lifetime of your<br />
machine.<br />
For reasons of technical progress, BENASSI SPA reserves the right to modify the mechanical parts, the finishes and the accessories. The data<br />
regarding measures, weights and performance are specified within DIN tolerance. The figures, the descriptions and the technical data are not binding.<br />
2 - AFTER-SALES SERVICE AND WARRANTY<br />
BENASSI SPA provides its customers with an after-sales service for solving any problem involving the use and the maintenance of its machinery. All the<br />
machines are guaranteed for defective material for 12 months (one year) from purchase. For any need, refer to your dealer.<br />
N.B. IMPORTANT WARNING FOR YOUR SAFETY<br />
Always use original BENASSI SPA products, spare parts and accessories; any modification or application using non-original parts exempts BENASSI<br />
SPA from any responsibility<br />
BENASSI SPA disclaims all responsibility in case of application of accessories made by other firms to its machines: Any warranty will be given for said<br />
applications even when such modifications have been tested by boards of control or certified by public bodies as tests on single machines are not valid.<br />
BENASSI SPA W ISHES YOU A PLEASANT W ORK W ITH OUR MACHINES<br />
N.B. PAY SPECIAL ATTENTION TO THE INSTRUCTIONS MARKED OUT BY THE<br />
FOLLOWING SIGN<br />
THIS SYMBOL INDICATES DANGER: FAILURE TO COMPLY WITH THESE<br />
INSTRUCTIONS MAY CAUSE INSIDIOUS OR EVEN FATAL INJURY.<br />
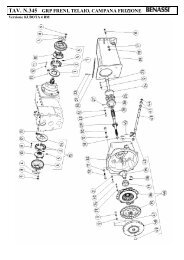
3 – TECHNICAL DETAILS<br />
LIST OF MACHINE PARTS<br />
1. Accelerator<br />
2. Stop engine<br />
3. Clutch lev er<br />
4. Clutch adjuster<br />
5. Handle-bar adjuster<br />
6. Tool-case<br />
7. Start engine<br />
8. Fuel inserting<br />
9. Air f ilter<br />
10. Oil lev el<br />
11. Power take-of f<br />
12. Driv ing wheel<br />
13. Mill<br />
14. Mills bonnet<br />
15. Bonnet adjustment<br />
16. Oil inlet<br />
17. Mills lev er<br />
18. Gearbox lev er<br />
19. Blocking push button<br />
2
SpA RT 80<br />
ENGINE<br />
MINSEL COMPACT 7 HP<br />
CYCLE 8<br />
STROKE 2<br />
FUEL TYPE Gasoline-oil mixture 4%<br />
DISPLACEMENT<br />
148 cc.<br />
NET W EIGHT<br />
Kg. 100 complete with accessories<br />
RPM 4500<br />
MAX. POW ER OF THE DRIVING SHAFT 6 HP (Kw. 4,4) whit a consumption of 2,0 Kg/H<br />
CLUTCH<br />
Oil bath cone clutch<br />
GEARBOX<br />
Oil bath gearbox , four forward speeds and 1 reverse speed.<br />
HANDLE-BAR<br />
Height and side adjustment<br />
W HEELS<br />
3.50.8 rubber or metal wheels<br />
MOVING SPEED with:<br />
•tyres 3.50.8<br />
•the engine at 5.000 RPM<br />
GEAR FORW ARD SPEED : Km/h REVERSE SPEED : Km/h<br />
1° 1.5 2.6<br />
2° 3.2<br />
3° 4.5<br />
4° 9.4<br />
The engine f itted on this cultiv ator has f ollowing f eatures:<br />
• Exhaust guard<br />
• Recoil starter<br />
• Oil bath air f ilter<br />
• Saf ety dev ice f or both f orward and backward gear stopping the tiller.<br />
• Standard handlebar with v ertical and side adjustment.<br />
MACHINE IDENTIFICATION<br />
The machine can be identif ied through its gearbox unit model and serial<br />
number. The motor serial number is printed on the motor plate or on the motor<br />
carburetor manif old by the manuf acturer.<br />
The machine identif ication data are reproduced on a plate located on the handlebar<br />
support (right-hand side looking f rom the operating position), and the serial<br />
number is reproduced both on the motor f lange and on the unit (see picture<br />
sideway s)<br />
Copy the plate data and the complete serial number on this manual in order to<br />
hav e them at hand when necessary .<br />
4 - PACKING AND TRANSPORT<br />
The machine is generally supplied without its accessories, in carton boxes hav ing the f ollowing ov erall dimensions:<br />
• WIDTH : cm. 95<br />
• HEIGHT: cm. 42<br />
• LENGTH : cm. 85<br />
• NET WEIGHT : Kg. 75 (without rotary tiller)<br />
During start-up the total exclusion of kinematic motions<br />
through blocking push button on clutch is scheduled<br />
Accessories are generally supplied separately f rom the<br />
machine, with or without packing<br />
Free the machine f rom its packing in order to prepare it to<br />
operate in the f ollowing way :<br />
98+-15<br />
a) Open the packing and f ree the machine f rom it, with the<br />
help of another person lif t the machine: one taking it f rom<br />
the wheels, the other f rom the handle-bars;<br />
b) Adjust handle-bars as desired;<br />
c) Apply the accessories<br />
1410<br />
3
SpA RT 80<br />
Spacer with pin f or 2^ wheel<br />
application<br />
Cod. 94904400<br />
Second rubber wheel 3.50.8<br />
Cod. 97004400<br />
5 -ACCESSORIES<br />
Front ballast Kg. 21,5<br />
Cod. 98000402<br />
Wheel ballast Kg. 9,5<br />
Cod. 98060100<br />
1^ iron wheel<br />
Cod. 97004300<br />
Adjustable f urrow-opener with<br />
connection<br />
Cod. 91002511<br />
2^ iron wheel<br />
Cod. 97004500<br />
(it is necessary to apply a<br />
spacer cod.94904400)<br />
6 - SAFETY RULES AND LIMITS ON USE<br />
IMPORTANT:<br />
Before using the machine read carefully this operation and<br />
maintenance manual; It w ill allow you to get from your machine the<br />
best performance of use and duration.<br />
• The use of the machine is f orbidden to persons y ounger than 16 y ears.<br />
• The operator is responsible of any possible damage and he should alway s driv e the machine caref ully and saf ely .<br />
• Bef ore carry ing the machine alway s empty the f uel tank.<br />
• Bef ore leav ing the machine be sure that it is f ully stopped.<br />
• Nev er use the machine without heav y shoes and long transf ers. Alway s inspect the area where y ou want to work<br />
taking of f stones, branches, cables and any other thing which can be dangerous.<br />
• Bef ore starting working, make sure that a radius of minimum 5 m. is completely f ree.<br />
• Clean any possible leakage of f uel.<br />
• Fill up when the engine is of f and not hot, alway s in an open space f ar f rom f ires or any heating source and ref rain<br />
f rom smoking during this operation.<br />
• Bef ore starting the machine make sure that y ou can quickly stop the engine and that y ou are f amiliar with the control<br />
lev ers.<br />
• Nev er allow the engine to run in enclosed spaces where the highly toxic carbon monoxide could not ev acuate.<br />
• Nev er start or use the machine not completely assembled especially concerning the saf ety dev ices and the tiller<br />
protection guards which should alway s be completely assembled with all its extensions.<br />
• Nev er f ix or clean the tiller blades or any other tools when the engine is running.<br />
• Nev er work in ov er 50% sloping ground.<br />
• We are not responsible f or accidents due to the wrong use of the machine neglecting the abov e basic instructions.<br />
• The elimination of the lubricants used must be carried out according to the norms existing in the country of use.<br />
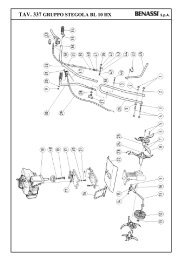
7 – STARTING AND STOPPING<br />
Whenev er y ou set about starting a cold engine, make sure :<br />
• That the gasoline cock “A” is alway s open. The lev er must be<br />
placed towards the outlet pipe.<br />
• That the gasoline has reached the carburetor. If so, by pumping<br />
piston “B”, the gasoline will drop down f rom the hole on the<br />
upper section of carburetor.<br />
• Then, turn the accelerator control lev er placed on the handle-bar<br />
of about ¼.<br />
• Check that the gear-lev er and the mill-control lev er are idle.<br />
4
SpA RT 80<br />
Check that stop lev er and clutch lev er are blocked through the<br />
blocking push button (Ref . ”F”)<br />
• Seize the starting-handle “C” by one only hand, pull it gently until the ratchet<br />
gear is engaged. Then giv e a pull. The cord must nev er be lef t f ree quite<br />
suddenly with the engine running, but f ollowed till when it’s completely<br />
winded-up.<br />
8 - OPERATING AND REGULATING THE MACHINE<br />
FUEL INLET<br />
FOR<br />
REPLENISHING<br />
The ref uelling must be alway s perf ormed bef ore starting the work, with cold and<br />
stopped engine, using a f unnel, and in the open air.<br />
If f uel comes out f rom the tank, mov e the machine at once bef ore starting the engine<br />
and dry well the parts wet of gasoline.<br />
We recommend to use alway s a f unnel with a net-f ilter in order to keep back the<br />
possible impurities.<br />
FUEL-TYPE: gasoline-oil mixture 4%<br />
SAFETY LEVER : The motor hoe is prov ided with a red saf ety stop lev er connected<br />
to the clutch lev er (Ref . G)through side blocking push button (Ref . “F”).<br />
The main f unction of this lev er consists in stopping the engine in the moment in which<br />
the hands are remov ed f rom the driv ing-beams.<br />
It’s recommended not to bind the stop-engine lev er “E” to the handle-bar hand-grip.<br />
CLUTCH LEVER : To assure a regular clutch working it is a good rule to check f rom<br />
time to time the play that the clutch-lev er must hav e: (as shown in the picture) the<br />
lev er idle-stroke must be f rom 8 to 10 mm. In the opposite, act on the adjuster (G)<br />
increasing or decreasing the play according to the need.<br />
DRIVING-BEAMS :<br />
Adjustable in height and transv ersally , with possibility of locking in the wished<br />
position. This operation must be carried out by means of the screw-handle (“A”) placed<br />
on the lowest section of driv ing-beams.<br />
SPEED AND MILL CONTROL LEVERS :<br />
The shif ting of speed-lev er (Ref . “I”)must alway s happen under the f ollowing<br />
conditions:<br />
• With engine idling<br />
• With the hand-clutch-lev er (Ref . G) pulled towards the hand-grip.<br />
Any how, nev er f orce the lev er in its shif ting.<br />
ATTENTION: The mills rotation must never occur, when the machine is in reverse speed, an<br />
inner lever-system disengages the mill or the reverse-speed.<br />
5
SpA RT 80<br />
If this should not occur, apply to a skilled workshop by our concessionary agents.<br />
In the picture, turning lever “A” left the rotary tiller is activated, on the contrary turning it right it is stopped.<br />
POWER TAKE-OFF :<br />
The motor hoe is equipped with a lateral power take of f , which may be<br />
employ ed both with stopped and running machine.<br />
The power take of f and its own couplings are unif ied with most of commercial<br />
fittings.<br />
POWER TAKE-OFF OUTLINE:<br />
Splined 16 UNI 221X120 mm. Working<br />
Turning direction: lef t.<br />
Max. rev . 440 at 5,000 engine/RPM.<br />
MILL BONNET :<br />
The milling-depth may be adjusted as f ollows: f or working on the surf ace,<br />
it’s recommended to keep the saf ety -mill-bonnet lowered.<br />
For a deep working, to sink more in the ground.<br />
For these operations it’s suf f icient to act on the pin f ixing the bonnet “L” and on<br />
adjusting pin “M”.<br />
DIRECTION - JOINTER :<br />
For getting a more regular machine adv ancement it is suf f icient to operate the<br />
adjustable direction-jointer.<br />
When working on sof t ground, it is required to keep the spur up, to help the<br />
machine adv ancement.<br />
On solid ground it’s right to keep the jointer down, so that sinking in the earth it<br />
prev ents a too quick machine adv ancement.<br />
For this adjustment, act on the pin “N” f ixing the jointer.<br />
The machine presented in this manual has been designed to be used only in<br />
agriculture and especially f or ground milling.<br />
Any dif f erent use is considered contrary to its proper use.<br />
The builder does not assume responsibility f or damages or injuries due to improper<br />
use of the machine.<br />
According to the norms, ev en the respect of the operation, maintenance, and repairing conditions f ixed by the Firm<br />
BENASSI SPA is part of a correct use<br />
The machine can be operated, maintained and repaired only by those operators who hav e read this manual and are<br />
inf ormed of possible dangers.<br />
Any arbitrary modif ication on the machine exempts the Firm BENASSI SPA f rom any responsibility in case of<br />
damages.<br />
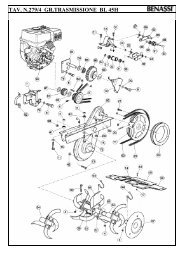
9 – MILL ASSEMBLING<br />
WORKING WIDTH : 18 cm.<br />
2 one-side joiners<br />
1 pin cm.17<br />
1 bonnet cm.18<br />
WORKING WIDTH : 32 cm.<br />
2 two-side joiners<br />
2 one-side joiners<br />
2 spacers<br />
1 pin cm.31<br />
1 bonnet cm.33<br />
WORKING WIDTH : 26 cm.<br />
2 two-side joiners<br />
1 pin cm.17<br />
1 bonnet cm.26<br />
WORKING WIDTH : 38 cm.<br />
2 two-side joiners<br />
2 one-side joiners<br />
2 spacers<br />
1 pin cm.36<br />
1 bonnet cm.38<br />
6
SpA RT 80<br />
WORKING WIDTH : 45 cm.<br />
4 two-side joiners<br />
2 spacers<br />
1 pin cm.36<br />
1 bonnet cm.45<br />
WORKING WIDTH : 65 cm.<br />
WORKING WIDTH : 58 cm.<br />
4 two-side joiners<br />
2 one-side joiners<br />
4 spacers<br />
1 pin cm.55<br />
1 bonnet cm.58<br />
6 two-side joiners<br />
4 spacers<br />
1 pin cm.55<br />
1 bonnet cm.65<br />
10 - MAINTENANCE AND LUBRICATION<br />
PLUG-CONTROL :<br />
From time to time it’s necessary to check the plug wear-lev el and the<br />
electrodes-distance, which must be of 0.5 mm , as shown in the near drawing.<br />
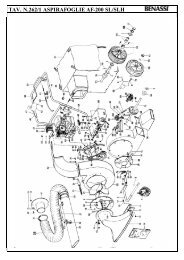
AIR FILTER CLEANING :<br />
This operation must be perf ormed regularly in the f ollowing way :<br />
• clean the f ilter externally , so to av oid that some earth f alls inside during the<br />
disassembling.<br />
• Loose the clips “P”, remov e the oil-cup “Q”, take away the f ilter-element “R”<br />
and wash caref ully the dif f erent parts with gasoline oil.<br />
• Fill the cup with new oil till reaching the lev el, as pointed out in the picture.<br />
OIL INLET BLEED :<br />
Ev ery component of the gear-box and transmission is in oil-bath. It’s<br />
necessary to check f rom time to time the oil-lev el through screw “S” and f ill it up<br />
again, if required, through the v ent plug “T”.<br />
USE ONLY OIL FOR TRANSMISSION SAE 30<br />
on<br />
oil<br />
FRONT-WHEEL OIL LEVEL PLUG :<br />
Check f rom time to time the oil lev el on the f ront wheel through plug “U”, placed<br />
one side, as shown in the picture. For a perf ect machine ef f iciency , a good<br />
maintenance and a perf ect lubrication are necessary .<br />
Check that air f ilter is clean, in case of oil bath f ilter check lev el ev ery 8-10<br />
operating hours or ev en more f requently when working in dusty grounds. Use motor<br />
to restore oil lev el and clean the cup bef ore f illing it.<br />
GEARBOX Check oil lev el ev ery 50 operating hours remov ing the cap on the<br />
gearbox sump keeping the machine in horizontal position.<br />
If necessary add SAE 30 oil. It is adv isable to replace oil at least ev ery 100<br />
hours.<br />
MILLS Bef ore starting to work check that all screws are tight, check especially<br />
rotary tiller hoe f astening screws.<br />
7
SpA RT 80<br />
11 - END-OF-SEASON MAINTENANCE<br />
OIL DRAG PLUG :<br />
For whatev er mechanical repair in the ear-box or in the mill-descent, it’s<br />
necessary to remov e the oil.<br />
To make the transmission empty , unscrew the plug “V” placed in the lowest<br />
section of the gear-box.<br />
Before parking the machine:<br />
• wash it accurately with gas oil,<br />
• empty the carburetor tank and clean or replace air f ilter,<br />
• lubricate and grease all articulated joints and gears,<br />
• replace or repair possible worn parts,<br />
• lubricate cy linder with motor oil through the spark plug hole, pull the start-up<br />
cord so that the piston makes some strokes<br />
• Park the machine in a dry place with wheels on wood tables or ev en better with wheels up f rom the f loor.<br />
12 - POSSIBLE PROBLEMS AND SOLUTIONS<br />
Possible problems that can be solv ed by the machine operator:<br />
MOTOR - The motor does not start; check that:<br />
• the gasoline in the tank is more then half .<br />
• the gasoline cock is open<br />
• if the motor is cold , the starter lev er is pulled<br />
• the gasoline reaches the carburetor<br />
• the bleed on the tank cap is not clogged<br />
• carburetor jets are not clogged, if necessary , clean<br />
them with air jet<br />
• the spark plug sparks, in order to carry out this check<br />
operation unscrew the spark plug; connect it to the power<br />
supply cable, place the spark plug earthed metal part<br />
(motor cy linder) and make the motor pulley turn as in the<br />
start-up phase. If electrodes do not spark, check the<br />
supply cable junctions, and if this does not solv e y our<br />
problems, replace the spark plug with one of the same<br />
ty pe. If ev en this time y ou should not obtain positiv e<br />
results, the def ect concerns the electric plant (points,<br />
condenser, coil etc.)In this case it is adv isable to contact<br />
the nearest serv ice (according to the motor assembled on<br />
the machine).<br />
13 - INSTRUCTIONS FOR A GOOD OPERATION OF THE MACHINE<br />
• Carry out a good breaking-in of the motor and of the<br />
machine (f or at least 10 hours do not exceed 70%of motor<br />
power)<br />
• alway s use the clutch bef ore using any lev er<br />
• do not keep the clutch disengaged f or long periods of<br />
time<br />
• nev er f orce gear lev ers, if y ou cannot engage them,<br />
jerkily release the clutch<br />
• nev er f orce the motor.<br />
• do not work at f ull speed f or long periods, in particular<br />
during hot day s<br />
• periodically check ty res pressure ( Atm. 1.3)<br />
• when assembling the dif f erent tools, do not damage<br />
shaf t spigot and spline, check that tool screws and lockpin<br />
are tight, in particular the rotary tiller hoe screws and the<br />
screws f astening the mowing bar<br />
• do not leav e the machine in the rain.<br />
IMPORTANT: using the machine for a<br />
long time you should use ear<br />
protection system.<br />
8
SpA RT 80<br />
TESTS FOR CE CERTIFICATION<br />
EC Certif icate of conf ormity conf orming to EEC directions 89/392<br />
40010 SanMatteo della Decima BO Italy Via Lampedusa n°1 Tel. (051) 682.46.56<br />
Declare in sole responsibility , that the product CULTIVATOR RT 80 to which this certif icate applies, conf orms<br />
to the basic saf ety and health requirements to EEC directions 89/392 and to the other relev ant EEC directions : PREN<br />
709/94 - N67 CEN TC 144/WG4 - PREN 836/92 - EN 294.<br />
THE PRESIDENT<br />
TEST AND RESULT<br />
TYPE: CULTIVATOR MODEL RT 80<br />
Noise lev el at operator’s ear : LAeq = 87,1 dB (A)<br />
Test condition: 1,6 Mt at the center of the handlebar<br />
Handlebar v ibration according to ISO.5349 : 5,7 m/sec 2<br />
S.Matteo della Decima li 20 -12 - 1994<br />
9
SpA RT 80<br />
S.p.A.<br />
Via Lampedusa, 1 - 40010 S. MATTEO DELLA DECIMA (BO) - ITALY<br />
TEL. 0039/051/82.05.34 TELEFAX 0039/051/682.61.64<br />
10