
Create successful ePaper yourself
Turn your PDF publications into a flip-book with our unique Google optimized e-Paper software.
<strong>nRF24LU1</strong> <strong>Development</strong> <strong>Kit</strong><br />
<strong>User</strong> <strong>Guide</strong> v1.0<br />
All rights reserved.<br />
Reproduction in whole or in parts is prohibited without the prior written permission of the copyright holder.<br />
September 2007
<strong>nRF24LU1</strong> <strong>Development</strong> <strong>Kit</strong> <strong>User</strong> <strong>Guide</strong><br />
Liability disclaimer<br />
Nordic Semiconductor ASA reserves the right to make changes without further notice to the product to<br />
improve reliability, function or design. Nordic Semiconductor ASA does not assume any liability arising<br />
out of the application or use of any product or circuits described herein. All application information is<br />
advisory and does not form part of the specification.<br />
Life support applications<br />
These products are not designed for use in life support appliances, devices, or systems where<br />
malfunction of these products can reasonably be expected to result in personal injury. Nordic<br />
Semiconductor ASA customers using or selling these products for use in such applications do so at<br />
their own risk and agree to fully indemnify Nordic Semiconductor ASA for any damages resulting from<br />
such improper use or sale.<br />
Contact details<br />
For your nearest dealer, please see www.nordicsemi.no<br />
Receive available updates automatically by subscribing to eNews from our homepage or check our<br />
website regularly for any available updates.<br />
Main office:<br />
Otto Nielsens vei 12<br />
7004 Trondheim<br />
Phone: +47 72 89 89 00<br />
Fax: +47 72 89 89 89<br />
www.nordicsemi.no<br />
Revision History<br />
Date Version Description<br />
September 2007 1.0<br />
Revision 1.0 Page 2 of 36
<strong>nRF24LU1</strong> <strong>Development</strong> <strong>Kit</strong> <strong>User</strong> <strong>Guide</strong><br />
Content<br />
1 Introduction ............................................................................................. 4<br />
2 Content of the development kit.............................................................. 5<br />
2.1 Hardware .......................................................................................... 5<br />
2.2 Software............................................................................................ 6<br />
2.3 Design files ....................................................................................... 6<br />
2.4 Documentation.................................................................................. 6<br />
2.5 Accessories....................................................................................... 6<br />
3 What can you do with the development kit........................................... 7<br />
4 How to use the development kit............................................................. 7<br />
4.1 Setup ................................................................................................ 7<br />
5 Output power measurements............................................................... 15<br />
6 Range evaluation................................................................................... 16<br />
7 Flash programming............................................................................... 18<br />
8 Wireless mouse demo .......................................................................... 20<br />
9 In circuit software debugging .............................................................. 22<br />
10 Using the <strong>Development</strong> <strong>Kit</strong> for prototyping ..................................... 23<br />
11 Hardware description......................................................................... 24<br />
11.1 Basic feature board..........................................................................24<br />
11.2 Features of the BFB.........................................................................25<br />
11.3 PS/2 Adapter....................................................................................28<br />
11.4 <strong>nRF24LU1</strong> Radio Modules...............................................................31<br />
11.5 <strong>nRF24LU1</strong> Radio Module hardware description ..............................32<br />
Revision 1.0 Page 3 of 36
<strong>nRF24LU1</strong> <strong>Development</strong> <strong>Kit</strong> <strong>User</strong> <strong>Guide</strong><br />
1 Introduction<br />
The <strong>Development</strong> <strong>Kit</strong> for the <strong>nRF24LU1</strong> Single Chip 2.4 GHz RF Transceiver has been developed to<br />
enable customers to get hands-on experience with the functionality of the device in their applications.<br />
The <strong>nRF24LU1</strong> <strong>Development</strong> <strong>Kit</strong> is convenient for use in the prototyping phase when developing,<br />
testing and debugging PC software, microcontroller code and/or electronic circuitry for interfacing<br />
towards <strong>nRF24LU1</strong> and a wireless communication link.<br />
The <strong>nRF24LU1</strong> <strong>Development</strong> <strong>Kit</strong> contains two <strong>nRF24LU1</strong> Radio Modules with a PCB antenna and<br />
one <strong>nRF24LU1</strong> Radio Module with an SMA connector. Also included is a reference design USB<br />
Dongle with the <strong>nRF24LU1</strong>. The <strong>nRF24LU1</strong> USB Dongle reference design is described in the<br />
<strong>nRF24LU1</strong> USB Dongle reference design <strong>User</strong> <strong>Guide</strong> document. This design is USB certified.<br />
Details regarding digital input/output voltage levels, configuration and timing requirements for control<br />
of the <strong>nRF24LU1</strong> device can be found in the <strong>nRF24LU1</strong> datasheet. The <strong>nRF24LU1</strong> datasheet can be<br />
downloaded from the Nordic Semiconductor web pages: http://www.nordicsemi.no.<br />
This document describes radio links with the <strong>nRF24LU1</strong> in both ends. In many applications, the<br />
<strong>nRF24LU1</strong> will normally be used in one end and a nRF24L01 plus a MCU in the other end.<br />
Key features of the <strong>nRF24LU1</strong> <strong>Development</strong> <strong>Kit</strong>:<br />
• Complete evaluation and development platform for <strong>nRF24LU1</strong><br />
• Enables development of full-custom applications with the <strong>nRF24LU1</strong><br />
• Supports In circuit software debugging with System Navigator from First Silicon Solutions<br />
• Flexible Basic Feature Board<br />
• <strong>nRF24LU1</strong> radio module with PCB antenna and JTAG connector<br />
• <strong>nRF24LU1</strong> radio module with SMA connector for RF testing<br />
• 5 samples of the <strong>nRF24LU1</strong> chip<br />
• Adaptors for programming the embedded flash on the <strong>nRF24LU1</strong><br />
• Evaluation and Configuration application suite<br />
• Easy access to all radio configuration settings in the <strong>nRF24LU1</strong><br />
• Export configuration to ANSI-C<br />
• Easy to set up transceiver in constant transmit mode<br />
• Easy Enhanced ShockBurst link evaluation for RF protocol <strong>Development</strong><br />
• Selectable file for data transfer<br />
• Configurable packet rate<br />
• Comprehensive link report including total transmission time, average data rate, packet error<br />
rate and number of retransmissions.<br />
• FCC/ETSI compliant<br />
• Full-speed USB 2.0 compliant<br />
• Complete set of design files for the radio modules<br />
• Comprehensive set of documentation including Getting Started <strong>Guide</strong> and <strong>User</strong> <strong>Guide</strong><br />
• Seamless integration with the <strong>nRF24LU1</strong> Software <strong>Development</strong> <strong>Kit</strong> for firmware<br />
development<br />
Revision 1.0 Page 4 of 36
<strong>nRF24LU1</strong> <strong>Development</strong> <strong>Kit</strong> <strong>User</strong> <strong>Guide</strong><br />
2 Content of the development kit<br />
The <strong>nRF24LU1</strong> development kit contains hardware modules, software, design files for the radio<br />
modules, documentation and compliance reports. Documents, design files and software is available<br />
on the attached CD.<br />
2.1 Hardware<br />
• 2 of Basic Feature Board<br />
• 2 of <strong>nRF24LU1</strong> Radio Module PCB, board version 1.0<br />
• 1 of ISP dongle version 1.0.<br />
• 1 of <strong>nRF24LU1</strong> Radio Module SMA, board version 1.0<br />
• 1 of <strong>nRF24LU1</strong> USB Dongle, board version 1.0<br />
• 1 of <strong>nRF24LU1</strong> USB Dongle Programming Adapter, board version 1.0<br />
• 1 of PS/2 Adapter, board version 1.0<br />
• 1 of <strong>nRF24LU1</strong> USB Dongle Programming adapter cable<br />
The revision numbers of the hardware refers to the information given in this document. This is the Bill<br />
of Material and the PCB version number.<br />
<strong>nRF24LU1</strong> Module PCB<br />
<strong>nRF24LU1</strong> Module SMA<br />
<strong>nRF24LU1</strong> USB Dongle<br />
ISP Dongle<br />
<strong>nRF24LU1</strong> USB Dongle<br />
Programming Adapter<br />
Basic Feature Board<br />
PS/2 Adapter<br />
<strong>nRF24LU1</strong> USB Dongle<br />
Programming adapter<br />
cable<br />
Figure 1: Hardware content of the <strong>nRF24LU1</strong> <strong>Development</strong> kit<br />
Revision 1.0 Page 5 of 36
<strong>nRF24LU1</strong> <strong>Development</strong> <strong>Kit</strong> <strong>User</strong> <strong>Guide</strong><br />
2.2 Software<br />
The software available with the kit:<br />
• <strong>nRF24LU1</strong> Configuration and Evaluation Suite (CES), v1.0, build 1926. Installed by running<br />
“<strong>nRF24LU1</strong>_DK_v1.0_setup.exe.” The program file is named “LU1Config.exe.”<br />
• <strong>nRF24LU1</strong> Flash Programmer application, v1.2, build 1891. Installed by running<br />
“<strong>nRF24LU1</strong>_SDK_v1.2_setup.exe.” The program file is named “LU1Prog.exe.”<br />
• <strong>nRF24LU1</strong> Software <strong>Development</strong> <strong>Kit</strong>, v1.2. Installed by running<br />
“<strong>nRF24LU1</strong>_SDK_v1.2_setup.exe.”<br />
• nRF2601 Wireless Desktop Protocol, v.1.1. Installed by running “WDP_v1.1_setup.exe.”<br />
• Evaluation version of Keil c51 compiler and µvision IDE<br />
All <strong>nRF24LU1</strong> are pre-programmed with the Configuration and Evaluation Suite Firmware v1.0.<br />
The software can only be used with Microsoft Windows XP operating system.<br />
2.3 Design files<br />
The following design files are available for the radio modules:<br />
• Altium Designer 6 files with libraries.<br />
• Gerber files.<br />
2.4 Documentation<br />
The following documentation are available in the document folder on the CD:<br />
• <strong>nRF24LU1</strong> <strong>Development</strong> <strong>Kit</strong> <strong>User</strong> <strong>Guide</strong><br />
• <strong>nRF24LU1</strong> USB Dongle Reference Design <strong>User</strong> <strong>Guide</strong><br />
• <strong>nRF24LU1</strong> <strong>Development</strong> <strong>Kit</strong> Getting Started<br />
• <strong>nRF24LU1</strong> USB Dongle Reference Design Getting Started<br />
• <strong>nRF24LU1</strong> RF qualification reports for FCC and ETSI.<br />
• <strong>nRF24LU1</strong> USB compliance test report<br />
The following documentation is available as part of the software installation packets above:<br />
• Software Developer <strong>Guide</strong><br />
• FS2 Installation<br />
• Keil License<br />
2.5 Accessories<br />
The following accessories are available:<br />
• 2 USB (A-B) cables<br />
• 1 CD containing Documentation, Software and PCB layout files<br />
Revision 1.0 Page 6 of 36
<strong>nRF24LU1</strong> <strong>Development</strong> <strong>Kit</strong> <strong>User</strong> <strong>Guide</strong><br />
3 What can you do with the development kit<br />
With the <strong>nRF24LU1</strong> <strong>Development</strong> <strong>Kit</strong>, you can do the following:<br />
• Program the flash memory in the <strong>nRF24LU1</strong><br />
• Develop your application<br />
o All GPIO pins on the <strong>nRF24LU1</strong> is available and can be connected to external<br />
circuitry<br />
o Tools for uploading and debugging firmware<br />
• In circuit software debugging<br />
• Evaluate the <strong>nRF24LU1</strong> with measurements<br />
o Output power measurement<br />
o Range evaluation<br />
• Wireless Mouse demo<br />
o The <strong>nRF24LU1</strong> <strong>Development</strong> <strong>Kit</strong> can loaded with the wireless desktop protocol and<br />
connected to a PS/2 mouse to emulate a wireless mouse.<br />
4 How to use the development kit<br />
This chapter describes how to use the <strong>nRF24LU1</strong> development kit.<br />
4.1 Setup<br />
To start using the development kit, follow these steps first:<br />
1. Run the “<strong>nRF24LU1</strong>_DK_v1.0_setup.exe” installer file from the CD.<br />
2. Make sure the potentiometer on the Basic Feature Board is set all the way to the ‘+’ side.<br />
3. Make sure the switch S1 on the radio module is set to VBUS<br />
The radio modules and the USB dongle in the development kit comes already programmed with the<br />
Configuration and Evaluation Suite (CES) firmware. The CES contains a firmware part, running on the<br />
<strong>nRF24LU1</strong>, and a PC-application running on Windows XP.<br />
The CES is used to evaluate the <strong>nRF24LU1</strong>. It can be used on any <strong>nRF24LU1</strong> design that follows the<br />
recommendations in the <strong>nRF24LU1</strong> product specification.<br />
The CES can be used in two ways:<br />
1. Basic: With only the CES firmware. The CES firmware makes the <strong>nRF24LU1</strong> enumerate as a<br />
keyboard on the PC it connects to. It enables the <strong>nRF24LU1</strong> to write its status to the PC. The<br />
user will then be able to read the status if Notepad is opened. Toggling of the different test<br />
modes is done by pressing “Num Lock” on the PC.<br />
2. Advanced: Using both the CES PC-application and the CES firmware. The CES PCapplication<br />
gives the user a command window where different parameters and modes in the<br />
<strong>nRF24LU1</strong> can be set.<br />
Revision 1.0 Page 7 of 36
<strong>nRF24LU1</strong> <strong>Development</strong> <strong>Kit</strong> <strong>User</strong> <strong>Guide</strong><br />
4.1.1 Basic setup<br />
The Basic setup is used to run the <strong>nRF24LU1</strong> trough a set of predefined modes, ideal to use when<br />
preparing for EMC testing.<br />
Figure 2: Basic Feature Board with <strong>nRF24LU1</strong> Radio Module connected to USB cable<br />
To use the CES firmware in stand alone mode, follow these steps:<br />
1. Connect the Basic Feature Board with the <strong>nRF24LU1</strong> Radio Module in place, as configured<br />
earlier, to a USB connector on the PC.<br />
2. Start Notepad on the PC. Make sure that the Notepad Window is the active Window as long<br />
as you run the test.<br />
3. Press “Num Lock”<br />
The following screen will appear:<br />
Figure 3 – CES Stand Alone startup screen<br />
Revision 1.0 Page 8 of 36
<strong>nRF24LU1</strong> <strong>Development</strong> <strong>Kit</strong> <strong>User</strong> <strong>Guide</strong><br />
4. Pressing “Num Lock” several times will step trough available modes in the basic setup:<br />
Figure 4 – CES Stand Alone test modes<br />
The modes will start at the beginning after “Test mode off”<br />
Note: Make sure the keyboard layout on the PC is set to “English”. Else, parts of the text might be<br />
unreadable.<br />
The different modes:<br />
TX Un-modulated carrier: Measure output power and harmonics<br />
TX Modulated carrier: Modulated with a PN9 sequence, to do bandwidth measurements.<br />
RX:<br />
To measure LO leakage in RX mode.<br />
TX Un-modulated sweep: Sweeps the carrier from ch 02 to ch 81. Max hold on spectrum<br />
analyzer to measure the whole band.<br />
RX sweep: Sweeps the receiver from ch 02 to ch 81<br />
All TX modes are with 0dBm output power.<br />
Note: The un-modulated carrier is slightly modulated by the preamble, so the carrier does not look<br />
completely clean. This mode is intended for output power measurements only.<br />
The exact same setup can be used with the <strong>nRF24LU1</strong> USB Dongle.<br />
Revision 1.0 Page 9 of 36
<strong>nRF24LU1</strong> <strong>Development</strong> <strong>Kit</strong> <strong>User</strong> <strong>Guide</strong><br />
4.1.2 Advanced setup<br />
Advanced setup gives access to all the different registers in the <strong>nRF24LU1</strong> trough the CES PCapplication.<br />
This setup is used during range test and other tests that require access to all parameters<br />
in the <strong>nRF24LU1</strong>.<br />
Advanced setup requires Microsoft .NET framework v2.0 runtime installed on the PC. It can be<br />
downloaded from Microsoft’s web pages.<br />
To use the CES PC application, follow these steps:<br />
1. Install the <strong>nRF24LU1</strong> CES software on the PC.<br />
2. Connect the Basic Feature Board with the <strong>nRF24LU1</strong> Radio Module in place, as<br />
configured earlier, to a USB connector on the PC.<br />
3. Start the <strong>nRF24LU1</strong> CES application from the “Nordic Semiconductor” folder on the Start<br />
menu.<br />
The following screen will appear:<br />
Figure 5 – CES General Settings<br />
The register settings in the bottom part of the screen reflect the settings done in the different tabs in<br />
the upper part. All parameters can be set using either the bottom register part, or by ticking the boxes<br />
in the upper part of the window. Please refer to the <strong>nRF24LU1</strong> Product Specification for details.<br />
On the upper part of the window, two tabs can be selected, Configuration and Link Evaluation<br />
Configuration tab<br />
The “Update Device” button will transfer the settings to the <strong>nRF24LU1</strong>.<br />
The tab “general settings” has the following parameters, see Figure 5.<br />
Power up – sets the radio in standby mode<br />
Revision 1.0 Page 10 of 36
<strong>nRF24LU1</strong> <strong>Development</strong> <strong>Kit</strong> <strong>User</strong> <strong>Guide</strong><br />
Chip enable – sets Chip Enable high. This must be ticked to enable the radio in RX mode, and to set<br />
a carrier in TX mode. Clicking the “Update Device” button is not needed for altering the Chip Enable<br />
line.<br />
Mask RX_DR, TX_DS and MAX_RT – Mask interrupts<br />
Enable hidden feature – To enable the extra enhanced ShockBurst features; dynamic payload,<br />
acknowledge on demand and payload sent with the acknowledge packet.<br />
Figure 6 – CES RF Settings<br />
The tab “RF Settings” has the following parameters, see Figure 6:<br />
RF channel – Sets the TX or RX frequency, where the frequency is 2400MHz+RF channel<br />
Output Power – Sets the TX output power<br />
Direction – Sets the radio to either PTX or PRX<br />
Data rate – Sets data rate to 1Mb/s or 2Mb/s<br />
High LNA gain – Sets the LNA gain in RX mode. By un-ticking this box, the receiver sensitivity is<br />
reduced, but also the current consumption in RX mode is reduced.<br />
PLL locked – Locks the PLL. Modulation is not possible when this box is ticked, but a constant carrier<br />
can be output for power measurements.<br />
Revision 1.0 Page 11 of 36
<strong>nRF24LU1</strong> <strong>Development</strong> <strong>Kit</strong> <strong>User</strong> <strong>Guide</strong><br />
Figure 7 – CES Packet settings<br />
The tab “Packet settings” has the following parameters, see Figure 7<br />
Data Pipe Enable – enable the data pipes by ticking the box.<br />
Address - sets the RX address of the different pipes.<br />
Payload width – sets the number of bytes in the payload from 0 to 32 bytes.<br />
TX address – sets the TX address. This must correspond with the RX address for the chosen pipe in<br />
the PRX device. To use the Auto Acknowledge function, the Data Pipe 0 and the TX address must be<br />
the same.<br />
CRC – can be set to 8 or 16 bits.<br />
Revision 1.0 Page 12 of 36
<strong>nRF24LU1</strong> <strong>Development</strong> <strong>Kit</strong> <strong>User</strong> <strong>Guide</strong><br />
Figure 8 – Auto acknowledge settings<br />
The tab “Automatic Acknowledge settings” has the following parameters, see Figure 8:<br />
Auto Retransmit Delay – sets the delay to re-send the packet when the packet or the ack is lost. This<br />
value can be set in 250us increments up to 4ms.<br />
Auto Retransmit Counter – Sets the number of times the packet can be retransmitted before the<br />
MAX_RT flag is set.<br />
Enable auto acknowledge, data pipe x – tick the box to enable auto ack on the different pipes.<br />
Figure 9 – Status view<br />
Revision 1.0 Page 13 of 36
<strong>nRF24LU1</strong> <strong>Development</strong> <strong>Kit</strong> <strong>User</strong> <strong>Guide</strong><br />
The “Status View” tab, se Figure 9, is used to read the Status register and the FIFO Status from the<br />
radio. The Observe TX field reads the packet loss and the resent packet counters.<br />
To save or restore the settings, use the “load configuration” and “save configuration” under the “file”<br />
menu. The “save configuration” will save a TXT file with the configurations settings in C-code format.<br />
This can be used directly in the source code.<br />
Revision 1.0 Page 14 of 36
<strong>nRF24LU1</strong> <strong>Development</strong> <strong>Kit</strong> <strong>User</strong> <strong>Guide</strong><br />
5 Output power measurements<br />
To measure the RF parameters, like output power and harmonics, you need a spectrum analyzer.<br />
Perform these steps to measure the output power of the carrier:<br />
1. Connect a Basic Feature Board with a <strong>nRF24LU1</strong> Radio Module SMA to a USB connector on<br />
the PC.<br />
2. Connect a SMA coaxial cable from the SMA connector on the radio module to the spectrum<br />
analyzer.<br />
3. Set the centre frequency to the <strong>nRF24LU1</strong> operating frequency, span to 10MHz and level to<br />
+5dBm on the spectrum analyzer.<br />
Use the CES in stand alone mode to enter the TX modes shown in Figure 4.<br />
Note: The carrier will be slightly modulated by the preamble so the carrier will not be a single tone.<br />
With a TX un-modulated carrier test running, the carrier should be visible on the spectrum analyzer.<br />
Revision 1.0 Page 15 of 36
<strong>nRF24LU1</strong> <strong>Development</strong> <strong>Kit</strong> <strong>User</strong> <strong>Guide</strong><br />
6 Range evaluation<br />
This test requires advanced setup.<br />
The range of a radio link is defined as the distance between a transmitter and a receiver, where the<br />
signal from the transmitter is at the sensitivity limit of the receiver at the receiver end of the link. The<br />
sensitivity limit is defined as the signal level where the received signal has a Bit Error Rate (BER) of<br />
1/1000. With the <strong>nRF24LU1</strong> it is not possible to measure the BER directly, but the <strong>nRF24LU1</strong><br />
<strong>Development</strong> <strong>Kit</strong> makes it possible to measure the Packet Error Rate (PER.) The relation between the<br />
PER and BER is as follows:<br />
For a given BER, the likelihood of get one bit corrupt is BER. The likelihood of getting a bit correct is<br />
(1-BER.) If a packet contains n bits (including address, control field, payload and crc,) the likelihood of<br />
getting all bits in one packet correct is (1-BER) n . From this we get the likelihood of getting the packet<br />
wrong: PER = 1-(1-BER) n .<br />
By measuring the PER for a given packet length and range, one can use this formula to determine if<br />
the sensitivity limit has been reached.<br />
The Link evaluation tab in the CES PC-application, Figure 10, enables the user to test the ShockBurst<br />
link between two boards. In order to run this test, two PCs are needed. Each PC is running the CES<br />
PC application and each has one basic feature board with a radio module with PCB antenna<br />
connected.<br />
Use this setup:<br />
1. Under the “General settings” tab: Power up must be ticked for both sides.<br />
2. Under the “RF settings” tab: One side set to PRX and one set to PTX.<br />
3. Under the “Packet settings” tab: Data Pipe 0 address and TX address must be equal for both<br />
PTX and PRX side, all 4 fields.<br />
4. Under the “Packet settings”: At the PRX side, payload width for Data Pipe 0 must be set to 1<br />
ore more and it must be equal on the PTX and PRX side.<br />
5. All other settings must be equal on both PTX and PRX side.<br />
6. Under the “Link evaluation tab” press “Select File” to choose a text file on both sides. This<br />
must be equal on both sides.<br />
7. Place the two basic feature boards so the distance between them is the same as the range<br />
you want to evaluate.<br />
8. Press “Run Tests” on the PRX Side.<br />
9. Press “Run Tests” on the PTX Side.<br />
The PTX will show a report after all packets has been transmitted. Press “Stop Tests” on the PRX to<br />
show the report of all received packets.<br />
The report on the PRX side tells how many packets that got lost during the transfer. This is used to<br />
calculate the packet error rate (PER) for the link. The PER can be reduced by increasing output power<br />
on both PTX and PRX side or increase Auto Retransmit Counter (ARC) on the PTX side. Use this test<br />
to find the suitable configuration for your application.<br />
Revision 1.0 Page 16 of 36
<strong>nRF24LU1</strong> <strong>Development</strong> <strong>Kit</strong> <strong>User</strong> <strong>Guide</strong><br />
Figure 10 - Link evaluation tab<br />
Note: The test will only test the Enhanced ShockBurst link. For a real application, there will be a<br />
protocol layer on top that can handle lost packets on a more secure way. The Wireless Desktop<br />
Protocol (nRF2601) is an example of such a upper protocol layer.<br />
Revision 1.0 Page 17 of 36
<strong>nRF24LU1</strong> <strong>Development</strong> <strong>Kit</strong> <strong>User</strong> <strong>Guide</strong><br />
7 Flash programming<br />
The firmware is programmed into the <strong>nRF24LU1</strong> flash memory with the ISP Dongle.<br />
For the <strong>nRF24LU1</strong> Radio Modules, the dongle is connected to the “ISP Interface” connector on the<br />
Basic Feature Board. Se Figure 11.<br />
Figure 11 – ISP dongle connection<br />
Both the Basic Feature Board and the ISP Dongle must have a separate USB connection to the PC.<br />
Make sure the switch on the <strong>nRF24LU1</strong> Radio Module is set to “VBUS”. The blue potentiometer must<br />
be set all the way to the ‘+’ side.<br />
Revision 1.0 Page 18 of 36
<strong>nRF24LU1</strong> <strong>Development</strong> <strong>Kit</strong> <strong>User</strong> <strong>Guide</strong><br />
The <strong>nRF24LU1</strong> Flash Programmer application must then be installed on the PC. When the program is<br />
started, the following screen will appear:<br />
Figure 12 - <strong>nRF24LU1</strong> Flash Programmer<br />
When the ISP Dongle is connected to the USB port, the text “USB Dongle not connected” will change<br />
to “USB Dongle connected” and the USB symbol will turn green.<br />
Choose the .HEX file with the “Browse” button and press “Program Flash”. A blue progress bar will<br />
appear. The FLASH is first programmed and then verified. A box will appear if the verify failed.<br />
Revision 1.0 Page 19 of 36
<strong>nRF24LU1</strong> <strong>Development</strong> <strong>Kit</strong> <strong>User</strong> <strong>Guide</strong><br />
8 Wireless mouse demo<br />
This demo shows how the <strong>nRF24LU1</strong> performs in a wireless mouse application. The demo is turning<br />
a wired PS/2 mouse into a wireless mouse running the wireless desktop protocol (nRF2601.) In this<br />
demo the <strong>nRF24LU1</strong> is used in both ends of the link, while in a real wireless mouse application, the<br />
nRF24L01 would have been used in the mouse end.<br />
The following equipment is needed to run the test:<br />
• 2 Basic feature boards with Radio Module with PCB antenna connected<br />
• 1 PS/2 adapter<br />
• 1 PS/2 mouse (not included in the <strong>Development</strong> kit.)<br />
• 1 PC running Windows XP (not included in the <strong>Development</strong> kit.)<br />
• 1 USB cable<br />
Before the demo, the radio modules must be programmed with the right firmware.<br />
To access the needed files, please make sure the <strong>nRF24LU1</strong> SDK is installed.<br />
The files can then be found at:<br />
C:\Program Files\Nordic Semiconductor\<strong>nRF24LU1</strong>\Source Code\Builds<br />
After programming, all devices are unpaired and thus need to be paired. First time programming and<br />
pairing are committed using the following procedure:<br />
Follow these steps to setup the development kit:<br />
1. Select one of the Basic Feature Board with an <strong>nRF24LU1</strong> Radio Module PCB to be used as<br />
the “Host side dongle” This will be connected to the PC via the USB cable during the demo.<br />
2. Program the “Host side dongle” with the file usb_dongle.hex. Follow the instructions in the<br />
Flash programming chapter above<br />
3. Unplug the “Host side dongle” from the PC.<br />
4. Assemble an Basic Feature Board with a <strong>nRF24LU1</strong> Radio Module PCB and one PS2<br />
Adapter to work as the mouse module. The PS/2 adapter must be plugged into the “ISP<br />
Interface” connector after the flash is programmed.<br />
5. Program the mouse module with the file mouse_keyboard.hex<br />
6. Power down the mouse module and connect a PS2 mouse to the PS2 adapter. Plug the<br />
adapter into the “ISP Interface” connector on the Basic Feature Board.<br />
7. Insert 3xAAA batteries into the battery holder on the Basic Feature Board.<br />
8. Set the switch S1 on the radio module to VBAT.<br />
9. Set the power switch on the Basic Feature Board to ON.<br />
10. Connect the “Host side dongle” to the PC.<br />
11. Start using the mouse within 5 seconds after insertion of the USB dongle.<br />
12. The mouse module is now paired and ready for use.<br />
Regarding the requirement of using the mouse within 5 seconds after insertion of the USB dongle,<br />
this is only required the very first time a mouse is to be paired. Once a pairing is successfully<br />
committed, all necessary pairing information is stored in Flash, thus pairing is not required on next<br />
power up. However, a previously paired mouse can easily be re-paired to another USB dongle by<br />
repeating procedure from 9 to 12. In this case, pairing to any previous dongle will be terminated.<br />
Revision 1.0 Page 20 of 36
<strong>nRF24LU1</strong> <strong>Development</strong> <strong>Kit</strong> <strong>User</strong> <strong>Guide</strong><br />
Figure 13: Basic Feature Board with PS/2 Adapter and <strong>nRF24LU1</strong> Radio Module connected to a PS/2<br />
Mouse<br />
Instead of using a basic feature board with a Radio Module with PCB antenna as the “Host side<br />
dongle” one can use the <strong>nRF24LU1</strong> USB dongle reference design. Please refer to the <strong>nRF24LU1</strong><br />
USB dongle <strong>User</strong> <strong>Guide</strong> for details on how to program it with the usb_dongle.hex file.<br />
Revision 1.0 Page 21 of 36
<strong>nRF24LU1</strong> <strong>Development</strong> <strong>Kit</strong> <strong>User</strong> <strong>Guide</strong><br />
9 In circuit software debugging<br />
It is possible to connect a FS2 System Navigator to the <strong>nRF24LU1</strong> Radio Module to enable In circuit<br />
software debugging.<br />
The FS2 system navigator must be connected to the JTAG connector on the radio module. See<br />
Figure 14.<br />
No connection during FS2 Debugging!<br />
Figure 14: FS2 System Navigator connected to <strong>nRF24LU1</strong> Radio Module<br />
Refer to the document FS2 Installation.pfd under C:\Program Files\Nordic<br />
Semiconductor\<strong>nRF24LU1</strong>\Doc for instructions how to use and setup the FS2 system navigator. The<br />
FS2 system navigator is not included in the development kit and must be purchased separately from<br />
First Silicon Solutions. The FS2 System Navigator to be used with <strong>nRF24LU1</strong> is the SNAV-CAST51.<br />
Note: The FS2 System Navigator and the ISP Dongle must never be connected to the system at the<br />
same time. Make sure that the FS2 Navigator is disconnected before the ISP Dongle is connected<br />
and vice versa.<br />
Revision 1.0 Page 22 of 36
<strong>nRF24LU1</strong> <strong>Development</strong> <strong>Kit</strong> <strong>User</strong> <strong>Guide</strong><br />
10 Using the <strong>Development</strong> <strong>Kit</strong> for prototyping<br />
The <strong>nRF24LU1</strong> is designed to be used on the host side of the wireless link, connected to a host USB<br />
port. On the other end of the link, the nRF24L01 together with a MCU will be typical for most<br />
applications. However, using <strong>nRF24LU1</strong> in both ends will give same link performance as if a<br />
<strong>nRF24LU1</strong> was communicating with a nRF24L01.<br />
The <strong>nRF24LU1</strong> Software <strong>Development</strong> <strong>Kit</strong>, SDK, is a good starting point to develop your own<br />
firmware. This comes with ready made libraries and example application, making it faster to get the<br />
application up and running. Please refer to the SDK documentation for details about the code and the<br />
use of this.<br />
The LEDs and buttons on the board can be used for debugging or in a real application if this is<br />
needed.<br />
The <strong>nRF24LU1</strong> USB dongle is developed as a ready USB dongle. It has limited space for I/O<br />
connectors so it will be more convenient to use the <strong>Development</strong> <strong>Kit</strong> for prototyping and firmware<br />
development. The FS2 hardware debugger can only be connected to the <strong>Development</strong> <strong>Kit</strong>. Please<br />
refer to the <strong>nRF24LU1</strong> USB dongle <strong>User</strong> <strong>Guide</strong> for details on how to use this in your development.<br />
Revision 1.0 Page 23 of 36
<strong>nRF24LU1</strong> <strong>Development</strong> <strong>Kit</strong> <strong>User</strong> <strong>Guide</strong><br />
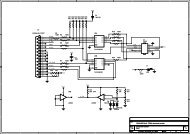
11 Hardware description<br />
This chapter describes the hardware of the <strong>nRF24LU1</strong> <strong>Development</strong> <strong>Kit</strong>.<br />
11.1 Basic feature board<br />
The BFB contains power supply, connectors, battery holder, LEDs and buttons in order to supply the<br />
<strong>Development</strong> <strong>Kit</strong> with commonly used features. The Radio Module is inserted in the 40 pin dual in line<br />
socket on the BFB as shown in Figure 16. The <strong>nRF24LU1</strong> radio module contains the <strong>nRF24LU1</strong> and<br />
the necessary circuitry.<br />
Figure 15 - Basic Feature Board<br />
The <strong>nRF24LU1</strong> <strong>Development</strong> <strong>Kit</strong> can be connected to a PC running the <strong>nRF24LU1</strong> Configuration and<br />
Evaluation software to perform tests on the radio. A description of test setups with the <strong>nRF24LU1</strong><br />
<strong>Development</strong> <strong>Kit</strong> is described in the “<strong>nRF24LU1</strong> Test Setup” document. Custom made firmware may<br />
also be run on the <strong>Development</strong> <strong>Kit</strong>.<br />
The schematic of the BFB is shown in Figure 17.<br />
Revision 1.0 Page 24 of 36
<strong>nRF24LU1</strong> <strong>Development</strong> <strong>Kit</strong> <strong>User</strong> <strong>Guide</strong><br />
Figure 16 - <strong>nRF24LU1</strong> <strong>Development</strong> kit<br />
11.2 Features of the BFB<br />
11.2.1 Power supply<br />
The <strong>nRF24LU1</strong> <strong>Development</strong> <strong>Kit</strong> BFB has two power supply options:<br />
1. Through the USB cable<br />
2. From the 3x AAA battery pack.<br />
The switch close to the battery pack must be set to “ON” to enable supply from the battery.<br />
If the USB cable is connected, the power will be sourced from the USB even if the battery switch is set<br />
to “ON”.<br />
The <strong>nRF24LU1</strong> <strong>Development</strong> <strong>Kit</strong> BFB has two power supply regulators; none of the regulators are<br />
used to supply the <strong>nRF24LU1</strong> Radio Module. This is done by the internal regulator of the <strong>nRF24LU1</strong>.<br />
The <strong>nRF24LU1</strong> radio module can be supplied with either USB power or from the battery pack by<br />
setting a switch on the Radio Module.<br />
The “ISP Interface” connector that is used for flash programming uses the adjustable regulator as a<br />
reference. For proper logic levels, the blue potentiometer must be set to max.<br />
11.2.2 LED<br />
There are four yellow LEDs on the <strong>nRF24LU1</strong> <strong>Development</strong> <strong>Kit</strong> BFB. Three of the LEDs are<br />
connected to the <strong>nRF24LU1</strong> and can be used to indicate status, depending on the firmware that runs<br />
on the <strong>nRF24LU1</strong>. The green LED on the <strong>nRF24LU1</strong> <strong>Development</strong> <strong>Kit</strong> BFB indicates the state of the<br />
battery switch. If it is lit, the battery switch is on and the batteries are ok.<br />
Revision 1.0 Page 25 of 36
<strong>nRF24LU1</strong> <strong>Development</strong> <strong>Kit</strong> <strong>User</strong> <strong>Guide</strong><br />
11.2.3 Buttons<br />
There are three buttons on the <strong>nRF24LU1</strong> <strong>Development</strong> <strong>Kit</strong> BFB that are connected to the<br />
<strong>nRF24LU1</strong>. These are used to give input to the MCU during tests. The function of these buttons<br />
depends on the firmware on the <strong>nRF24LU1</strong><br />
11.2.4 Rotary Switch<br />
The rotary switch is not used when the BFB is used with the <strong>nRF24LU1</strong> Radio Module.<br />
11.2.5 SPI Interface<br />
This connector is used to program the FLASH on the <strong>nRF24LU1</strong>. The ISP dongle is then connected<br />
here. The pin out of this connector is shown in Table 1.<br />
Pin Number Signal name Description<br />
1 RF_VDD Supply voltage<br />
2 Not used<br />
3 RESET Reset signal to <strong>nRF24LU1</strong><br />
4 CSN SPI CSN<br />
5 MISO SPI MISO<br />
6 PROG PROG signal from <strong>nRF24LU1</strong><br />
7 MOSI SPI MOSI<br />
8 SCK SPI SCK<br />
9 Not used<br />
10 GND Common ground<br />
Table 1 - Pinout of the SPI Interface connector<br />
11.2.6 Module connector<br />
A 40 pin dual in line socket, J1, is used to connect the <strong>nRF24LU1</strong> Radio Module to the BFB. The pin<br />
out for this connector is given in Table 2.<br />
Pin Number Signal name Description Connected to<br />
1 GND Common ground<br />
2 LED1 Led driver on Radio Module, LED 1<br />
P0.0<br />
3 LED2 Led driver on Radio Module, LED 2<br />
P0.1<br />
4 LED3 Led driver on Radio Module, LED 3<br />
P0.2<br />
5 Not used LED 4<br />
6 Not used<br />
7 Not used<br />
8 Not used<br />
9 Not used<br />
10 GND Common ground<br />
11 Not used<br />
12 P0.5 GPIO P0.5 Button B1<br />
13 P0.4 GPIO P0.4 Button B2<br />
14 P0.3/CSN GPIO P0.3 or SPI CSN Button B3<br />
15 Not used<br />
16 Not used<br />
17 Not used<br />
Revision 1.0 Page 26 of 36
<strong>nRF24LU1</strong> <strong>Development</strong> <strong>Kit</strong> <strong>User</strong> <strong>Guide</strong><br />
Pin Number Signal name Description Connected to<br />
18 Not used<br />
19 GND Common ground<br />
20 Not used<br />
21 Not used<br />
22 Not used<br />
23 Not used<br />
24 Not used<br />
25 Not used<br />
26 GND Common ground<br />
27 VBUS USB supply voltage input USB Connector<br />
28 VDD Regulated voltage input Output of fixed reg.<br />
29 GND Common ground<br />
30 D- USB D- signal USB Connector<br />
31 D+ USB D+ signal USB Connector<br />
32 GND Common ground<br />
33 P0.0/SCK GPIO P0.0 or SPI SCK SPI INTERFACE<br />
34 P0.2/MISO GPIO P0.2 or SPI MISO SPI INTERFACE<br />
35 P0.1/MOSI GPIO P0.1 or SPI MOSI SPI INTERFACE<br />
36 P0.3/CSN SPI CSN SPI INTERFACE<br />
37 RESET <strong>nRF24LU1</strong> Reset SPI INTERFACE<br />
38 PROG <strong>nRF24LU1</strong> Prog SPI INTERFACE<br />
39 Not used<br />
40 VBAT Battery Voltage Battery pack<br />
11.2.7 Signal grid<br />
Table 2 - Module connector J1 pin out<br />
The signal grid is a grid of 5 x 6 trough-hole pads. All signals that is present on the BFB are routed<br />
trough this grid. The pin out is shown in Table 3.<br />
Pin Number Signal name Description Connected to<br />
1 VBAT Battery Switch<br />
2 VDD_REG_RF Output of variable reg.<br />
3 PROG <strong>nRF24LU1</strong> Prog<br />
4 RESET <strong>nRF24LU1</strong> Reset<br />
5 CSN SPI CSN<br />
6 P0.1 GPIO LED 2<br />
7 P0.0 GPIO LED 1<br />
8 SCK SPI SCK<br />
9 MISO SPI MISO<br />
10 MOSI SPI MOSI<br />
11 P0.2 GPIO LED 3<br />
12 Led 4 Not connected to the <strong>nRF24LU1</strong> LED 4<br />
13 J1 pin 8 Not used<br />
14 J1 pin 7 Not used<br />
15 J1 pin 6 Not used<br />
16 P0.5 GPIO Button B3<br />
17 P0.4 GPIO Button B2<br />
18 P0.3 GPIO Button B1<br />
19 J1 pin 11 Not used<br />
20 J1 pin 9 Not used<br />
21 SPARE 6 Not used<br />
22 J1 pin 18 Not used Rotary switch<br />
23 J1 pin 17 Not used Rotary switch<br />
Revision 1.0 Page 27 of 36
3<br />
7<br />
6<br />
3<br />
7<br />
6<br />
1<br />
3<br />
1<br />
2<br />
<strong>nRF24LU1</strong> <strong>Development</strong> <strong>Kit</strong> <strong>User</strong> <strong>Guide</strong><br />
Pin Number Signal name Description Connected to<br />
24 J1 pin 16 Not used Rotary switch<br />
25 J1 pin 15 Not used Rotary switch<br />
26 SPARE 5 Not used<br />
27 SPARE 4 Not used<br />
28 SPARE 3 Not used<br />
29 SPARE 2 Not used<br />
30 SPARE 1 Not used<br />
Table 3 - Pin out of the signal grid<br />
xxx<br />
JP101<br />
JUMPER<br />
xxx<br />
+ C1<br />
2.2uF/20V<br />
C2<br />
100nF/50V<br />
0805<br />
R1<br />
10K<br />
0603<br />
8<br />
5<br />
U1<br />
LT1763CS8<br />
IN<br />
SHDN<br />
GND<br />
GND<br />
GND<br />
OUT<br />
BYP<br />
ADJ<br />
1<br />
4<br />
2<br />
C3<br />
10nF<br />
R4<br />
7.5K<br />
0603<br />
R2<br />
5.6K<br />
R3<br />
4.7K<br />
0603<br />
+ C4<br />
10uF/6V<br />
VDD_REG_RF<br />
C5<br />
100nF/16V<br />
RF_VDD<br />
(VDD_nRF = 1.8V - 3.6V)<br />
+ C9<br />
10uF/6V<br />
xxx<br />
P0.7<br />
Un-regulated<br />
R5<br />
22K<br />
0603<br />
JB_1<br />
1<br />
2<br />
CON2<br />
LED1<br />
LED<br />
R11<br />
150ohm<br />
VDD<br />
LED2<br />
LED<br />
R12<br />
150ohm<br />
VBUS<br />
S1<br />
1 2<br />
Battery<br />
D2<br />
BAT-54<br />
LED3<br />
LED<br />
R13<br />
150ohm<br />
LED4<br />
LED<br />
R14<br />
150ohm<br />
D1<br />
BAT-54<br />
LED5<br />
Green<br />
R10<br />
150ohm<br />
R15<br />
10K<br />
S2<br />
SW1<br />
B1<br />
R16<br />
10K<br />
S3<br />
SW1<br />
B2<br />
R17<br />
10K<br />
S4<br />
SW1<br />
B3<br />
xxx<br />
8<br />
5<br />
C6<br />
1uF/20V<br />
3216<br />
P2.4<br />
P2.6<br />
P2.5<br />
P2.7<br />
U2<br />
LT1763CS8-3<br />
IN<br />
SH DN<br />
GND<br />
GND<br />
GND<br />
1<br />
OUT<br />
2<br />
SENSE<br />
4<br />
BYP<br />
SW1<br />
1 8<br />
C C<br />
4 2<br />
CODE SWITCH PT65<br />
VDD<br />
+ C8<br />
C7 10uF<br />
10nF 3216<br />
5<br />
Supply Level Adjust, 1.9V - 3.6V<br />
6 4<br />
2<br />
R6<br />
0-10K<br />
RF_VDD<br />
J2<br />
IRQ<br />
8<br />
MISO<br />
7<br />
MOSI<br />
6<br />
SCK<br />
5<br />
CSN<br />
4<br />
CE<br />
3<br />
2<br />
1<br />
VBUS<br />
nRF24L01<br />
J3<br />
VBUS<br />
1<br />
D-<br />
2<br />
D+<br />
3<br />
VDD<br />
4<br />
GND<br />
USB_B<br />
VDD_REG_RF<br />
P0.7<br />
P1.0<br />
P1.1<br />
P1.2<br />
P1.3<br />
RF_VDD<br />
P1.4<br />
J4<br />
P1.5<br />
P1.6<br />
1<br />
P0.6<br />
2<br />
CE<br />
3<br />
CSN<br />
4<br />
MISO<br />
5<br />
IRQ<br />
6<br />
MOSI<br />
7<br />
SCK<br />
8<br />
9<br />
10<br />
HEADER 10<br />
P0.7 40<br />
VDD_REG_RF 39<br />
IRQ 38<br />
CE<br />
37<br />
CSN 36<br />
MOSI 35<br />
MISO 34<br />
SCK 33<br />
GND 32<br />
D+<br />
31<br />
D-<br />
30<br />
GND 29<br />
VDD 28<br />
VBUS 27<br />
GND 26<br />
SPARE_1 25<br />
SPARE_2 24<br />
SPARE_3 23<br />
SPARE_4 22<br />
SPARE_5 21<br />
SPARE_6 20<br />
GND 19<br />
P2.7 18<br />
P2.6 17<br />
P2.5 16<br />
P2.4 15<br />
P2.3 14<br />
P2.2 13<br />
P2.1 12<br />
P2.0 11<br />
GND 10<br />
P0.6<br />
9<br />
P1.6<br />
8<br />
P1.5<br />
7<br />
P1.4<br />
6<br />
P1.3<br />
5<br />
P1.2<br />
4<br />
P1.1<br />
3<br />
P1.0<br />
2<br />
GND 1<br />
J1<br />
P0.5<br />
P0.4<br />
P0.3<br />
P0.2<br />
P0.1<br />
P0.0<br />
40PIN<br />
P1.0<br />
P1.1<br />
P1.2<br />
P1.3<br />
P2.1<br />
P2.2<br />
P2.3<br />
P2.7<br />
Figure 17 - Schematic of the <strong>nRF24LU1</strong> <strong>Development</strong> <strong>Kit</strong> Basic Feature Board<br />
11.3 PS/2 Adapter<br />
The <strong>nRF24LU1</strong> <strong>Development</strong> kit contains one PS/2 Adapter. These are simple level shifters and a<br />
DC-DC cconverter that enables a PS/2 Mouse or Keyboard to be connected to the <strong>nRF24LU1</strong>. The<br />
PS/2 Adapter connects to the “ISP Interface” connector on the BFB. This setup is intended to emulate<br />
a wireless mouse or keyboard using existing devices. The schematic and layout for the PS/2 Adapter<br />
is shown in Figure 18 and Figure 19. The BOM is in Table 5.<br />
The PS/2 is a bi-directional synchronous link, with one data line and one clock line. The power supply<br />
and the logic levels are 5v TTL. To interface this to the <strong>nRF24LU1</strong>, the PS/2 adapter is used.<br />
The DC-DC converter is a MAX619 3v to 5v IC.<br />
Revision 1.0 Page 28 of 36
<strong>nRF24LU1</strong> <strong>Development</strong> <strong>Kit</strong> <strong>User</strong> <strong>Guide</strong><br />
The level shifter is made by resistors and a transistor. Since it is difficult to use a level shifter in a bidirectional<br />
data line, the signal is split on the MCU side, so that the input and output are on two<br />
different IO’s. Table 4 shows the connection to the <strong>nRF24LU1</strong>.<br />
PS/2 Signal name <strong>nRF24LU1</strong> Connection<br />
Data in P0.0<br />
Data out P0.1<br />
Clock in P0.3<br />
Clock out P0.2<br />
Table 4 - PS/2 connection<br />
Revision 1.0 Page 29 of 36
<strong>nRF24LU1</strong> <strong>Development</strong> <strong>Kit</strong> <strong>User</strong> <strong>Guide</strong><br />
xxx<br />
C23<br />
VDD<br />
PS2VDD<br />
C21 C20<br />
10uF 10uF<br />
1<br />
2<br />
3<br />
4<br />
1uF<br />
U3<br />
C1+ C1-<br />
IN SHDN<br />
OUT GND<br />
C2+ C2-<br />
MAX619CSA<br />
C22<br />
8<br />
7<br />
6<br />
5<br />
1uF<br />
PS2VDD<br />
1k R8<br />
1k<br />
R9<br />
R19<br />
2k2<br />
R20<br />
2k2<br />
J1<br />
6<br />
5<br />
4<br />
3<br />
2<br />
1<br />
Clock<br />
Data<br />
T2<br />
R17 1k<br />
R18 1k<br />
R5 1k<br />
VDD<br />
J2<br />
1 2<br />
3 4<br />
5 6<br />
7 8<br />
9 10<br />
BC847C<br />
T1<br />
R4<br />
1k<br />
IDC 10 female<br />
GND<br />
BC847C<br />
R6<br />
10k<br />
R7<br />
10k<br />
Figure 18 - Schematics of the PS/2 Adapter<br />
Designator Value Footprint Comment<br />
C20, C21 10uF 3216 10uF Tantal 10V<br />
C22, C23 1uF 3216[1206]<br />
1uF X5R, +/-10%<br />
6.3V<br />
J1 MiniDIN 6-pin MiniDIN<br />
J2 IDC 10 female HDR2x5<br />
R4, R5, R8, R9, R17,<br />
R18 1k 0603s 5%<br />
R6, R7 10k 0603s 5%<br />
R19, R20 2k2 0603s 5%<br />
T1, T2 BC847C SOT-23 BC847C<br />
U3 MAX619CSA SO8 MAX619<br />
PCB<br />
0007KJO<br />
Table 5 - PS/2 Adapter BOM<br />
Revision 1.0 Page 30 of 36
<strong>nRF24LU1</strong> <strong>Development</strong> <strong>Kit</strong> <strong>User</strong> <strong>Guide</strong><br />
No components in bottom layer<br />
Top silkscreen<br />
Top signal layer<br />
Figure 19 - PS/2 Adapter layout<br />
Bottom signal layer<br />
11.4 <strong>nRF24LU1</strong> Radio Modules<br />
This chapter describes the <strong>nRF24LU1</strong> Radio Modules with the Nordic Semiconductor <strong>nRF24LU1</strong><br />
Embedded 2.4GHz Transceiver with USB.<br />
Figure 20 - The <strong>nRF24LU1</strong> Radio Module with PCB antenna<br />
Figure 21 -The <strong>nRF24LU1</strong> Radio Module with SMA connector<br />
Revision 1.0 Page 31 of 36
<strong>nRF24LU1</strong> <strong>Development</strong> <strong>Kit</strong> <strong>User</strong> <strong>Guide</strong><br />
The Radio Modules for the <strong>nRF24LU1</strong> Embedded 2.4GHz Transceiver with USB has been developed<br />
to enable customers to test functionality, run communication and verify the performance parameters<br />
of the device. The <strong>nRF24LU1</strong> Radio Modules comes with the <strong>nRF24LU1</strong> DEVKIT .The modules come<br />
in two versions; one with a SMA connector and one with a quarter wave PCB antenna. The module<br />
with SMA connector is developed to make it easy to do conducted measurements to test the<br />
performance of the radio. Except for the antenna, the modules have the same layout and same Bill of<br />
Material.<br />
The <strong>nRF24LU1</strong> Radio Modules are intended for evaluation and development purposes only.<br />
11.5 <strong>nRF24LU1</strong> Radio Module hardware description<br />
Figure 22 to Figure 25 shows the <strong>nRF24LU1</strong> Radio Modules circuit diagrams and PCB layouts. The<br />
BOM is given in Table 8.<br />
The module has the <strong>nRF24LU1</strong> and all necessary circuit to start using the <strong>nRF24LU1</strong>. It plugs into the<br />
40 pin DIL connector of the Basic Feature Board (BFB). All I/Os are then available on the Basic<br />
Feature Board.<br />
11.5.1 Debugger interface<br />
To use the built in debugger of the <strong>nRF24LU1</strong>, a JTAG/FS2 interface, J2, is available on the module.<br />
J2 pin<br />
1 TCK<br />
2 GND<br />
3 TDO<br />
4 VDD<br />
5 TMS<br />
6 VDD<br />
7 Trig out / P0.4<br />
8 RESET<br />
9 TDI<br />
10 Not used<br />
Table 6 - FS2 Debug Interface<br />
JTAG/FS4 name<br />
11.5.2 Led drivers<br />
LED 1-3 on the BFB is driven with LED drivers on the Radio Module<br />
11.5.3 Power Supply Switch<br />
The switch S1 can be used to switch the power supply between the battery pack on the BFB for stand<br />
alone use, or to VBUS from the USB connector.<br />
11.5.4 Flash programming<br />
The FLASH in the <strong>nRF24LU1</strong> can be programmed from the “ISP Interface” connector on the BFB by<br />
using the ISP Dongle<br />
Note: The JTAG connector on the Radio Modules is not pin compatible with the ISP Dongle from<br />
Nordic Semiconductor and can not be used to program the flash.<br />
11.5.5 Antenna<br />
For connection of a single ended antenna or to any 50Ω test equipment, the <strong>nRF24LU1</strong> Radio Module<br />
with the SMA connector can be used.<br />
Revision 1.0 Page 32 of 36
<strong>nRF24LU1</strong> <strong>Development</strong> <strong>Kit</strong> <strong>User</strong> <strong>Guide</strong><br />
The <strong>nRF24LU1</strong> Radio Module PCB has an integrated PCB antenna for general testing.<br />
Except from the PCB antenna and the SMA connector, the modules are identical. C14 on the<br />
<strong>nRF24LU1</strong> Radio Module PCB is to match the antenna to the 50 ohm antenna interface and is not<br />
present on the SMA version of the module.<br />
11.5.6 40 pin DIL connector<br />
Pin number<br />
Description<br />
1 GND<br />
2 LED1<br />
3 LED2<br />
4 LED3<br />
5 LED4 – Not used<br />
6 Not used<br />
7 Not used<br />
8 Not used<br />
9 Not used<br />
10 GND<br />
11 Not used<br />
12 P0.5<br />
13 P0.4<br />
14 P0.3<br />
15 Not used<br />
16 Not used<br />
17 Not used<br />
18 Not used<br />
19 GND<br />
20 Not used<br />
21 Not used<br />
22 Not used<br />
23 Not used<br />
24 Not used<br />
25 Not used<br />
26 GND<br />
27 VBUS<br />
28 VDD – Not used<br />
29 GND<br />
30 D+<br />
31 D-<br />
32 GND<br />
33 P0.0 / SCK<br />
34 P0.2 / MISO<br />
35 P0.1 / MOSI<br />
36 P0.3 / CSN<br />
37 RESET<br />
38 PROG<br />
39 VDD Adjustable – Not used<br />
40 VBAT<br />
Table 7 - Pin out of the module connector<br />
The <strong>nRF24LU1</strong> Radio Module is manufactured on a 1.6mm thick, 2 layer FR4 substrate.<br />
Revision 1.0 Page 33 of 36
9<br />
<strong>nRF24LU1</strong> <strong>Development</strong> <strong>Kit</strong> <strong>User</strong> <strong>Guide</strong><br />
J2<br />
1<br />
2<br />
3<br />
4<br />
5<br />
6<br />
7<br />
8<br />
9<br />
10<br />
JTAG<br />
IDC10<br />
R8<br />
R9<br />
R10<br />
R13<br />
R11<br />
R12<br />
J1<br />
VDD_nRF<br />
0R SCK/TCK<br />
0R CSN/TDO<br />
0R MOSI/TMS<br />
0R P0.4<br />
0R RESET<br />
0R MISO/TDI<br />
GND<br />
1 GND<br />
2 LED1<br />
3 LED2<br />
4 LED3<br />
5 LED4<br />
6<br />
7<br />
8<br />
9<br />
10 GND<br />
11<br />
12 P0.5<br />
13 P0.4<br />
14 CSN/TDO<br />
15<br />
16<br />
17<br />
18<br />
19 GND<br />
20<br />
21<br />
22<br />
23<br />
24<br />
25<br />
26 GND<br />
27 VBUS<br />
28 VDD<br />
29 GND<br />
30 D-<br />
31 D+<br />
32 GND<br />
33 SCK/TCK<br />
34 MISO/TDI<br />
35 MOSI/TMS<br />
36 CSN/TDO<br />
37 RESET<br />
38 PROG<br />
39 VDD_REG_RF<br />
40 VBAT<br />
LED1<br />
Q1<br />
SCK/TCK<br />
C1<br />
R1 X1 16MHz<br />
R14 10k<br />
BC847C<br />
15pF<br />
GND<br />
C2 1M<br />
GND<br />
LED2<br />
LED3<br />
15pF<br />
GND<br />
Q3<br />
Q2<br />
MISO/TDI<br />
MOSI/TMS<br />
R16 10k<br />
R15 10k<br />
BC847C<br />
BC847C<br />
VDD_nRF<br />
GND<br />
GND<br />
GND<br />
C8<br />
10nF<br />
C14 C15<br />
GND 33pF NA<br />
GND<br />
R3 22R<br />
D+<br />
D-<br />
R4 22R<br />
VBUS<br />
1 S1<br />
2<br />
VBAT<br />
3<br />
GND<br />
R6 10R<br />
C12<br />
10uF<br />
GND<br />
R17<br />
10k<br />
GND<br />
PROG<br />
RESET<br />
SCK/TCK<br />
MOSI/TMS<br />
MISO/TDI<br />
CSN/TDO<br />
P0.4<br />
P0.5<br />
1<br />
2<br />
3<br />
4<br />
5<br />
6<br />
7<br />
8<br />
R5<br />
10k<br />
VDD_nRF<br />
C7<br />
10nF<br />
GND<br />
32<br />
XC1<br />
31<br />
XC2<br />
30<br />
VSS<br />
29<br />
DEC2<br />
28<br />
DEC1<br />
27<br />
VDD<br />
26<br />
VSS<br />
25<br />
IREF<br />
VDD<br />
VDD<br />
VBUS<br />
VSS<br />
VDD<br />
ANT2<br />
D+<br />
ANT1<br />
D-<br />
VDD_PA<br />
VSS<br />
VDD<br />
PROG <strong>nRF24LU1</strong> VSS<br />
RESET<br />
VSS<br />
VDD<br />
P0.0<br />
P0.1<br />
VSS<br />
P0.2<br />
P0.3<br />
P0.4<br />
P0.5<br />
10<br />
11<br />
12<br />
13<br />
14<br />
15<br />
16<br />
GND<br />
C9 33nF<br />
C10 33nF<br />
R2 22k<br />
GND VDD_nRF<br />
C11<br />
100n<br />
U1<br />
GND<br />
24<br />
23<br />
22<br />
21<br />
20<br />
19<br />
18<br />
17<br />
GND<br />
<strong>nRF24LU1</strong><br />
L3<br />
4.7nH<br />
L1<br />
8.2nH<br />
L2<br />
3.9nH<br />
C3<br />
2.2nF<br />
C5<br />
1.0pF<br />
C4<br />
10pF<br />
C13<br />
3.3pF L4<br />
1.8nH<br />
C6<br />
1.5pF<br />
GND<br />
Pinlist<br />
Figure 22 - Schematics of the <strong>nRF24LU1</strong> Radio Module PCB<br />
No components in bottom layer<br />
Top silkscreen<br />
Top signal layer<br />
Bottom signal layer<br />
Figure 23 - <strong>nRF24LU1</strong> Radio Module PCB antenna PCB layout<br />
Revision 1.0 Page 34 of 36
<strong>nRF24LU1</strong> <strong>Development</strong> <strong>Kit</strong> <strong>User</strong> <strong>Guide</strong><br />
J2<br />
1<br />
2<br />
3<br />
4<br />
5<br />
6<br />
7<br />
8<br />
9<br />
10<br />
JTAG<br />
IDC10<br />
R8<br />
R9<br />
R10<br />
R13<br />
R11<br />
R12<br />
J1<br />
1<br />
2<br />
3<br />
4<br />
5<br />
6<br />
7<br />
8<br />
9<br />
10<br />
11<br />
12<br />
13<br />
14<br />
15<br />
16<br />
17<br />
18<br />
19<br />
20<br />
21<br />
22<br />
23<br />
24<br />
25<br />
26<br />
27<br />
28<br />
29<br />
30<br />
31<br />
32<br />
33<br />
34<br />
35<br />
36<br />
37<br />
38<br />
39<br />
40<br />
VDD_nRF<br />
0R<br />
0R<br />
0R<br />
0R<br />
0R<br />
0R<br />
GND<br />
SCK/TCK<br />
CSN/TDO<br />
MOSI/TMS<br />
P0.4<br />
RESET<br />
MISO/TDI<br />
GND<br />
LED1<br />
LED2<br />
LED3<br />
LED4<br />
GND<br />
P0.5<br />
P0.4<br />
CSN/TDO<br />
GND<br />
GND<br />
VBUS<br />
VDD<br />
GND<br />
D-<br />
D+<br />
GND<br />
SCK/TCK<br />
MISO/TDI<br />
MOSI/TMS<br />
CSN/TDO<br />
RESET<br />
PROG<br />
VDD_REG_RF<br />
VBAT<br />
LED1<br />
GND<br />
LED2<br />
LED3<br />
D+<br />
D-<br />
GND<br />
VBUS<br />
VBAT<br />
Q1<br />
R14 10k<br />
BC847C<br />
Q3<br />
R16 10k<br />
BC847C<br />
1 S1<br />
3<br />
SCK/TCK<br />
MISO/TDI<br />
2<br />
GND<br />
GND<br />
Q2<br />
R15 10k<br />
BC847C<br />
R3 22R<br />
R4 22R<br />
R6 10R<br />
C14<br />
33pF<br />
MOSI/TMS<br />
C15<br />
NA<br />
C12<br />
10uF<br />
GND<br />
C8<br />
10nF<br />
GND<br />
R17<br />
10k<br />
GND<br />
GND<br />
GND<br />
C1<br />
15pF<br />
GND<br />
C2 1M<br />
15pF<br />
PROG<br />
RESET<br />
SCK/TCK<br />
MOSI/TMS<br />
MISO/TDI<br />
CSN/TDO<br />
P0.4<br />
P0.5<br />
VDD_nRF<br />
R1 X1 16MHz<br />
R5<br />
10k<br />
VDD_nRF<br />
C7<br />
10nF<br />
GND<br />
GND<br />
1<br />
VDD<br />
2<br />
VBUS<br />
3<br />
VDD<br />
4<br />
D+<br />
5<br />
D-<br />
6<br />
VSS<br />
7<br />
PROG<br />
8<br />
RESET<br />
32<br />
31<br />
30<br />
29<br />
28<br />
27<br />
26<br />
25<br />
XC1<br />
XC2<br />
VSS<br />
DEC2<br />
DEC1<br />
VDD<br />
VSS<br />
IREF<br />
VDD<br />
P0.0<br />
P0.1<br />
VSS<br />
P0.2<br />
P0.3<br />
P0.4<br />
P0.5<br />
GND<br />
9<br />
10<br />
11<br />
12<br />
13<br />
14<br />
15<br />
16<br />
C9 33nF<br />
C10 33nF<br />
R2 22k<br />
U1<br />
24<br />
VDD<br />
23<br />
VSS<br />
22<br />
ANT2<br />
21<br />
ANT1<br />
20<br />
VDD_PA<br />
19<br />
VDD<br />
18<br />
<strong>nRF24LU1</strong> VSS<br />
17<br />
VSS<br />
<strong>nRF24LU1</strong><br />
GND<br />
C11<br />
100n<br />
GND<br />
GND<br />
VDD_nRF<br />
L1<br />
8.2nH<br />
L2<br />
C3<br />
L3<br />
2.2nF<br />
4.7nH<br />
3.9nH<br />
C5<br />
1.0pF<br />
C4<br />
10pF<br />
C6<br />
1.5pF<br />
J3<br />
GND<br />
SMA Female<br />
Pinlist<br />
Figure 24 - Schematics of the <strong>nRF24LU1</strong> Radio Module SMA<br />
No components in bottom layer<br />
Top silkscreen<br />
Top signal layer<br />
Figure 25 - <strong>nRF24LU1</strong> Radio Module SMA layout<br />
Bottom signal layer<br />
Revision 1.0 Page 35 of 36
<strong>nRF24LU1</strong> <strong>Development</strong> <strong>Kit</strong> <strong>User</strong> <strong>Guide</strong><br />
Designator Value Comment<br />
C1, C2 15pF NPO, +/-2% 50V<br />
C3 2.2nF X7R, +/-10% 50V<br />
C4, C13 4.7pF NP0 +/-0.25pF, 50V<br />
C5 1.5pF NP0 +/-0.1pF, 50V<br />
C6 1.0pF NP0 +/-0.1pF, 50V<br />
C7, C8 10nF X7R, +/-10% 50V<br />
C9, C10 33nF X7R, +/-10% 50V<br />
C11 100n X7R, +/-10% 50V<br />
C12 10uF Tantal 10V<br />
C13<br />
4.7pF<br />
NP0 +/-0.25pF, 50V. Only on PCB antenna<br />
version<br />
C14 33pF NPO, +/-2% 50V<br />
C15<br />
NA<br />
J1<br />
Pinlist<br />
J2 IDC10 Header 2x5 pin<br />
J3 SMA Female Only on SMA version<br />
L1 8.2nH Chip inductor +/-5%. Murata LQP15-series<br />
L2 2.7nH Chip Inductor +/-5%. Murata LQP15-series<br />
L3 3.9nH Chip inductor +/-5%. Murata LQP15-series<br />
Q1, Q2, Q3 BC847C BC847C<br />
R1 1M 5%<br />
R2 22k 1%<br />
R3, R4 22R 5%<br />
R5, R14, R15, R16, R17 10k 5%<br />
R6 10R 5%<br />
R8, R9, R10, R11, R12,<br />
R13<br />
0R<br />
S1<br />
Switch<br />
U1 <strong>nRF24LU1</strong> <strong>nRF24LU1</strong><br />
X1<br />
16MHz<br />
TSX-4025, CL=9pF, +/-10%. Se product<br />
specification for details.<br />
PCB 0008KJO <strong>nRF24LU1</strong> Radio Module SMA<br />
PCB 0009KJO <strong>nRF24LU1</strong> Radio Module PCB<br />
Table 8 - <strong>nRF24LU1</strong> Radio Module Bill of material, common to both versions, except where noted<br />
Revision 1.0 Page 36 of 36