Transia Plate Gluten - IUL Instruments GmbH
Transia Plate Gluten - IUL Instruments GmbH
Transia Plate Gluten - IUL Instruments GmbH
You also want an ePaper? Increase the reach of your titles
YUMPU automatically turns print PDFs into web optimized ePapers that Google loves.
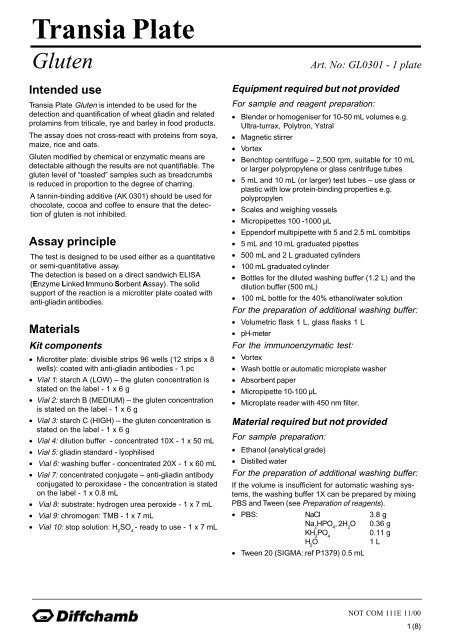
<strong>Transia</strong> <strong>Plate</strong><br />
<strong>Gluten</strong> Art. No: GL0301 - 1 plate<br />
Intended use<br />
<strong>Transia</strong> <strong>Plate</strong> <strong>Gluten</strong> is intended to be used for the<br />
detection and quantification of wheat gliadin and related<br />
prolamins from triticale, rye and barley in food products.<br />
The assay does not cross-react with proteins from soya,<br />
maize, rice and oats.<br />
<strong>Gluten</strong> modified by chemical or enzymatic means are<br />
detectable although the results are not quantifiable. The<br />
gluten level of “toasted” samples such as breadcrumbs<br />
is reduced in proportion to the degree of charring.<br />
A tannin-binding additive (AK 0301) should be used for<br />
chocolate, cocoa and coffee to ensure that the detection<br />
of gluten is not inhibited.<br />
Assay principle<br />
The test is designed to be used either as a quantitative<br />
or semi-quantitative assay.<br />
The detection is based on a direct sandwich ELISA<br />
(Enzyme Linked Immuno Sorbent Assay). The solid<br />
support of the reaction is a microtiter plate coated with<br />
anti-gliadin antibodies.<br />
Materials<br />
Kit components<br />
• Microtiter plate: divisible strips 96 wells (12 strips x 8<br />
wells): coated with anti-gliadin antibodies - 1 pc<br />
• Vial 1: starch A (LOW) – the gluten concentration is<br />
stated on the label - 1 x 6 g<br />
• Vial 2: starch B (MEDIUM) – the gluten concentration<br />
is stated on the label - 1 x 6 g<br />
• Vial 3: starch C (HIGH) – the gluten concentration is<br />
stated on the label - 1 x 6 g<br />
• Vial 4: dilution buffer - concentrated 10X - 1 x 50 mL<br />
• Vial 5: gliadin standard - lyophilised<br />
• Vial 6: washing buffer - concentrated 20X - 1 x 60 mL<br />
• Vial 7: concentrated conjugate – anti-gliadin antibody<br />
conjugated to peroxidase - the concentration is stated<br />
on the label - 1 x 0.8 mL<br />
• Vial 8: substrate: hydrogen urea peroxide - 1 x 7 mL<br />
• Vial 9: chromogen: TMB - 1 x 7 mL<br />
• Vial 10: stop solution: H 2<br />
SO 4<br />
- ready to use - 1 x 7 mL<br />
Equipment required but not provided<br />
For sample and reagent preparation:<br />
• Blender or homogeniser for 10-50 mL volumes e.g.<br />
Ultra-turrax, Polytron, Ystral<br />
• Magnetic stirrer<br />
• Vortex<br />
• Benchtop centrifuge – 2,500 rpm, suitable for 10 mL<br />
or larger polypropylene or glass centrifuge tubes<br />
• 5 mL and 10 mL (or larger) test tubes – use glass or<br />
plastic with low protein-binding properties e.g.<br />
polypropylen<br />
• Scales and weighing vessels<br />
• Micropipettes 100 -1000 µL<br />
• Eppendorf multipipette with 5 and 2.5 mL combitips<br />
• 5 mL and 10 mL graduated pipettes<br />
• 500 mL and 2 L graduated cylinders<br />
• 100 mL graduated cylinder<br />
• Bottles for the diluted washing buffer (1.2 L) and the<br />
dilution buffer (500 mL)<br />
• 100 mL bottle for the 40% ethanol/water solution<br />
For the preparation of additional washing buffer:<br />
• Volumetric flask 1 L, glass flasks 1 L<br />
• pH-meter<br />
For the immunoenzymatic test:<br />
• Vortex<br />
• Wash bottle or automatic microplate washer<br />
• Absorbent paper<br />
• Micropipette 10-100 µL<br />
• Microplate reader with 450 nm filter.<br />
Material required but not provided<br />
For sample preparation:<br />
• Ethanol (analytical grade)<br />
• Distilled water<br />
For the preparation of additional washing buffer:<br />
If the volume is insufficient for automatic washing systems,<br />
the washing buffer 1X can be prepared by mixing<br />
PBS and Tween (see Preparation of reagents).<br />
• PBS: NaCl 3.8 g<br />
Na 2<br />
HPO 4<br />
, 2H 2<br />
O 0.36 g<br />
KH 2<br />
PO 4<br />
0.11 g<br />
H 2<br />
O<br />
1 L<br />
• Tween 20 (SIGMA: ref P1379) 0.5 mL<br />
NOT COM 111E 11/00<br />
1 (8)
<strong>Transia</strong> <strong>Plate</strong><br />
<strong>Gluten</strong><br />
Storage conditions<br />
The kit components should be stored at 2-8°C.<br />
Safety<br />
Good laboratory practice should be employed when<br />
using this kit. Safety clothing should be worn and skin<br />
contact with reagents avoided. Do not ingest.<br />
If any reagent comes into contact with eyes or skin,<br />
rinse immediately with plenty of water. Do not pipette by<br />
mouth.<br />
Material and safety data sheets are available on request.<br />
Test procedure<br />
The test is designed to be used either as a quantitative<br />
or semi-quantitative assay. The quantitative assay is<br />
based on a standard curve with optical density (OD)<br />
plotted versus gliadin concentration. In the semi-quantitative<br />
assay reference starches are used to determine<br />
if the gluten content of the sample is above or below<br />
that of the reference starch. Both procedures are described<br />
below.<br />
The use of reference starches in the quantitative assay<br />
is optional, but if used they will give an indication of the<br />
efficiency of the extraction procedure.<br />
Preparation of reagents<br />
• Important: Allow the reagents to reach room temperature<br />
(18-25°C). Remove them from the box at least<br />
one hour before use.<br />
• Have all the reagents and samples ready for use so<br />
that the various materials can be added to the wells<br />
without delay.<br />
• Shake each vial manually or with a Vortex before use.<br />
Preparation of the washing buffer 1X<br />
Use 600 mL of diluted washing buffer to wash six strips.<br />
The preparation could be done in advance or during the<br />
first incubation step. See Assay procedure, step 3.<br />
1. Dilute the washing buffer 20X (vial 6) in distilled<br />
water 1:20 – 60 mL of washing buffer 20X and 1140<br />
mL of distilled water.<br />
2. Mix and fill the washing bottle.<br />
3. Store the washing buffer 1X at 2-8°C for a maximum<br />
of three months.<br />
Preparation of additional washing buffer 1X<br />
1. Dissolve the different components (see Material<br />
required but not provided) in a one-litre beaker with<br />
approximately 800 mL of distilled water and agitate.<br />
2. Check the pH (7.2 ± 0.1) and complete to one litre in<br />
a volumetric flask.<br />
3. Transfer to a flask and label. Store at 2-8°C for a<br />
maximum of three months.<br />
Preparation of the 40% ethanol/water solution<br />
Prepare a 40% ethanol/water solution by mixing 40 mL<br />
of ethanol with 60 mL of distilled water. Note: measure<br />
the ethanol and the water separately before mixing.<br />
Store in a 100 mL bottle. Prepare fresh 40% ethanol/<br />
water solution for each run.<br />
Preparation of the dilution buffer 1X<br />
Prepare only the volume necessary for the test, it is not<br />
advisable to store dilution buffer 1X.<br />
Dilute the dilution buffer 10X (vial 4) in distilled water<br />
1:10 – 50 ml of dilution buffer 10X and 450 mL of distilled<br />
water.<br />
Mix gently.<br />
Preparation of the reference starches for<br />
a semi-quantitative assay<br />
1. Weigh 1 g of each reference starch (vials 1-3) into<br />
separate labelled containers.<br />
2. Add 10 mL of 40% ethanol/water solution.<br />
3. Homogenise for 30 seconds using homogeniser, or for<br />
30 minutes using a magnetic stirrer.<br />
4. Centrifuge at 2500 rpm for 10 minutes at room temperature,<br />
18-25°C.<br />
5. Collect the liquid extract of each reference starch and<br />
dilute it as described below.<br />
Dilute starch A 1/50<br />
Add 100 µL of extract A to 4.9 mL of dilution buffer<br />
1X.<br />
Dilute starch B 1/250<br />
First dilute the extract B 1/50, by adding 100 µL of<br />
extract to 4.9 mL of dilution buffer 1X.<br />
Then add 1 mL of dilution 1/50 to 4 mL of dilution<br />
buffer 1X.<br />
Dilute starch C 1/1000<br />
First dilute the extract C 1/50, by adding 100 µL of<br />
extract to 4.9 mL of dilution buffer 1X.<br />
Then prepare a 1/250 dilution, by adding 1 mL of<br />
dilution 1/50 to 4 mL of dilution buffer 1X.<br />
Finally, add 1 mL of dilution 1/250 to 3 mL of dilution<br />
buffer 1X.<br />
NOT COM 111E 11/00<br />
2 (8)
<strong>Transia</strong> <strong>Plate</strong><br />
<strong>Gluten</strong><br />
Preparation of the standards for<br />
a quantitative assay<br />
1. Reconstitute the gliadin standard by adding the<br />
volume of 40% ethanol/water solution stated on the<br />
vial label.<br />
2. Gently mix by inversion or vortex until the powder is<br />
completely dissolved. Store at 2-8°C for a maximum<br />
of three months. The reconstituted concentrated<br />
gliadin standard contains 500 µg gliadin /mL.<br />
3. Prepare the following dilutions:<br />
Dilution 1: 5 µg gliadin /mL<br />
100 µL concentrated gliadin standard [500 µg /mL] +<br />
9.9 mL dilution buffer 1X<br />
Dilution 2: 0.80 µg gliadin /mL<br />
400 µL dilution 1 + 2.1 mL dilution buffer 1X<br />
Dilution 3: 0.20 µg gliadin /mL<br />
400 µL dilution 2 + 1.2 mL dilution buffer 1X<br />
Dilution 4: 0.16 µg gliadin /mL<br />
400 µL dilution 2 + 1.6 mL dilution buffer 1X<br />
Dilution 5 - 0.08 µg gliadin /mL<br />
1 mL dilution 4 + 1 mL dilution buffer 1X<br />
Dilution 6: 0.04 µg gliadin /mL<br />
1 mL dilution 5 + 1 mL dilution buffer 1X<br />
Dilution 7: 0.02 µg gliadin /mL<br />
1 mL dilution 6 + 1 mL dilution buffer 1X<br />
Dilution 8: 0.01 µg gliadin /mL<br />
1 mL dilution 7 + 1 mL dilution buffer 1X<br />
Dilutions 3 to 8 (0.2-0.01 µg gliadin /mL) are used as<br />
standards in the assay. The standards must be prepared<br />
for each run.<br />
Dilution of conjugate<br />
The concentration of the concentrated conjugate supplied<br />
with the kit varies from batch to batch. The concentration<br />
is always stated on the label of the vial (nX).<br />
The dilution of the conjugate should not be prepared in<br />
advance, it is done during the first incubation of the<br />
assay. See Assay procedure, step 3.<br />
Dilute the conjugate according to the concentrationfactor<br />
given on the label on vial 7. For one plate, 12 mL<br />
of diluted conjugate is prepared. If, for example, the<br />
concentration is given to 40X on the vial label then mix<br />
11.7 mL of dilution buffer 1X with 300 µL of conjugate<br />
40X (vial 7).<br />
Swirl gently to ensure mixing without generating foam.<br />
Mixing of chromogen and substrate<br />
• The mixture of chromogen and substrate can not be<br />
prepared more than two hours in advance due to the<br />
potential loss of activity. It is done during the<br />
second incubation of the assay. See Assay<br />
procedure, step 6.<br />
• Mix 60 µL of substrate (vial 8) and 60 µL of chromogen<br />
(vial 9) for each well used.<br />
Preparation of samples<br />
To avoid cross-contamination during extraction rinse the<br />
blender or homogeniser with 40% ethanol/water solution<br />
between each sample.<br />
The extraction should be done the same day as the<br />
immunoassay, store the extract at room temperature.<br />
Extraction (general procedure)<br />
1. Weigh 1 g of the sample into labelled containers.<br />
2. Add 10 mL of 40% ethanol/water solution.<br />
3. Homogenise for 30 seconds using an homogeniser, or<br />
for 30 minutes using a magnetic stirrer.<br />
4. Centrifuge at 2,500 rpm for 10 minutes at room temperature<br />
(18-25°C).<br />
5. Collect the liquid extract and dilute it as described<br />
below (see Dilution of the extract).<br />
Extraction – hard samples (cookies, noodles…)<br />
1. Weigh 5 g of the sample.<br />
2. Grind it into a powder.<br />
3. Weigh 1 g of powder into a labelled container.<br />
4. Add 10 mL of 40% ethanol/water solution.<br />
5. Homogenise for 30 seconds using an homogeniser, or<br />
for 30 minutes using a magnetic stirrer.<br />
6. Centrifuge at 2,500 rpm for 10 minutes at room temperature<br />
(18-25°C).<br />
5. Collect the liquid extract and dilute it as described<br />
below (see Dilution of the extract).<br />
Extraction – meat, meat products<br />
When the gluten is not evenly distributed a larger<br />
sample is necessary. The ratio 1:10 (sample:extracting<br />
solution) should be kept.<br />
1. Weigh 10-20 g of the sample.<br />
2. Add 100-200 mL of 40% ethanol/water solution.<br />
3. Homogenise for 30 seconds using an homogeniser, or<br />
for 30 minutes using a magnetic stirrer.<br />
4. Centrifuge at 2,500 rpm for 10 minutes at room temperature<br />
(18-25°C).<br />
5. Collect the liquid extract and dilute it as described<br />
below (see Dilution of the extract).<br />
NOT COM 111E 11/00<br />
3 (8)
<strong>Transia</strong> <strong>Plate</strong><br />
<strong>Gluten</strong><br />
Dilution of the liquid extract<br />
The recommended dilutions for different types of food<br />
are found in Table 1. In order to reduce the risk of<br />
matrix interference a sample needs to be diluted at<br />
least 1/50 before performing the assay.<br />
The standard curve will give an accurate reading within<br />
the range of the standards. If the sample has a concentration<br />
outside this range it will need to be diluted further.<br />
We recommend that you make at least two dilutions<br />
for each sample.<br />
For a semi-quantitative test and for unknown samples<br />
prepare the dilutions 1/50, 1/250 and 1/1,000.<br />
Note that this type of aqueous ethanol solution, such as<br />
the liquid extract, is very difficult to pipette accurately.<br />
After dispensing the extract into the dilution tube, rinse<br />
the tip several times up and down with the buffer in the<br />
dilution tube.<br />
Dilution 1/50<br />
Add 100 µL of the extract to 4.9 mL of the dilution buffer<br />
1X.<br />
Dilution 1/250<br />
Add 1 mL of dilution 1/50 to 4 mL of the dilution buffer<br />
1X.<br />
Dilution 1/1,000<br />
Add 1 mL of dilution 1/250 to 3 mL of the dilution buffer<br />
1X.<br />
Dilution 1/10,000<br />
Add 1 mL of dilution 1/1,000 to 9 mL of the dilution<br />
buffer 1X.<br />
Dilution 1/20,000<br />
Add 1 mL of dilution 1/10,000 to 1 mL of the dilution<br />
buffer 1X.<br />
TABLE 1<br />
Sample Expected Dilution<br />
gluten content<br />
Starch quality control<br />
or “gluten-free” products<br />
e.g. dietary bread,<br />
baking mix, baby food, 1/50<br />
milk drink 0-0.02% to 1/1,000<br />
Soup, processed meat,<br />
analgesic, icing sugar<br />
1/1,000 to<br />
mix, pet food 0.1-2.0% 1/10,000<br />
Biscuits, flour mixes,<br />
bread crumb<br />
preparations, noodles, 1/10,000<br />
pasta >2.0% and higher<br />
NOT COM 111E 11/00<br />
4 (8)
<strong>Transia</strong> <strong>Plate</strong><br />
<strong>Gluten</strong><br />
Assay procedure<br />
Important: Allow the reagents to reach room temperature (18-25°C). Remove them from the box<br />
at least one hour before use. Shake the reagent vials before use.<br />
Do not interchange reagents between kits with different batch numbers.<br />
The washing step is very important. When washing, direct a strong beam at the bottom of the<br />
well.<br />
1. Attach the required number of strips to the plate: two wells for the negative control and two<br />
wells for each dilution of sample extracts.<br />
For a semi-quantitative assay add two wells for each reference starch.<br />
For a quantitative assay add two wells for each standard. Note that only dilutions 3-8 are<br />
used as standards.<br />
Return the unused strips to the zip-lock bag containing dehydrating agent and close it tightly.<br />
Write the position of the controls, standards and samples on the work sheet (ENR COM 113).<br />
2. Distribute 100 µL of the negative control (use dilution buffer), standards<br />
and/or reference starches and dilutions of sample extracts into the assigned detection wells.<br />
3. Incubate at room temperature (18-25 o C) for 40 minutes. Note that the incubation starts<br />
once the last well has been filled. Prepare the washing buffer and the conjugate solution - see<br />
Preparation of reagents.<br />
4. Empty the plate over a container and shake out the remaining contents by briskly flicking<br />
your wrist. Rinse each well, keep the washing buffer in the plate for 5-10 seconds and then<br />
remove it by inverting the plate over the container and shaking out the remaining contents.<br />
Repeat the washing four times. At the end of the washing, drain the plate on absorbent paper,<br />
tapping it firmly.<br />
5. Add 100 µL of diluted conjugate to each well using a multipipette. Be careful not to touch the<br />
wells with the tip. Mix the contents of the wells using a gentle circular motion.<br />
6. Incubate at room temperature (18-25 o C) for 40 minutes. Note that the incubation starts<br />
once the last well has been filled. Prepare the chromogen/substrate mixture - see Preparation<br />
of reagents.<br />
7. Perform the washing five times as described in step 4.<br />
8. Add 100 µL of the substrate/chromogen mixture to all the wells, preferably using a<br />
multipipette.<br />
9. Incubate at room temperature (18-25 o C) for 30 minutes. Note that the incubation starts<br />
once the first well has been filled. Mix the contents of the wells using a gentle circular motion.<br />
10. Add 50 µL of stop solution (vial 10) to each well, following the same order used when the<br />
substrate/chromogen mixture was added.<br />
Mix the contents of the wells thoroughly to ensure complete colour conversion. The blue turns<br />
to yellow.<br />
11. Read the optical densities using a plate reader at 450 nm (blank on air).<br />
NOT COM 111E 11/00<br />
5 (8)
<strong>Transia</strong> <strong>Plate</strong><br />
<strong>Gluten</strong><br />
Result interpretation -<br />
semi-quantitative assay<br />
Validation of the test<br />
The mean optical density (OD) of the negative controls<br />
must be lower than 0.15. If not, the results are<br />
not valid. Repeat the ELISA, taking extra care that all<br />
the reagents are at room temperature and that the<br />
washing step is performed correctly.<br />
<strong>Gluten</strong> content<br />
As defined by the Codex Alimentarius Commission in<br />
1981 (Codex Standard for “<strong>Gluten</strong>-free” Foods, STAN<br />
118-198, Food Agriculture Organisation/World Health<br />
Organisation, Rome, Italy), products labelled glutenfree<br />
may not contain more than 200 ppm (0.02%)<br />
gluten.<br />
Compare the mean OD of the sample with the mean<br />
OD of the reference starches.<br />
If the OD of the sample diluted 1/50 is lower than the<br />
OD of starch A then the product may be labelled<br />
“gluten-free”.<br />
If the OD of the sample diluted 1/50 is higher than<br />
the OD of starch A, but the OD of the sample diluted<br />
1/250 is lower than the OD of starch B, then the<br />
gluten level should be measured quantitatively to<br />
determine if the product could be labelled “glutenfree”<br />
or not.<br />
If the OD of the sample diluted 1/250 is higher than<br />
the OD of starch B, but the OD of the sample diluted<br />
1/1,000 is lower than the OD of starch C, then the<br />
label “gluten-free” is not acceptable.<br />
If the OD of the sample diluted 1/1,000 is higher than<br />
the OD of starch C then the label “gluten-free” is not<br />
acceptable.<br />
Result interpretation -<br />
quantitative assay<br />
Validation of the test<br />
The mean OD of the negative controls must be lower<br />
than 0.15.<br />
The standards must meet the following requirements:<br />
Dilution Standard OD<br />
3 0.20 µg/mL ≥ 0.800<br />
4 0.16 µg/mL ≥ 0.650<br />
5 0.08 µg/mL ≥ 0.350<br />
6 0.04 µg/mL ≥ 0.200<br />
7 0.02 µg/mL ≥ 0.100<br />
8 0.01 µg/mL ≥ 0.070<br />
If the standards do not meet the requirements, repeat<br />
the ELISA, taking extra care that all reagents are at<br />
room temperature and that the washing step is performed<br />
correctly.<br />
<strong>Gluten</strong> content<br />
Using a lin-lin graph paper, draw a standard curve<br />
with the OD of the standards on the y-axis and the<br />
concentration [µg/mL] on the x-axis. An example of a<br />
standard curve is given in Appendix B.<br />
Plot the mean OD of the chosen sample dilution on<br />
the standard curve. Read the gliadin concentration<br />
(G) of the sample dilution.<br />
Note the gliadin concentration on the work sheet<br />
(ENR COM 113) and calculate the gluten content by<br />
using the following equation.<br />
% gluten = G x D x 2 x 10 /10,000<br />
G = gliadin concentration read from the standard<br />
curve<br />
D = dilution factor of the extract (e.g. 50, 250…)<br />
Factor 2 ⇒ it is estimated that 50% of the protein in<br />
gluten is in the form of gliadin.<br />
Factor 10 ⇒ 10 mL of extraction solution is used for<br />
1g of sample<br />
Factor 10,000 ⇒ converts the concentration from<br />
µg/g into %<br />
See Appendix A for conversion from % to ppm.<br />
NOT COM 111E 11/00<br />
6 (8)
<strong>Transia</strong> <strong>Plate</strong><br />
<strong>Gluten</strong><br />
Performance characteristics<br />
Detection limit<br />
The test is designed to detect down to 10 ppm (or<br />
0.001%) gluten in the samples.<br />
Limitation of standard curve –<br />
- quantitative assay<br />
The standard curve will give an accurate reading<br />
within the range 0.01-0.2 µg gliadin/mL. If the sample<br />
has a concentration outside this range it will need to<br />
be diluted (see Preparation of samples).<br />
Repeatability<br />
The inter-assay coefficient of variation on standard<br />
curves is 10%.<br />
The inter-assay coefficient of variation on gluten<br />
content, including sample preparation (extraction), is<br />
10-30%, depending on the type of food.<br />
Appendices<br />
Appendix A - Units for gluten content<br />
Appendix B - Example of standard curve<br />
Work sheet ENR COM 113<br />
This information is based on our present knowledge<br />
and is intended to provide general notes on our<br />
product and its use. It should not be interpreted as a<br />
guarantee of the specific properties of the product<br />
and its suitability for a particular application.<br />
This kit is manufactured under licence by:<br />
Diffchamb S.A.<br />
8, rue Saint Jean de Dieu<br />
69007 Lyon - France<br />
Tel.: +33 (0)4 72 71 56 80<br />
Fax: +33 (0)4 72 73 43 34<br />
www.diffchamb.com<br />
NOT COM 111E 11/00<br />
7 (8)
<strong>Transia</strong> <strong>Plate</strong><br />
<strong>Gluten</strong><br />
Appendix A<br />
Units for gluten content<br />
Several different units are used to measure the gluten<br />
content. The following is a simple key for converting<br />
between different units.<br />
mg gluten per kg sample =<br />
= µg gluten per g sample=<br />
= ppm<br />
ppm = 10,000 x [%]<br />
Example: 100 ppm gluten= 0.01% gluten<br />
If the gliadin concentration is given, Factor 2 could be<br />
used to estimate the gluten content.<br />
Example: 50 ppm gliadin ⇒ 100 ppm gluten<br />
Appendix B<br />
Example of a standard curve<br />
2,000<br />
1,500<br />
OD at 450 nm<br />
1,000<br />
0,500<br />
0,000<br />
0,00 0,05 0,10 0,15 0,20<br />
Gliadin Concentration (µg/mL) ( NOT COM 111E 11/00<br />
8 (8)


