2005 - Z1 FR 3 ETA
2005 - Z1 FR 3 ETA
2005 - Z1 FR 3 ETA

You also want an ePaper? Increase the reach of your titles
YUMPU automatically turns print PDFs into web optimized ePapers that Google loves.
© Marzocchi Suspension<br />
<strong>2005</strong> - <strong>Z1</strong> <strong>FR</strong> 3 <strong>ETA</strong><br />
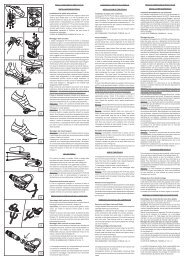
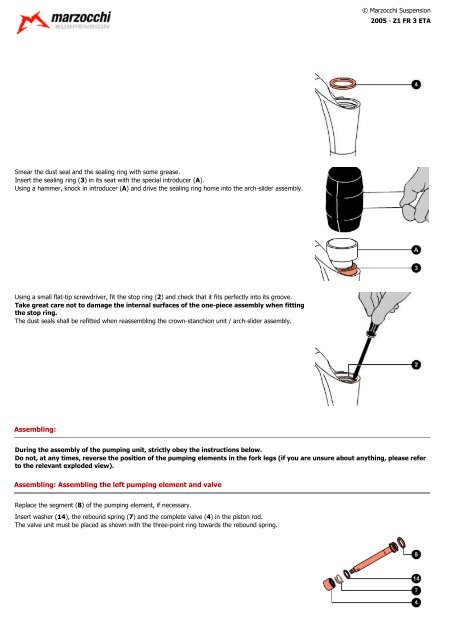
Smear the dust seal and the sealing ring with some grease.<br />
Insert the sealing ring (3) in its seat with the special introducer (A).<br />
Using a hammer, knock in introducer (A) and drive the sealing ring home into the arch-slider assembly.<br />
Using a small flat-tip screwdriver, fit the stop ring (2) and check that it fits perfectly into its groove.<br />
Take great care not to damage the internal surfaces of the one-piece assembly when fitting<br />
the stop ring.<br />
The dust seals shall be refitted when reassembling the crown-stanchion unit / arch-slider assembly.<br />
Assembling:<br />
During the assembly of the pumping unit, strictly obey the instructions below.<br />
Do not, at any times, reverse the position of the pumping elements in the fork legs (if you are unsure about anything, please refer<br />
to the relevant exploded view).<br />
Assembling: Assembling the left pumping element and valve<br />
Replace the segment (8) of the pumping element, if necessary.<br />
Insert washer (14), the rebound spring (7) and the complete valve (4) in the piston rod.<br />
The valve unit must be placed as shown with the three-point ring towards the rebound spring.