Custom branding Acrobat X Pro's PDF Portfolios using Adobe ... - Ipex
Custom branding Acrobat X Pro's PDF Portfolios using Adobe ... - Ipex
Custom branding Acrobat X Pro's PDF Portfolios using Adobe ... - Ipex

Create successful ePaper yourself
Turn your PDF publications into a flip-book with our unique Google optimized e-Paper software.
081<br />
www.macuser.co.uk<br />
5 November 2010<br />
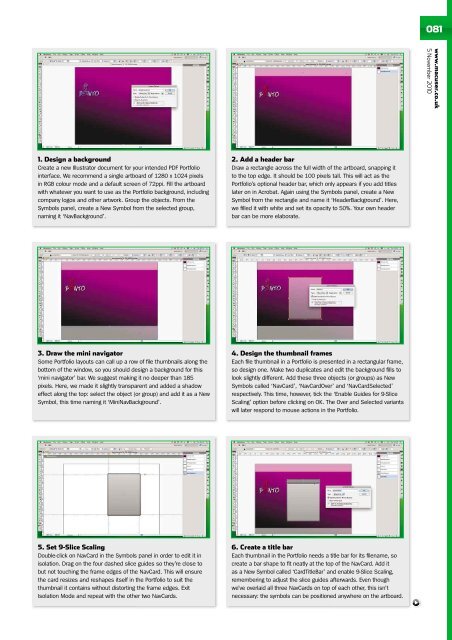
1. Design a background<br />
Create a new Illustrator document for your intended <strong>PDF</strong> Portfolio<br />
interface. We recommend a single artboard of 1280 x 1024 pixels<br />
in RGB colour mode and a default screen of 72ppi. Fill the artboard<br />
with whatever you want to use as the Portfolio background, including<br />
company logos and other artwork. Group the objects. From the<br />
Symbols panel, create a New Symbol from the selected group,<br />
naming it ‘NavBackground’.<br />
2. Add a header bar<br />
Draw a rectangle across the full width of the artboard, snapping it<br />
to the top edge. It should be 100 pixels tall. This will act as the<br />
Portfolio’s optional header bar, which only appears if you add titles<br />
later on in <strong>Acrobat</strong>. Again <strong>using</strong> the Symbols panel, create a New<br />
Symbol from the rectangle and name it ‘HeaderBackground’. Here,<br />
we filled it with white and set its opacity to 50%. Your own header<br />
bar can be more elaborate.<br />
3. Draw the mini navigator<br />
Some Portfolio layouts can call up a row of file thumbnails along the<br />
bottom of the window, so you should design a background for this<br />
‘mini navigator’ bar. We suggest making it no deeper than 185<br />
pixels. Here, we made it slightly transparent and added a shadow<br />
effect along the top: select the object (or group) and add it as a New<br />
Symbol, this time naming it ‘MiniNavBackground’.<br />
4. Design the thumbnail frames<br />
Each file thumbnail in a Portfolio is presented in a rectangular frame,<br />
so design one. Make two duplicates and edit the background fills to<br />
look slightly different. Add these three objects (or groups) as New<br />
Symbols called ‘NavCard’, ‘NavCardOver’ and ‘NavCardSelected’<br />
respectively. This time, however, tick the ‘Enable Guides for 9-Slice<br />
Scaling’ option before clicking on OK. The Over and Selected variants<br />
will later respond to mouse actions in the Portfolio.<br />
5. Set 9-Slice Scaling<br />
Double-click on NavCard in the Symbols panel in order to edit it in<br />
isolation. Drag on the four dashed slice guides so they’re close to<br />
but not touching the frame edges of the NavCard. This will ensure<br />
the card resizes and reshapes itself in the Portfolio to suit the<br />
thumbnail it contains without distorting the frame edges. Exit<br />
Isolation Mode and repeat with the other two NavCards.<br />
6. Create a title bar<br />
Each thumbnail in the Portfolio needs a title bar for its filename, so<br />
create a bar shape to fit neatly at the top of the NavCard. Add it<br />
as a New Symbol called ‘CardTitleBar’ and enable 9-Slice Scaling,<br />
remembering to adjust the slice guides afterwards. Even though<br />
we’ve overlaid all three NavCards on top of each other, this isn’t<br />
necessary: the symbols can be positioned anywhere on the artboard.