Custom branding Acrobat X Pro's PDF Portfolios using Adobe ... - Ipex
Custom branding Acrobat X Pro's PDF Portfolios using Adobe ... - Ipex
Custom branding Acrobat X Pro's PDF Portfolios using Adobe ... - Ipex

Create successful ePaper yourself
Turn your PDF publications into a flip-book with our unique Google optimized e-Paper software.
083<br />
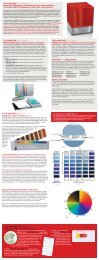
Here’s a rundown of all the objects you need to create for your custom Portfolio theme.<br />
Remember to add each item as a symbol <strong>using</strong> the precise object names given.<br />
CARDS<br />
Object name<br />
IconBackground<br />
IconBackgroundOver<br />
InfoIcon<br />
ExtractIcon<br />
DeleteIcon<br />
NavCard<br />
NavCardOver<br />
NavCardSelected<br />
CardTitleBar<br />
FolderTitleBar<br />
CloseButton<br />
CloseButtonOver<br />
Description<br />
Background image for all icons that appear on the card. InfoIcon, ExtractIcon and DeleteIcon appear on<br />
top of this object. Size: 30 x 30 pixels<br />
MouseOver state for the IconBackground. Size: 30 x 30 pixels<br />
Icon to show metadata. Not present in all layouts. Size: 30 x 30 pixels<br />
Icon to extract file. Not present in edit mode. Size: 30 x 30 pixels<br />
Icon to delete file. Size: 30 x 30 pixels<br />
Background image for the card. Use 9-Slice Scaling<br />
MouseOver state for the NavCard. Use 9-Slice Scaling<br />
Selected state for the NavCard Use 9-Slice Scaling<br />
Background image for the card title area. Size: 54 pixels high Use 9-Slice Scaling<br />
Background image for the folder title area (appears below the folder icon). Use 9-Slice Scaling<br />
Close button on flip size of card. Not present in all layouts<br />
Over state for CloseButton. Not present in all layouts<br />
www.macuser.co.uk<br />
5 November 2010<br />
FOLDER ICONS<br />
Object name<br />
FolderSmall<br />
FolderMedium<br />
FolderLarge<br />
BACKGROUND IMAGES<br />
Object name<br />
NavBackground<br />
HeaderBackground<br />
MiniNavBackground<br />
FILE NAVIGATION BUTTONS<br />
Object name<br />
NextButton<br />
NextButtonOver<br />
PreviousButton<br />
PreviousButtonOver<br />
MININAVIGATOR<br />
Object name<br />
MiniNavSlammerBackground<br />
MiniNavSlammerBackgroundOver<br />
MiniNavSlammerIcon<br />
MiniNavCard<br />
MiniNavCardOver<br />
MiniNavCardSelected<br />
Description<br />
Image used to represent a folder in the MiniNav area<br />
Image used to represent a folder in the FreeForm layout medium card<br />
Image used to represent a folder on most cards. Optimum size: 285 x 360 pixels<br />
Description<br />
Background image for the Portfolio. Note: When part of a theme, the image will always stretch to fill the<br />
available space. Doesn’t use 9-Slice Scaling<br />
Background image for the header area. Note: In <strong>Adobe</strong> default layouts, only appears if there is content in<br />
the header. Size: 100 pixels high<br />
Background image for the MiniNav<br />
Description<br />
Image for the next file button. Size: 50 x 50 pixels<br />
MouseOver state for the NextButton<br />
Image for the previous file button. Size: 50 x 50 pixels<br />
MouseOver state for the PreviousButton<br />
Description<br />
Background image for the ‘Slammer’ button, the button that opens/closes the MiniNav. Size: 80 x 28 pixels<br />
MouseOver state for MiniNavSlammerBackground. Size: 80 x 28 pixels<br />
Icon for the Slammer button. Note: This icon will rotate 180° when the MiniNav is toggled. Design this icon<br />
for the MiniNav open state<br />
Card for the MiniNav. Use 9-Slice Scaling<br />
MouseOver state for the MiniNavCard<br />
Selected state for the MiniNavCard<br />
13. Process with Flash<br />
Save and close your Illustrator document. Launch Flash and create<br />
a new blank file. Go to File > Import > Import To Stage and choose<br />
your Illustrator document. In the Import dialog, tick all the symbols<br />
you created and deselect the option to ‘Import as a single bitmap<br />
image’. Save the Flash file, then choose File > Publish Settings,<br />
make sure ‘Flash (.swf)’ is ticked, and click Publish.<br />
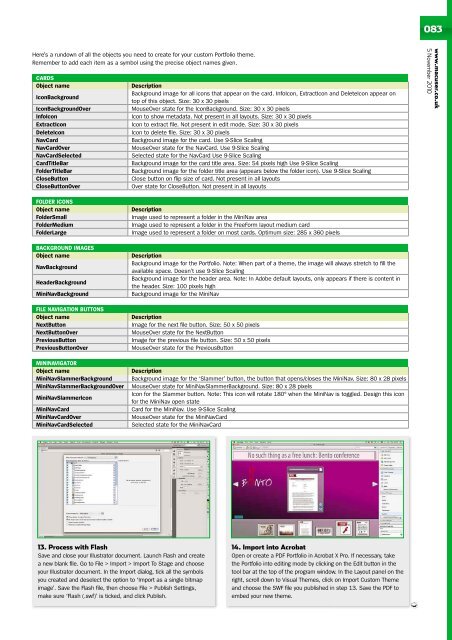
14. Import into <strong>Acrobat</strong><br />
Open or create a <strong>PDF</strong> Portfolio in <strong>Acrobat</strong> X Pro. If necessary, take<br />
the Portfolio into editing mode by clicking on the Edit button in the<br />
tool bar at the top of the program window. In the Layout panel on the<br />
right, scroll down to Visual Themes, click on Import <strong>Custom</strong> Theme<br />
and choose the SWF file you published in step 13. Save the <strong>PDF</strong> to<br />
embed your new theme.