hi-speed usb 2.0 analog tv stick user manual - MANHATTAN
hi-speed usb 2.0 analog tv stick user manual - MANHATTAN
hi-speed usb 2.0 analog tv stick user manual - MANHATTAN

You also want an ePaper? Increase the reach of your titles
YUMPU automatically turns print PDFs into web optimized ePapers that Google loves.
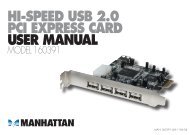
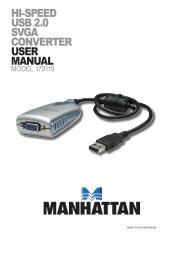
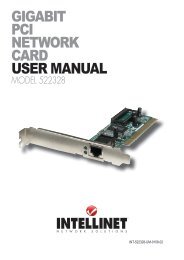
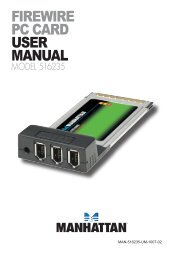
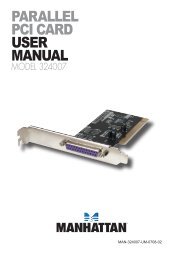
Hi-Speed<br />
USB <strong>2.0</strong><br />
Analog<br />
TV Stick<br />
User<br />
Manual<br />
Model 176668<br />
MAN-176668-UM-0907-02
Contents<br />
section<br />
page<br />
1. Introduction.......................................................................3<br />
Package Contents.....................................................................................3<br />
System Requirements...............................................................................3<br />
2. Installation.........................................................................4<br />
driver Installation......................................................................4<br />
3. Operation...........................................................................5<br />
User Functions.........................................................................5<br />
Function Setup.........................................................................5<br />
Recording & Playback...............................................................8<br />
Remote Control...................................................................... 11<br />
4. Specifications................................................................... 11<br />
2<br />
CONTENTS
1. INTRODUCTION<br />
Thank you for purchasing the <strong>MANHATTAN</strong> ® Hi-Speed USB <strong>2.0</strong> Analog TV<br />
Stick, Model 176668.<br />
The Hi-Speed USB <strong>2.0</strong> Analog TV Stick brings <strong>analog</strong> television to your<br />
notebook or desktop computer, allowing you to schedule and record television<br />
programs directly onto hard drives for replay or transfer to CDs and portable<br />
media devices.<br />
Among the many quality features and convenient benefits you’ll enjoy with t<strong>hi</strong>s<br />
Hi-Speed USB <strong>2.0</strong> Analog TV Stick:<br />
• Receive <strong>analog</strong> television broadcasts on notebook and desktop computers —<br />
supports most TV standards<br />
• Compact design enables clear, crisp reception almost anywhere — no<br />
external power required<br />
• Easily schedule and directly save programs to hard drive for replay or<br />
transfer to CD<br />
• Digital video recording, automatic channel scanning, customizable favorites<br />
and time-s<strong>hi</strong>fting enhanced program viewing<br />
• Plug and Play and USB installation; Windows compatible<br />
• Lifetime Warranty<br />
NOTE: T<strong>hi</strong>s device is designed for office or home use only. Do not place it near<br />
any heat source, nor in any location that does not provide adequate air<br />
circulation. Do not attempt to repair t<strong>hi</strong>s device — if damage to the device<br />
occurs, contact your local distributor for assistance.<br />
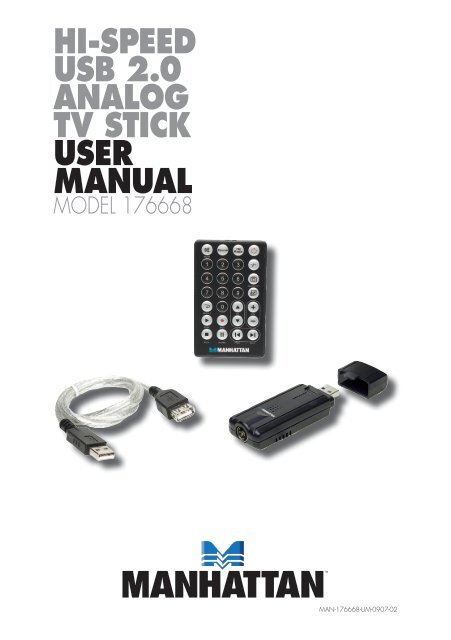
Package Contents<br />
• Hi-Speed USB <strong>2.0</strong> Analog TV Stick<br />
• USB extension cable<br />
• Remote control (CR 2025 battery included)<br />
• User <strong>manual</strong> and software/driver CD<br />
system requirements<br />
• Pentium 4 2.4 GHz, 256 MB RAM and 30 MB HDD space recommended<br />
• DirectX 9.0 or above<br />
• VGA grap<strong>hi</strong>cs with overlay support<br />
• Windows XP SP2/Vista/7<br />
INTRODUCTION<br />
3
2. installation<br />
There are two options for installation: automatic and <strong>manual</strong>. Insert the software/<br />
driver CD, choose “scan the CD” and double-click “PEN TV\setup.exe.” The<br />
software is now ready for installation. NOTE: Install the software before<br />
updating your files. to remove the software, go to “Add and delete program”<br />
on the control panel.<br />
driver installation<br />
1. Insert the software/driver CD in the CD drive. The computer’s<br />
operating system will automatically display the initial<br />
installation procedure prompt. Click “Driver Install” (or run<br />
Driver\Setup.exe), then<br />
click “Next ” as needed to<br />
continue through the<br />
welcome screen to the<br />
DirectX setup screen.<br />
2. Read the license<br />
agreement, select “I<br />
accept the agreement”<br />
and click “Next.”<br />
3. When the “Restart<br />
Computer” screen<br />
displays, click “Finish.”<br />
4. If the “Hardware Installation” screen<br />
displays, click “Continue Anyway.”<br />
5. Select “Yes, I want to restart my<br />
computer now,” then click “Finish.”<br />
6. Open the control panel; click on<br />
“System,” then “System Properties,”<br />
“Device Manager” and “Hardware”<br />
to confirm the driver (as <strong>hi</strong>ghlighted<br />
at right) has been installed.<br />
4<br />
INSTALLATION
3. operation<br />
<strong>user</strong> functions<br />
The <strong>user</strong> interface functions are defined below. NOTE: Functions listed with an<br />
asterisk (*) are not featured on t<strong>hi</strong>s product.<br />
1. Record<br />
2. Play<br />
3. Pause<br />
4. Stop<br />
5. Reverse<br />
6. Fast forward<br />
7. Hue<br />
8. Status window<br />
9. Minimize<br />
10. Full-screen window &<br />
video desktop switch<br />
function setup<br />
Click on the “Setup”<br />
button (#25 above) to<br />
change settings for any of<br />
the functions.<br />
Channel Edit<br />
Click on the Channel Edit<br />
tab to change the<br />
channel list so that<br />
favorites are easier to<br />
find and access. Before<br />
editing the list, select your<br />
country in the “Region”<br />
window.<br />
11. exit<br />
12. Channel up<br />
13. Channel down<br />
14. TAB/Back to<br />
previous channel<br />
15. 10 channels<br />
16. Numeric keys<br />
17. Time-s<strong>hi</strong>ft<br />
18. * Switch to/from<br />
stereo<br />
19. * TeleText<br />
20. * S<strong>hi</strong>ft video source<br />
21. Open recorded file<br />
22. Search (Auto-scan)<br />
23. * Radio (switch to FM)<br />
24. 16-channel preview<br />
25. Setup menu<br />
26. Snapshot<br />
27. Schedule recording<br />
28. Mute<br />
29. Volume down<br />
30. Volume up<br />
Auto Scan<br />
OPERATION<br />
5
Click “Auto Scan” to automatically scan all the channels available in your area.<br />
NOTE: The volume is muted during a channel scan.<br />
To rename a channel:<br />
1. Click on a channel to <strong>hi</strong>ghlight it.<br />
2. Right-click to enable the name change.<br />
3. Enter the new name in the “Name” window.<br />
4. Re-position the channel as desired using the “Up” and “Down” buttons.<br />
To fine tune a channel:<br />
1. Click on a channel to <strong>hi</strong>ghlight it.<br />
2. Slide the Fine Tune control left or right to adjust. NOTE: Normally, the<br />
program automatically provides the best quality possible.<br />
To activate or skip a channel:<br />
1. Click on a channel to <strong>hi</strong>ghlight it.<br />
2. Click the box in the “Index” column (as shown in the screen image on Page 5)<br />
to keep the channel on the active list; click a box with a check mark (thereby<br />
removing the check mark) to skip that channel in<br />
the list.<br />
To add a channel:<br />
1. Click the “Add” button.<br />
2. Enter a name and frequency.<br />
3. Click “OK.”<br />
Color/Image Control<br />
Click on the Video ProcAmp tab to<br />
adjust the settings for Brightness,<br />
Contrast, Hue, Saturation and<br />
Sharpness. Simply click on the slider<br />
control and move it left or right to suit<br />
your preferences. Click “Default” to<br />
return to the original settings.<br />
NOTE: Should the TV screen go blank<br />
or black during any of these<br />
adjustments, click “Default.”<br />
Recording Options<br />
Click on the Record tab to select a recording format: DVD, VCD, SVCD, MPEG4,<br />
AVI, WMV, MP3 or WMA.<br />
NOTE: TV standards and their control vary by country/region.<br />
NTSC (National Television Systems Committee): America, Taiwan, Canada,<br />
Japan and Central and South America. PAL (Phase Alteration Line): Europe,<br />
C<strong>hi</strong>na, Central Africa, Australia and South Africa. SECAM: France, Africa<br />
and the Middle East.<br />
6<br />
OPERATION
The recording size can be from<br />
352 x 240 to 720 x 480 (NTSC)<br />
or 352 x 288 to 720 x 576 (PAL).<br />
Keep in mind that larger audio<br />
and video bit rates use more disk<br />
space, but provide better audio<br />
and video quality. If space is limited,<br />
therefore, adjust the recording<br />
setting as needed to save longer<br />
programs with <strong>hi</strong>gh-quality images.<br />
Path Setting<br />
Click on the Directory Setting<br />
tab to save still images or video<br />
files. Then, to check/confirm<br />
their path, click on the adjacent<br />
“Browse” button.<br />
Right-Click Options<br />
Other options and menu access<br />
routes are available by right-clicking,<br />
w<strong>hi</strong>ch displays a pop-up menu<br />
with the following selections.<br />
Always on top: Keeps the TV<br />
display on top of any others<br />
that are active.<br />
Display panel: Displays or <strong>hi</strong>des<br />
the software control panel.<br />
Full-screen mode: Enlarges the<br />
window to full-screen size. Double-clicking on the screen returns the image to<br />
window mode.<br />
TeleText: NOTE: T<strong>hi</strong>s function is not featured on t<strong>hi</strong>s product.<br />
Desktop mode: Displays the TV image on the computer desktop.<br />
Video input: Presents three options: TV Tuner (default), Composite and S-video.<br />
Video standard: Changes the video format to PAL/NTSC/SECAM. The default<br />
is PAL-BDGHI.<br />
Color adjust: Adjusts the color and brightness.<br />
Capture: Takes a single-frame snapshot. The default format saves the image as a<br />
.bmp file.<br />
Channel list: Lets you edit the channels. For details, see Channel Edit, Pages 5-6.<br />
Directory setting: Lets you select w<strong>hi</strong>ch directory to save recordings and images<br />
to. For details, see Path Setting above.<br />
About: Shows the program version and copyright information.<br />
Exit: Exits the program.<br />
OPERATION<br />
7
ecording & playback<br />
T<strong>hi</strong>s device supports MPEG-1 and MPEG-2 formats. To record w<strong>hi</strong>le watc<strong>hi</strong>ng<br />
a TV program, click on the “Record” button (see Page 5). To stop recording,<br />
click on “Record” again. Name the file or default save. The status panel will<br />
show real-time recording information (and will s<strong>hi</strong>eld some information).<br />
Recording File Space Requirements<br />
Space required for recording depends on the format, as shown below. Note:<br />
Recording a DVD requires much more space than a VCD does, but it doesn’t<br />
mean the DVD’s quality will be better. Recording a super video CD (SVCD)<br />
provides the same quality as a DVD and is good enough for recording since<br />
the quality of a normal TV signal doesn’t have the same definition as DVD.<br />
Format Resolution Video bit rate Audio bit rate Disk space<br />
NTSC DVD 720 x 480 6 Mbps 224 Kbps 2.6 GB/hr<br />
NTSC SVCD 480 x 480 2.42 Mbps 224 Kbps 1 GB/hr<br />
NTSC VCD 320 x 240 1.15 Mbps 224 Kbps 600 MB/hr<br />
PAL DVD 720 x 576 6 Mbps 224 Kbps 2.6 GB/hr<br />
PAL SVCD 480 x 576 2.42 Mbps 224 Kbps 1 GB/hr<br />
PAL VCD 352 x 288 1.15 Mbps 224 Kbps 600 MB/hr<br />
AVI 352 x 288 224 Kbps<br />
MPEG-4 352 x 288 224 Kbps<br />
WMV 352 x 288 1.2 Mbps 224 Kbps About 650 MB/hr<br />
MP3<br />
WMA<br />
Schedule Recording<br />
224 Kbps<br />
224 Kbps<br />
You can also set the program to record in advance, specifying the channel to<br />
record; the time of day and the day of the week to begin recording; and the<br />
recording duration period. Click “Schedule Recording” (see Page 5) to display the<br />
“Schedule” screen, w<strong>hi</strong>ch features the following options buttons.<br />
New: Lets you add a new<br />
Schedule Recording task.<br />
Modify: Lets you make<br />
changes to a selected task.<br />
Delete: Lets you delete the<br />
selected task.<br />
OK: Activates the status of all<br />
Schedule Recording tasks<br />
that’ve been entered.<br />
8<br />
OPERATION
With the Add Task screen<br />
displayed, you have the<br />
following options.<br />
Task name: Asks that you enter<br />
an identifying name for the<br />
recording.<br />
Mode: Lets you select “Record”<br />
or “Watch Only.”<br />
Video input: Gives you the<br />
option of TV Tuner, Composite<br />
or S-Video.<br />
Channel: Lets you select the<br />
channel you wish to watch or record.<br />
Duration time: Lets you enter the length of the task. (Minimum is 3 minutes;<br />
default is 30 minutes.)<br />
Click “Next” to display the Record Format screen. Choose DVD, VCD, SVCD,<br />
MPEG4, AVI, WMV, MP3 or WMA (see “Recording Options” on Page 7 for<br />
a similar screen display).<br />
Click “Next” to display the Time<br />
Setting screen, w<strong>hi</strong>ch presents<br />
these options.<br />
Only once: Limits the task to a<br />
one-time recording.<br />
Every week: Repeatedly records<br />
each week as scheduled.<br />
Every day: Repeatedly records<br />
each day as scheduled.<br />
NOTE: Time of day is a 24-hour<br />
(vs. 12-hour) format.<br />
When finished, click “Next” to activate the Schedule Recording settings and<br />
display the After Task Completed screen. T<strong>hi</strong>s presents three courses of action<br />
once the recording task is complete.<br />
Auto Shutdown: Turns off the power to the PC after recording.<br />
Exit Application: Exits the program, but doesn’t shut down the computer.<br />
Stay On: Keeps the software active and lets you continue watc<strong>hi</strong>ng TV.<br />
Click “Next” to display the Finish screen, then click “Finish.”<br />
NOTE: If the operating system displays<br />
the prompt shown at right, there is a<br />
conflict between two or more time<br />
settings. Click “OK,” then revise one or<br />
more of the time settings and follow the<br />
preceding prompts to the Finish screen.<br />
OPERATION<br />
9
Video Playback<br />
To play a recorded file, click on the<br />
“Open recorded file” button (see Page<br />
5) to access the file (in w<strong>hi</strong>chever<br />
folder it was saved to). Double-click<br />
on the file, or <strong>hi</strong>ghlight it and click<br />
“Open.” W<strong>hi</strong>le the file plays, the<br />
control panel will display time<br />
information and the status of<br />
associated playback functions.<br />
Snapshot<br />
To capture a<br />
picture w<strong>hi</strong>le<br />
watc<strong>hi</strong>ng TV<br />
(and save it as<br />
a .bmp file),<br />
click on the “Snapshot” button (see Page 5). Save the image when prompted,<br />
and double-click on the image to perform edits. If you don’t wish to save the<br />
image, click on “Delete.”<br />
TV Channel Preview<br />
Complete the channel scan before previewing. Most channel preview/selection<br />
functions are controlled with standard keys and buttons.<br />
To view the next or previous channel on the menu list w<strong>hi</strong>le watc<strong>hi</strong>ng TV: Click<br />
on the Channel Up/Channel Down buttons.<br />
To view a specific channel: Enter the channel number using the numeric keys.<br />
To return to the previous channel: Click on the “TAB” button.<br />
To preview 16 channels simultaneously: Click on the “16” button. To select one<br />
of these 16 channels for viewing, click on the channel image.<br />
Time-S<strong>hi</strong>fting<br />
Time-s<strong>hi</strong>ft lets you skip commercials (not automatically, however), pause and<br />
replay w<strong>hi</strong>le watc<strong>hi</strong>ng real-time TV — without interrupting any ongoing recording<br />
— by temporarily saving the “live” video to your hard disk for a specified period<br />
of time.<br />
In Time-s<strong>hi</strong>ft, you are recording to and playing back from the same video file or<br />
buffer. You can play back from various locations in that buffer. As with video<br />
playback, you can pause, fast-forward and rewind. A major difference,<br />
however, is that the software is simultaneously recording real-time television<br />
w<strong>hi</strong>le playing back from the buffer.<br />
NOTE: Time-s<strong>hi</strong>ft can use a significant amount of disk space. There is greater CPU<br />
utilization during Time-s<strong>hi</strong>ft because you are simultaneously recording and playing<br />
recorded videos. At full DVD quality, Time-s<strong>hi</strong>ft can require up to a 1.7-GHz CPU.<br />
10<br />
OPERATION
Click on the “Time-s<strong>hi</strong>ft” button to active it (see Page 5). A time monitoring bar<br />
will appear, informing you how much of the Time-s<strong>hi</strong>ft buffer is in use. You can<br />
also use your mouse to drag the Time Control Shuttle to jump to a specific time.<br />
To exit Time-s<strong>hi</strong>ft, click on the “Stop” button (see Page 5).<br />
remote control<br />
1. Mute<br />
2. Input source: TV,<br />
Composite & S-Video<br />
3. * FM: Switch to<br />
CardTV3 FM<br />
4. * On/Off: CardTV3 FM<br />
application software<br />
5. Single/double/triple<br />
digit<br />
6. Snapshot: Take a picture<br />
of the on-screen image<br />
* Not available with t<strong>hi</strong>s device.<br />
7. Full Screen/Restore:<br />
Switches between full<br />
& default screens<br />
8. Numeric keys<br />
9. Return to previous channel<br />
10. Play, Record, Stop &<br />
Pause<br />
11. Volume Up/Down<br />
12. Channel Up/Down<br />
13. Reverse/Fast Forward<br />
4. specifications<br />
Standards<br />
• Hi-Speed USB <strong>2.0</strong> compliant<br />
• Meets worldwide TV and PAL/<br />
SECAM/NTSC video standards<br />
Input<br />
• Connection: TV cable with adapter<br />
• PAL/SECAM/NTSC video standards<br />
• 125-channel support<br />
• S-video and AV-video image input<br />
• MPEG-1 or MPEG-2 capture format<br />
output<br />
• USB A-type male<br />
• MPEG-1/2/4, DVD, VCD, SVCD,<br />
AVI, WMV, MP3 and WMA (BMP<br />
for snapshot)<br />
• 10-bit GigaColor provides 8-, 9-,<br />
10-bit colors<br />
• 30 fps @ 720 x 480 /<br />
25 fps @ 720 x 576<br />
Physical<br />
• TM5600 c<strong>hi</strong>pset<br />
• Dimensions, overall: 8.5 x 2.9 x 1.5 cm<br />
(3.3 x 1.1 x 0.5 in.)<br />
• USB extension cable: 80 cm<br />
(31.5 in.)<br />
• Weight: 28 g (1 oz.)<br />
System Requirements<br />
• Pentium 4 2.4 GHz, 256 MB RAM<br />
and 30 MB HDD space recommended<br />
• DirectX 9.0 or above<br />
• VGA grap<strong>hi</strong>cs with overlay support<br />
• Windows XP SP2/Vista/7<br />
Package Contents<br />
• Hi-Speed USB <strong>2.0</strong> Analog TV Stick<br />
• USB extension cable<br />
• Remote control (CR 2025 battery<br />
included)<br />
• User <strong>manual</strong> and software/driver CD<br />
SPECIFICATIONS<br />
11
<strong>MANHATTAN</strong> ® offers a complete line<br />
of PC Components, Peripherals, Cables and Accessories.<br />
Ask your local computer dealer for more information<br />
or visit us online at<br />
www.manhattan-products.com<br />
Copyright © <strong>MANHATTAN</strong><br />
All products mentioned are trademarks or registered trademarks of their respective owners.