Von Duprin CS 98 9949 Installation Instructions - Access Hardware ...
Von Duprin CS 98 9949 Installation Instructions - Access Hardware ...
Von Duprin CS 98 9949 Installation Instructions - Access Hardware ...

You also want an ePaper? Increase the reach of your titles
YUMPU automatically turns print PDFs into web optimized ePapers that Google loves.
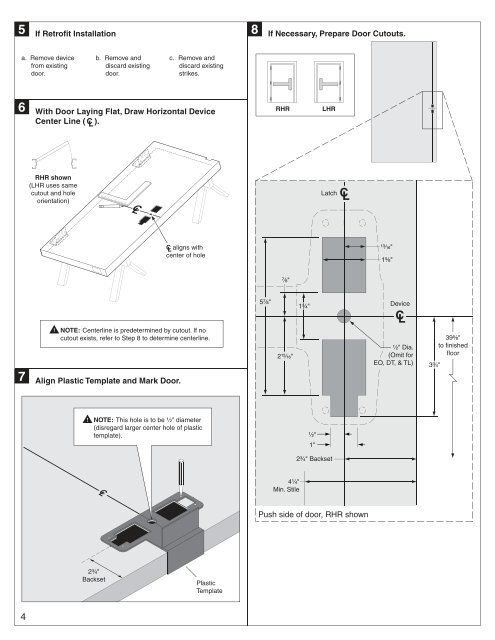
5 If Retrofit <strong>Installation</strong><br />
8 If Necessary, Prepare Door Cutouts.<br />
a. Remove device<br />
from existing<br />
door.<br />
b. Remove and<br />
discard existing<br />
door.<br />
c. Remove and<br />
discard existing<br />
strikes.<br />
6 With Door Laying Flat, Draw Horizontal Device<br />
Center Line ( ).<br />
RHR<br />
LHR<br />
RHR shown<br />
(LHR uses same<br />
cutout and hole<br />
orientation)<br />
Latch<br />
C L aligns with<br />
center of hole<br />
¹³⁄₁₆"<br />
1⁵⁄₈"<br />
⁷⁄₈"<br />
5⁷⁄₈"<br />
1³⁄₄"<br />
Device<br />
!<br />
NOTE: Centerline is predetermined by cutout. If no<br />
cutout exists, refer to Step 8 to determine centerline.<br />
7 Align Plastic Template and Mark Door.<br />
2¹⁵⁄₁₆"<br />
¹⁄₂" Dia.<br />
(Omit for<br />
EO, DT, & TL)<br />
3³⁄₄"<br />
39⁵⁄₈"<br />
to finished<br />
floor<br />
!<br />
NOTE: This hole is to be ¹⁄₂" diameter<br />
(disregard larger center hole of plastic<br />
template).<br />
¹⁄₂"<br />
1"<br />
2³⁄₄" Backset<br />
4¹⁄₄"<br />
Min. Stile<br />
Push side of door, RHR shown<br />
2³⁄₄"<br />
Backset<br />
Plastic<br />
Template<br />
4