Instructions for the assembly and installation - KLARO GmbH
Instructions for the assembly and installation - KLARO GmbH
Instructions for the assembly and installation - KLARO GmbH

You also want an ePaper? Increase the reach of your titles
YUMPU automatically turns print PDFs into web optimized ePapers that Google loves.
<strong>Instructions</strong> <strong>for</strong> <strong>the</strong> <strong>assembly</strong> <strong>and</strong> <strong>installation</strong> of <strong>KLARO</strong> Easy<br />
5.2. Installation in exterior zones<br />
5.2.1. Location<br />
The location of <strong>the</strong> exterior cabinet must be a cool place<br />
with no direct solar radiation onto <strong>the</strong> cabinet during <strong>the</strong><br />
summer months. The best locations are <strong>the</strong> east or north<br />
sides of buildings. The rear side of <strong>the</strong> outer column <strong>and</strong><br />
<strong>the</strong> sides of <strong>the</strong> outer plastic cabinet must be installed with<br />
a clearance of at least 10 cm to allow <strong>for</strong> <strong>the</strong> easy<br />
replacement of <strong>the</strong> filter mat at <strong>the</strong> ventilation grids <strong>and</strong> <strong>for</strong><br />
adequate air circulation. The absolute maximum length of<br />
<strong>the</strong> air hoses is 20 meters.<br />
5.2.2. Electricity supply<br />
A top hat rail socket / junction box is provided in <strong>the</strong> control<br />
cabinet <strong>for</strong> electricity supply. The cable used <strong>for</strong> <strong>the</strong><br />
electricity supply is laid via <strong>the</strong> base into <strong>the</strong> cabinet where<br />
it is connected.<br />
5.2.3. Assembly <strong>and</strong> <strong>installation</strong><br />
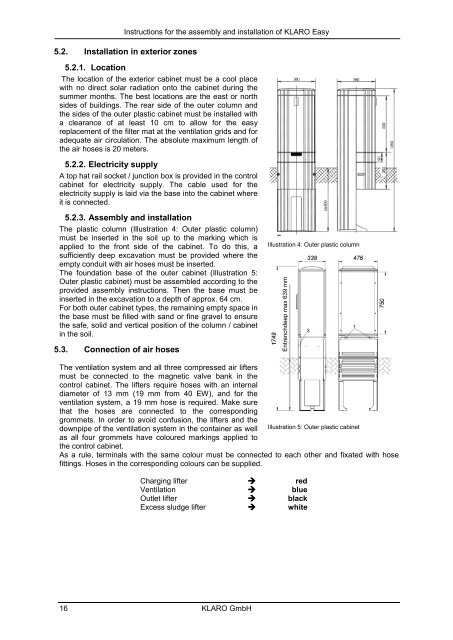
The plastic column (Illustration 4: Outer plastic column)<br />
must be inserted in <strong>the</strong> soil up to <strong>the</strong> marking which is<br />
applied to <strong>the</strong> front side of <strong>the</strong> cabinet. To do this, a<br />
sufficiently deep excavation must be provided where <strong>the</strong><br />
empty conduit with air hoses must be inserted.<br />
The foundation base of <strong>the</strong> outer cabinet (Illustration 5:<br />
Outer plastic cabinet) must be assembled according to <strong>the</strong><br />
provided <strong>assembly</strong> instructions. Then <strong>the</strong> base must be<br />
inserted in <strong>the</strong> excavation to a depth of approx. 64 cm.<br />
For both outer cabinet types, <strong>the</strong> remaining empty space in<br />
<strong>the</strong> base must be filled with s<strong>and</strong> or fine gravel to ensure<br />
<strong>the</strong> safe, solid <strong>and</strong> vertical position of <strong>the</strong> column / cabinet<br />
in <strong>the</strong> soil.<br />
5.3. Connection of air hoses<br />
Illustration 4: Outer plastic column<br />
Entrenchdeep max 639 mm<br />
The ventilation system <strong>and</strong> all three compressed air lifters<br />
must be connected to <strong>the</strong> magnetic valve bank in <strong>the</strong><br />
control cabinet. The lifters require hoses with an internal<br />
diameter of 13 mm (19 mm from 40 EW), <strong>and</strong> <strong>for</strong> <strong>the</strong><br />
ventilation system, a 19 mm hose is required. Make sure<br />
that <strong>the</strong> hoses are connected to <strong>the</strong> corresponding<br />
grommets. In order to avoid confusion, <strong>the</strong> lifters <strong>and</strong> <strong>the</strong><br />
downpipe of <strong>the</strong> ventilation system in <strong>the</strong> container as well Illustration 5: Outer plastic cabinet<br />
as all four grommets have coloured markings applied to<br />
<strong>the</strong> control cabinet.<br />
As a rule, terminals with <strong>the</strong> same colour must be connected to each o<strong>the</strong>r <strong>and</strong> fixated with hose<br />
fittings. Hoses in <strong>the</strong> corresponding colours can be supplied.<br />
Charging lifter red<br />
Ventilation blue<br />
Outlet lifter black<br />
Excess sludge lifter white<br />
16 <strong>KLARO</strong> <strong>GmbH</strong>