Using Coin3D with Microsoft Visual Studio for MECH 434/534 ...
Using Coin3D with Microsoft Visual Studio for MECH 434/534 ...
Using Coin3D with Microsoft Visual Studio for MECH 434/534 ...

You also want an ePaper? Increase the reach of your titles
YUMPU automatically turns print PDFs into web optimized ePapers that Google loves.
<strong>Using</strong> <strong>Coin3D</strong> <strong>with</strong> <strong>Microsoft</strong> <strong>Visual</strong> <strong>Studio</strong><br />
<strong>for</strong> <strong>MECH</strong> <strong>434</strong>/<strong>534</strong> Assignments<br />
During this course, you will be asked to complete 7 Homework assignments and 3 projects<br />
using <strong>Coin3D</strong>, 3D Graphics Developer Kit. Coin is an OpenGL based, retained mode 3D<br />
graphics rendering library. It is implemented in C++ and publicly available at<br />
http://www.coin3d.org/. In the rest of the document, we will provide you <strong>with</strong> step‐by‐step<br />
installation instructions <strong>for</strong> <strong>Microsoft</strong> <strong>Visual</strong> <strong>Studio</strong> 2008. Note that it is also possible to<br />
complete the assignments and projects <strong>with</strong> a different IDE (Integrated Development<br />
Environment) as long as your programs run correctly and adhere to standards. If you use a<br />
Mac or Linux machine, I would suggest you use the Qt Creator.<br />
Installing <strong>Microsoft</strong> <strong>Visual</strong> <strong>Studio</strong> 2008 on your computer<br />
If you have not already done so, install <strong>Microsoft</strong> <strong>Visual</strong> <strong>Studio</strong> 2008 (version 9) on your<br />
computers <strong>with</strong> the C++ option. To do this, you can drop by the CIT office, and they can<br />
install it <strong>for</strong> you. If you would like to install the IDE yourself please follow these steps:<br />
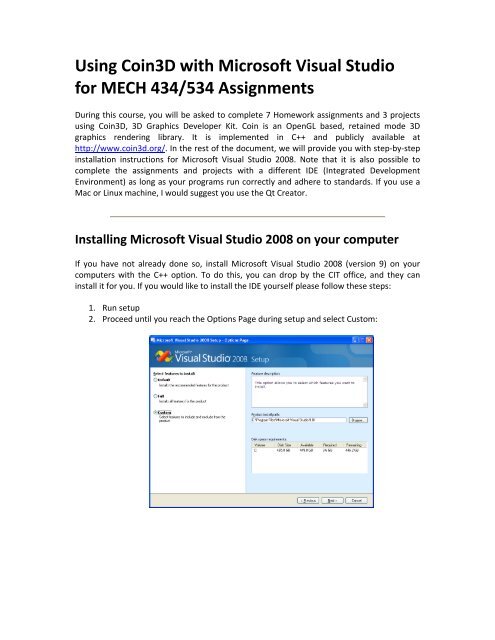
1. Run setup<br />
2. Proceed until you reach the Options Page during setup and select Custom:
3. Uncheck all options except C++ and press Install:<br />
4. You are done when you see the following screen:<br />
Installing <strong>Coin3D</strong> on your computer<br />
Having installed the <strong>Visual</strong> <strong>Studio</strong>, it is time to install <strong>Coin3D</strong>, the graphics library we will use<br />
<strong>for</strong> <strong>MECH</strong> <strong>434</strong>/<strong>534</strong>. The latest version is publicly available in the web so you can download<br />
and install it on your own machines.<br />
1. Go to http://www.coin3d.org/lib/downloads<br />
2. Select the option “I’m Developing Open Source Software”
3. On the next page, select “Continue to open source downloads (<strong>for</strong> free software<br />
developers)<br />
4. Select the latest Coin release and the latest SoWin release from the list (You will need<br />
SoWin in order to write Windows API programs).<br />
a. Download <strong>Visual</strong> C++ 9.0 binaries <strong>for</strong> the latest Coin release <strong>for</strong> Windows.<br />
b. Download one of the source code archives <strong>for</strong> the latest SoWin release.<br />
5. Install Coin library<br />
a. Extract the archive file that contains the Coin release to a local directory you choose<br />
<strong>for</strong> your Coin installation. The path to the directory should not contain spaces.<br />
Something like C:\<strong>Coin3D</strong> will work. In the end, the coin directory should contain 4<br />
subfolders: bin, include, lib, and share.<br />
b. Define an environment variable named COINDIR to point to the directory you<br />
created. You can do this from Control Panel | System | Advanced | Environment<br />
Variables | New.<br />
c. Also add the bin folder to your system path by editing the existing Path<br />
Variable:
d. These operations might require you to restart your computer <strong>for</strong> the changes to take<br />
effect, hence restart your computer.<br />
6. Compile and install SoWin<br />
a. Extract the archive file that contains the SoWin release.<br />
b. Open <strong>Microsoft</strong> <strong>Visual</strong> <strong>Studio</strong> Solution sowin1.sln residing <strong>with</strong>in the folder<br />
build\msvc9 by double clicking on it.<br />
c. If your configuration is correct, the solution will be opened in <strong>Visual</strong> <strong>Studio</strong>.<br />
d. If you are using a 64‐bit system, select x64 <strong>for</strong> the solution plat<strong>for</strong>m<br />
(OPTIONAL FOR x64 users).<br />
e. Select Build Build Solution from the menu or basically hit F7 to compile the<br />
code. When this operation is finished, in the output window (at the bottom<br />
portion of the IDE), you will see the following message:<br />
========== Build: 3 succeeded, 1 failed, 0 up-to-date, 0 skipped ==========<br />
Don’t worry about the error, it only indicates that the documentation could<br />
not be installed, which is not a major issue.
f. Do the same build operation also <strong>for</strong> the Release configuration by selecting<br />
DLL (Release) from the configuration pull‐down list.<br />
g. Check your Coin installation folder. It should now contain a new folder named<br />
data.
Testing your installation, setting up a project and compiling<br />
your first program<br />
1. Run <strong>Visual</strong> <strong>Studio</strong> and select File New Project from the menu.<br />
2. Select project properties in the dialog box by executing the following steps:<br />
a. Select Win32 as the project type and Win32 Console Application as the<br />
template.<br />
b. Give a name <strong>for</strong> your project.<br />
c. Choose the location on your computer where the project files will be saved<br />
to.<br />
d. Uncheck Create directory <strong>for</strong> solution checkbox.<br />
e. Click OK.
f. You will see a confirmation screen. Click on Application Settings be<strong>for</strong>e<br />
hitting Next.<br />
g. Check Empty project and hit Finish.<br />
3. Download main.cpp and jackbox.iv to your computer and paste them to the newly<br />
created folder.<br />
4. Add main.cpp to your project either by<br />
a. dragging and dropping main.cpp to the Source Files folder in Solution Explorer<br />
b. right clicking Source Files, then selecting Add Existing Item…
5. Select configuration profile as Release<br />
6. If you are using a 64‐bit system, select x64 <strong>for</strong> the solution plat<strong>for</strong>m (OPTIONAL FOR<br />
x64 users):<br />
a. Open Configuration Manager by using the Solution Plat<strong>for</strong>ms drop down<br />
menu.<br />
b. Create a new plat<strong>for</strong>m by selecting Active solution configuration as Release<br />
and selecting in Active solution plat<strong>for</strong>m drop down menus.
c. Create a new plat<strong>for</strong>m by choosing x64 in New Plat<strong>for</strong>m and by selecting Copy<br />
setting from Win32. Click OK and close Configuration Manager.<br />
d. Finally, select x64 as the solution plat<strong>for</strong>m in the drop down list.<br />
7. Configure project properties<br />
a. Select Project Properties… from the menu<br />
b. In Configuration Properties | C++ | General, add $(COINDIR)/include to<br />
Additional Include Directories:
c. In Configuration Properties | C++ | Preprocessor, add COIN_DLL;SOWIN_ DLL<br />
to Preprocessor Definitions:<br />
d. In Configuration Properties | Linker| General, add $(COINDIR)/lib to<br />
Additional Library Directories:
e. In Configuration Properties | Linker| Input, set Additional Dependencies as<br />
coin3.lib sowin1.lib simage1.lib:<br />
f. Press OK.<br />
8. Compile your program by selecting Build Build Solution or simply by pressing F7.<br />
9. If everything is configured correctly, you will see the following message in the output<br />
window:<br />
========== Build: 1 succeeded, 0 failed, 0 up-to-date, 0 skipped ==========<br />
10. Run your program by selecting Debug Start Without Debugging or simply by<br />
pressing Ctrl + F5.<br />
11. If your installation is successful, a new SoWin window will be created:<br />
12. You can reuse the same project files in your other assignments by renaming the<br />
projects and replacing the source files.