Comfort Terminal - Knight Farm Machinery
Comfort Terminal - Knight Farm Machinery
Comfort Terminal - Knight Farm Machinery

You also want an ePaper? Increase the reach of your titles
YUMPU automatically turns print PDFs into web optimized ePapers that Google loves.
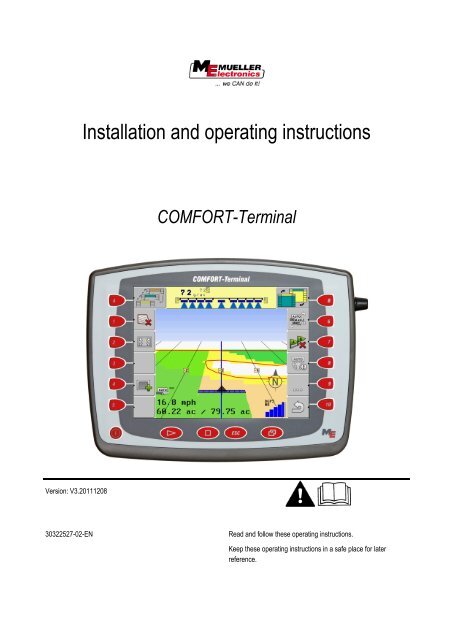
Installation and operating instructions<br />
COMFORT-<strong>Terminal</strong><br />
Version: V3.20111208<br />
30322527-02-EN<br />
Read and follow these operating instructions.<br />
Keep these operating instructions in a safe place for later<br />
reference.
Imprint<br />
Document<br />
Copyright ©<br />
Installation and operating instructions<br />
Product: COMFORT-<strong>Terminal</strong><br />
Document number: 30322527-02-EN<br />
From software version: 3.90<br />
Original language: German<br />
Müller-Elektronik GmbH & Co.KG<br />
Franz-Kleine-Straße 18<br />
33154 Salzkotten<br />
Germany<br />
Phone: ++49 (0) 5258 / 9834 - 0<br />
Fax: ++49 (0) 5258 / 9834 - 90<br />
Email: info@mueller-elektronik.de<br />
Homepage: http://www.mueller-elektronik.de
Contents<br />
Contents<br />
1 For your safety 7<br />
1.1 Basic safety instructions 7<br />
1.2 Layout and meaning of warnings 7<br />
1.3 User requirements 8<br />
1.4 Intended use 8<br />
1.5 EC declaration of conformity 8<br />
2 About these Operating Instructions 9<br />
2.1 Applicability 9<br />
2.2 Target group of these Operating Instructions 9<br />
2.3 Layout of operating instructions 9<br />
2.4 Layout of references 9<br />
3 Product description 10<br />
3.1 Performance description 10<br />
3.2 Scope of delivery 10<br />
3.3 System requirements 11<br />
3.4 Correctly interpreting information on the nameplate 11<br />
4 Mounting and installation 12<br />
4.1 Instructions on retrofitting 12<br />
4.2 Mounting the terminal in the tractor cab 13<br />
4.2.1 Screwing on the GSM antenna 13<br />
4.2.2 <strong>Terminal</strong> ports 14<br />
4.3 SIM card 14<br />
4.3.1 Inserting the SIM card 15<br />
4.4 GPS Receiver 16<br />
4.4.1 Connecting the GPS Receiver to the terminal 17<br />
4.4.2 Entering the position of the GPS Receiver 17<br />
For machines fitted with an ISO jobcomputer 18<br />
For machines not fitted with a jobcomputer 19<br />
5 Basic control principles 21<br />
5.1 Getting to grips with the controls 21<br />
5.2 Initial start-up 22<br />
5.3 Using the function keys 23<br />
5.4 Restarting the terminal 24<br />
5.5 Inputting data 25<br />
6 Opening applications in the selection menu 26<br />
6.1 Display layout in the selection menu 26<br />
6.2 Opening applications 27<br />
Copyright © Müller-Elektronik GmbH & Co.KG 3
Contents<br />
6.3 Segmentation of the display 27<br />
7 Configuring the terminal in the Service application 29<br />
7.1 Controls in the Service application 29<br />
7.2 Icons in the Service application 30<br />
7.3 Changing the language 30<br />
7.4 Adjusting the brightness for day or night mode 31<br />
7.5 Configuring the basic display settings 32<br />
7.6 Activating and deactivating applications 33<br />
7.7 Activating licenses for full versions of the software 34<br />
7.8 Deleting files from the USB flash drive 35<br />
7.9 Deleting pools 36<br />
7.10 GPS Receiver 37<br />
7.10.1 Activating the GPS Receiver 37<br />
7.10.2 Configuring the DGPS Receiver A100 38<br />
7.11 Configuring the "GPS TILT-Module" terrain compensation 40<br />
7.12 Screenshots 41<br />
7.12.1 Configuring the screenshots function 41<br />
7.12.2 Creating screenshots 41<br />
7.13 Activating the "Diagnostics" function 42<br />
7.13.1 Jobcomputer diagnostics 42<br />
Sending diagnostic data to the portal 43<br />
7.13.2 CAN-Trace settings 43<br />
7.14 Activating an external LightBar 44<br />
7.15 Camera 45<br />
7.15.1 Activating a camera 45<br />
7.15.2 Operating the camera 45<br />
7.16 Configuring <strong>Farm</strong>Pilot 46<br />
7.16.1 Activating <strong>Farm</strong>Pilot 47<br />
7.16.2 Configuring the connection with <strong>Farm</strong>Pilot 47<br />
7.16.3 Configuring the GPRS connection manually 48<br />
8 TaskManager application 51<br />
8.1 Basics 51<br />
8.1.1 About TaskManager 51<br />
8.1.2 USB flash drive 51<br />
8.1.3 Starting the TaskManager application 51<br />
8.1.4 Controls in the TaskManager application 52<br />
8.1.5 Setting up the operation mode for the TaskManager application 54<br />
8.1.6 Display layout in the TaskManager application 55<br />
Switching between screens 56<br />
Master data screen 56<br />
Task list screen 57<br />
Task data screen 58<br />
8.1.7 Exporting machine settings for the <strong>Farm</strong> Management Information System 59<br />
4 Copyright © Müller-Elektronik GmbH & Co.KG
Contents<br />
8.2 Step 1: Transferring data from the <strong>Farm</strong> Management Information System to the terminal 61<br />
8.2.1 Transferring data using a USB flash drive 61<br />
Creating a "Task data" folder on the USB flash drive 62<br />
8.2.2 Transferring data via the <strong>Farm</strong>Pilot portal 62<br />
8.3 Step 2: Selecting a task to process 63<br />
8.3.1 Creating a new task on the terminal 63<br />
Creating a new task 63<br />
Copying a task 65<br />
8.3.2 Adopting an existing task 66<br />
Resuming a task 67<br />
Splitting an order that has already been started 68<br />
8.4 Step 3: Entering and saving task data 71<br />
8.4.1 Entering task data 71<br />
Selecting a customer 72<br />
Selecting a farm (business) 72<br />
Selecting a field 72<br />
Selecting a person in charge 72<br />
Selecting rate and mix 72<br />
Measure 73<br />
8.4.2 Saving task data 74<br />
8.5 Step 4: Starting a task 75<br />
8.5.1 Selecting the machine 76<br />
8.5.2 Selecting a worker 79<br />
8.6 Step 5: Using the TaskManager application during work 81<br />
8.6.1 Entering a change of shift 81<br />
8.6.2 Altering rates 81<br />
8.6.3 Selecting the task processing phase 81<br />
8.6.4 Evaluating counters 82<br />
8.6.5 Displaying the counters of a machine 83<br />
8.6.6 Documenting filling and emptying 83<br />
8.6.7 Exiting the TaskManager application 85<br />
8.7 Step 6: Stopping work 85<br />
8.7.1 Stopping a task 85<br />
8.7.2 Pausing a task 85<br />
8.8 Step 7: Transferring completed tasks to the <strong>Farm</strong> Management Information System 87<br />
8.8.1 Transferring tasks using a USB flash drive 87<br />
8.8.2 Uploading a set of tasks to the <strong>Farm</strong>Pilot portal 88<br />
8.9 Important files stored on the USB flash drive 88<br />
9 Maintenance and servicing 90<br />
9.1 Servicing and cleaning the terminal 90<br />
9.2 Disposing of the unit 90<br />
9.3 Checking the software version 90<br />
9.4 Technical specifications 90<br />
9.4.1 Technical specifications of the terminal 90<br />
9.4.2 Pin assignment of port A 91<br />
9.4.3 Pin assignment of port B 92<br />
Copyright © Müller-Elektronik GmbH & Co.KG 5
Contents<br />
9.4.4 Pin assignment of port C 93<br />
9.4.5 Pin assignment of camera ports 1 and 2 94<br />
10 Notes 95<br />
6 Copyright © Müller-Elektronik GmbH & Co.KG
For your safety<br />
Basic safety instructions 1<br />
1<br />
1.1<br />
1.2<br />
For your safety<br />
Basic safety instructions<br />
Please read the following safety instructions carefully before operating the product for the first time.<br />
▪ Before maintenance or repair to the tractor, always disconnect the connection between the<br />
tractor and the terminal.<br />
▪ Before charging the tractor battery, always disconnect the connection between the tractor and<br />
the terminal.<br />
▪ Before welding to the tractor or an attached device, always disconnect the power supply to the<br />
terminal.<br />
▪ Do not make any unauthorized modifications to the product. Unauthorized modifications or use<br />
may impair safety and reduce the service life or operability of the unit. Modifications are<br />
considered unauthorized if they are not described in the product documentation.<br />
▪ Follow all recognised safety, industrial and medical rules as well as all road traffic laws.<br />
Layout and meaning of warnings<br />
All safety instructions found in these Operating Instructions are composed in accordance with the<br />
following pattern:<br />
WARNING<br />
This signal word identifies medium-risk hazards, which could potentially cause death or serious<br />
bodily injury, if not avoided.<br />
CAUTION<br />
This signal word identifies low-risk hazards, which could potentially cause minor or moderate bodily<br />
injury or damage to property, if not avoided.<br />
NOTICE<br />
This signal word identifies actions which could lead to operational malfunctions if performed<br />
incorrectly.<br />
These actions require that you operate in a precise and cautious manner in order to produce<br />
optimum work results.<br />
There are some actions that need to be performed in several steps. If there is a risk involved in<br />
carrying out any of these steps, a safety warning will appear in the instructions themselves.<br />
Safety instructions always directly precede the step involving risk and can be identified by their bold<br />
font type and a signal word.<br />
Example<br />
1. NOTICE! This is a notice. It warns that there is a risk involved in the next step.<br />
2. Step involving risk.<br />
Copyright © Müller-Elektronik GmbH & Co.KG 7
1<br />
For your safety<br />
User requirements<br />
1.3<br />
1.4<br />
User requirements<br />
▪ Learn how to operate the terminal correctly. The terminal must not be operated by anyone who<br />
has not read the Operating Instructions.<br />
▪ Please read and carefully observe all safety instructions and warnings contained in these<br />
Operating Instructions and in the manuals of any connected machines and farm equipment.<br />
Intended use<br />
The terminal is intended exclusively for use in agriculture as well as in wine-growing, fruit-cultivating,<br />
and hop-growing operations. The manufacturer cannot be held responsible for any installation or use<br />
of the terminal that deviates from or exceeds the scope of intended use.<br />
The manufacturer cannot be held liable for any personal injury or property damage resulting from<br />
such improper use. All risks involved in engaging in improper usage, lie solely with the user.<br />
Intended use also includes the adherence to the conditions for operation and repairs prescribed by<br />
the manufacturer.<br />
The manufacturer cannot be held liable for any personal injury or property damage resulting from<br />
such non-observance. All risk involved during improper use lies with the user.<br />
All applicable accident prevention regulations and all other generally recognized safety, industrial,<br />
and medical rules as well as all road traffic laws must be observed. Any unauthorized modifications<br />
made to the unit will void the manufacturer's warranty.<br />
1.5<br />
EC declaration of conformity<br />
This product has been manufactured in conformity with the following national and harmonised<br />
standards as specified in the current EMC Directive 2004/108/EC:<br />
▪ EN ISO 14982<br />
8 Copyright © Müller-Elektronik GmbH & Co.KG
About these Operating Instructions<br />
Applicability 2<br />
2<br />
2.1<br />
2.2<br />
2.3<br />
About these Operating Instructions<br />
Applicability<br />
These Operating Instructions apply to the following terminals:<br />
▪ <strong>Terminal</strong>s from hardware version 3.0.0<br />
▪ Software from version 3.90 of the "Service“ application<br />
Target group of these Operating Instructions<br />
These Operating Instructions are intended for personnel entrusted with installing and operating the<br />
terminal.<br />
Layout of operating instructions<br />
The operating instructions explain step by step how you can perform certain operations with the<br />
product.<br />
We use the following symbols throughout these Operating Instructions to identify different operating<br />
instructions:<br />
Type of depiction<br />
1.<br />
Meaning<br />
Actions that must be performed in succession.<br />
2.<br />
⇨<br />
Result of the action.<br />
This will happen when you perform an action.<br />
⇨<br />
Result of an operating instruction.<br />
This will happen when you have completed all<br />
steps.<br />
Requirements.<br />
In the event that any requirements have been<br />
specified, these must be met before an action<br />
can be performed.<br />
2.4<br />
Layout of references<br />
If any references are given in these Operating Instructions, they will appear thus:<br />
Example of a reference: [➙ 9]<br />
References can be identified by their square brackets and an arrow. The number following the arrow<br />
shows you on what page the chapter starts where you can find further information.<br />
Copyright © Müller-Elektronik GmbH & Co.KG 9
3<br />
Product description<br />
Performance description<br />
3<br />
3.1<br />
Hardware<br />
Product description<br />
Performance description<br />
The terminal is available in two hardware versions:<br />
▪ With GSM modem and with camera connections<br />
– Complete functionality:<br />
– It is the prerequisite for work with the <strong>Farm</strong>Pilot portal;<br />
– On the rear side you can find two camera connections and one connection for the GSM<br />
antenna.<br />
▪ Without GSM modem and without camera connections<br />
You can find out the terminal version you have on the connections on the terminal rear side. [➙ 14]<br />
Software<br />
All applications of Müller-Elektronik available are installed on the terminal. But first you must activate<br />
some of them.<br />
See also: Activating licenses for full versions of the software [➙ 34]<br />
The following applications are activated:<br />
▪ SERVICE – this application configures the terminal.<br />
▪ TaskManager – this is the certified ISOBUS Taskcontroller from Müller-Elektronik. In this<br />
application you can use the terminal for processing all tasks previously planned on the PC.<br />
▪ ISO11783 VT – Interface for controlling the ISOBUS job computers. The terminal is compliant<br />
with ISOBUS standard ISO 11783. This terminal can be used as the control unit independently of<br />
the manufacturer as an independent terminal on all machines that meet the requirements of this<br />
ISOBUS standard.<br />
You can test the following application for 50 hours free of charge:<br />
▪ TRACK-Leader – a modern system enabling the driver of an agricultural vehicle keep exact<br />
parallel lanes on the field.<br />
▪ SECTION-Control – automatic boom section switching. Additional module for TRACK-Leader.<br />
▪ HEADLAND-Control – with this application you can also drive in parallel around the field in<br />
headland. Additional module for TRACK-Leader.<br />
▪ VARIABLE RATE-Cont. – with this application you can work with prescription maps saved as<br />
shp files. Additional module for TRACK-Leader.<br />
▪ TRACK-Leader TOP – automatic steering. Additional module for TRACK-Leader.<br />
▪ FIELD-Nav – this is the first navigation software that contains all navigable paths, takes<br />
movement restrictions into account and leads directly to the field or other agricultural destination.<br />
3.2<br />
Scope of delivery<br />
The following items are included in delivery:<br />
▪ <strong>Terminal</strong><br />
▪ Installation and Operating Instructions<br />
▪ Bracket for mounting the terminal<br />
▪ USB flash drive<br />
10 Copyright © Müller-Elektronik GmbH & Co.KG
Product description<br />
System requirements 3<br />
3.3<br />
System requirements<br />
The following requirements must be met for the tractor to be used in conjunction with the terminal:<br />
▪ The tractor must be ISOBUS-capable.<br />
If your tractor is not ISOBUS-capable, you can upgrade it. Our staff will be glad to advise you on<br />
selecting compatible components.<br />
Requirements for the <strong>Farm</strong> Management Information System:<br />
In order to use the data from the "TaskManager" application with the <strong>Farm</strong> Management Information<br />
System:<br />
▪ The <strong>Farm</strong> Management Information System must be ISO XML-capable.<br />
System requirements for using the <strong>Farm</strong>Pilot portal:<br />
To use the <strong>Farm</strong>Pilot portal, you will require a terminal with a built-in GSM modem.<br />
The following terminals are currently equipped with a modem:<br />
▪ BASIC-<strong>Terminal</strong> GSM item no.: 30322512<br />
▪ BASIC-<strong>Terminal</strong> TOP GSM item no.: 30322522<br />
▪ COMFORT-<strong>Terminal</strong> GSM item no.: 30322527<br />
If you bought a terminal without a GSM modem, you can retrofit it with a GSM modem later. Please<br />
call our Customer Services department.<br />
3.4<br />
Correctly interpreting information on the nameplate<br />
On the reverse of the terminal you will find a nameplate sticker. On this sticker you can find all the<br />
information you need to definitively identify the product.<br />
Have these details ready when you contact Customer Services.<br />
Nameplate on the reverse of the terminal<br />
Customer number<br />
If the product was manufactured for an<br />
agricultural machinery manufacturer, the<br />
agricultural machinery manufacturer's item<br />
number will be shown here.<br />
Hardware version<br />
Müller-Elektronik item number<br />
Operating voltage<br />
The product may only be connected to<br />
voltages within this range.<br />
Software version<br />
If you update the software, this version will no<br />
longer be up-to-date.<br />
Serial number<br />
Copyright © Müller-Elektronik GmbH & Co.KG 11
4<br />
Mounting and installation<br />
Instructions on retrofitting<br />
4<br />
Mounting and installation<br />
Mount the terminal and all additional components in the following order:<br />
1. Mount the terminal in the tractor cab.<br />
2. Connect the terminal to the basic equipment.<br />
3. Connect the terminal to other components.<br />
Refer to the following chapters to learn how to perform these steps.<br />
4.1<br />
Instructions on retrofitting<br />
Instructions on how to retrofit electrical and electronic farm equipment and/or<br />
components<br />
Agricultural equipment used today features electronic components and parts whose function can be<br />
affected by other farm equipment which emits electromagnetic waves. Such effects could lead to<br />
personnel being put in danger, if the following safety instructions are not adhered to.<br />
Selecting components<br />
User responsibility<br />
Additional requirements<br />
When selecting components, make sure first of all, that the retrofitted electrical and electronic<br />
components comply with the current version of the EMC Directive 2004/108/EC and carry the CE<br />
marking.<br />
When retrofitting a machine with electrical and electronic farm equipment and/or components<br />
connected to the vehicle's electrical system, it is your own responsibility to check whether the<br />
installation causes interference with the vehicle's electronic system or other components. This<br />
applies, in particular, to the electronic control of:<br />
▪ EHR,<br />
▪ front linkage,<br />
▪ take-off shafts,<br />
▪ engine,<br />
▪ gear.<br />
The following requirements must be met in order to retrofit mobile communication systems (e.g. radio,<br />
phone):<br />
▪ All farm equipment must be approved and installed in accordance with the regulations applicable<br />
in the respective country (e.g. in Germany, the Federal Approvals Office for Telecommunications<br />
(BZT)).<br />
▪ The equipment must be installed as a fixed installation.<br />
▪ The operation of portable or mobile farm equipment in the interior of the vehicle is only permitted<br />
via a connection to a permanently installed exterior antenna.<br />
▪ The transmitting part must be spatially separated from the vehicle's electronic system.<br />
▪ When attaching the antenna, pay attention to proper installation, including a sound ground<br />
connection between the antenna and the vehicle's ground wire.<br />
For information on wiring and installation as well as the maximum allowable current consumption,<br />
please also refer to the installation guide provided by the machine manufacturer.<br />
12 Copyright © Müller-Elektronik GmbH & Co.KG
Mounting and installation<br />
Mounting the terminal in the tractor cab 4<br />
4.2<br />
Mounting the terminal in the tractor cab<br />
NOTICE<br />
Electromagnetic interference<br />
The operation of the terminal may be impaired by electromagnetic waves emitted by other farm<br />
equipment.<br />
◦ Mount the terminal at least 1 m away from the radio antenna or from a radio device.<br />
Procedure<br />
1. Screw the bracket to the terminal.<br />
2. Mount the terminal with the bracket installed inside the tractor cab.<br />
For instance, you can use the ME base console for this purpose.<br />
The base console is not included in the terminal delivery. It belongs to the delivery scope of<br />
ISOBUS basic equipment.<br />
Base console<br />
4.2.1<br />
Procedure<br />
Screwing on the GSM antenna<br />
The GSM antenna transmits information to the <strong>Farm</strong>Pilot portal via a mobile phone network.<br />
1. NOTICE! There is a very sensitive contact pin in the center of the GSM antenna. Make<br />
sure not to damage the contact pin when screwing on the GSM antenna.<br />
2. Screw the GSM antenna on the rear side of the terminal.<br />
Copyright © Müller-Elektronik GmbH & Co.KG 13
4<br />
Mounting and installation<br />
SIM card<br />
4.2.2<br />
<strong>Terminal</strong> ports<br />
Rear of the terminal. Version with a GSM modem and camera connections<br />
GSM antenna port<br />
Only for terminals with a GSM modem<br />
installed.<br />
Not currently in use<br />
Port for analog camera<br />
Only for terminals with a GSM modem<br />
installed.<br />
Item no. 30322527<br />
Port for analog camera<br />
Only for terminals with a GSM modem<br />
installed.<br />
USB port<br />
USB 1.1<br />
Covering cap for USB port<br />
Prevents dust from entering the USB socket.<br />
SIM card slot<br />
Port B<br />
CAN bus port<br />
For connection of a working position sensor<br />
for<br />
TRACK-Leader II.<br />
Port A<br />
CAN bus port<br />
To connect the ISOBUS basic equipment.<br />
Port C<br />
Serial port RS232<br />
4.3<br />
SIM card<br />
The terminal must be equipped with a SIM card so that you can use the <strong>Farm</strong>Pilot portal. If you do<br />
not intend to use the <strong>Farm</strong>Pilot portal, you will not need any SIM card.<br />
Which SIM card<br />
You must purchase the SIM card from your mobile phone provider.<br />
Select a mobile phone provider that can guarantee good mobile phone reception on your fields. A<br />
good connection is required in order for your work with the <strong>Farm</strong>Pilot portal to run smoothly.<br />
The SIM card must meet the following requirements:<br />
▪ It must be GPRS-capable.<br />
▪ It must be PIN-free. Inform your mobile phone provider about this requirement before purchasing<br />
the SIM card.<br />
▪ The contract must enable data transfer.<br />
14 Copyright © Müller-Elektronik GmbH & Co.KG
Mounting and installation<br />
SIM card 4<br />
4.3.1<br />
Procedure<br />
Inserting the SIM card<br />
Required tool<br />
▪ Torx TX10 screwdriver<br />
1. Switch off the terminal and disconnect all cable connections to other equipment.<br />
2. Unscrew the SIM card cover on the reverse of the terminal. Use a Torx TX10 screwdriver.<br />
3. Press latch release with finger nail.<br />
⇨ Card holder will be unlatched:<br />
4. Raise the card holder. The card holder can be raised on the right hand side where the casing is<br />
rounded. The card holder is held in place by hinges on the other side.<br />
Copyright © Müller-Elektronik GmbH & Co.KG 15
4<br />
Mounting and installation<br />
GPS Receiver<br />
5. Slide the SIM card into the card holder. Following installation, the chip on the card must be in<br />
contact with the circuit board. The card must be positioned as shown in the picture.<br />
6. Shut the card holder.<br />
7. Press the card holder lightly onto the circuit board, until it clicks into place on the right hand side.<br />
8. CAUTION! Tighten the screws, but not too tight, otherwise the cover might be damaged.<br />
9. Screw the cover back on. Make sure that the rubber seal is positioned between the cover and<br />
the casing.<br />
4.4<br />
GPS Receiver<br />
The GPS Receiver gathers and transmits information about the position of the machine to the<br />
connected terminal.<br />
Technical requirements for using the DGPS Receiver<br />
Operating voltage:<br />
Current consumption<br />
Supply voltage of the terminal – 1.5 V<br />
Maximum of 200 mA (at 70 °C) without any additional load from<br />
other appliances (the current consumption of the multifunctional<br />
grip and LightBar have already been taken into account in this<br />
specification.)<br />
GPS standard NMEA 0183<br />
Refresh rates and signals<br />
5 Hz (GPGGA, GPVTG)<br />
1 Hz (GPGSA, GPZDA)<br />
Transmission rate<br />
19200 baud<br />
16 Copyright © Müller-Elektronik GmbH & Co.KG
Mounting and installation<br />
GPS Receiver 4<br />
Data bits 8<br />
Parity<br />
no<br />
Stop bits 1<br />
Flow control<br />
none<br />
4.4.1<br />
Connecting the GPS Receiver to the terminal<br />
CAUTION<br />
Damage to the equipment caused by short circuit<br />
Pin 4 of port C is live. The voltage depends on the operating voltage of the terminal and is used to<br />
supply the DGPS Receiver A100 from Müller Elektronik.<br />
Other GPS Receivers may suffer damage if connected to this port.<br />
Before connecting a different GPS Receiver:<br />
◦ Check what voltage the terminal is connected to (12 V or 24 V).<br />
◦ Check the pin assignment of the GPS Receiver.<br />
◦ Check the allowable voltage for the GPS Receiver.<br />
◦ Compare the terminal voltage to the allowable voltage for the GPS Receiver.<br />
◦ Compare the pin assignment.<br />
◦ Only connect the GPS Receiver to the terminal, if the voltage range and pin assignment of both<br />
devices don't differ from each other.<br />
The DGPS Receiver A100 has a status LED, which shows the quality of the connection:<br />
▪ red: The DGPS Receiver is connected to the terminal, but has no GPS reception<br />
▪ orange: GPS reception is working<br />
▪ green: DGPS reception is working<br />
During initial start-up it can take approx. 30 minutes until the GPS Receiver has reception. At<br />
subsequent start-ups it will only take approx. 1-2 minutes.<br />
Procedure<br />
The GPS Receiver is mounted on the roof of the tractor.<br />
1. - Switch off the terminal.<br />
2. Guide the connection cable from the GPS Receiver into the cab.<br />
3. CAUTION! Ensure that the cable is not laid across sharp edges or at risk of becoming<br />
bent. Lay the cable in a place where nobody can trip over it.<br />
4. Connect the connecting cable of the GPS Receiver to port C on the terminal.<br />
4.4.2<br />
Entering the position of the GPS Receiver<br />
When you have mounted and connected the GPS Receiver, you must enter its exact position.<br />
The position of the GPS Receiver is also referred to as the "GPS Receiver offset".<br />
Copyright © Müller-Elektronik GmbH & Co.KG 17
4<br />
Mounting and installation<br />
GPS Receiver<br />
In order to enter an accurate position for the GPS Receiver, you must measure the distances of the<br />
GPS Receiver from the longitudinal axis and from the so-called attachment point [➙ 19].<br />
When entering distances, please note that it is essential to specify whether the GPS Receiver is to<br />
the left or right of the tractor's longitudinal axis and whether it is positioned before or after the<br />
attachment point.<br />
What is the position of the GPS Receiver<br />
to the right of the longitudinal axis<br />
to the left of the longitudinal axis<br />
before the attachment point<br />
after the attachment point<br />
The distance should be entered as follows<br />
y<br />
- y<br />
x<br />
- x<br />
Procedure<br />
1. Switch to the "Settings" screen:<br />
| TaskManager |<br />
⇨ The following screen will appear:<br />
2. Measuring the position of the GPS Receiver. You will find out how to do this in the following<br />
subchapters.<br />
3. Enter the distances measured in the fields "Offset X" and "Offset Y".<br />
For machines fitted with an ISO jobcomputer<br />
On the following illustration distances are marked, which must be measured for each different<br />
machine.<br />
18 Copyright © Müller-Elektronik GmbH & Co.KG
Mounting and installation<br />
GPS Receiver 4<br />
GPS Receiver offset with ISOBUS machines<br />
Attachment point for attached and trailer<br />
equipment<br />
GPS Receiver<br />
Attached and trailer equipment<br />
Self-propelled machines<br />
y<br />
Distance between the longitudinal axis and the<br />
GPS Receiver<br />
for Offset Y<br />
x<br />
Distance for Offset X<br />
Procedure<br />
Thus you can calculate the distances for machines with attached and trailer equipment with an<br />
ISOBUS jobcomputer:<br />
The jobcomputer of the farm equipment in use is connected to the terminal<br />
In the jobcomputer the geometry of the farm equipment is configured.<br />
1. Measure the distance between the attachment point of the attached and trailer equipment and<br />
the GPS Receiver.<br />
2. Enter the distance measured as parameter "Offset X".<br />
3. Measure the distance between the longitudinal axis of the machine and the GPS Receiver.<br />
4. Enter the distance measured as parameter "Offset Y".<br />
Procedure<br />
Thus you can calculate the distances for self-propelled machines with an ISOBUS jobcomputer:<br />
The jobcomputer of the farm equipment in use is connected to the terminal<br />
In the jobcomputer the geometry of the farm equipment is configured.<br />
1. Enter 0 cm as parameter "Offset X".<br />
2. Measure the distance between the longitudinal axis of the machine and the GPS Receiver.<br />
3. Enter the distance measured as parameter "Offset Y".<br />
For machines not fitted with a jobcomputer<br />
When you connect an agricultural device without an ISOBUS job computer to the tractor, you need to<br />
enter the position of the GPS receiver in the TRACK-Leader application. To do so, you have to create<br />
a machine profile.<br />
Copyright © Müller-Elektronik GmbH & Co.KG 19
4<br />
Mounting and installation<br />
GPS Receiver<br />
You can read how to do this in the operating instructions to TRACK-Leader.<br />
All data on the "GPS Receiver offset" screen will be ignored.<br />
20 Copyright © Müller-Elektronik GmbH & Co.KG
Basic control principles<br />
Getting to grips with the controls 5<br />
5<br />
5.1<br />
Basic control principles<br />
Getting to grips with the controls<br />
<strong>Terminal</strong> controls<br />
Rotary knob<br />
Keys<br />
Function keys<br />
Controls<br />
Rotary knob<br />
The rotary knob is located in the top right hand corner of the terminal.<br />
Control with the rotary knob may vary slightly between the different applications.<br />
You can use the rotary knob to perform the following actions:<br />
Turning the rotary knob:<br />
▪ Move the cursor up and down.<br />
▪ Change a parameter value.<br />
Pressing the rotary knob:<br />
▪ Click on the selected line.<br />
▪ Activate parameter.<br />
▪ Confirm input.<br />
Function keys<br />
Operating the function keys is the same across all applications.<br />
Performing the functions depicted on the display<br />
Keys<br />
Switch the terminal on and off<br />
Has no function<br />
Copyright © Müller-Elektronik GmbH & Co.KG 21
5<br />
Basic control principles<br />
Initial start-up<br />
Has no function<br />
Exit screen<br />
Cancel input<br />
Hide warning messages and alerts<br />
Open the "Selection menu" application<br />
Exit the "Selection menu" application<br />
5.2<br />
Procedure<br />
Initial start-up<br />
This is how you start the terminal for the first time:<br />
You have mounted and connected the terminal.<br />
1. - Switch on the terminal.<br />
2. Wait for approx. 15 seconds until all applications have been loaded.<br />
3. - Open the "Selection menu" application.<br />
⇨ The following screen will appear:<br />
⇨ You are now in the selection menu.<br />
⇨ When the terminal is connected to an ISOBUS job computer, they will be now loaded. The<br />
progress of this process is indicated by the progress bar next to the job computer icon. The<br />
time taken to complete this process depends on the number of connected job computers.<br />
4. Wait until all job computers have been loaded.<br />
22 Copyright © Müller-Elektronik GmbH & Co.KG
Basic control principles<br />
Using the function keys 5<br />
⇨ The following screen will appear:<br />
The job computers are loaded when no more progress bars are displayed.<br />
5. In the selection menu you can select which application you wish to display next.<br />
6. - Select the "Service" line. The "Service" line must be framed by a black square:<br />
7. - Click on the "Service" line.<br />
⇨ The following screen will appear:<br />
⇨ You have opened the "Service" application.<br />
8. Configuring the terminal in the Service application [➙ 29]<br />
5.3<br />
Using the function keys<br />
Whenever you use the function keys, you will activate the function depicted on the adjacent function<br />
icon.<br />
Copyright © Müller-Elektronik GmbH & Co.KG 23
5<br />
Basic control principles<br />
Restarting the terminal<br />
CAUTION<br />
Danger of pressing the function keys without care<br />
When pressing function keys, components of the connected machine can be moved or activated.<br />
As a result, people can be injured and property damaged.<br />
Before pressing a function key:<br />
◦ Make sure you know what will happen when you press the function key.<br />
◦ Consult the Operating Instructions of the connected machine or of the agricultural equipment to<br />
establish what dangers could arise from pressing that key.<br />
◦ Fulfill all the measures described in the machine's Operating Instructions in order to avoid<br />
danger.<br />
◦ Only press the function key when you are sure that no danger is posed to people or property.<br />
When you press a function key, the function / operation depicted on the function icon will be<br />
performed.<br />
Using the function keys<br />
Function icon<br />
Depiction of an available function.<br />
Function key<br />
Performs the function depicted on the function<br />
icon.<br />
Example<br />
When you press the function key , the function depicted on the function icon will be<br />
activated.<br />
If not function icon appears next to a function key, this means that this function key has no function at<br />
present.<br />
5.4<br />
Procedure<br />
Restarting the terminal<br />
When restarting the terminal, you must give the connected jobcomputers enough time to restart as<br />
well. For this reason, always wait approx. 30 seconds after switching off the terminal before switching<br />
the terminal back on.<br />
1. - Switch off the terminal.<br />
2. Wait 30 seconds until the jobcomputers have also been switched off.<br />
3. - Switch on the terminal.<br />
24 Copyright © Müller-Elektronik GmbH & Co.KG
Basic control principles<br />
Inputting data 5<br />
5.5<br />
Inputting data<br />
All data must be entered on the data input screen.<br />
Data input screen<br />
Controls<br />
Below the characters, you will find 5 icons which will assist you when entering the data.<br />
Delete characters<br />
Move cursor to the left<br />
Move cursor to the right<br />
Confirm and finish input.<br />
No function<br />
Procedure<br />
This is how you enter the data:<br />
The data input screen has been opened:<br />
1. - Select the desired character.<br />
2. - Click on the selected character.<br />
3. When all characters have been entered, select the "OK" symbol with the rotary button and click.<br />
⇨ The input will be applied.<br />
Copyright © Müller-Elektronik GmbH & Co.KG 25
6<br />
Opening applications in the selection menu<br />
Display layout in the selection menu<br />
6<br />
Opening applications in the selection menu<br />
In the selection menu you can choose which application you wish to view on the display.<br />
You can open the selection menu at any time. This will not close the application currently running.<br />
Controls<br />
Open the selection menu<br />
Press again – open the most recently activated application<br />
Display the application in the header of the split display.<br />
Display the application in the main section of the display.<br />
6.1<br />
Display layout in the selection menu<br />
The display is split into the following sections:<br />
▪ Function icons – left and right<br />
▪ Applications section – in the middle, between the function icons.<br />
Sections in the selection menu<br />
Name of an application<br />
Function icons on the left<br />
Select an application which will later be<br />
displayed in the header.<br />
Selection<br />
The selected application is displayed in the<br />
header<br />
ISO ID of the application<br />
ISO name of the application<br />
Selection<br />
The selected application is displayed on the<br />
main display.<br />
Function icons on the right<br />
Open an application on the main display.<br />
Cursor<br />
Open the selected application using the rotary<br />
knob.<br />
26 Copyright © Müller-Elektronik GmbH & Co.KG
Opening applications in the selection menu<br />
Opening applications 6<br />
6.2<br />
Opening applications<br />
You can perform the following actions in the selection menu:<br />
▪ Open an application.<br />
▪ Display an application in the header of the split display.<br />
Procedure<br />
1. - Set which application is to be displayed in the header of the split display.<br />
⇨ The function icon of the selected application is marked with a dot on the left hand side:<br />
2. Start the application for the main display. There are several ways to do so:<br />
a) With the rotary knob:<br />
- Select the desired application<br />
- Open the selected application<br />
b) Using the function keys on the right hand side:<br />
- Display the application shown next to the function icon.<br />
⇨ Both applications will appear on the display.<br />
6.3<br />
Segmentation of the display<br />
The display of the terminal is split into two sections.<br />
A different application is displayed in each section. This allows you, for example, to control the tractor<br />
on the field and monitor the field sprayer at the same time. This means that you will not need an<br />
additional terminal.<br />
Segmentation of the display<br />
Header – informative section.<br />
The header allows you to display information<br />
from an application.<br />
Main screen – section used for control.<br />
The main display shows the application<br />
currently running, function icons and the<br />
information you need to control the application<br />
that is currently running.<br />
Copyright © Müller-Elektronik GmbH & Co.KG 27
6<br />
Opening applications in the selection menu<br />
Segmentation of the display<br />
In the selection menu you can see which applications can be run with the split display.<br />
Controls<br />
Function icon<br />
Function<br />
Switch applications in the header section.<br />
Swap applications between the header section and the main section of the<br />
display.<br />
28 Copyright © Müller-Elektronik GmbH & Co.KG
Configuring the terminal in the Service application<br />
Controls in the Service application 7<br />
7<br />
Configuring the terminal in the Service application<br />
In the "Service" application you can configure the terminal and activate the connected farm<br />
equipment.<br />
Once you have launched the "Service" application, you will be shown the following screen:<br />
Start screen of the "Service" application<br />
Main section<br />
Screen contents<br />
Version number<br />
Name of the terminal and version of the<br />
installed software<br />
Cursor<br />
Selects a line that can be clicked on with the<br />
rotary knob.<br />
Function icons section<br />
Icons that can be pressed on this screen.<br />
7.1<br />
Controls in the Service application<br />
The "Service" application is controlled using the rotary knob and the function keys.<br />
Controls<br />
Some of the function icons explained here will only appear if a specific function is activated. This<br />
limits the information shown on the display to just the information that you need for your work.<br />
Function icon Meaning Appears only if...<br />
Scroll<br />
There is one more page with<br />
function icons.<br />
Back<br />
Activate day mode<br />
Activate night mode<br />
File cannot be deleted (grey)<br />
Selected object cannot be<br />
deleted<br />
Copyright © Müller-Elektronik GmbH & Co.KG 29
7<br />
Configuring the terminal in the Service application<br />
Icons in the Service application<br />
Function icon Meaning Appears only if...<br />
Delete file (red)<br />
Selected object can be deleted<br />
Configure GPS Receiver<br />
GPS Receiver is activated<br />
Configure <strong>Farm</strong>Pilot<br />
<strong>Farm</strong>Pilot portal is activated<br />
Open the Diagnostics screen<br />
Diagnostics is activated<br />
Retrieve default values.<br />
Display DGPS connection status<br />
7.2<br />
Icons<br />
Icons in the Service application<br />
You will find the following icons in the Service application.<br />
Function is activated<br />
Function is deactivated<br />
7.3<br />
Changing the language<br />
When you switch on the terminal for the first time, the text may appear in a foreign language (in<br />
German).<br />
In this chapter you will learn how to change the language of the terminal.<br />
Procedure<br />
1. - Switch on the terminal.<br />
2. - Press.<br />
30 Copyright © Müller-Elektronik GmbH & Co.KG
Configuring the terminal in the Service application<br />
Adjusting the brightness for day or night mode 7<br />
⇨ The following screen will appear:<br />
3. - Click on "Service".<br />
⇨ The following screen will appear:<br />
The texts on this screen may appear in a foreign language.<br />
4. - Click on "<strong>Terminal</strong> Einstellungen“ ("Display settings").<br />
5. - Click on "Sprache" ("Language").<br />
6. - Select the abbreviation of your language.<br />
7. - Press.<br />
⇨ The following message will appear: “Changes will be adopted after restart!“<br />
8. - Press.<br />
⇨ The language in the "Service" application will be changed. Language will be changed in<br />
other application only after a terminal restart.<br />
9. - Restart terminal.<br />
⇨ The language in other applications will be changed.<br />
7.4<br />
Procedure<br />
Adjusting the brightness for day or night mode<br />
In this chapter you will learn how to adjust the brightness of the display for day or night mode.<br />
1. Open the "Service" application:<br />
| Service<br />
Copyright © Müller-Elektronik GmbH & Co.KG 31
7<br />
Configuring the terminal in the Service application<br />
Configuring the basic display settings<br />
⇨ The following screen will appear:<br />
2. Change the operating mode.<br />
Depending on which operating mode is currently active, you can use one of the function icons:<br />
– Activate day mode.<br />
– Activate night mode.<br />
⇨ The brightness of the display will be adjusted immediately.<br />
7.5<br />
Procedure<br />
Configuring the basic display settings<br />
The basic display settings can be adjusted on the "Display settings" screen.<br />
1. Switch to the "Display settings" screen:<br />
| Service | Display settings<br />
⇨ The following screen will appear:<br />
2. - Change the desired parameter.<br />
List of parameters<br />
Parameter Sub-parameter Meaning<br />
Brightness Day Adjusting brightness for day mode<br />
Night<br />
Night mode<br />
Adjusting brightness for night mode<br />
Switching night mode on and off<br />
0 = day mode is activated<br />
32 Copyright © Müller-Elektronik GmbH & Co.KG
Configuring the terminal in the Service application<br />
Activating and deactivating applications 7<br />
Parameter Sub-parameter Meaning<br />
1 = night mode is activated<br />
Volume<br />
Adjust volume<br />
Date / time Date Setting current date<br />
Time<br />
Time zone<br />
Setting current time<br />
0 = Time zone: Greenwich Mean Time (GMT)<br />
1 = GMT +1 hour (Germany)<br />
-1 = GMT -1 hour<br />
Language<br />
Selecting language<br />
Measurement units Metric Displays all units in metrical system<br />
Imperial<br />
US<br />
Displays all units in imperial system<br />
Displays all units in US system<br />
Keyboard brightness<br />
Setting the level of keyboard brightness in percent<br />
7.6<br />
Activating and deactivating applications<br />
In the "Service" application you can activate and deactivate other applications that are installed on<br />
the terminal.<br />
The applications are installed in packages, in so-called plugins. A plugin can contain several<br />
applications.<br />
You can for example deactivate a plugin if you do not want to use it. Then the plugin will not be<br />
displayed in the selection menu.<br />
Name of the plugin<br />
TaskManager<br />
TRACK-Leader<br />
Includes the following applications<br />
TaskManager<br />
TRACK-Leader II<br />
SECTION-Control<br />
TRACK-Leader TOP<br />
HEADLAND-Control<br />
VARIABLE RATE-Control<br />
FIELD-Nav<br />
FIELD-Nav<br />
Procedure<br />
This is how you activate and deactivate plugins:<br />
1. Switch to the "Plugin settings" screen:<br />
| Service | Plugin settings<br />
Copyright © Müller-Elektronik GmbH & Co.KG 33
7<br />
Configuring the terminal in the Service application<br />
Activating licenses for full versions of the software<br />
⇨ The following screen will appear:<br />
2. - Click on the desired plugin.<br />
⇨ The icon preceding the name of the plugin indicates whether the plugin is activated or<br />
deactivated.<br />
3. - Exit screen.<br />
⇨ The following notification will appear:<br />
“Changes will be adopted after restart!“<br />
4. - Confirm.<br />
5. - Restart terminal.<br />
⇨ All activated plugins will appear in the selection menu.<br />
7.7<br />
Activating licenses for full versions of the software<br />
Several applications are pre-installed on the terminal, which you can use for trial purposes for up to<br />
50 hours. [➙ 10] After this time has elapsed, they will be automatically deactivated. The amount of<br />
free usage time remaining is shown in brackets next to the name of the application.<br />
To activate a license you will require an activation number, which you will receive on purchasing an<br />
application from Müller-Elektronik. If you request the activation number by phone or by email, you will<br />
be required to give our staff the following information:<br />
▪ Code – Found under the name of the application on the "License management" screen.<br />
▪ Serial number of the terminal – Found on the nameplate on the reverse of the terminal.<br />
▪ Item number of the terminal – Found on the nameplate on the reverse of the terminal.<br />
Procedure<br />
The activation number is entered as follows:<br />
1. Switch to the "License management" screen:<br />
| Service | License management<br />
34 Copyright © Müller-Elektronik GmbH & Co.KG
Configuring the terminal in the Service application<br />
Deleting files from the USB flash drive 7<br />
⇨ The following screen will appear:<br />
2. Click on the desired application.<br />
⇨ The following screen will appear:<br />
3. Enter the activation number in the "Key" field. You will receive the activation number on<br />
purchasing a software licence.<br />
4. Confirm<br />
⇨ The following icon will appear next to the application on the "License management" screen:<br />
⇨ The application is activated. You can use the application without any restrictions.<br />
7.8<br />
Deleting files from the USB flash drive<br />
NOTICE<br />
Potential loss of data!<br />
Deleted files cannot be retrieved!<br />
◦ Think very carefully about which file you wish to delete.<br />
On the "File management" screen you can delete files from the USB flash drive.<br />
The "File management" screen only displays files that are stored in either of the following two folders<br />
on the USB flash drive:<br />
▪ Screencopy – contains all screenshots you have created<br />
▪ Taskdata – contains all task data for the "TaskManager" application<br />
Procedure<br />
1. Switch to the "File management" screen:<br />
| Service | File management<br />
Copyright © Müller-Elektronik GmbH & Co.KG 35
7<br />
Configuring the terminal in the Service application<br />
Deleting pools<br />
⇨ The following screen will appear:<br />
2. Click on "USB".<br />
⇨ The "Screencopy" and "Taskdata" folders will appear.<br />
⇨ If these folders fail to appear, it is because you did not create them on the USB flash drive.<br />
3. Click on the desired folder.<br />
⇨ The contents of the folder will be displayed.<br />
A folder may either contain files or further folders.<br />
If nothing is displayed, the folder is empty.<br />
4. Select the files to be deleted.<br />
5. – Delete file (red)<br />
⇨ Deleting file.<br />
7.9<br />
Deleting pools<br />
You can delete the pools to speed up the terminal's operation.<br />
When to delete<br />
Procedure<br />
Pools are the intermediate storage for the terminal. Pools are used to temporarily store graphics or<br />
text. Over time, the pools will become too large and slow down the operation of the terminal.<br />
▪ After updating the software of a connected jobcomputer.<br />
▪ If the terminal operates more slowly than usual.<br />
▪ When asked to do so by Customer Services.<br />
1. Switch to the "File management" screen:<br />
| Service | File management<br />
⇨ The following screen will appear:<br />
2. Click on "Pools".<br />
⇨ The names of several folders will appear.<br />
⇨ If the pool is empty, nothing will appear.<br />
3. Click on the desired folder.<br />
36 Copyright © Müller-Elektronik GmbH & Co.KG
Configuring the terminal in the Service application<br />
GPS Receiver 7<br />
⇨ The contents of the folder will be displayed.<br />
The names of the folders are the ISO IDs of the applications whose temporary data they<br />
store.<br />
4. Select the desired file.<br />
5. - Delete file.<br />
⇨ Deleting file.<br />
6. - Restart terminal.<br />
7.10<br />
GPS Receiver<br />
When you connect a GPS Receiver to the terminal, you must activate and configure it.<br />
7.10.1<br />
Activating the GPS Receiver<br />
In order to activate the GPS Receiver, you must first activate its driver.<br />
A driver is a small program that controls connected farm equipment. The drivers for the farm<br />
equipment supplied by Müller-Elektronik are pre-installed on the terminal.<br />
Procedure<br />
1. Switch to the "Driver settings" screen:<br />
| Service | Driver settings<br />
⇨ The following screen will appear:<br />
2. Select "GPS".<br />
3. Click on "GPS".<br />
Copyright © Müller-Elektronik GmbH & Co.KG 37
7<br />
Configuring the terminal in the Service application<br />
GPS Receiver<br />
⇨ The installed drivers will appear.<br />
⇨ Next to the active driver the icon will appear.<br />
⇨ The driver "GPS_A100" for the DGPS Receiver A100 from Müller-Elektronik comes<br />
activated as standard.<br />
4. Select the line containing the correct antenna driver:<br />
GPS_A100 – if the DGPS Receiver was connected directly to the terminal (port C)<br />
GPS_PSRCAN – if the GPS Receiver was connected via the CAN-interface, i.e. to a<br />
jobcomputer.<br />
5. Click on the selected line.<br />
⇨ Next to the driver the icon<br />
will appear.<br />
6. - Restart terminal.<br />
⇨ GPS Receiver is activated.<br />
⇨ The following function icon will be displayed on the start screen of the "Service" application:<br />
⇨ You have activated the GPS Receiver.<br />
7.10.2<br />
Parameters<br />
Configuring the DGPS Receiver A100<br />
The DGPS Receiver A100 is delivered ready-configured. However you can change the configuration.<br />
In this chapter you will learn how to do this.<br />
You can configure the following parameters in the process:<br />
Baud rate<br />
Setting for the speed at which the terminal sends data to the DGPS Receiver. The parameter sets the<br />
baud rate for the terminal.<br />
The default baud rate is 19200.<br />
This baud rate is suitable for the DGPS Receiver A100.<br />
Satellite 1 and Satellite 2<br />
Only required with the correction signal "WAAS/EGNOS".<br />
Satellite 1 – primary DGPS satellite. The DGPS Receiver will connect to this satellite in the first<br />
instance.<br />
Satellite 2 – secondary DGPS satellite. The DGPS Receiver will only connect to this satellite in the<br />
event that the primary satellite fails.<br />
38 Copyright © Müller-Elektronik GmbH & Co.KG
Configuring the terminal in the Service application<br />
GPS Receiver 7<br />
Your satellite selection will depend on which satellite currently has the best availability in your region.<br />
Potential values:<br />
▪ "Auto"<br />
The software automatically selects the current best satellite. This setting is not recommended, as<br />
it slows down start-up of the DGPS Receiver.<br />
▪ Name of the satellite<br />
Steering<br />
This parameter activates the "Automatic steering" assistance function in the GPS Receiver.<br />
Potential values:<br />
▪ "On"<br />
Activates automatic steering assistance.<br />
▪ "Off"<br />
Deactivates automatic steering assistance.<br />
Correction signal<br />
Type of correction signal for the DGPS Receiver.<br />
Potential values:<br />
▪ "WAAS/EGNOS“<br />
Correction signal in Europe and in North America.<br />
▪ "E-DIF“<br />
Internal calculation of correction data.<br />
This setting is required outside of the EU and the USA.<br />
To use e-Dif, you will require a special version of the DGPS Receiver A100. You can order this<br />
this DGPS Receiver from Müller Elektronik with the item number 30302464.<br />
Terrain compensation<br />
Under this parameter the terrain compensation GPS TILT-Module is configured.<br />
You can order the terraín compensation from Müller Elektronik with the following item number:<br />
30302495.<br />
Controls<br />
Function icon<br />
Function<br />
Reset the configuration of the DGPS Receiver to default values<br />
Display DGPS connection status<br />
Procedure<br />
You can configure the parameter as follows:<br />
The DGPS Receiver A100 from Müller Elektronik is connected and activated.<br />
The driver of the external LightBar "LightBar_ME" is deactivated. Otherwise the DGPS Receiver<br />
cannot be configured.<br />
The external LightBar is not connected.<br />
1. Switch to the "GPS" screen:<br />
| Service |<br />
Copyright © Müller-Elektronik GmbH & Co.KG 39
7<br />
Configuring the terminal in the Service application<br />
Configuring the "GPS TILT-Module" terrain compensation<br />
⇨ The following screen will appear:<br />
2. - Click on the desired parameter.<br />
⇨ A selection list will appear.<br />
3. - Click on the desired value.<br />
⇨ Next to the value the icon<br />
will appear.<br />
4. - Back.<br />
⇨ For some parameters is it necessary to restart the terminal. In these cases the following<br />
notification will appear:<br />
“Settings will be adopted after restart.“<br />
⇨ You have configured the DGPS Receiver.<br />
7.11<br />
Procedure<br />
Configuring the "GPS TILT-Module" terrain compensation<br />
The "GPS TILT-Module" terrain compensation is connected.<br />
The driver of the external LightBar is deactivated.<br />
The external LightBar is not connected.<br />
1. Measure the distance between the GPS Receiver and the ground surface.<br />
2. Switch on the terminal.<br />
3. Switch to the configuration screen of the terrain compensation:<br />
| Service | | Terrain compensation<br />
⇨ The following screen will appear:<br />
40 Copyright © Müller-Elektronik GmbH & Co.KG
Configuring the terminal in the Service application<br />
Screenshots 7<br />
4. Enter the distance between the GPS Receiver and the ground surface in the line "GPS Receiver<br />
height".<br />
5. Position the tractor on a ground surface that is known to be level.<br />
6. Click on the line "Null point calibration".<br />
⇨ The position of the terrain compensation on an even surface is being calibrated.<br />
⇨ After calibration the angle 0 will appear in the line 'angle'. The angle displayed changes every<br />
time the tractor tilts.<br />
7.12<br />
Screenshots<br />
A screenshot is a photo of the display.<br />
If an error occurs when you are using the terminal, Customer Services may ask you to capture a<br />
screenshot.<br />
A screenshot can be:<br />
▪ emailed to Customer Services. Email address: service@mueller-elektronik.de<br />
▪ sent to the <strong>Farm</strong>Pilot portal (provided you have activated the <strong>Farm</strong>Pilot portal)<br />
7.12.1<br />
Procedure<br />
Configuring the screenshots function<br />
You have activated the "Diagnostics" function. [➙ 42]<br />
1. Start the "Service" application:<br />
| Service |<br />
2. – Open the "Diagnostics" screen.<br />
3. Click on "Screenshot settings".<br />
4. Click on "Activate screenshots".<br />
⇨ The status of the function is displayed on the icon:<br />
- Function activated<br />
- Function deactivated<br />
5. Click on "Storage location".<br />
⇨ The line will be highlighted with a frame.<br />
6. Select "USB" to save screenshots on the USB flash drive.<br />
7. Select "Portal" to send screenshots to the <strong>Farm</strong>Pilot portal.<br />
7.12.2<br />
Procedure<br />
Creating screenshots<br />
You have configured the "Screenshots" function.<br />
If you want to save the screenshots to the USB flash drive, you will already have inserted the<br />
USB flash drive into the terminal.<br />
1. Open any screen.<br />
Copyright © Müller-Elektronik GmbH & Co.KG 41
7<br />
Configuring the terminal in the Service application<br />
Activating the "Diagnostics" function<br />
2. Press the following buttons in the order displayed and keep them pressed for a short while:<br />
(on older terminals you need to press the buttons in reversed order)<br />
⇨ While the screenshot is being captured, the icon of a photo camera will be displayed in the<br />
centre of the display:<br />
⇨ When the camera icon disappears, the screenshot has been created.<br />
⇨ You will find the screenshot you captured in the location you specified as the "Storage location".<br />
The USB flash drive saves the screenshots in the folder "ScreenCopy".<br />
7.13<br />
Procedure<br />
Activating the "Diagnostics" function<br />
To activate the "Diagnostics" function, you must first activate its driver.<br />
1. Switch to the "Driver settings" screen:<br />
| Service | Driver settings<br />
⇨ The following screen will appear:<br />
2. Click on "Diagnostics".<br />
3. Click on the "DiagnosticsServices" driver.<br />
⇨ Next to the driver the icon<br />
will appear.<br />
4. - Restart terminal.<br />
⇨ The following function icon will appear on the start screen of the "Service" application:<br />
⇨ You have activated the "Diagnostics" function.<br />
7.13.1<br />
Jobcomputer diagnostics<br />
The screen "Jobcomputer diagnosis" contains a variety of information that is primarily important to<br />
Customer Services. Customer Services can use this screen to determine which versions of the<br />
hardware and software are installed on your terminal. This will speed up the diagnostic process if<br />
errors arise.<br />
42 Copyright © Müller-Elektronik GmbH & Co.KG
Configuring the terminal in the Service application<br />
Activating the "Diagnostics" function 7<br />
Sending diagnostic data to the portal<br />
Customer Services may ask you to send diagnostic data to the portal. This allows Customer Services<br />
to gather detailed information about your terminal and therefore examine it more thoroughly.<br />
Procedure<br />
You have activated the "Diagnostics" function.<br />
You have activated the <strong>Farm</strong>Pilot portal.<br />
1. Switch to the "Jobcomputer diagnosis" screen:<br />
| Service | | | Jobcomputer Diagnostics<br />
2. - Send diagnostic data.<br />
⇨ The following notification will appear:<br />
“DeviceidentData transfer“<br />
⇨ The data are being uploaded to the portal.<br />
3. Wait until the "Sending DeviceIdentData" notification disappears.<br />
⇨ The data have been uploaded to the portal.<br />
4. If the process is taking too long, you can cancel the data transfer.<br />
5. - Cancel data transfer.<br />
7.13.2<br />
CAN-Trace settings<br />
CAN-Trace is a function that logs the data exchange between the terminal and the connected<br />
jobcomputers. Customer Services can use the logged data for diagnostic purposes should any errors<br />
arise in the system.<br />
If an error occurs when using the terminal, Customer Services may ask you to activate the CAN-<br />
Trace function.<br />
Only activate this function if prompted to do so by Customer Services.<br />
Procedure<br />
1. Switch to the "CAN-Trace settings" screen:<br />
| Service | | | CAN-Trace settings<br />
1. Click on "Duration (min.)".<br />
2. Set the duration. Specify for how long communication should be logged after the terminal has<br />
been restarted. Communication can be logged for a duration of one to five minutes.<br />
3. Click on "Storage location".<br />
4. Select the storage location.<br />
5. Select "USB" to save data on the USB flash drive. The USB flash drive must be inserted in the<br />
terminal.<br />
6. Select "Portal" to send data to the <strong>Farm</strong>Pilot portal. <strong>Farm</strong>Pilot must be activated before data can<br />
be transferred.<br />
7. Click on "Activate CAN-Trace".<br />
⇨ The status of the function is displayed on the icon.<br />
Copyright © Müller-Elektronik GmbH & Co.KG 43
7<br />
Configuring the terminal in the Service application<br />
Activating an external LightBar<br />
⇨ The icon<br />
must appear next to "Activate CAN-Trace".<br />
8. - Restart terminal.<br />
⇨ After restarting the terminal, CAN-Trace will log the communication between the terminal<br />
and the jobcomputer.<br />
9. Leave the terminal switched on until the set CAN-Trace duration has elapsed.<br />
⇨ The CAN-Trace function will be deactivated automatically.<br />
10. If you specified USB as the storage location, verify that the file "StartupTrace.txt" exists on the<br />
USB flash drive:<br />
11. If this file is missing, you must run the CAN-Trace function again.<br />
12. Email the "StartupTrace.txt" file to Customer Services. If you chose "Portal" as the storage<br />
location, this file will have been sent automatically.<br />
7.14<br />
Activating an external LightBar<br />
If you connected an external LightBar to the terminal, you must activate it.<br />
To activate the external LightBar, you must first activate its driver.<br />
You can order the external LightBar from Müller Elektronik with the following item number: 30302490.<br />
Procedure<br />
1. Switch to screen "Driver settings":<br />
| Service | Driver settings<br />
⇨ The following screen will appear:<br />
2. Click on "LightBar".<br />
⇨ The installed drivers will appear.<br />
3. Click on the "LightBar_ME" driver.<br />
⇨ Next to the driver the icon<br />
will appear.<br />
4. - Restart terminal.<br />
⇨ You have activated the external LightBar.<br />
44 Copyright © Müller-Elektronik GmbH & Co.KG
Configuring the terminal in the Service application<br />
Camera 7<br />
7.15<br />
Camera<br />
7.15.1<br />
Activating a camera<br />
If you have connected a camera or camera system to the terminal, you must activate it.<br />
To activate a camera or a camera system, you must first activate its driver.<br />
Procedure<br />
1. Switch to the "Driver settings" screen:<br />
| Service | Driver settings<br />
2. The following screen will appear:<br />
3. Click on "Camera".<br />
4. Click on the "Camera_ME" driver.<br />
⇨ Next to the driver the icon<br />
will appear.<br />
5. - Restart terminal.<br />
⇨ The following function icon will appear on the start screen of the "Service" application:<br />
6. You have activated the camera driver.<br />
7.15.2<br />
Controls<br />
Operating the camera<br />
Function icon<br />
Meaning<br />
Switching between several cameras.<br />
Rotating image.<br />
Zooming in for camera images.<br />
Copyright © Müller-Elektronik GmbH & Co.KG 45
7<br />
Configuring the terminal in the Service application<br />
Configuring <strong>Farm</strong>Pilot<br />
Function icon<br />
Meaning<br />
Zooming out for camera images.<br />
Activating automatic camera mode.<br />
In automatic mode the camera images will be automatically displayed if a<br />
sensor sends a signal to do so.<br />
This only works if the vehicle is equipped with a suitable sensor.<br />
Saving camera settings.<br />
Exiting camera.<br />
You can press the function keys even if the camera is set to full screen mode.<br />
Procedure<br />
You have connected and activated the camera.<br />
1. Switch to the "Camera" screen:<br />
| Service | |<br />
⇨ The following screen will appear<br />
2. Use the function keys to control the camera.<br />
7.16<br />
Configuring <strong>Farm</strong>Pilot<br />
<strong>Farm</strong>Pilot is an internet portal which allows software on a farm computer to exchange data with<br />
machines via a mobile phone network. Operating data are stored in a central location on the portal<br />
and are presented clearly to the user.<br />
Before you can use <strong>Farm</strong>Pilot in conjunction with your terminal, you must complete the following<br />
steps:<br />
▪ Purchase a SIM card and have it activated.<br />
▪ Activate <strong>Farm</strong>Pilot<br />
▪ Enter your <strong>Farm</strong>Pilot access data<br />
Refer to the following chapters to learn how to perform these steps.<br />
46 Copyright © Müller-Elektronik GmbH & Co.KG
Configuring the terminal in the Service application<br />
Configuring <strong>Farm</strong>Pilot 7<br />
7.16.1<br />
Activating <strong>Farm</strong>Pilot<br />
To activate <strong>Farm</strong>Pilot on your terminal, you must first activate its driver.<br />
NOTICE<br />
High costs from prolonged data transfer<br />
If you do not have a flatrate in your mobile phone contract, continuous use of <strong>Farm</strong>Pilot can lead to<br />
high costs.<br />
If your flatrate has a data volume limit, continuous use of <strong>Farm</strong>Pilot can quickly use up your data<br />
volume limit.<br />
◦ Deactivate the <strong>Farm</strong>Pilot driver, when you are not using the portal.<br />
Procedure<br />
1. Switch to the "Driver settings" screen:<br />
| Service | Driver settings<br />
⇨ The following screen will appear:<br />
2. Click on "<strong>Farm</strong>Pilot".<br />
3. Click on the "TPD" driver.<br />
⇨ Next to the driver the icon<br />
will appear.<br />
4. - Restart terminal.<br />
⇨ The following function icon will appear on the start screen of the "Service" application:<br />
⇨ You have activated the <strong>Farm</strong>Pilot portal.<br />
You must now enter the access data for the <strong>Farm</strong>Pilot portal.<br />
7.16.2<br />
Configuring the connection with <strong>Farm</strong>Pilot<br />
Before you can connect the terminal to <strong>Farm</strong>Pilot, you must configure the connection.<br />
You will receive this data when purchasing the <strong>Farm</strong>Pilot access data.<br />
Parameters<br />
You will require the following parameters for the configuration:<br />
Username<br />
Username for <strong>Farm</strong>Pilot.<br />
Copyright © Müller-Elektronik GmbH & Co.KG 47
7<br />
Configuring the terminal in the Service application<br />
Configuring <strong>Farm</strong>Pilot<br />
Password<br />
Password for <strong>Farm</strong>Pilot.<br />
Provider<br />
Opens a screen where the GPRS connection can be configured.<br />
With most mobile phone providers, this configuration occurs automatically.<br />
If the access data for the GPRS connection differ with your provider, you can configure the<br />
connection manually.<br />
You can find precise instructions in the chapter:<br />
Configuring the GPRS connection manually [➙ 48]<br />
Server<br />
Server address<br />
The server address cannot be altered.<br />
Log<br />
Switches logging on and off.<br />
Switch on logging only when prompted to do so by Customer Services.<br />
Procedure<br />
1. Open the "Service" application:<br />
| Service<br />
2. - Open the access data screen for <strong>Farm</strong>Pilot.<br />
⇨ The following screen will appear:<br />
3. Click on the line with the desired parameter.<br />
4. Configure parameter.<br />
7.16.3<br />
Configuring the GPRS connection manually<br />
In this chapter you will learn how to configure the GPRS connection manually.<br />
With most SIM cards, the GPRS connection will be configured automatically.<br />
The GPRS connection must be manually configured in the following instances:<br />
▪ You have bought a new SIM card. The terminal does not recognise your mobile phone provider.<br />
▪ Your mobile phone provider has altered the access data for the GPRS connection.<br />
48 Copyright © Müller-Elektronik GmbH & Co.KG
Configuring the terminal in the Service application<br />
Configuring <strong>Farm</strong>Pilot 7<br />
Parameters<br />
The values you must enter for the parameters, depend on your mobile phone provider. You can find<br />
out these data from your mobile phone provider.<br />
You will require the following parameters for the configuration:<br />
Country<br />
Country for which the SIM card is configured. Cannot be altered.<br />
Provider<br />
Name of the mobile phone provider. Appears automatically.<br />
With unrecognised cards, you can enter the name of the mobile phone provider yourself.<br />
APN<br />
Abbreviation of "Acces Point Name“.<br />
Address of the GPRS access point.<br />
DNS 1 and DNS 2<br />
Abbreviation of "Domain Name System“.<br />
IP addresses of the first and second DNS servers<br />
Number<br />
Dialling code for the modem. Cannot be altered.<br />
Username<br />
Username for the GPRS connection.<br />
Password<br />
Password for the GPRS connection.<br />
Controls<br />
Function icon<br />
Function<br />
Retrieve default values.<br />
Procedure<br />
You can configure the mobile connection as follows:<br />
You have inserted the SIM card.<br />
You have activated the <strong>Farm</strong>Pilot portal.<br />
1. Switch to the configuration screen for the GPRS connection:<br />
| | Provider<br />
Copyright © Müller-Elektronik GmbH & Co.KG 49
7<br />
Configuring the terminal in the Service application<br />
Configuring <strong>Farm</strong>Pilot<br />
⇨ The following screen will appear:<br />
2. Set GPRS connection parameters.<br />
50 Copyright © Müller-Elektronik GmbH & Co.KG
TaskManager application<br />
Basics 8<br />
8<br />
8.1<br />
TaskManager application<br />
Basics<br />
8.1.1<br />
About TaskManager<br />
„TaskManager“ is an application from Müller-Elektronik working as the interface between an<br />
agricultural device and <strong>Farm</strong> Management Information System on the terminals.<br />
With TaskManager you can open all orders, previously planned in the <strong>Farm</strong> Management Information<br />
System, on the terminal.<br />
All information contained in the order will be transferred by TaskManager to specialized applications<br />
of the terminal. This means that each application is doing exactly what it can do best:<br />
▪ The position of the field is transferred to FIELD-Nav. It can therefore navigate the terminal<br />
directly to the field.<br />
▪ The prescription map, field border and other information about any work important for sub-areas<br />
stored in the order are transferred to TRACK-Leader. The field can be therefore processed.<br />
▪ TaskManager documents work duration, attending persons, machines and operating means.<br />
▪ After work completion TaskManager saves all work results on the USB flash drive, so that you<br />
can open them again in your <strong>Farm</strong> Management Information System.<br />
The version described here supports the following functions:<br />
▪ Creating tasks on the terminal.<br />
▪ Viewing and processing tasks that have been planned using the <strong>Farm</strong> Management Information<br />
System.<br />
▪ Transferring prescription maps from an order to TRACK-Leader.<br />
▪ Delivering required values to ISOBUS job computers.<br />
▪ Documenting how the work has been done. The type of documented data depends on the type<br />
of the ISOBUS job computer.<br />
▪ Saving work results for further evaluation in PC software.<br />
▪ Recording complete task data.<br />
▪ Exchanging task data between the <strong>Farm</strong>Pilot portal and the TaskManager.<br />
8.1.2<br />
USB flash drive<br />
The USB flash drive has two jobs:<br />
▪ It is used to move data between the <strong>Farm</strong> Management Information System and the terminal.<br />
▪ It is the external storage during work.<br />
The USB flash drive must always be connected during work.<br />
See also:<br />
▪ Step 1: Transferring data from the <strong>Farm</strong> Management Information System to the terminal [➙<br />
61]<br />
▪ Step 7: Transferring completed tasks to the <strong>Farm</strong> Management Information System [➙ 87]<br />
8.1.3<br />
Procedure<br />
Starting the TaskManager application<br />
1. Insert an empty USB flash drive into the terminal.<br />
Copyright © Müller-Elektronik GmbH & Co.KG 51
8<br />
TaskManager application<br />
Basics<br />
2. Open the "Selection menu" application:<br />
⇨ The following screen will appear:<br />
3. Click on the "TaskManager" line.<br />
⇨ The following screen will appear:<br />
⇨ The "TaskManager" application has been started.<br />
8.1.4<br />
Controls in the TaskManager application<br />
The "TaskManager" application is controlled using the rotary knob and the function keys.<br />
In this chapter you will find an overview of all function icons that you may come across in the<br />
"TaskManager" application.<br />
Controls<br />
Function icon Meaning<br />
Switch to the "Task data" screen – if a task has been started.<br />
Switch to the "Task list" screen – if no task has been started.<br />
Back<br />
52 Copyright © Müller-Elektronik GmbH & Co.KG
TaskManager application<br />
Basics 8<br />
Function icon Meaning<br />
Switch to the "GPS Receiver offset" screen.<br />
Configure the position of the GPS Receiver.<br />
Remove the USB flash drive.<br />
Will only appear if the folder "Task data" exists on the USB flash drive.<br />
Prepare an empty USB flash drive for use with the "TaskManager" application<br />
without <strong>Farm</strong>Pilot.<br />
The "Task data" folder will be created on the USB flash drive.<br />
Download a set of tasks from the <strong>Farm</strong>Pilot portal<br />
Will only appear if you are connected to the <strong>Farm</strong>Pilot portal<br />
Upload set of tasks to the <strong>Farm</strong>Pilot portal<br />
Will only appear if you are connected to the <strong>Farm</strong>Pilot portal<br />
Display the field in FIELD-Nav<br />
The function icon is grey when the function has been deactivated.<br />
Create a new task<br />
Copy existing task<br />
Split stopped task<br />
Start task<br />
Stop task<br />
Confirm<br />
Save task data<br />
Select worker<br />
Deactivate worker<br />
Select machine<br />
Copyright © Müller-Elektronik GmbH & Co.KG 53
8<br />
TaskManager application<br />
Basics<br />
Function icon Meaning<br />
Deactivate machine<br />
Start navigation to field<br />
The function icon is grey when the function has been deactivated.<br />
Start navigation to unloading location<br />
Only appears if your terminal has the "Slave" status within a group of vehicles.<br />
The function icon is grey when the function has been deactivated.<br />
Enter filled capacity<br />
Enter emptied capacity<br />
8.1.5<br />
Setting up the operation mode for the TaskManager application<br />
The "TaskManager" application can be run in two different modes:<br />
▪ ISO mode<br />
▪ SC mode<br />
In ISO mode, the TaskManager will have full functionality.<br />
However, the TaskManager's functionality is limited in SC mode.<br />
Use this mode when you are not using the TaskManager.<br />
Features of SC mode:<br />
▪ The parameters of the machine will be reloaded every time the terminal is restarted.<br />
▪ When you open the TaskManager in SC mode, only the name of the connected machine will be<br />
shown on the display.<br />
Procedure<br />
You can change the mode of the "TaskManager" application as follows:<br />
1. Switch to the "Settings" screen:<br />
| TaskManager |<br />
54 Copyright © Müller-Elektronik GmbH & Co.KG
TaskManager application<br />
Basics 8<br />
⇨ The following screen will appear:<br />
2. - Select and click on the "Operation mode" line.<br />
⇨ The mode will change with each click.<br />
3. Set the desired mode.<br />
4. - Restart terminal.<br />
⇨ The set mode will be activated after restart.<br />
8.1.6<br />
Display layout in the TaskManager application<br />
The display of the COMFORT-<strong>Terminal</strong> will always show two screens at the same time:<br />
▪ The "Task data" screen on the left<br />
▪ All other screens on the right.<br />
The following picture shows these two areas as well as additional information that can be found on<br />
the display.<br />
Display layout in the TaskManager application<br />
Copyright © Müller-Elektronik GmbH & Co.KG 55
8<br />
TaskManager application<br />
Basics<br />
Task data screen<br />
Permanent section<br />
Counter section<br />
Cursor<br />
Determines which screen is currently active.<br />
Selects a line that can be clicked on with the<br />
rotary knob.<br />
Section with interchanging screens<br />
Function icons section<br />
You will always be shown the function icons<br />
that are associated with the currently active<br />
screen.<br />
Information about the application version<br />
Switching between screens<br />
On the display of the COMFORT-<strong>Terminal</strong>, the screens are arranged side by side. However, only one<br />
screen is active at any one time. The active screen is always the one in which the cursor has been<br />
placed.<br />
To switch to a different screen, you must first activate it.<br />
The following options are available to you:<br />
▪ Switch to the "Task data" screen from the right hand section.<br />
▪ Switch to the right hand section from the "Task data" screen.<br />
Controls<br />
Switch to the "Task data" screen – if a task has been started.<br />
Switch to the "Task list" screen – if no task has been started.<br />
Back<br />
Master data screen<br />
The "Master data" screen is the start screen for the "TaskManager" application. From this screen you<br />
can access all other screens.<br />
You can identify the "Master data" screen by this icon.<br />
You will find the icon in the upper section of the screen.<br />
Master data screen<br />
56 Copyright © Müller-Elektronik GmbH & Co.KG
TaskManager application<br />
Basics 8<br />
Task list screen<br />
In the main section of this screen, you will see folders which contain the data stored in the <strong>Farm</strong><br />
Management Information System.<br />
If you move the cursor right down to the bottom using the rotary knob, you will be able to see<br />
additional folders containing master data.<br />
The "Task list" screen contains the names of all tasks stored on the USB flash drive.<br />
You can identify the "Task list" screen by this icon.<br />
You will find the icon in the upper section of the screen.<br />
Task list screen<br />
Beneath the task list you will find the background information about the respective task you selected.<br />
You can identify the status of the task by the colour of the icon preceding the name of the task.<br />
Tasks whose names are preceded by an asterisk are copies of other tasks.<br />
The following table contains an overview of all icons used to mark the different types of tasks.<br />
Icons<br />
Icon Icon colour Meaning<br />
light yellow<br />
Tasks that have not been started yet<br />
dark yellow<br />
Paused tasks<br />
green<br />
Started tasks<br />
red<br />
Stopped tasks<br />
Tasks processed by the "Master"<br />
Copyright © Müller-Elektronik GmbH & Co.KG 57
8<br />
TaskManager application<br />
Basics<br />
Tasks that have not been started yet<br />
Tasks that have not been started yet and are tasks which are stored on the USB flash drive, but have<br />
not yet been started.<br />
These tasks may include:<br />
▪ Newly created tasks<br />
▪ Copies of existing tasks – if the name of the task is preceded by an asterisk<br />
▪ Tasks imported via the <strong>Farm</strong>Pilot portal or the <strong>Farm</strong> Management Information System which<br />
have not yet been started.<br />
Paused tasks<br />
Paused tasks are tasks which have been interrupted and not fully completed. A task will be paused<br />
automatically if another task is started while the first task is still in progress.<br />
Paused tasks are displayed in the <strong>Farm</strong>Pilot portal as not yet completed.<br />
Started tasks<br />
Started tasks are tasks that have been started and are currently being processed.<br />
Stopped tasks<br />
Stopped tasks are tasks that have been stopped. As a rule, these are tasks which have been<br />
completed. However, the program is not capable of verifying whether the tasks have been fully<br />
completed.<br />
Therefore, only stop a task if you have completed it. Stopped tasks are displayed as completed tasks<br />
in the <strong>Farm</strong>Pilot portal.<br />
Tasks processed by the Master<br />
Appears only in cooperation with the <strong>Farm</strong>Pilot portal.<br />
All tasks processed by the fleet leader (Master) will be labeled as such.<br />
Every time the Master starts to process a new task, you will be notified by a pop-up window.<br />
Task data screen<br />
On the "Task data" screen you can find all the information about the selected task.<br />
The "Task data" screen will be displayed when you select or create a task on the "Task list" screen.<br />
58 Copyright © Müller-Elektronik GmbH & Co.KG
TaskManager application<br />
Basics 8<br />
You can identify the "Task data" screen by this icon.<br />
You will find the icon in the upper section of the screen.<br />
The colour of the icon will vary depending on whether the task has been started or<br />
newly created.<br />
Green – the task displayed has been started.<br />
Yellow – the task displayed has not been started.<br />
Task data screen<br />
Name and number of the task<br />
Serial task number.<br />
TSK means TASK .<br />
Task processing stage<br />
Indicates what stage of completion the task is<br />
at [➙ 81].<br />
Task data section<br />
Contains detailed information about the<br />
selected task<br />
Cursor<br />
Selects a line that you can click on using the<br />
rotary knob.<br />
Function icons section<br />
Icons that can be pressed on this screen.<br />
Counter section<br />
Only appears when you start the task.<br />
The task data section may also contain the following icon:<br />
This means that the task data also contain an application map. The icon is used for information<br />
purposes only.<br />
8.1.7<br />
Exporting machine settings for the <strong>Farm</strong> Management Information System<br />
Before preparing an order in the <strong>Farm</strong> Management Information System for the TaskManager<br />
application, the <strong>Farm</strong> Management Information System must know the unique number of the job<br />
computer mounted on the agricultural machine.<br />
To deliver this number to the <strong>Farm</strong> Management Information System, you need to create a blank<br />
order on the terminal. Then you have to open this order in the <strong>Farm</strong> Management Information<br />
System.<br />
When to perform<br />
You must perform this step in the following instances:<br />
▪ Before the first start-up.<br />
▪ When connecting the terminal to a new machine.<br />
Copyright © Müller-Elektronik GmbH & Co.KG 59
8<br />
TaskManager application<br />
Basics<br />
▪ When changing the machine parameters in the jobcomputer.<br />
Mode of operation<br />
In this step, all parameters stored in the job computer of the agricultural machine are saved in an<br />
XML file. These data are provided with a unique ID number.<br />
The unique ID number is also the serial number of the connected jobcomputer. You can find it in the<br />
"Selection menu" application.<br />
You have to repeat this step once more for each ISOBUS-capable agricultural machine.<br />
Procedure<br />
You have connected the terminal to the jobcomputer of the machine that you wish to add to the<br />
master data.<br />
You have configured the machine.<br />
1. Insert an empty USB flash drive into the terminal.<br />
2. Create a "Task data" folder on the USB flash drive [➙ 62]<br />
3. Create a new task [➙ 63]. You do not need to enter any task data for this task.<br />
4. Start task [➙ 75].<br />
⇨ The following screen will appear:<br />
5. Wait several minutes, until the counters appear.<br />
⇨ The following screen will appear:<br />
60 Copyright © Müller-Elektronik GmbH & Co.KG
TaskManager application<br />
Step 1: Transferring data from the <strong>Farm</strong> Management Information System to the terminal 8<br />
6. - Stop task.<br />
7. - Switch to the "Master data" screen.<br />
8. - Save the data on the USB flash drive.<br />
⇨ The machine data are saved to the "Taskdata.xml" file located in the "Task data" folder on<br />
the USB flash drive.<br />
9. Wait until the data have been written and read.<br />
⇨ The function icon<br />
will be hidden.<br />
10. Remove the USB flash drive from the terminal.<br />
⇨ You have transferred the machine parameters to the USB flash drive.<br />
According to whether you wish to export machine data to create a new machine in the <strong>Farm</strong><br />
Management Information System or update the parameters of an existing machine, a different<br />
procedure applies in the <strong>Farm</strong> Management Information System.<br />
Follow the manual for your <strong>Farm</strong> Management Information System.<br />
NOTICE<br />
If you create more than one entry for a machine in the <strong>Farm</strong> Management Information System, this<br />
can later lead to errors in the TaskManager.<br />
◦ Only create one entry per machine in the <strong>Farm</strong> Management Information System.<br />
8.2<br />
Step 1: Transferring data from the <strong>Farm</strong> Management Information System to<br />
the terminal<br />
You can transfer the data from the <strong>Farm</strong> Management Information System to the terminal in the<br />
following ways:<br />
▪ using a USB flash drive<br />
▪ via the <strong>Farm</strong>Pilot portal<br />
8.2.1<br />
Procedure<br />
Transferring data using a USB flash drive<br />
You have created the "Task data" folder on the USB flash drive.<br />
The "Task data" folder contains the file "Taskdata.xml".<br />
1. Start the "TaskManager" application.<br />
| TaskManager<br />
2. Insert the USB flash drive into the terminal.<br />
⇨ The following notification will appear:<br />
“Copying task data!“<br />
⇨ The task processed most recently will be started automatically.<br />
Copyright © Müller-Elektronik GmbH & Co.KG 61
8<br />
TaskManager application<br />
Step 1: Transferring data from the <strong>Farm</strong> Management Information System to the terminal<br />
Creating a "Task data" folder on the USB flash drive<br />
You must create a "Task data" folder in the following instances:<br />
▪ If you use the "TaskManager" without the <strong>Farm</strong>Pilot portal.<br />
▪ If you wish to export the machine settings to the <strong>Farm</strong> Management Information System.<br />
Procedure<br />
1. Insert an empty USB flash drive into the terminal.<br />
2. Open the "TaskManager" application:<br />
| TaskManager<br />
⇨ The following screen will appear:<br />
⇨ If the following function icon<br />
created.<br />
appears on this screen, the folder has already been<br />
3. – Press.<br />
4. – Press.<br />
⇨ The "Task data" folder is being created on the USB flash drive.<br />
⇨ A function icon will appear on the "Master data" screen:<br />
8.2.2<br />
Procedure<br />
Transferring data via the <strong>Farm</strong>Pilot portal<br />
You will receive data from the portal if they are sent by a dispatcher. The dispatcher will always send<br />
the data as sets of tasks that consist of one or more tasks.<br />
You will receive the set of tasks from the dispatcher as follows:<br />
You have opened the "TaskManager" application.<br />
You have inserted a USB flash drive into the terminal.<br />
NOTE!: The USB flash drive must not contain a folder named "TASK DATA". However, if the<br />
folder does exist, you must save [➙ 87] the existing data on the USB flash drive.<br />
62 Copyright © Müller-Elektronik GmbH & Co.KG
TaskManager application<br />
Step 2: Selecting a task to process 8<br />
1. The dispatcher will send you the task data.<br />
⇨ The following notification will appear:<br />
“New task data available!“<br />
2. - Confirm.<br />
⇨ The data are not on the terminal yet, but are ready to be downloaded.<br />
3. - Load the data from the portal. (the arrow on the icon must point downwards)<br />
⇨ The following notification will appear:<br />
“Start downloading task data“<br />
4. - Confirm.<br />
⇨ The data are being loaded.<br />
5. Open the "Task list" screen.<br />
⇨ All tasks from the set of tasks will appear on the "Task list" screen.<br />
⇨ You have received a set of tasks from the dispatcher.<br />
You can process the tasks from the set of tasks.<br />
8.3<br />
Step 2: Selecting a task to process<br />
Before you start working, you must first select the task you wish to process.<br />
The following options are available to you:<br />
▪ Create a new task on the terminal<br />
▪ Resume an existing task<br />
8.3.1<br />
Creating a new task on the terminal<br />
You can create a new task directly on the terminal.<br />
Creating a new task<br />
When creating a task directly on the terminal, you will not need to fill it with task data right away. You<br />
can process a task and then enter into the <strong>Farm</strong> Management Information System what you have<br />
done and on which field.<br />
The following options are available to you:<br />
▪ Create a new task on the terminal<br />
▪ Copy an existing task and save the copy as a new task<br />
Procedure<br />
1. Switch to the "Master data" screen.<br />
Copyright © Müller-Elektronik GmbH & Co.KG 63
8<br />
TaskManager application<br />
Step 2: Selecting a task to process<br />
⇨ The following screen will appear:<br />
2. Click on the "Tasks" line.<br />
⇨ The following screen will appear:<br />
The "Task list" screen may show tasks that have already been created, as shown in the<br />
picture.<br />
3. - Create a new task.<br />
64 Copyright © Müller-Elektronik GmbH & Co.KG
TaskManager application<br />
Step 2: Selecting a task to process 8<br />
⇨ The following screen will appear:<br />
⇨ The new task was named by the terminal with the current date and time. The task has not<br />
been saved yet.<br />
⇨ You have created a new task.<br />
You now have the following options:<br />
▪ You can fill the task with task data. [➙ 71]<br />
▪ You can start the task. [➙ 75]<br />
▪ You can save the task. [➙ 74]<br />
Copying a task<br />
You will not always have to create a new task. In most cases, it is advisable to copy an existing task<br />
and save the copy as a new task.<br />
The copy of the task contains all the field boundaries and application cards of the original task, but<br />
can be processed like a new task.<br />
Procedure<br />
1. Switch to the "Master data" screen.<br />
⇨ The following screen will appear:<br />
2. Click on the "Tasks" line.<br />
Copyright © Müller-Elektronik GmbH & Co.KG 65
8<br />
TaskManager application<br />
Step 2: Selecting a task to process<br />
⇨ The following screen will appear:<br />
3. Select a task that has the most similarities to the task you wish to create. The task must not be<br />
started.<br />
4. - Create a copy of an existing task.<br />
⇨ The following notification will appear:<br />
“Copy task“<br />
5. - Confirm.<br />
⇨ The following screen will appear:<br />
⇨ The new task will be added to the list and marked as a copy with an asterisk.<br />
⇨ You have created a new task.<br />
You now have the following options:<br />
▪ You can start the task you copied. [➙ 75]<br />
8.3.2<br />
Adopting an existing task<br />
You can process one of the tasks that appears on the "Task list" screen.<br />
66 Copyright © Müller-Elektronik GmbH & Co.KG
TaskManager application<br />
Step 2: Selecting a task to process 8<br />
Resuming a task<br />
The tasks may originate directly from the <strong>Farm</strong> Management Information System, from the <strong>Farm</strong>Pilot<br />
portal or from the USB flash drive.<br />
The following options are available to you:<br />
▪ Resume an existing task<br />
▪ Splitting a task that has already been started<br />
Procedure<br />
You have copied the data from the <strong>Farm</strong> Management Information System to the USB flash<br />
drive.<br />
You have inserted the USB flash drive into the terminal.<br />
1. Switch to the "Master data" screen.<br />
⇨ The following screen will appear:<br />
2. Click on the "Tasks" line.<br />
⇨ The following screen will appear:<br />
⇨ The list contains an overview of the tasks stored on the USB flash drive.<br />
3. Click on the desired task.<br />
It does not matter what icon is used to mark the task. You can resume any tasks.<br />
Copyright © Müller-Elektronik GmbH & Co.KG 67
8<br />
TaskManager application<br />
Step 2: Selecting a task to process<br />
⇨ The following screen will appear:<br />
⇨ The task data have already been filled in for this task. You will no longer be able to alter the<br />
data.<br />
You can now read the following chapter:<br />
▪ Start task [➙ 75]<br />
Splitting an order that has already been started<br />
Use this function in the following instance:<br />
You have already processed a task and traveled over a portion of the field. However, you have<br />
realized that you wish to process the remainder of the field using a different product or alter the<br />
concentration.<br />
You will not be able to alter the products for a task that you have already started. Therefore, you will<br />
have to split the task.<br />
Splitting will turn the original task into two tasks:<br />
▪ Processed portion of the order – keeps the name of the original order. It contains all information<br />
created during the completion of this portion.<br />
▪ Uncompleted portion of the task – will be displayed on the list as a new task. You can continue<br />
processing this task. The task contains all the field boundaries and field data from the original<br />
task.<br />
Procedure<br />
1. Switch to the "Master data" screen.<br />
68 Copyright © Müller-Elektronik GmbH & Co.KG
TaskManager application<br />
Step 2: Selecting a task to process 8<br />
⇨ The following screen will appear:<br />
2. Click on the "Tasks" line.<br />
⇨ The following screen will appear:<br />
⇨ The list contains an overview of the tasks stored on the USB flash drive.<br />
3. Start the desired task. You can only copy tasks that have already been started.<br />
4. - Return to the "Task list" screen.<br />
Copyright © Müller-Elektronik GmbH & Co.KG 69
8<br />
TaskManager application<br />
Step 2: Selecting a task to process<br />
⇨ The following screen will appear:<br />
The task must be marked with the following icon:<br />
- Task started<br />
5. - Split task.<br />
⇨ The following notification will appear:<br />
“Split task“<br />
6. - Confirm.<br />
⇨ The following screen will appear:<br />
A new task will appear on the Task list screen. The task is marked with an asterisk. This<br />
task is the unprocessed portion of the original task. It contains all the data from the original<br />
task. In particular, the field boundaries and obstacles from SECTION-Control.<br />
⇨ You have split the task and created a copy.<br />
You now have the following options:<br />
▪ You can alter the rates and products for this task. [➙ 72]<br />
70 Copyright © Müller-Elektronik GmbH & Co.KG
TaskManager application<br />
Step 3: Entering and saving task data 8<br />
8.4<br />
Step 3: Entering and saving task data<br />
Task data are entered in two different locations:<br />
▪ In the <strong>Farm</strong> Management Information System<br />
▪ In the "TaskManager" application<br />
In the "TaskManager" application you can only select data which you have previously created in the<br />
<strong>Farm</strong> Management Information System. You can assign these data to the individual tasks.<br />
You can only alter the task data of a task if you have created a new task and have not saved it yet.<br />
8.4.1<br />
Entering task data<br />
You can only enter the task data that you have created in the <strong>Farm</strong> Management Information System<br />
and saved on your USB flash drive.<br />
The task data created in the <strong>Farm</strong> Management Information System will be saved in the following<br />
categories:<br />
Icon Name of the category Comment<br />
Customer<br />
<strong>Farm</strong> / business<br />
Field<br />
Person in charge<br />
Worker<br />
Machine<br />
Cannot be selected until the<br />
task has been started<br />
Cannot be selected until the<br />
task has been started<br />
Product and rate<br />
Measure<br />
The names used here may not always correspond to the category names used in the <strong>Farm</strong><br />
Management Information System. This is due to the fact that the names vary with each specific <strong>Farm</strong><br />
Management Information System used.<br />
For instance, if you did not create any data in a particular category, the following screen will appear:<br />
Depending on the category, a different, struck-through icon may appear.<br />
Copyright © Müller-Elektronik GmbH & Co.KG 71
8<br />
TaskManager application<br />
Step 3: Entering and saving task data<br />
Selecting a customer<br />
Procedure<br />
1. Click on the following line and hold for two seconds:<br />
Selecting a farm (business)<br />
⇨ A list of available customers will appear.<br />
2. Select customers from the list.<br />
⇨ The name of the selected customer will appear on the "Task data" screen.<br />
⇨ You have assigned the task to a customer.<br />
Procedure<br />
1. Click on the following line and hold for two seconds:<br />
Selecting a field<br />
⇨ A list of available farms will appear.<br />
⇨ The list only contain farms that belong to the selected customer.<br />
2. Click on the desired farm.<br />
⇨ The selected farm will appear on the "Task Data" screen.<br />
⇨ You have assigned the task to a farm.<br />
Procedure<br />
1. Click on the following line and hold for two seconds:<br />
⇨ A list of available fields will appear.<br />
⇨ The list only contains fields that belong to the selected farm.<br />
2. Select the desired field.<br />
⇨ The selected field will appear on the "Task data" screen.<br />
⇨ You have assigned the task to a field.<br />
Selecting a person in charge<br />
Procedure<br />
1. Click on the following line and hold for two seconds:<br />
Selecting rate and mix<br />
⇨ A list of available people will appear.<br />
2. Select the desired person.<br />
⇨ The name of the person will appear on the "Task data" screen.<br />
⇨ You have assigned the task to a person.<br />
Icons<br />
You will see two icons on the screen:<br />
Mix<br />
Name of the mix to be spread<br />
Product<br />
If the mix is composed of several products, you can specify the individual products here.<br />
72 Copyright © Müller-Elektronik GmbH & Co.KG
TaskManager application<br />
Step 3: Entering and saving task data 8<br />
To the right of each icon there are three input fields, each of which you can select and click on with<br />
the cursor.<br />
You can use the input fields to specify which mix you wish to spread, in what quantity and composed<br />
of what products.<br />
The application will not check whether the quantities of the individual products total the rate of the<br />
mix.<br />
The following picture shows an overview of the input fields.<br />
Overview of the input fields<br />
Rate<br />
Product quantity<br />
Unit of measurement<br />
Product type<br />
Procedure<br />
1. Click on the following line:<br />
2. Click on the first field next to the icon .<br />
3. Enter the desired rate.<br />
4. Click on the middle field next to the icon .<br />
5. Select the unit of measurement.<br />
6. Click on the right hand field next to the icon .<br />
7. Select the product type.<br />
8. Enter the product quantity and the unit of measurement next to the icon .<br />
⇨ A new line containing the icon<br />
will appear.<br />
9. You can enter additional products next to the icon .<br />
10. - Confirm entries.<br />
⇨ The data you entered will be saved.<br />
⇨ The rate will appear on the "Task data" screen.<br />
Measure<br />
Procedure<br />
1. Click on the following line and hold for two seconds:<br />
⇨ A list of available measures will appear.<br />
Copyright © Müller-Elektronik GmbH & Co.KG 73
8<br />
TaskManager application<br />
Step 3: Entering and saving task data<br />
2. Select a measure.<br />
⇨ The selected action will appear on the "Task Data" screen.<br />
8.4.2<br />
Saving task data<br />
You can only save the task if the function icon<br />
appears on the "Task data" screen.<br />
Once saved, the task data can no longer be altered.<br />
Procedure<br />
You have created a new task and entered the task data.<br />
You are on the following screen:<br />
1. – Save task data. This function icon will only appear if saving the task data is<br />
possible.<br />
⇨ The following screen will appear:<br />
The saved task will appear on the "Task list" screen. The name comprises the date and time<br />
the task was created.<br />
⇨ You have saved the task.<br />
New parameters will appear on the "Task data" screen:<br />
74 Copyright © Müller-Elektronik GmbH & Co.KG
TaskManager application<br />
Step 4: Starting a task 8<br />
▪ Machine<br />
▪ Worker<br />
You will only be able to alter these parameters once you start the task.<br />
8.5<br />
Procedure<br />
Step 4: Starting a task<br />
You can start every task irrespective of its status.<br />
1. Switch to the "Task list" screen.<br />
⇨ The following screen will appear:<br />
2. Click on the desired task.<br />
⇨ The following screen will appear:<br />
3. - Start the task.<br />
Copyright © Müller-Elektronik GmbH & Co.KG 75
8<br />
TaskManager application<br />
Step 4: Starting a task<br />
⇨ The following screen will appear:<br />
⇨ The task has a new status: Green – task started.<br />
⇨ The following function icons will appear:<br />
- Stop task.<br />
- Navigate to field.<br />
⇨ You have started the task.<br />
You now have the following options:<br />
▪ You can select machines. [➙ 76]<br />
▪ You can select workers. [➙ 79]<br />
▪ You can let the application navigate you to the field. (Only if FIELD-Nav has been activated.) To<br />
learn how to do so, read the FIELD-Nav operating instructions.<br />
▪ You can stop the task. [➙ 85]<br />
8.5.1<br />
Selecting the machine<br />
This step requires that you select the machines and farm equipment which will be used to process<br />
the task.<br />
You can add any number of machines and farm equipment.<br />
The terminal records the length of time worked by the machines you added.<br />
Controls<br />
Add machine<br />
Reactivate deactivated machine (press and hold)<br />
Deactivate machine<br />
Icons<br />
Machines can be activated or deactivated. For each machine, the terminal calculates the length of<br />
time for which it was activated.<br />
The icon preceding the name of the machine indicates whether the machine is activated or<br />
deactivated.<br />
76 Copyright © Müller-Elektronik GmbH & Co.KG
TaskManager application<br />
Step 4: Starting a task 8<br />
Machine is deactivated<br />
(red background)<br />
Machine is activated<br />
(green background)<br />
no icon<br />
If you are processing the task using a machine not intended for this purpose, no icon<br />
will appear before the machine's name.<br />
Procedure 1<br />
You can select a machine from a list as follows<br />
You have started a task.<br />
1. Click on the following line on the "Task data" screen:<br />
⇨ The following screen will appear:<br />
⇨ The screen contains a list of all machines which you have assigned to this task. If you<br />
process the task using the assigned machine, the machine displayed will be activated<br />
immediately. If you are processing the task using a machine not assigned to this task, no<br />
icon will appear before the machine's name.<br />
⇨ If the machine "ME_ISO_Spritze" appears at this point, you have not created an ISO<br />
machine in your <strong>Farm</strong> Management Information System.<br />
2. - Add machines.<br />
Copyright © Müller-Elektronik GmbH & Co.KG 77
8<br />
TaskManager application<br />
Step 4: Starting a task<br />
⇨ A list of machines and farm equipment will appear:<br />
3. Click on the desired machine or equipment on the list.<br />
For instance, a tractor with which you wish to pull a sprayer.<br />
⇨ The following screen will appear:<br />
⇨ You will find the following information below the name of the machine:<br />
- For activated machines: Date and time of activation<br />
- For deactivated machines: Date and time of deactivation<br />
4. Add additional machines or farm equipment.<br />
⇨ You have selected a machine.<br />
Procedure 2<br />
You can reactivate a deactivated machine as follows:<br />
1. Click on the following line on the "Task data" screen:<br />
2. Select a deactivated machine from the list.<br />
3. - Press and hold for 3 seconds.<br />
⇨ Machine will be activated.<br />
78 Copyright © Müller-Elektronik GmbH & Co.KG
TaskManager application<br />
Step 4: Starting a task 8<br />
8.5.2<br />
Selecting a worker<br />
This step requires that you select the workers who will process the task.<br />
You can add any number of workers.<br />
The terminal records the length of time worked by the workers you added.<br />
Controls<br />
Add worker<br />
(grey asterisk next to the image of the worker)<br />
End worker's shift<br />
(red x next to the image of the worker)<br />
Icons<br />
Workers can be activated or deactivated. The terminal will calculate the amount of time worked by the<br />
workers you activated.<br />
The icon preceding the name of the worker indicates whether the worker is activated or deactivated.<br />
Worker is deactivated<br />
(red background)<br />
Worker is activated<br />
(green background)<br />
no icon<br />
No icon will precede the name of the worker assigned to the task.<br />
Procedure 1<br />
You can activate a worker as follows:<br />
1. Click on the following line on the "Task data" screen:<br />
⇨ The following screen will appear:<br />
2. Select the name of an assigned or deactivated worker on the list.<br />
3. - Press and hold for 3 seconds.<br />
⇨ Worker will be activated.<br />
Copyright © Müller-Elektronik GmbH & Co.KG 79
8<br />
TaskManager application<br />
Step 4: Starting a task<br />
Procedure 2<br />
You can activate a worker, who was not previously assigned to the task, as follows:<br />
1. Click on the following line on the "Task data" screen:<br />
⇨ The following screen will appear:<br />
The name of the assigned worker will appear on the screen. However, this worker has not<br />
yet been activated.<br />
2. – Add worker.<br />
⇨ A list of names of available workers will appear.<br />
3. Click on the desired worker on the list.<br />
⇨ The following screen will appear:<br />
The selected worker has been added and activated.<br />
⇨ You will find the following information below the name of the worker:<br />
- For activated workers: Date and time of activation<br />
- For deactivated workers: Date and time of deactivation<br />
⇨ You have selected a worker.<br />
80 Copyright © Müller-Elektronik GmbH & Co.KG
TaskManager application<br />
Step 5: Using the TaskManager application during work 8<br />
8.6<br />
Step 5: Using the TaskManager application during work<br />
8.6.1<br />
Procedure<br />
Entering a change of shift<br />
1. Click on the following line on the "Task data" screen:<br />
2. - End the active worker's shift.<br />
⇨ The amount of time worked by the worker will no longer be recorded from now on.<br />
3. – Add worker.<br />
⇨ A list of names of available workers will appear.<br />
If the name of the desired worker does not appear, the worker has not yet been created in<br />
the <strong>Farm</strong> Management Information System.<br />
4. Click on the desired worker on the list.<br />
⇨ The worker will be added to the task.<br />
⇨ The counters will begin to record the length of time spent working.<br />
⇨ You have selected a worker.<br />
8.6.2<br />
Procedure<br />
Altering rates<br />
1. Click on the following line on the "Task data" screen:<br />
2. Click on the first field next to the icon .<br />
3. Enter the desired rate.<br />
4. - Confirm and save your entry.<br />
⇨ The machine will adopt the rate.<br />
8.6.3<br />
Selecting the task processing phase<br />
Setting the task processing phase allows you to calculate the tasks more accurately.<br />
The phase of task processing is visible on the "Task data" screen:<br />
The following phases exist:<br />
▪ Driving time (to field)<br />
▪ Preparation<br />
▪ Working time<br />
▪ Break<br />
▪ Repair time<br />
Copyright © Müller-Elektronik GmbH & Co.KG 81
8<br />
TaskManager application<br />
Step 5: Using the TaskManager application during work<br />
Procedure<br />
1. Click on the following line on the "Task data" screen:<br />
TSK-(serial task number)<br />
⇨ The following screen will appear:<br />
2. Click on the desired phase of task processing.<br />
⇨ The new phase is visible on the "Task data" screen.<br />
8.6.4<br />
Evaluating counters<br />
When you start a task, you can evaluate the counter while you are spreading your mix.<br />
The counter will appear on the "Task data" screen.<br />
82 Copyright © Müller-Elektronik GmbH & Co.KG
TaskManager application<br />
Step 5: Using the TaskManager application during work 8<br />
Task data screen with counter<br />
The values gathered by the counter are updated two to three times per minute.<br />
The counters displayed depend on which machine is connected.<br />
8.6.5<br />
Procedure<br />
Displaying the counters of a machine<br />
1. Switch to the "Task data" screen.<br />
2. Click on the following line on the "Task data" screen:<br />
⇨ A screen will appear with the selected machines.<br />
3. - Click on the desired machine.<br />
⇨ The counters of the machine you clicked on will appear on the "Task data" screen.<br />
8.6.6<br />
Documenting filling and emptying<br />
With ISO machines, filling and emptying are automatically documented.<br />
With non-ISO machines, you can document filling and emptying using the "TaskManager" application.<br />
You can evaluate the documented values in the <strong>Farm</strong>Pilot portal.<br />
Example 1<br />
Example 2<br />
After weighing a tipper truck, the driver can enter that he has loaded 20 tonnes of maize.<br />
After spreading 5000 litres of manure with a non-ISO manure truck, the driver can enter the quantity<br />
spread as 'emptying'.<br />
Controls<br />
Function icon<br />
Function<br />
Enter filled capacity<br />
Enter emptied capacity<br />
Procedure<br />
Thus you can document the filling or emptying of a container for non-ISO machines.<br />
Copyright © Müller-Elektronik GmbH & Co.KG 83
8<br />
TaskManager application<br />
Step 5: Using the TaskManager application during work<br />
You have started a task.<br />
1. Open the "Task list" screen.<br />
2. Click on the following line:<br />
Filling/Emptying<br />
⇨ The following screen will appear:<br />
3. Press the desired function key.<br />
- Enter filled capacity<br />
- Enter emptied capacity<br />
⇨ The following screen will appear:<br />
⇨ You can identify whether you are entering the filled capacity or the emptied capacity by the<br />
icon in the upper left hand corner.<br />
4. The screen consists of three columns, in which you can enter data:<br />
In the left hand column: Enter capacity.<br />
In the middle column: Enter the unit.<br />
l = litres<br />
t = tonnes<br />
In the right hand column: Select from a list the product to be filled or emptied.<br />
84 Copyright © Müller-Elektronik GmbH & Co.KG
TaskManager application<br />
Step 6: Stopping work 8<br />
5. - Exit screen.<br />
6. The following notification will appear:<br />
“Save changes“<br />
7. Click "Yes" to confirm.<br />
⇨ The "Task data" screen will appear.<br />
8.6.7<br />
Procedure<br />
Exiting the TaskManager application<br />
You can exit the TaskManager application at any time. This will neither finish nor cancel the tasks.<br />
1. - Open the "Selection menu" application.<br />
⇨ The selection menu will appear.<br />
2. Start the desired application.<br />
8.7<br />
Step 6: Stopping work<br />
You can stop a task at any time. You must decide yourself whether this task has been fully processed<br />
or must be processed further.<br />
If you stop the work, you must decide what should happen to the task. Depending on whether the<br />
task was fully processed or must be processed further, you have the following options:<br />
▪ Stop task<br />
▪ Pause task<br />
8.7.1<br />
Stopping a task<br />
When you stop a task, <strong>Farm</strong>Pilot will consider this task to be fully completed.<br />
Therefore, you should only stop tasks if they have been completed.<br />
Procedure<br />
1. Switch to the "Task data" screen.<br />
2. - Stop task.<br />
⇨ The task will be stopped.<br />
⇨ The task will be marked red on the "Task list" screen.<br />
8.7.2<br />
Pausing a task<br />
You can pause a task if you need to interrupt your work, but have not yet completed the task.<br />
A task will only be paused if you start another task.<br />
Copyright © Müller-Elektronik GmbH & Co.KG 85
8<br />
TaskManager application<br />
Step 6: Stopping work<br />
Procedure<br />
You have started a task and are on the "Task data" screen:<br />
1. Switch to the "Task list" screen while the task is started.<br />
⇨ The following screen will appear:<br />
The active task is marked green.<br />
2. Click on any task, preferably one that has been stopped.<br />
⇨ The following screen will appear:<br />
86 Copyright © Müller-Elektronik GmbH & Co.KG
TaskManager application<br />
Step 7: Transferring completed tasks to the <strong>Farm</strong> Management Information System 8<br />
3. - Start task<br />
⇨ The active task will be paused and the task you have selected will be started.<br />
4. - Stop task.<br />
⇨ The task will be stopped.<br />
⇨ The original task will be marked yellow on the "Task list" screen.<br />
⇨ The paused task is now marked yellow.<br />
8.8<br />
Step 7: Transferring completed tasks to the <strong>Farm</strong> Management Information<br />
System<br />
When you have finished processing a task or set of tasks, you can export the completed tasks from<br />
the terminal for further processing and evaluation.<br />
The following options are available to you:<br />
▪ Transfer tasks to the <strong>Farm</strong> Management Information System using a USB flash drive<br />
▪ Send a set of tasks to the <strong>Farm</strong>Pilot portal<br />
8.8.1<br />
Procedure<br />
Transferring tasks using a USB flash drive<br />
You have completed all tasks.<br />
All tasks are marked red on the task list.<br />
1. Open the "Master data" screen.<br />
2. - Write task data to the USB flash drive.<br />
⇨ Wait until the icon<br />
flashing.<br />
disappears and the LED on the USB flash drive stops<br />
3. Remove the USB flash drive.<br />
4. Connect the USB flash drive to the farm computer.<br />
Copyright © Müller-Elektronik GmbH & Co.KG 87
8<br />
TaskManager application<br />
Important files stored on the USB flash drive<br />
5. Import and process data with the <strong>Farm</strong> Management Information System.<br />
8.8.2<br />
Procedure<br />
Uploading a set of tasks to the <strong>Farm</strong>Pilot portal<br />
You have received the processed tasks via <strong>Farm</strong>Pilot.<br />
You have completed all tasks. All tasks are marked red on the task list.<br />
1. Open the "Master data" screen.<br />
⇨ The following screen will appear:<br />
2. - Upload a set of tasks to the <strong>Farm</strong>Pilot portal.<br />
⇨ The following notification will appear:<br />
“Start uploading task data“<br />
3. - Confirm.<br />
⇨ The data are being loaded.<br />
⇨ The transferred task data will no longer be displayed on the terminal.<br />
⇨ A new folder is being created on the USB flash drive: "TaskData_work(serial number)".<br />
Backup copies of the tasks sent to the <strong>Farm</strong>Pilot portal will be created in this folder.<br />
⇨ You have uploaded a set of tasks to the portal.<br />
8.9<br />
Important files stored on the USB flash drive<br />
All task data, field data and machine data will be saved on the USB flash drive. This makes it possible<br />
to transfer these data between the terminal and the <strong>Farm</strong> Management Information System.<br />
All files have standardised names which may not be altered.<br />
The folders that must be stored on the USB flash drive vary depending on whether you are using the<br />
terminal in conjunction with the <strong>Farm</strong>Pilot portal or transfering the data from the <strong>Farm</strong> Management<br />
Information System using a USB flash drive.<br />
Important files:<br />
The files specified here may appear in various folders.<br />
TASKDATA.xml – A file containing all task data stored in the <strong>Farm</strong> Management Information<br />
System. The file will be saved from the <strong>Farm</strong> Management Information System either onto the hard<br />
drive of the farm computer or onto a USB flash drive.<br />
88 Copyright © Müller-Elektronik GmbH & Co.KG
TaskManager application<br />
Important files stored on the USB flash drive 8<br />
When using the <strong>Farm</strong>Pilot portal, the file will automatically be created in the folder "TaskData_work".<br />
When working without the <strong>Farm</strong>Pilot portal, you must copy the file from the hard drive to the folder<br />
"TASK DATA" on the USB flash drive.<br />
The Taskdata.xml file must not be larger than 2 MB. Files that are too large may cause problems<br />
during data transfer and slow down the terminal considerably.<br />
GRD{number}.bin – A file containing the application cards for a field. If you wish to use the task<br />
manager in combination with application cards, you must transfer this file to the terminal as well.<br />
Important folders:<br />
TaskData – A folder containing all tasks of a set of tasks that are currently being processed.<br />
This folder will only be required if you use the "TaskManager" application without <strong>Farm</strong>Pilot.<br />
Also read the chapter: Creating a "Task data" folder on the USB flash drive [➙ 62]<br />
TaskData_work – A folder containing all tasks of a set of tasks that are currently being processed.<br />
This folder will be created automatically when the USB flash drive is inserted into the terminal. It will<br />
then replace the task data folder until the task data are written to the USB flash drive. Thus, until the<br />
function key<br />
is pressed.<br />
TaskData(number) – Backup copies of the tasks sent to the <strong>Farm</strong>Pilot portal will be created in this<br />
folder.<br />
The folder will automatically be created on the USB flash drive when using the <strong>Farm</strong>Pilot portal. This<br />
requires that the USB flash drive be inserted into the terminal.<br />
Copyright © Müller-Elektronik GmbH & Co.KG 89
9<br />
Maintenance and servicing<br />
Servicing and cleaning the terminal<br />
9<br />
Maintenance and servicing<br />
NOTICE<br />
This product does not contain any components which require maintenance or repair!<br />
Never unscrew the casing!<br />
9.1<br />
9.2<br />
Servicing and cleaning the terminal<br />
▪ Press the keys with your fingertips. Avoid using your finger nails.<br />
▪ Only clean the product with a soft, damp cloth.<br />
▪ Only use clear water or glass cleaner.<br />
Disposing of the unit<br />
When it has reached the end of its service life, please dispose of this product as<br />
electronic scrap in accordance with applicable EU legislation.<br />
9.3<br />
Procedure<br />
Checking the software version<br />
1. Open the "Service" application:<br />
| Service<br />
2. The following screen will appear:<br />
3. The software version can be found below the ME logo.<br />
9.4<br />
Technical specifications<br />
9.4.1<br />
Technical specifications of the terminal<br />
Parameter<br />
Operating voltage<br />
Value<br />
10 - 30 V<br />
Operating temperature -20 - +70 °C<br />
90 Copyright © Müller-Elektronik GmbH & Co.KG
Maintenance and servicing<br />
Technical specifications 9<br />
Parameter<br />
Value<br />
Storage temperature -30 - +80 °C<br />
Dimensions (W x H x D)<br />
340 x 250 x 100 mm<br />
Protection class IP 54 in accordance with DIN 40050/15<br />
EMC In accordance with ISO 14982 / PREN 55025<br />
ESD protection In accordance with 10605<br />
Power input At terminal: 30322527<br />
Typically: 0.9 A at 13.8 V<br />
without external equipment<br />
At terminal: 30322528<br />
Typically: 0.8 A at 13.8 V<br />
without external equipment<br />
Display<br />
Processor<br />
RAM<br />
Boot USB<br />
Keyboard<br />
Outputs<br />
VGA TFT colour display; display size (diagonal): 26 cm ; resolution:<br />
640 x 480 pixels<br />
32-bit ARM920T up to 400 MHz<br />
64 MB SDRAM<br />
128 MB<br />
17 illuminated keys plus rotary knob<br />
2 x CAN<br />
1 x USB<br />
1 x RS232<br />
2 x M12 for two analogue cameras (optional)<br />
9.4.2<br />
Pin assignment of port A<br />
Port A is a 9-pin D-sub port of the ISO agricultural machinery interface (CAN).<br />
Pin no.: Signal: Pin no.: Signal<br />
1 CAN_L 6 - Vin 1 (GND)<br />
2 CAN_L 1 7 CAN_H 1<br />
3 CAN_GND 1 8 CAN_EN_out 2<br />
4 CAN_H 9 + Vin 1<br />
5 CAN_EN_in<br />
Legend:<br />
Copyright © Müller-Elektronik GmbH & Co.KG 91
9<br />
Maintenance and servicing<br />
Technical specifications<br />
+Vin = voltage supply (+)<br />
–Vin = ground (-)<br />
1) - Signals marked with 1 correspond to the CiA assignment (CAN in automation).<br />
Both signals CAN_L and CAN_L 1 and/or CAN_H and CAN_H 1 are linked internally and used to loop<br />
the CAN bus through.<br />
Assigning CAN_EN_in to the supply potential (= +Vin) enables the terminal to be switched on.<br />
The signals '-Vin' and 'CAN_GND' are directly linked with both connectors, therefore it is crucial to<br />
avoid differences in potential between the pins of these two connectors.<br />
2) is compliant with TBC_Pwr in ISO 11783. When the terminal is switched on, this pin is under<br />
voltage (supply voltage minus approx. 1.2V).<br />
9.4.3<br />
Pin assignment of port B<br />
Port B is a 9-pin D-Sub port.<br />
The connector can be used for the following purposes depending on its assignment:<br />
Purpose<br />
Pins used<br />
As second CAN interface 7, 9<br />
As second serial interface 2, 3, 4, 5<br />
As signal input for two digital and one analog<br />
signal.<br />
1, 5, 6, 8<br />
Pin assignment of port B<br />
Pin no.: Signal: Pin no.: Signal<br />
1 Wheel sensor 1 6 Joint shaft 2<br />
2 /RxD 7 CAN_H<br />
3 /TxD 8 Operating position sensor 3<br />
4 Voltage supply for GPS receiver<br />
A100 4<br />
9 CAN_L<br />
5 GND<br />
Legend:<br />
1 ) Digital input pursuant to: ISO 11786:1995 chapter 5.2<br />
2 ) Digital input pursuant to: ISO 11786:1995 chapter 5.3<br />
3 ) Analog input pursuant to: ISO 11786:1995 chapter 5.5<br />
4 ) The pin is switched in parallel with pin 4 by port C. Total loading is 600mA.<br />
92 Copyright © Müller-Elektronik GmbH & Co.KG
Maintenance and servicing<br />
Technical specifications 9<br />
9.4.4<br />
Pin assignment of port C<br />
Port C is an RS232 interface<br />
CAUTION<br />
Damage to the equipment caused by short circuit<br />
Pin 4 of port C is live. The voltage depends on the operating voltage of the terminal and is used to<br />
supply the DGPS Receiver A100 from Müller Elektronik.<br />
Other GPS Receivers may suffer damage if connected to this port.<br />
Before connecting a different GPS Receiver:<br />
◦ Check what voltage the terminal is connected to (12 V or 24 V).<br />
◦ Check the pin assignment of the GPS Receiver.<br />
◦ Check the allowable voltage for the GPS Receiver.<br />
◦ Compare the terminal voltage to the allowable voltage for the GPS Receiver.<br />
◦ Compare the pin assignment.<br />
◦ Only connect the GPS Receiver to the terminal, if the voltage range and pin assignment of both<br />
devices don't differ from each other.<br />
Pin assignment of port C<br />
Pin no.:<br />
Signal<br />
1 DCD<br />
2 /RxD<br />
3 /TxD<br />
4 Voltage supply for GPS receiver A100 1<br />
5 GND<br />
6 DSR<br />
7 RTS<br />
8 CTS<br />
9 RI (+5 V)<br />
Legend:<br />
1 ) The pin is switched in parallel with pin 4 by port B. Total loading is 600mA.<br />
When switched on, the terminal routes current to the farm equipment that is connected via the RS232<br />
connector. The voltage of the RS232 connector is dependent on the operating voltage of the terminal.<br />
When connected to a 12 V battery, the terminal will transfer approx. 11.3 V to the connected<br />
equipment.<br />
Copyright © Müller-Elektronik GmbH & Co.KG 93
9<br />
Maintenance and servicing<br />
Technical specifications<br />
When connected to a 24 V battery, the terminal will transfer approx. 23.3 V to the connected<br />
equipment.<br />
The use of a GPS Receiver only requires the signals RxD and TxD as well as GND.<br />
9.4.5<br />
Pin assignment of camera ports 1 and 2<br />
Ports 1 and 2 are used to connect an analogue camera. The pin assignment is identical for both<br />
ports.<br />
Ports 1 and 2 are 5-pin, A-encoded M12 sockets. Please refer to the following table for the pin<br />
assignment.<br />
Pin assignment of the socket (in<br />
the terminal)<br />
Pin assignment of the connector<br />
Pin<br />
Signal<br />
1 Pin is exclusively intended for use by ME (do not connect anything)<br />
2 GND<br />
3 Pin is exclusively intended for use by ME (do not connect anything)<br />
4 Video signal<br />
5 Video screen<br />
Outer sheathing<br />
Screen<br />
94 Copyright © Müller-Elektronik GmbH & Co.KG
Notes<br />
10<br />
10<br />
Notes<br />
Copyright © Müller-Elektronik GmbH & Co.KG 95