USER GUIDE - GN ReSound
USER GUIDE - GN ReSound
USER GUIDE - GN ReSound

You also want an ePaper? Increase the reach of your titles
YUMPU automatically turns print PDFs into web optimized ePapers that Google loves.
The receiver tube<br />
The receiver tube contains the wiring to the receiver which delivers the sound to the ear canal. It is important<br />
that the receiver tube and the receiver dome/RIE mold fits correctly in your ear. If the receiver tube or the<br />
receiver dome/RIE mould irritates your ear in any way and prevents you from wearing your hear ing instrument,<br />
please contact your hearing care pro fessional. You should never attempt to modify the shape of the<br />
receiver tube yourself. The receiver tube and the receiver dome/RIE mould should be cleaned regularly.<br />
Please see instructions in the next section.<br />
i Cleaning the receiver tubes and domes<br />
The receiver tube and the receiver dome should be cleaned regularly. Use a damp cloth to clean the receiver<br />
tube and receiver dome on the outside. Do not use water when you are cleaning the receiver tubes<br />
or the receiver domes. Please see instruction on page 30 or 31 for how to change the wax guard filter.<br />
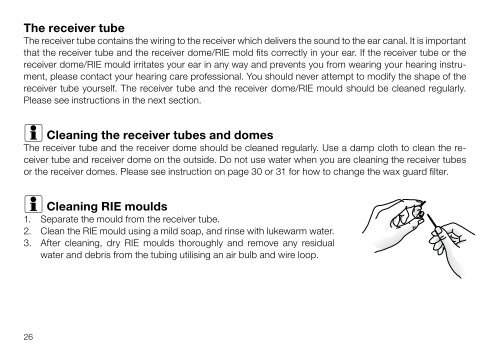
i Cleaning RIE moulds<br />
1. Separate the mould from the receiver tube.<br />
2. Clean the RIE mould using a mild soap, and rinse with lukewarm water.<br />
3. After cleaning, dry RIE moulds thoroughly and remove any residual<br />
water and debris from the tubing utilising an air bulb and wire loop.<br />
Changing wax guard for receiver tube<br />
1 2 3 4 5 6<br />
7<br />
8<br />
9<br />
10<br />
For NP receivers:<br />
1. Clean any debris from the old waxguard.<br />
2. Insert the wand into the old waxguard.<br />
3. Twist the wand with the waxguard in a clockwise direction to ensure it is attached to the wand.<br />
4. Pull the wand and waxguard away from the tube/mould.<br />
5. Insert the old waxguard into the center of the HF3 wheel.<br />
6. Dispose of the old waxguard by drawing the wand to the narrow end of the center disposal area.<br />
7. Insert the empty wand into a new waxguard on the HF3 wheel.<br />
8. Pull the new waxguard attached to the wand away from the HF3 wheel.<br />
9. Insert the wand into the receiver tube/mould.<br />
10. Twist the wand to release the new waxguard onto the receiver tube/mould.<br />
For S and HP 2 receivers:<br />
1. To remove the old wax guard, insert the removal side of the wax guard tool into the used wax guard<br />
so that the shaft of the tool is touching the rim of the wax guard. Slowly pull the wax guard straight<br />
out.<br />
2. To insert the ne w wax guard, gently press the replacement side of the wax guard tool straight into<br />
the hole of the sound outlet until the outer ring lies flush with the outside of the receiver. Pull the tool<br />
straight out -the new wax guard will remain in place.<br />
26 27