USER GUIDE - GN ReSound
USER GUIDE - GN ReSound
USER GUIDE - GN ReSound

Create successful ePaper yourself
Turn your PDF publications into a flip-book with our unique Google optimized e-Paper software.
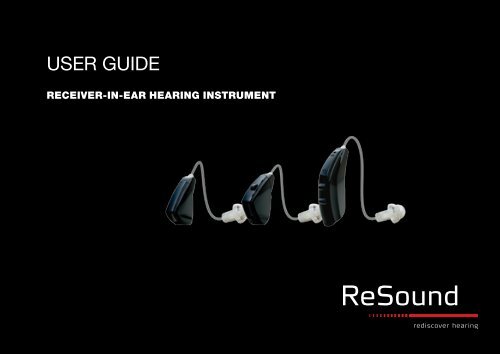
<strong>USER</strong> <strong>GUIDE</strong><br />
Receiver-In-Ear Hearing Instrument
Hearing instrument type designations for models included in this user guide are: SY312, FCC ID: X26SY312,<br />
IC: 6941C-SY312; SY312e, FCC ID: X26SY312e, IC: 6941C-SY312e; and MRIE, FCC ID: X26MRIE, IC:<br />
6941C-MRIE. Please see page 6 for list of models referring to all types.<br />
Statement:<br />
This device complies with Part 15 of the FCC Rules.<br />
Operation is subject to the following two conditions: (1) this device may not cause harmful inter ference,<br />
and (2) this device must accept any interference received, including interference that may cause undesired<br />
operation.<br />
Note: This equipment has been tested and found to comply with the limits for a Class B digital device, pursuant<br />
to part 15 of the FCC Rules. These limits are designed to provide reasonable protection against harmful<br />
interference in a residential installation. This equipment generates, uses and can radiate radio frequency<br />
energy and, if not installed and used in accordance with the instructions, may cause harmful interference<br />
to radio communications. However, there is no guarantee that interference will not occur in a particular<br />
installation. If this equipment does cause harmful interference to radio or television reception, which can be<br />
determined by turning the equipment off and on, the user is encouraged to try to correct the interference<br />
by one or more of the following measures:<br />
• Reorient or relocate the receiving antenna.<br />
• Increase the separation between the equipment and receiver.<br />
• Connect the equipment into an outlet on a circuit different from the one in which the receiver is connected.<br />
• Consult the dealer or an experienced radio/TV technician for help.<br />
Changes or modifications can void the user´s authority to operate the equipment<br />
Intended use<br />
Generic air-conduction hearing instruments are wearable sound-amplifying devices intended to compensate<br />
for impaired hearing. The fundamental operating principle of hearing instruments is to receive, amplify,<br />
and transfer sound to the ear drum of a hearing impaired person.<br />
List of countries:<br />
Products without wireless functionality are intended for worldwide sales.<br />
Products with wireless functionality are intended for sale in countries within European Economic Area as<br />
well as Switzerland.<br />
Specification of restrictions: You are not allowed to operate the equipment within 20 km of the centre<br />
of Ny Ålesund, Norway.<br />
The products are in compliance with the following regulatory requirements:<br />
• In EU: the device conforms to the Essential Requirements according to Annex I of Council Directive<br />
93/42/EEC for medical devices (MDD) and essential requirements and other relevant provisions of Directive<br />
1999/5/EC (R&TTE).<br />
• The declaration of conformity may be consulted at www.resound.com<br />
• In US: FCC CFR 47 Part 15, subpart C, section 15.249<br />
• Other identified applicable international regulatory requirements in countries outside EU and US. Please<br />
refer to local country requirements for these areas.<br />
• Products are categorized as receiver category 2 according to EN 300 440<br />
• In Canada these hearing instruments are certified under models: SY312/IC: 6941C-SY312; SY312e/<br />
IC:6941C-SY312e; and MRIE/IC: 6941C-MRIE.<br />
2 3
• This Class B digital apparatus complies with Canadian ICES-003. Cet appareil numérique de la classe<br />
B est conforme à la norme NMB-003 du Canada.<br />
• Operation is subject to the following two conditions: (1) this device may not cause interference, and (2) this<br />
device must accept any interference, including interference that may cause undesired operation of the device.<br />
• In Japan, this device has been granted a designation number by Ministry of Internal Affairs and Communications<br />
under “Ordinance Concerning Technical Regulations Conformity Certification, etc., of Specified<br />
Radio Equipment ( 特 定 無 線 設 備 の 技 術 基 準 適 合 証 明 等 に 関 する 規 則 ) ‘Article 2-1-19.’ This device<br />
should not be modified (otherwise the granted designation number will be invalid).”<br />
Introduction<br />
Congratulations on the purchase of your new hearing instruments. <strong>ReSound</strong>’s innovative sound technology<br />
and design, combined with the customised device programming selected by your hearing care professional,<br />
will make hearing a more enjoyable experience. Hearing instruments will enable you to hear sounds<br />
that you may not have heard in years because of your hearing loss. Practice and a positive attitude are<br />
important in learning to use hearing instruments. Your <strong>ReSound</strong> instruments have been adjusted according<br />
to your individual hearing loss and needs. Some people adjust quickly to wearing hearing instruments in<br />
their ears and hearing new sounds; other people may need more time.<br />
Please read this manual carefully in order to wholly benefit from the use of your hearing instruments. With<br />
proper care, maintenance, and usage, your hearing instruments will aid you in better communication for<br />
many years. Ask your hearing care professional if you have any questions.<br />
Hearing instrument model:<br />
Model 60: Battery size 10<br />
Model 61: Battery size 312<br />
Model 62: Battery size 312<br />
Receiver tube length:<br />
Dome size:<br />
Left serial number:<br />
Right serial number:<br />
<strong>ReSound</strong> is a registred trade mark of <strong>ReSound</strong> A/S<br />
4 5
Micro receiver-in-the-ear (RIE) hearing<br />
instruments with size 10A battery are<br />
available in the following variants:<br />
AL960-DR, AL760-DR, AL560-DR<br />
ALT960-DR<br />
VO960-DR, VO760-DR, VO560-DR,<br />
VOT960-DR, VOT760-DR<br />
Mini receiver-in-the-ear (RIE) hearing<br />
instruments of type SY312 with FCC ID<br />
X26SY312, IC number 6941C-SY312 and<br />
size 312 battery are available in the<br />
following variants:<br />
AL961-DRW, AL761-DRW<br />
AL561-DRW, AL461-DRW<br />
ALT961-DRW<br />
Mini receiver-in-the-ear (RIE) hearing<br />
instruments of type SY312e with FCC ID<br />
X26SY312e, IC number 6941C-SY312e and<br />
size 312 battery are available in the following<br />
variants:<br />
VO961-DRW, VO761-DRW, VO561-DRW,<br />
VOT961-DRW, VOT761-DRW<br />
Receiver-in-the-ear (RIE) hearing<br />
instruments of type MRIE with FCC ID<br />
X26MRIE, IC number 6941C-MRIE and size<br />
312 battery are available in the following<br />
variants:<br />
AL962-DVIRW, AL762-DVIRW<br />
AL562-DVIRW, AL462-DVIRW<br />
ALT962-DVIRW<br />
VO962-DRW, VO762-DRW, VO562-DRW,<br />
VOT962-DRW, VOT762-DRW<br />
The identification number for the MRIE, SY312 and<br />
SY312e device models can be found at location<br />
“15” as indicated in the illustrations on page 9.<br />
Contents<br />
Introduction .................................4<br />
Description of the hearing instruments ............8<br />
Getting started ..............................10<br />
On/Off function .............................10<br />
SmartStart .................................10<br />
Inserting/Replacing the battery .................10<br />
Low battery indicator .........................11<br />
Sports lock.................................12<br />
Inserting/removing hearing instruments ..........12<br />
Program and Multi-Function buttons.............14<br />
Flight mode ................................17<br />
Telephone use ..............................19<br />
Listen to radio or TV..........................20<br />
Cellular phones .............................20<br />
PhoneNow .................................20<br />
Telecoil (optional) ............................22<br />
Tele-loop systems ...........................23<br />
Direct audio input (optional) ...................23<br />
Connecting/Disconnecting audio boots ..........23<br />
Care and maintenance........................24<br />
Daily maintenance ...........................25<br />
The receiver tube ...........................26<br />
Cleaning the receiver tubes and domes ..........26<br />
Cleaning RIE moulds .........................26<br />
Replacing the wax filter (receiver in-the-ear models). 27<br />
How to apply domes .........................28<br />
Using <strong>ReSound</strong> hearing instruments with<br />
smart phone apps . . . . . . . . . . . . . . . . . . . . . . . . . . . 29<br />
General precautions..........................30<br />
General warnings............................30<br />
Tinnitus Sound Generator (TSG) module .........32<br />
The scientific concepts that form<br />
the basis for the device .......................34<br />
Significant physical characteristics ..............34<br />
Prescription use of this TSG hearing instrument....35<br />
Important notice for prospective<br />
sound generator users........................35<br />
TSG warning to hearing healthcare professionals...36<br />
Battery warning Information....................37<br />
Hearing instrument expectations................37<br />
Warning to hearing aid dispensers ..............38<br />
Important notice for prospective hearing aid users..38<br />
Children with hearing loss .....................39<br />
Troubleshooting guide ........................40<br />
Technical data ..............................44<br />
Warranty and repairs .........................54<br />
Temperature test, transport<br />
and storage information.......................54<br />
6 7
1. Receiver tube<br />
2. Receiver Open Dome<br />
3. Receiver Tulip Dome<br />
4. Receiver Power Dome<br />
5. RIE mould<br />
6. Sports lock<br />
7. Battery compartment<br />
8. Receiver<br />
9. Push button<br />
10. Volume Control (optional)<br />
11. S receiver tube<br />
12. NP receiver tube<br />
13. HP receiver tube<br />
14. Left/right indicator<br />
15. Model, and serial number<br />
16. Direct audio input<br />
7<br />
60 models<br />
1<br />
8<br />
2<br />
61 models<br />
(type SY312e<br />
and SY312)<br />
7<br />
9<br />
1<br />
8<br />
2<br />
3<br />
9, 10<br />
7<br />
62 models<br />
(type MRIE)<br />
1<br />
4<br />
8<br />
2<br />
5<br />
(Indentification number for the<br />
SY312e and SY312 devices)<br />
15<br />
14<br />
15<br />
16<br />
14<br />
11 12<br />
13<br />
6<br />
8 9
Getting started<br />
On/Off function<br />
1. When the battery door is closed, the hearing instrument turns on,<br />
and the default program will be activ ated.<br />
2. To turn off the hearing instrument, open the battery door. Use your<br />
fingernail to pull it open.<br />
On<br />
Off<br />
i Tip:<br />
1. Always use new Zinc-Air batteries that have a minimum remaining shelf life of one year.<br />
2. Whenever the hearing instruments are not in use, remember to turn them off to avoid unnecessary<br />
battery consumption.<br />
SmartStart<br />
Hearing instruments can be turned on once you have placed them on<br />
your ears. If you prefer to turn them on just prior to placing them on your ear, your hearing care professional<br />
can activate a function called SmartStart. This function will delay the time in which the hearing instruments<br />
turn on by ten seconds after the battery compartment is closed. With SmartStart, a beep will be heard for<br />
each second of the delay period.<br />
Inserting/Replacing the battery<br />
1. Open the battery door completely by using your fingernail. Remove the used battery if present.<br />
2. Prepare the new battery (please refer to page 7 for information on appropriate battery type/size for your<br />
hearing instrument). Remove the protective foil and wait 2 minutes before inserting the battery into the<br />
hearing instrument to allow activation of the battery.<br />
3. Insert the new battery with the positive side in the<br />
2<br />
correct position.<br />
4. Gently close the battery door.<br />
3<br />
1<br />
Low battery indicator<br />
Your hearing care professional can set your hearing instrument to give an acoustical indication when the<br />
battery is reaching its end of life. The hearing instrument will reduce amplification and emit a melody if battery<br />
power gets too low. This signal will recur every five minutes until the hearing instrument automatically<br />
switches off. It is recommended that you keep spare batteries on hand.<br />
Low battery indicator (instruments paired with accessories only)<br />
Active usage of the <strong>ReSound</strong> Unite accessories (Remote Control, Phone Clip, TV Streamer and Mini Microphone)<br />
requires more battery power from the hearing instruments than when these are working on their own<br />
meaning that battery life is highly dependent on the amount of wireless accessory usage. When the battery<br />
in the hearing instrument has depleted to a level at which use of the <strong>ReSound</strong> Unite TV Streamer, Phone<br />
Clip and Mini Microphone cannot be supported, the hearing instrument will play two sets of descending<br />
tones. After this, your hearing instrument and <strong>ReSound</strong> Unite Remote Control will continue to work as usual,<br />
but you will not be able to use your <strong>ReSound</strong> Unite TV Streamer, Phone Clip and Mini Microphone. At some<br />
point the battery level will not support the remote control either and you will once again hear the descending<br />
tones. The hearing instruments will continue to work as usual. Once a new battery is inserted, full operation<br />
of the accessories will resume.<br />
10 11
Sports lock<br />
The sports lock will be applied or adjusted by your hearing care professional.<br />
Inserting/Removing hearing instruments<br />
Insertion (custom RIE moulds)<br />
1. Hold the RIE mould between your thumb and index finger and position its sound<br />
outlet in your ear canal.<br />
2. Slide the RIE mould all the way into your ear with a gentle, twisting movement.<br />
3. Move the RIE mould up and down and gently press to ensure it is positioned correctly<br />
in the ear. Opening and closing your mouth can ease insertion.<br />
4. Make sure the hearing instrument is seated behind the ear.<br />
By experimenting, an easier method may be discovered. With proper insertion, hearing<br />
instruments should fit snugly but comfortably. If hearing instruments cause irritation of<br />
the ears, contact your hearing care professional.<br />
i Never attempt to modify the shape of the hearing instrument, RIE moulds, or tubing<br />
yourself.<br />
i Tip: It may be helpful to pull the top of your ear back with your opposite hand during insertion to open<br />
the ear canal.<br />
Insertion (domes)<br />
1. Hold the receiver tube where it bends, and<br />
gently place the dome into the ear canal. Push<br />
the dome far enough into the ear canal so that<br />
the receiver tube lies flush with the side of the<br />
head.<br />
2. It is important that the tube and the dome fit<br />
correctly into your ear.<br />
3. When the dome is placed correctly, you should<br />
not be able to see the receiver tube sticking out<br />
when facing a mirror.<br />
i Note: You should never attempt to bend or modify the shape of the receiver tube.<br />
Removal (RIE moulds)<br />
1. Grasp the removal string and pull the RIE mould outward.<br />
2. Consult your hearing care professional if you have difficulties removing the hearing instrument.<br />
Removal (domes)<br />
1. Hold the receiver tube with your thumb and forefinger and remove the tube.<br />
2. Consult your hearing care professional if you have difficulties removing the<br />
hearing instrument.<br />
12 13
Program and Multi-Function buttons<br />
If you have a hearing aid with a program button or multi-function button, this will allow you to use up to four<br />
different listening programs, each of them suitable for certain situations.<br />
When using the program or multi-function buttons to switch programs, each press will move the instrument<br />
to the next program. For example, if it was in program 1 it will switch to program 2, if it was in program 2 it<br />
will switch to program 3 etc.<br />
When you close the battery door and switch the instrument on, it will start in program 1. Press the program<br />
or multi-function buttons if you want to move to a different listening program.<br />
If you have two hearing instruments with the synchronization function enabled, program changes to one<br />
instrument will automatically repeat in the second instrument. When a program change is made in one<br />
instrument, you will hear the same amount of confirmation beeps in the second instrument.<br />
Program button (61 models only)<br />
Your hearing care professional can fill out the following table for you.<br />
Multi-function button (62 models only)<br />
Your instrument has a fully automatic volume control. Therefore, it should not be necessary to control the<br />
volume manually.<br />
However, in addition to controlling listening programs, the multi-function button (62 models only) provides<br />
you with the ability to adjust the amplification to your liking.<br />
Programme<br />
1<br />
2<br />
3<br />
4<br />
Description of when to use<br />
If you have two hearing instruments with the synchronization function enabled and you have the Multifunction<br />
Button set for volume control functionality, volume adjustments to one instrument will automatically<br />
repeat in the second instrument. When a volume control adjustment is made in one instrument, you will hear<br />
a confirmation beep. A beep in the second instrument will follow.<br />
The multi-function button is designed to change the volume or listening programs of the hearing instrument,<br />
based on different ways it is pressed.<br />
14 15
If necessary, your hearing care practitioner can change these settings and fill in the following table to indicate<br />
the new settings:<br />
Multi-function button action Default setting New setting<br />
i Flight mode* (Wireless models only)<br />
When boarding a flight or entering an area where RF transmitters are prohibited, wireless functionality must<br />
be deactivated, as it is not allowed to radiate radio signals during flights or in otherwise restricted areas.<br />
Short press up<br />
Short press down<br />
Long press up (3 seconds)<br />
Long press down (3 seconds<br />
Increases volume<br />
Decreases volume<br />
Changes programs<br />
Activates streaming<br />
For Alera wireless hearing instruments follow the following steps to enter and leave flight mode:<br />
It is possible to disable wireless operation by opening and closing the battery compartment of the hearing<br />
instrument while at the same time pressing the push button.<br />
When disabled manually, wireless operation may be re-enabled by opening and closing the battery compartment<br />
normally, (i.e. without at the same time pressing the push button).<br />
For Verso wireless hearing instruments follow the following steps to enter and leave flight mode:<br />
It is possible to disable wireless operation by opening and closing the battery compartment three times<br />
within a ten second period (open-close, open-close, open-close). Your instruments will now be in flight<br />
mode.<br />
If the hearing instrument is in flight mode, the hearing instrument must have been operating in flight mode<br />
for at least 10 seconds before attempting to enable wireless again. it is possible to re-enable wireless operation<br />
by opening and closing the battery door once. 10 seconds after this operation is completed, wireless<br />
operation will begin again.<br />
*For wireless models only<br />
16 17
i<br />
Note: It is important to wait an additional 15 seconds after wireless function resumes before opening<br />
and closing the battery compartment again for any reason. If the battery compartment is opened and<br />
closed during this 15 second window, flight mode will resume.<br />
Telephone use<br />
If your hearing instruments are fit with a receiver open dome or receiver tulip dome, you can probably<br />
use the telephone as you normally would by holding it up to your ear canal opening. If your hearing<br />
instruments are fit with a receiver power dome or RIE mould, finding the optimal position for holding a<br />
telephone while using a hearing instrument may require practice for some individuals, and one or more<br />
of the following suggestions may be helpful.<br />
1. Hold the telephone as you would normally.<br />
2. Hold the telephone towards the top of the ear (closer to where the<br />
microphones are located).<br />
3. If whistling occurs, it may take a brief moment of holding the telephone in<br />
the same position before the hearing instrument adapts and reduces the<br />
feedback.<br />
4. Any whistling may also be decreased by holding the telephone slightly<br />
away from the ear.<br />
5. Depending on your individual needs, your hearing care professional may<br />
activate a programme specifically for telephone use.<br />
18 19
Listen to radio or TV<br />
When listening to the TV or the radio, start out by listening to news commentators since they usually speak<br />
clearly, then try other programmes.<br />
If you find it difficult to listen to TV or radio, your hearing care professional will be able to give you advice on<br />
available accessories to enhance your listening capabilities for TV and radio.<br />
Cellular phones<br />
Your hearing instrument is designed to comply with the most stringent Standards of International Electromagnetic<br />
Compatibility. However, not all cell phones are hearing instrument compatible. The varying degree<br />
of disturbance can be due to the nature of your particular cellular phone or of your wireless telephony<br />
service provider.<br />
If you find it difficult to obtain a good result while using your cellular phone, your hearing care professional<br />
will be able to give you advice on available accessories to enhance listening capabilities.<br />
PhoneNow<br />
The PhoneNow function, allows your hearing instrument to automatically switch to your tele phone programme<br />
when a telephone receiver is raised to the ear. When the telephone receiver is removed from the<br />
ear, the hearing instrument automatically returns to the previous listening programme.<br />
1. Clean the telephone receiver thoroughly.<br />
2. Hold the telephone vertically, in a position similar to when making a<br />
telephone call.<br />
3. Place the magnets just below the telephone receiver. Make sure not<br />
to cover the microphone openings. If necessary, move the magnet to<br />
another position to improve ease of use and comfort while speaking.<br />
4. If you are not satisfied with the strength of PhoneNow, you can<br />
reposition the PhoneNow magnet or add additional PhoneNow magnets.<br />
PhoneNow usage<br />
Telephones can be used in a normal manner. A short melody will indicate that the PhoneNow feature has<br />
automatically switched the hearing instrument to your telephone programme. Initially, you may need to<br />
move the telephone receiver slightly to find the best position for reliable PhoneNow activation and good<br />
hearing on the telephone.<br />
If you have two hearing instruments with the synchronization function enabled, the volume of hearing instrument<br />
on the non-phone ear will be turned down.<br />
i<br />
Only use recommended cleaning agent to clean the telephone prior to placing the magnet on the<br />
phone in order to obtain best possible adherence.<br />
Placement of PhoneNow magnets<br />
Place PhoneNow magnet on your telephone receiver to allow operation of the PhoneNow function. In order<br />
to place PhoneNow magnet properly:<br />
20 21
i PhoneNow precautions<br />
1. Keep magnets out of reach of pets, children and mentally challenged persons. If a magnet is swallowed,<br />
please seek advice from a medical practitioner.<br />
2. The magnet may affect some medical devices or electronic systems. The manufacturer of any<br />
magnetically sensitive devices (e.g. pacemakers) should advise you regarding appropriate safety<br />
precautions when using your hearing instrument and magnet in close proximity to the medical device<br />
or electronic system in question.If the manufacturer cannot issue a statement, we recommend keeping<br />
the magnet or a telephone equipped with the magnet 30 cm (12”) away from magnetically sensitive<br />
devices (e.g. pacemakers).<br />
3. High distortion during dialing or phoning may mean that the magnet is not in the optimal position relative<br />
to the telephone receiver. To avoid the issue, please move the magnet to another place on the telephone<br />
receiver.<br />
4. Only use magnets supplied by <strong>ReSound</strong>.<br />
Tele-loop systems<br />
Many places, such as theatres, houses of worship, and schools are equipped with tele-loop systems. When<br />
using a telecoil programme with tele-loop systems, sound is picked up directly and may improve speech<br />
understanding. If there is no sound from the hearing instruments in a tele-loop system and with a telecoil<br />
programme activated, the tele-loop system may not be turned on or is not operating correctly. If a facility is<br />
not equipped with a tele-loop system, sitting as close as possible to the front may be helpful.<br />
Direct audio input (optional)<br />
Use of direct audio input (DAI), which enables a direct connection of the hearing instruments to items such<br />
as television, radio, and remote microphones, may increase speech understanding for some individuals.<br />
The sound source is connected to the hearing instruments by a cable or a wireless FM system to the audio<br />
boot. This accessory connects to the bottom of the hearing instruments, and once properly clicked into<br />
place, the hearing instruments switch to DAI automatically.<br />
Telecoil (optional)<br />
If equipped, a telecoil can be activated by your hearing care professional and accessed through one of<br />
the additional programmes. A telecoil picks up a telephone’s magnetic signal and converts it to sound. An<br />
optional telephone programme may help to improve speech understanding on the telephone. When using<br />
a telecoil programme, the receiver of the telephone may need to be held closer to the hearing instrument.<br />
The handset of the telephone may need to be moved to slightly different positions in order to find the best<br />
reception.<br />
Connecting/Disconnecting audio boots<br />
Connecting audio boots<br />
1. Align the tip of the audio boot with the groove just above the battery<br />
compartment and below the model number.<br />
1<br />
22 23
2. Once in place, move the boot in the direction of the<br />
battery compartment.<br />
3. Gently click the audio boot onto the hearing<br />
instrument.<br />
Disconnecting audio boots<br />
4. Press and hold the button on the front side of the<br />
audio boot.<br />
5. Gently remove the audio boot from the hearing<br />
instrument.<br />
2<br />
4<br />
3<br />
5<br />
3. Avoid rough handling of hearing instruments or dropping them on hard surfaces or floors.<br />
4. Do not leave hearing instruments in or near direct heat or sunlight, such as in a hot, parked car, as<br />
excessive heat can cause damage or deform the casing.<br />
5. Do not wear your instrument while showering, swimming, in heavy rain or in a moist atmosphere such<br />
as a steam bath or sauna.<br />
6. If your instrument does get wet, or if it has been exposed to high humidity or perspiration, it should be<br />
left to dry out overnight with the battery out and the battery compartment open. It is also a good idea to<br />
put the instrument and battery in a sealed container together with a drying agent (desiccator) overnight.<br />
Do not use the instrument until it is completely dry. Consult your hearing care professional as to which<br />
drying agent to use.<br />
7. Remove your hearing instrument when applying such things as cosmetics, perfume, aftershave, hair<br />
spray, and suntan lotion. These might get into the instrument and cause damage.<br />
i Care and maintenance<br />
Your hearing instrument is protected by a layer of protective, hydrophobic nanocoat material.<br />
Please follow the following instructions to prolong the durability of your hearing instruments:<br />
i Daily maintenance<br />
It is important to keep your hearing instrument clean and dry. On a daily basis,<br />
clean the hearing instruments using a soft cloth or tissue.<br />
1. Keep your hearing instrument clean and dry. Wipe the case with a soft cloth or tissue after use to remove<br />
grease or moisture. Do not use water or solvents, as these can damage the hearing instrument(s).<br />
2. Never immerse hearing instruments in water or other liquids, as liquids may cause permanent damage<br />
to the hearing instruments.<br />
24 25
The receiver tube<br />
The receiver tube contains the wiring to the receiver which delivers the sound to the ear canal. It is important<br />
that the receiver tube and the receiver dome/RIE mold fits correctly in your ear. If the receiver tube or the<br />
receiver dome/RIE mould irritates your ear in any way and prevents you from wearing your hear ing instrument,<br />
please contact your hearing care pro fessional. You should never attempt to modify the shape of the<br />
receiver tube yourself. The receiver tube and the receiver dome/RIE mould should be cleaned regularly.<br />
Please see instructions in the next section.<br />
i Cleaning the receiver tubes and domes<br />
The receiver tube and the receiver dome should be cleaned regularly. Use a damp cloth to clean the receiver<br />
tube and receiver dome on the outside. Do not use water when you are cleaning the receiver tubes<br />
or the receiver domes. Please see instruction on page 30 or 31 for how to change the wax guard filter.<br />
i Cleaning RIE moulds<br />
1. Separate the mould from the receiver tube.<br />
2. Clean the RIE mould using a mild soap, and rinse with lukewarm water.<br />
3. After cleaning, dry RIE moulds thoroughly and remove any residual<br />
water and debris from the tubing utilising an air bulb and wire loop.<br />
Changing wax guard for receiver tube<br />
1 2 3 4 5 6<br />
7<br />
8<br />
9<br />
10<br />
For NP receivers:<br />
1. Clean any debris from the old waxguard.<br />
2. Insert the wand into the old waxguard.<br />
3. Twist the wand with the waxguard in a clockwise direction to ensure it is attached to the wand.<br />
4. Pull the wand and waxguard away from the tube/mould.<br />
5. Insert the old waxguard into the center of the HF3 wheel.<br />
6. Dispose of the old waxguard by drawing the wand to the narrow end of the center disposal area.<br />
7. Insert the empty wand into a new waxguard on the HF3 wheel.<br />
8. Pull the new waxguard attached to the wand away from the HF3 wheel.<br />
9. Insert the wand into the receiver tube/mould.<br />
10. Twist the wand to release the new waxguard onto the receiver tube/mould.<br />
For S and HP 2 receivers:<br />
1. To remove the old wax guard, insert the removal side of the wax guard tool into the used wax guard<br />
so that the shaft of the tool is touching the rim of the wax guard. Slowly pull the wax guard straight<br />
out.<br />
2. To insert the ne w wax guard, gently press the replacement side of the wax guard tool straight into<br />
the hole of the sound outlet until the outer ring lies flush with the outside of the receiver. Pull the tool<br />
straight out -the new wax guard will remain in place.<br />
26 27
How to apply domes<br />
It is recommended that your hearing care professional change domes, as incorrect dome replacement<br />
could result in injury.<br />
<strong>ReSound</strong> standard domes<br />
1. Push the new dome over the receiver.<br />
2. Make sure that the new dome is properly and securely mounted.<br />
<strong>ReSound</strong> tulip domes<br />
Tulip domes are mounted in a similar manner to standard domes, but a few extra steps are required. Tulip<br />
domes consist of two “petals”. It is important to note that the largest petal is the outermost petal. To ensure<br />
this:<br />
1. Push the largest petal away from the receiver tube using a finger. This bends the petal forward.<br />
2. Then push the largest “petal” back, and it will be placed on top of the smaller petal.<br />
1 2<br />
Using <strong>ReSound</strong> hearing instruments with smart phone apps<br />
i Intended use of smart phone apps:<br />
<strong>GN</strong> <strong>ReSound</strong> smart phone apps are intended to be used with <strong>GN</strong> <strong>ReSound</strong> wireless hearing aids. <strong>GN</strong> Re-<br />
Sound smart phone apps send and receive signals from the <strong>GN</strong> <strong>ReSound</strong> wireless hearing aids via smart<br />
phones for which the apps have been developed.<br />
Use with smart phone apps:<br />
• Notifications of app updates should not be disabled, and it is recommended that the user installs all<br />
updates to ensure that the app will function correctly and will be kept up to date.<br />
• The app must only be used with <strong>GN</strong>R devices for which it is intended, and <strong>GN</strong>R take no responsibility if<br />
the app is used with other devices.<br />
28 29
i General precautions<br />
1. Do not leave hearing instruments in the sun, near an open fire, or in a hot, parked car.<br />
2. Do not wear hearing instruments while showering, swimming, in heavy rain, or in a moist atmosphere<br />
such as a steam bath or sauna.<br />
3. Should the hearing instrument become moist, remove the battery and place the hearing instrument in<br />
a closed container with a drying agent. Your hearing care professional can provide options for drying<br />
containers or kits.<br />
4. Remove the hearing instruments when applying items such as cosmetics, perfume, after-shave, hair<br />
spray, and suntan lotion.<br />
5. When wireless function is activated, the device uses low-powered digitally coded transmissions in<br />
order to communicate with other wireless devices. Although unlikely, nearby electronic devices may be<br />
affected. In that case, move the hearing instrument away from the affected electronic device.<br />
6. When using wireless functionality and the devices are affected by electromagnetic interference, move<br />
away from the source.<br />
7. Use only original <strong>GN</strong> <strong>ReSound</strong> consumables e.g. tubes and domes.<br />
Never attempt to modify the shape of the hearing instrument, ear-moulds, or tubing yourself.<br />
8. Do only connect <strong>ReSound</strong> hearing instruments to <strong>ReSound</strong> accessories intended and qualified to be<br />
used with <strong>ReSound</strong> hearing instruments.<br />
i General warnings<br />
1. Consult a hearing care professional if you discover a foreign object in your ear canal, if you experience<br />
skin irritation, or if excessive ear wax accumulates with the use of the hearing instrument.<br />
2. Different types of radiation, from e.g. NMR, MRI, or CT scanners, may damage hearing instruments. It<br />
is recommended not to wear hearing instruments during these or other similar procedures. Other types<br />
contain less energy and will not damage hearing instruments. However, they have the potential to<br />
momentarily affect the sound quality or temporarily create strange sounds from hearing instruments.<br />
3. Do not wear hearing instruments in mines, oil fields, or other explosive areas unless those areas are<br />
certified for hearing instrument use.<br />
4. Do not allow others to use your hearing instruments. This may cause damage to the hearing instruments<br />
or to the hearing of the other individual.<br />
5. Instrument usage by children or mentally challenged persons should be supervised at all times to<br />
ensure their safety.The hearing instrument contains small parts that could be swallowed by children.<br />
Please be mindful not to leave children unsupervised with this hearing instrument.<br />
6. Hearing instruments should be used only as prescribed by your hearing care professional. Incorrect<br />
use may result in hearing loss.<br />
7. External devices connected to the electrical input must be safe according to the requirements of IEC<br />
60601-1-1, IEC 60065, or IEC 60950-1, as appropriate (wired connection, f.ex. HI-PRO), SpeedLink).<br />
8. If device is broken, do not use.<br />
9. Be careful when boarding flights, to remember to deactivate the wireless functionality.<br />
Turn off your wireless functionality by using the flight mode in areas where radio frequency emission is<br />
prohibited.<br />
i Note:<br />
* <strong>ReSound</strong> wireless devices operate in the frequency range of 2.4 GHz - 2.48 GHz.<br />
* <strong>ReSound</strong> wireless devices include a RF transmitter that operates in the range of 2.4 GHz - 2.48 GHz.<br />
* For use of wireless functionality only use <strong>ReSound</strong> Unite accessories. For further guidance regarding e.g.<br />
pairing, please refer to the user guide of the relevant <strong>ReSound</strong> Unite accessory.<br />
of radiation, such as burglar alarms, room surveillance systems, radio equipment, mobile telephones,<br />
30 31
Tinnitus Sound Generator (TSG) module<br />
Intended use for the TSG module<br />
Your <strong>ReSound</strong> hearing instruments may also include the Tinnitus Sound Generator function, a tool for<br />
generating sounds to be used in tinnitus management programmes to relieve suffering from tinnitus.<br />
i TSG warnings<br />
• Sound generators can be dangerous if improperly used.<br />
• Sound generators should be used only as advised by your doctor, audiologist, or hearing healthcare<br />
professional.<br />
• Sound generators are not toys and should be kept out of reach of anyone who might cause themselves<br />
injury (especially children and pets).<br />
User instructions for the TSG module<br />
Description of the device<br />
The Tinnitus Sound Generator (TSG) Module is a software tool that generates sounds to be used in tinnitus<br />
management programmes to relieve suffering from tinnitus.<br />
If your tinnitus troubles you only in quiet environments, your doctor, audiologist or hearing healthcare professional<br />
can set the TSG Module so that it becomes audible exclusively in such surroundings. The overall<br />
sound level can be adjusted via an optional volume control. Your doctor, audiologist or hearing healthcare<br />
professional will review with you the need for having such a control.<br />
TSG volume control<br />
The sound generator is set to a specific loudness level by the hearing healthcare professional. When switching<br />
the sound generator on, the volume will have this optimal setting. Therefore, it might not be necessary<br />
to control the volume (loudness) manually. However, the volume control provides the ability to adjust the<br />
volume, or amount of stimulus, to the liking of the user.<br />
i Caution<br />
• The volume control is an optional feature in the TSG module used for adjusting the sound generator<br />
output level. To prevent unintended usage by pediatric or physically or mentally challenged users, the<br />
volume control must, if enabled, be configured to only provide a decrease of the sound generator output<br />
level.<br />
Explanation of how the device functions<br />
The TSG module is a frequency and amplitude shaped white-noise generator. Noise signal level and frequency<br />
characteristics can be adjusted to the specific therapeutic needs as determined by your doctor,<br />
audiologist or hearing healthcare professional.<br />
i TSG precautions<br />
• Should the user develop any side effects from using the sound generator, such as dizziness, nausea,<br />
headaches, perceived decrease in auditory function or increase in tinnitus perception, the user should<br />
discontinue use of the sound generator and seek medical evaluation.<br />
• Children and physically or mentally challenged users will require guardian supervision while wearing the<br />
TSG hearing instrument.<br />
Your doctor, audiologist or hearing healthcare professional can modulate the generated noise with the purpose<br />
of making it more pleasant. The noise can then resemble, for example, crushing waves on a shore.<br />
Modulation level and speed can also be configured to your likes and needs.<br />
32 33
The scientific concepts that form the basis for the device<br />
The TSG Module provides sound enrichment with the aim of surrounding the tinnitus sound with a neutral<br />
sound which is easily ignored. Sound enrichment is an important component of most approaches to tinnitus<br />
management, such as Tinnitus Retraining Therapy (TRT). To assist habituation to tinnitus, this needs<br />
to be audible. The ideal level of the TSG module, therefore, should be set so that it starts to blend with the<br />
tinnitus, and so that you can hear both your tinnitus as well as the sound used.<br />
In a majority of instances, the TSG module can also be set to mask the tinnitus sound, so to provide temporary<br />
relief by introducing a more pleasant and controllable sound source.<br />
Significant physical characteristics<br />
Audio signal technology<br />
Digital<br />
Prescription use of this TSG hearing instrument<br />
The TSG module should be used as prescribed by your doctor, audiologist or hearing healthcare professional.<br />
In order to avoid permanent hearing damages, the maximum daily usage depends on the level of<br />
the generated sound.<br />
Should you develop any side effects from using the sound generator, such as dizziness, nausea, headaches,<br />
perceived decrease in auditory function or increase in tinnitus perception, you should discontinue<br />
use of sound generator and seek medical evaluation.<br />
The target population is primarily the adult population over 18 years of age. This product may also be used<br />
with children 5 years of age or older. However, children and physically or mentally challenged users will require<br />
training by a doctor, audiologist, hearing healthcare professional or the guardian for the insertion and<br />
removal of the hearing instrument containing the TSG module.<br />
Available sounds<br />
White noise signal which can be shaped with the following configurations:<br />
High-pass filter<br />
Low-pass filter<br />
500 Hz 2000 Hz<br />
750 Hz 3000 Hz<br />
1000 Hz 4000 Hz<br />
1500 Hz 5000 Hz<br />
Important notice for prospective sound generator users<br />
A tinnitus masker is an electronic device intended to generate noise of sufficient intensity and bandwidth to<br />
mask internal noises. It is also used as an aid in hearing external noises and speech.<br />
Good health practice requires that a person with a tinnitus condition have a medical evaluation by a licensed<br />
physician (preferably a physician who specializes in diseases of the ear) before using a sound generator.<br />
Licensed physicians who specialize in diseases of the ear are often referred to as otolaryngologists, otologists<br />
or otorhinolaryngologists.<br />
2000 Hz 6000 Hz<br />
The purpose of medical evaluation is to assure that all medically treatable conditions that may affect tinnitus<br />
are identified and treated before the sound generator instrument is used. The sound generator instrument is<br />
The white noise signal can be modulated in amplitude with an attenuation depth of up to 14dB.<br />
34 35
a tool to generate sounds to be used with appropriate counselling and/or in a tinnitus management program<br />
to relieve patients suffering from tinnitus.<br />
i TSG warning to hearing healthcare professionals<br />
A hearing healthcare professional should advise a prospective sound generator user to consult promptly<br />
with a licensed physician (preferably an ear specialist) before getting a sound generator if the hearing<br />
healthcare professional determines through inquiry, actual observation, or review of any other available<br />
information concerning the prospective user that the prospective user has any of the following conditions:<br />
(i) Visible congenital or traumatic deformity of the ear.<br />
(ii) History of active drainage from the ear within the previous 90 days.<br />
(IIi) History of sudden or rapidly progressive hearing loss within the previous 90 days.<br />
(iv) Acute or chronic dizziness.<br />
(v) Unilateral hearing loss of sudden or recent onset within the previous 90 days.<br />
(vi) Audiometric air-bone gap equal to or greater than 15dB at 500 hertz (Hz), 1000 Hz, and 2000 Hz.<br />
(vii) Visible evidence of significant cerumen accumulation or a foreign body in the ear canal.<br />
(viii) Pain or discomfort in the ear.<br />
i CAUTION: The maximum output of the sound generator falls into the range that can cause hearing<br />
loss according to OSHA regulations. The user should not use the sound generator for more than eight (8)<br />
hours a day when this is set below 90dB SPL. Above that level, the device should not be used for more than<br />
two (2) hours per day. In no case should the sound generator be worn at uncomfortable levels.<br />
i Battery warning information<br />
Batteries, although very small, contain dangerous substances, and should be disposed of carefully. This is<br />
for the safety of you and the environment. Please note:<br />
1. Do not attempt to recharge batteries (Zinc Air) which are not specifically designated as rechargeable<br />
because they may leak or explode.<br />
2. DO NOT attempt to dispose of batteries by burning them. Used batteries are harmful to the environment.<br />
Please dispose of them according to local regulations or return them to your hearing care practitioner.<br />
3. DO NOT place batteries in your mouth. Consult a physician immediately if a battery has been swallowed,<br />
as they can be harmful to your health.<br />
4. Keep batteries away from pets, children and mentallly challenged persons.<br />
5. Remove the batteries to prevent leakage when the hearing instruments are not in use for an extended<br />
period of time.<br />
i Hearing instrument expectations<br />
A hearing instrument will not restore normal hearing and will not prevent or improve a hearing impairment<br />
resulting from organic conditions. Consistent use of the hearing instrument is recommended. In most cases,<br />
infrequent use does not permit you to attain full benefit from it.<br />
The use of a hearing instrument is only part of hearing rehabilitation and may need to be supplemented by<br />
auditory training and instructions in lip-reading.<br />
36 37
i Warning to hearing aid dispensers (US Only)<br />
A hearing aid dispenser should advise a prospective hearing aid user to consult promptly with a licensed<br />
physician (preferably an ear specialist) before dispensing a hearing aid if the hearing aid dispenser determines<br />
through inquiry, actual observation, or review of any other available information concerning the<br />
prospective user, that the prospective user has any of the following conditions:<br />
(i) Visible congenital or traumatic deformity of the ear.<br />
(ii) History of active drainage from the ear within the previous 90 days.<br />
(iii) History of sudden or rapidly progressive hearing loss within the previous 90 days.<br />
(iv) Acute or chronic dizziness.<br />
(v) Unilateral hearing loss of sudden or recent onset within the previous 90 days.<br />
(vi) Audiometric air-bone gap equal to or greater than 15 decibels at 500 hertz (Hz),<br />
1,000 Hz, and 2,000 Hz.<br />
(vii) Visible evidence of significant cerumen accumulation or a foreign body in the ear canal.<br />
(viii) Pain or discomfort in the ear.<br />
Important notice for prospective hearing aid users (US Only)<br />
Good health practice requires that a person with a hearing loss have a medical evaluation by a licensed<br />
physician (preferably a physician who specializes in diseases of the ear) before purchasing a hearing aid.<br />
Licensed physicians who specialize in diseases of the ear are often referred to as otolaryngologists, otologists<br />
or otorhinolaryngologists. The purpose of medical evaluation is to assure that all medically treatable<br />
conditions that may affect hearing are identified and treated before the hearing aid is purchased.<br />
Following the medical evaluation, the physician will give you a written statement that states that your hearing<br />
loss has been medically evaluated and that you may be considered a candidate for a hearing aid. The<br />
physician will refer you to an audiologist or a hearing aid dispenser, as appropriate, for a hearing aid evaluation.<br />
The audiologist or hearing aid dispenser will conduct a hearing aid evaluation to assess your ability<br />
to hear with and without a hearing aid. The hearing aid evaluation will enable the audiologist or dispenser<br />
to select and fit a hearing aid to your individual needs. If you have reservations about your ability to adapt<br />
to amplification, you should inquire about the availability of a trial-rental or purchase-option program. Many<br />
hearing aid dispensers now offer programs that permit you to wear a hearing aid for a period of time for a<br />
nominal fee after which you may decide if you want to purchase the hearing aid.<br />
Federal law restricts the sale of hearing aids to those individuals who have obtained a medical evaluation<br />
from a licensed physician. Federal law permits a fully informed adult to sign a waiver statement declining the<br />
medical evaluation for religious or personal beliefs that preclude consultation with a physician. The exercise<br />
of such a waiver is not in your best health interest and its use is strongly discouraged.<br />
Children with hearing loss (US Only)<br />
In addition to seeing a physician for a medical evaluation, a child with a hearing loss should be directed to<br />
an audiologist for evaluation and rehabilitation since hearing loss may cause problems in language development<br />
and the educational and social growth of a child. An audiologist is qualified by training and experience<br />
to assist in the evaluation and rehabilitation of a child with a hearing loss.<br />
38 39
Troubleshooting Guide<br />
Symptom cause POSSIBLE REMEDY<br />
No sound Not turned on Turn on by closing the battery door<br />
Dead battery<br />
Replace battery<br />
Battery door will not close<br />
Insert battery properly<br />
Blocked RIE mould or tube<br />
Clean RIE mould or tube<br />
Blocked wax filter<br />
Replace wax filter or consult your hearing care professional<br />
Not loud enough Incorrect RIE mould placement Reinsert RIE mould<br />
Blocked RIE mould or dome<br />
Clean RIE mould, replace dome, replace filter<br />
Change in hearing sensitivity<br />
Consult your hearing care professional<br />
Excessive ear wax<br />
Consult your hearing care professional<br />
Volume set too low<br />
Consult your hearing care professional<br />
40 41
Troubleshooting Guide<br />
Symptom cause POSSIBLE REMEDY<br />
Excessive whistling /<br />
feedback<br />
Sound distorted /<br />
not clear<br />
Wireless does not work<br />
Incorrect RIE mould placement<br />
Incorrect dome placement<br />
Excessive ear wax<br />
Feedback control may need adjustment<br />
RIE mould tubing worn or damaged<br />
Hearing instrument settings not optimal<br />
Weak battery<br />
Improper RIE mould or dome fit<br />
Hearing instrument damaged<br />
Hearing instrument settings not optimal<br />
Possible Root Cause - Device is in flight mode<br />
Re-insert RIE mould carefully<br />
Re-insert dome<br />
Consult your hearing care professional<br />
Consult your hearing care professional<br />
Consult your hearing care professional<br />
Consult your hearing care professional<br />
Replace battery<br />
Consult your hearing care professional<br />
Consult your hearing care professional<br />
Consult your hearing care professional<br />
For Alera devices with push button: Open and close the battery compartment. For Alera<br />
devices without push button: Open and close the battery door twice within 10 seconds<br />
For all Verso devices: Open and close the battery compartment once. Wireless will reactivate<br />
10 seconds later. (If Root Cause is device in flight mode)<br />
If there are any other problems not mentioned in this guide, please contact your hearing care professional.<br />
42 43
Technical data<br />
Micro and Mini RIE—NP receiver<br />
Models: AL960-DR, AL760-DR, AL560-DR, AL961-DRW,<br />
AL761-DRW, AL561-DRW, ALT960-DR, ALT961-DRW<br />
Open Closed<br />
Reference test gain (60 dB SPL input) HFA 30 32 dB<br />
Full-on gain (50 dB SPL Input) Max<br />
HFA<br />
47<br />
41<br />
50<br />
42<br />
dB<br />
dB<br />
Maximum output (90 dB SPL input) Max<br />
HFA<br />
114<br />
108<br />
114<br />
108<br />
dB SPL<br />
dB SPL<br />
Total harmonic distortion<br />
500 Hz<br />
800 Hz<br />
1600 Hz<br />
0.8<br />
0.8<br />
0.7<br />
0.8<br />
0.9<br />
0.8<br />
%<br />
%<br />
%<br />
Equivalent input noise (w/o noise reduction) 24 25 dB SPL<br />
Frequency range (DIN 45605) 100– 100– Hz<br />
6790 6720<br />
Current drain (in test mode)<br />
ALx60<br />
ALx61<br />
1.1<br />
1.2<br />
1.1<br />
1.2<br />
mA<br />
mA<br />
Data in accordance with ANSI S3.22–2003 and IEC 60118-7; Supply Voltage<br />
1.3 V, 2cc coupler<br />
Output<br />
(dB SPL)<br />
Gain<br />
(dB)<br />
MAXIMUM OUTPUT (OSPL 90)<br />
2cc Coupler<br />
Frequency (Hz)<br />
FULL-ON AND REFERENCE TEST GAIN<br />
2cc Coupler<br />
Full-on gain<br />
50 dB SPL input<br />
Reference test gain<br />
60 dB SPL input<br />
Frequency (Hz)<br />
Micro and Mini RIE—HP receiver<br />
Models: AL960-DR, AL760-DR, AL560-DR, AL961-DRW, AL761-<br />
DRW, AL561-DRW, ALT960-DR, ALT961-DRW<br />
Open Closed<br />
Reference test gain (60 dB SPL input) HFA 35 35 dB<br />
Full-on gain (50 dB SPL Input) Max<br />
HFA<br />
57<br />
49<br />
58<br />
49<br />
dB<br />
dB<br />
Maximum output (90 dB SPL input)<br />
Total harmonic distortion<br />
Max<br />
HFA<br />
500 Hz<br />
800 Hz<br />
1600 Hz<br />
117<br />
112<br />
0.8<br />
1.1<br />
0.9<br />
117<br />
112<br />
0.7<br />
1.0<br />
0.8<br />
dB SPL<br />
dB SPL<br />
%<br />
%<br />
%<br />
Equivalent input noise (w/o noise reduction) 26 26 dB SPL<br />
Frequency range (DIN 45605) 100– 100– Hz<br />
7150 7140<br />
Current drain (in test mode)<br />
ALx60<br />
ALx61<br />
1.1<br />
1.2<br />
1.1<br />
1.2<br />
mA<br />
mA<br />
Data in accordance with ANSI S3.22–2003 and IEC 60118-7; Supply Voltage<br />
1.3 V, 2cc coupler<br />
Output<br />
(dB SPL)<br />
Gain<br />
(dB)<br />
MAXIMUM OUTPUT (OSPL 90)<br />
130<br />
2cc Coupler<br />
120<br />
110<br />
100<br />
90<br />
80<br />
70<br />
100 1000 10000<br />
Frequency (Hz)<br />
70<br />
60<br />
50<br />
40<br />
30<br />
20<br />
FULL-ON AND REFERENCE TEST GAIN<br />
2cc Coupler<br />
Full-on Full-on gain gain<br />
50 50 dB dB SPL SPL input input<br />
Reference test gain<br />
60 dB SPL input<br />
10<br />
100 1000 10000<br />
Frequency (Hz)<br />
Open configuration<br />
Open configuration<br />
44<br />
Closed configuration<br />
Closed configuration<br />
45
RIE—NP receiver<br />
Models: AL962-DVIRW, AL762-DVIRW, AL562-DVIRW,<br />
ALT962-DVIRW<br />
Open Closed<br />
Reference test gain (60 dB SPL input) HFA 30 32 dB<br />
Full-on gain (50 dB SPL Input) Max<br />
HFA<br />
47<br />
41<br />
50<br />
42<br />
dB<br />
dB<br />
Maximum output (90 dB SPL input) Max<br />
HFA<br />
114<br />
108<br />
114<br />
108<br />
dB SPL<br />
dB SPL<br />
Total harmonic distortion<br />
500 Hz<br />
800 Hz<br />
1600 Hz<br />
0.8<br />
0.8<br />
0.7<br />
0.8<br />
0.9<br />
0.8<br />
%<br />
%<br />
%<br />
Telecoil sensitivity (SPLIV @ 31.6 mA/m) 90 91 dB SPL<br />
Equivalent input noise (w/o noise reduction) 24 25 dB SPL<br />
Frequency range (DIN 45605) 100– 100– Hz<br />
6790 6720<br />
Current drain (in test mode) 1.2 1.2 mA<br />
Data in accordance with ANSI S3.22–2003 and IEC 60118-7; Supply Voltage<br />
Output<br />
(dB SPL)<br />
Gain<br />
(dB)<br />
MAXIMUM OUTPUT (OSPL 90)<br />
2cc Coupler<br />
Frequency (Hz)<br />
FULL-ON AND REFERENCE TEST GAIN<br />
2cc Coupler<br />
Full-on gain<br />
50 dB SPL input<br />
Reference test gain<br />
60 dB SPL input<br />
Open configuration<br />
Closed configuration<br />
RIE—HP receiver<br />
Models: AL962-DVIRW, AL762-DVIRW, AL562-DVIRW,<br />
ALT962-DVIRW<br />
Open Closed<br />
Reference test gain (60 dB SPL input) HFA 35 35 dB<br />
Full-on gain (50 dB SPL Input) Max<br />
HFA<br />
57<br />
49<br />
58<br />
49<br />
dB<br />
dB<br />
Maximum output (90 dB SPL input)<br />
Total harmonic distortion<br />
46 47<br />
Max<br />
HFA<br />
500 Hz<br />
800 Hz<br />
1600 Hz<br />
117<br />
112<br />
0.8<br />
1.1<br />
0.9<br />
117<br />
112<br />
0.7<br />
1.0<br />
0.8<br />
dB SPL<br />
dB SPL<br />
%<br />
%<br />
%<br />
Telecoil sensitivity (SPLIV @ 31.6 mA/m) 96 96 dB SPL<br />
Equivalent input noise (w/o noise reduction) 26 26 dB SPL<br />
Frequency range (DIN 45605) 100– 100– Hz<br />
7150 7140<br />
Current drain (in test mode) 1.2 1.2 mA<br />
1.3 V, 2cc coupler Frequency (Hz)<br />
Data in accordance with ANSI S3.22–2003 and IEC 60118-7; Supply Voltage<br />
1.3 V, 2cc coupler<br />
Output<br />
(dB SPL)<br />
Gain<br />
(dB)<br />
MAXIMUM OUTPUT (OSPL 90)<br />
130<br />
2cc Coupler<br />
120<br />
110<br />
100<br />
90<br />
80<br />
70<br />
100 1000 10000<br />
Frequency (Hz)<br />
FULL-ON AND REFERENCE TEST GAIN<br />
2cc Coupler<br />
Full-on Full-on gain gain<br />
50 50 dB dB SPL SPL input input<br />
70<br />
60<br />
50<br />
40<br />
30<br />
Reference test gain<br />
20<br />
60 dB SPL input<br />
10<br />
100 1000 10000<br />
Frequency (Hz)<br />
Open configuration<br />
Closed configuration
Micro and Mini RIE—S receiver<br />
Models: VO960-DR, VO760-DR, VO560-DR,<br />
VO961-DRW, VO761-DRW, VO561-DRW<br />
VOT960-DR, VOT760-DR, VOT961-DRW, VOT761-DRW<br />
Open Closed<br />
Reference test gain (60 dB SPL input) HFA 31 31 dB<br />
Full-on gain (50 dB SPL Input) Max<br />
HFA<br />
46<br />
41<br />
50<br />
42<br />
Maximum output (90 dB SPL input) Max 113 113<br />
HFA 108 108<br />
Total harmonic distortion<br />
500 Hz 0.5 0.3<br />
800 Hz 0.5 0.6<br />
1600 Hz 0.8 1.0<br />
dB<br />
dB<br />
dB SPL<br />
dB SPL<br />
%<br />
%<br />
%<br />
Equivalent input noise (w/o noise reduction) 23 24 dB SPL<br />
Frequency range (DIN 45605) 100– 100– Hz<br />
7110 7100<br />
Current drain (in test mode)<br />
VOx60<br />
VOx61<br />
1.1<br />
1.1<br />
1.1<br />
1.1<br />
mA<br />
mA<br />
Output<br />
(dB SPL)<br />
Gain<br />
(dB)<br />
130<br />
120<br />
110<br />
100<br />
90<br />
80<br />
70<br />
70<br />
60<br />
50<br />
40<br />
30<br />
20<br />
10<br />
MAXIMUM OUTPUT (OSPL 90)<br />
2cc Coupler<br />
Frequency (Hz)<br />
FULL-ON AND REFERENCE TEST GAIN<br />
2cc Coupler<br />
Full-on gain<br />
50 dB SPL input<br />
Reference test gain<br />
60 dB SPL input<br />
Micro and Mini RIE—NP receiver<br />
Models: VO960-DR, VO760-DR, VO560-DR,<br />
VO961-DRW, VO761-DRW, VO561-DRW<br />
VOT960-DR, VOT760-DR, VOT961-DRW, VOT761-DRW<br />
Open Closed<br />
Reference test gain (60 dB SPL input) HFA 32 33 dB<br />
Full-on gain (50 dB SPL Input) Max<br />
HFA<br />
47<br />
42<br />
51<br />
43<br />
dB<br />
dB<br />
Maximum output (90 dB SPL input)<br />
Total harmonic distortion<br />
Max<br />
HFA<br />
500 Hz<br />
800 Hz<br />
1600 Hz<br />
114<br />
109<br />
0.8<br />
0.9<br />
0.9<br />
114<br />
109<br />
0.9<br />
0.8<br />
1.0<br />
dB SPL<br />
dB SPL<br />
%<br />
%<br />
%<br />
Equivalent input noise (w/o noise reduction) 22 23 dB SPL<br />
Frequency range (DIN 45605) 100– 100– Hz<br />
6840 6780<br />
Current drain (in test mode)<br />
VOx60<br />
VOx61<br />
1.1<br />
1.1<br />
1.1<br />
1.1<br />
mA<br />
mA<br />
Output<br />
(dB SPL)<br />
Gain<br />
(dB)<br />
130<br />
120<br />
110<br />
100<br />
90<br />
80<br />
70<br />
MAXIMUM OUTPUT (OSPL 90)<br />
2cc Coupler<br />
Frequency (Hz)<br />
FULL-ON AND REFERENCE TEST GAIN<br />
2cc Coupler<br />
Full-on gain<br />
50 dB SPL input<br />
Reference test gain<br />
60 dB SPL input<br />
Data in accordance with ANSI S3.22–2003 and IEC 60118-7; Supply Voltage<br />
1.3 V, 2cc coupler<br />
Frequency (Hz)<br />
Data in accordance with ANSI S3.22–2003 and IEC 60118-7; Supply Voltage<br />
1.3 V, 2cc coupler<br />
Frequency (Hz)<br />
Open configuration<br />
Open configuration<br />
Closed configuration<br />
Closed configuration<br />
48 49
Micro and Mini RIE—HP 2<br />
receiver<br />
Models: VO960-DR, VO760-DR, VO560-DR,<br />
VO961-DRW, VO761-DRW, VO561-DRW<br />
VOT960-DR, VOT760-DR, VOT961-DRW, VOT761-DRW<br />
Open Closed<br />
Reference test gain (60 dB SPL input) HFA 36 36 dB<br />
Full-on gain (50 dB SPL Input) Max<br />
HFA<br />
59<br />
50<br />
59<br />
51<br />
dB<br />
dB<br />
Maximum output (90 dB SPL input) Max<br />
HFA<br />
118<br />
114<br />
119<br />
114<br />
dB SPL<br />
dB SPL<br />
Total harmonic distortion<br />
500 Hz<br />
800 Hz<br />
1600 Hz<br />
1.4<br />
1.4<br />
1.1<br />
1.2<br />
1.6<br />
1.0<br />
%<br />
%<br />
%<br />
Equivalent input noise (w/o noise reduction) 23 23 dB SPL<br />
Frequency range (DIN 45605) 100– 100– Hz<br />
6790 6710<br />
Current drain (in test mode)<br />
VOx60<br />
VOx61<br />
1.1<br />
1.1<br />
1.1<br />
1.1<br />
mA<br />
mA<br />
Data in accordance with ANSI S3.22–2003 and IEC 60118-7; Supply Voltage<br />
1.3 V, 2cc coupler<br />
Output<br />
(dB SPL)<br />
Gain<br />
(dB)<br />
MAXIMUM OUTPUT (OSPL 90)<br />
2cc Coupler<br />
Frequency (Hz)<br />
FULL-ON AND REFERENCE TEST GAIN<br />
2cc Coupler<br />
Full-on gain<br />
50 dB SPL input<br />
Reference test gain<br />
60 dB SPL input<br />
Frequency (Hz)<br />
RIE—S receiver<br />
Models: VO962-DRW, VO762-DRW, VO562-DRW<br />
VOT962-DRW, VOT762-DRW<br />
Open Closed<br />
Reference test gain (60 dB SPL input) HFA 31 31 dB<br />
Full-on gain (50 dB SPL Input) Max<br />
HFA<br />
46<br />
41<br />
50<br />
42<br />
dB<br />
dB<br />
Maximum output (90 dB SPL input)<br />
Total harmonic distortion<br />
Max<br />
HFA<br />
500 Hz<br />
800 Hz<br />
1600 Hz<br />
113<br />
108<br />
0.5<br />
0.5<br />
0.9<br />
113<br />
108<br />
0.4<br />
0.5<br />
1.0<br />
dB SPL<br />
dB SPL<br />
%<br />
%<br />
%<br />
Telecoil sensitivity (SPLIV @ 31.6 mA/m) 91 92 dB SPL<br />
Equivalent input noise (w/o noise reduction) 23 24 dB SPL<br />
Frequency range (DIN 45605) 100– 100– Hz<br />
7110 7100<br />
Current drain (in test mode) 1.2 1.2 mA<br />
Data in accordance with ANSI S3.22–2003 and IEC 60118-7; Supply Voltage<br />
1.3 V, 2cc coupler<br />
Output<br />
(dB SPL)<br />
Gain<br />
(dB)<br />
130<br />
120<br />
110<br />
100<br />
90<br />
80<br />
70<br />
70<br />
60<br />
50<br />
40<br />
30<br />
20<br />
10<br />
MAXIMUM OUTPUT (OSPL 90)<br />
2cc Coupler<br />
Frequency (Hz)<br />
FULL-ON AND REFERENCE TEST GAIN<br />
2cc Coupler<br />
Full-on gain<br />
50 dB SPL input<br />
Reference test gain<br />
60 dB SPL input<br />
Frequency (Hz)<br />
Open configuration<br />
Open configuration<br />
Closed configuration<br />
Closed configuration<br />
50 51
RIE—NP receiver<br />
Models: VO962-DRW, VO762-DRW, VO562-DRW<br />
VOT962-DRW, VOT762-DRW<br />
MAXIMUM OUTPUT (OSPL 90)<br />
2cc Coupler<br />
RIE—HP 2<br />
receiver<br />
Models: VO962-DRW, VO762-DRW, VO562-DRW<br />
VOT962-DRW, VOT762-DRW<br />
MAXIMUM OUTPUT (OSPL 90)<br />
2cc Coupler<br />
Open<br />
Closed<br />
Reference test gain (60 dB SPL input) HFA 30 33 dB<br />
Output<br />
(dB SPL)<br />
Open Closed<br />
Reference test gain (60 dB SPL input) HFA 36 36 dB<br />
Output<br />
(dB SPL)<br />
Full-on gain (50 dB SPL Input)<br />
Max<br />
HFA<br />
46<br />
41<br />
50<br />
43<br />
dB<br />
dB<br />
Full-on gain (50 dB SPL Input)<br />
Max<br />
HFA<br />
59<br />
50<br />
59<br />
51<br />
dB<br />
dB<br />
Maximum output (90 dB SPL input)<br />
Total harmonic distortion<br />
Max<br />
HFA<br />
500 Hz<br />
800 Hz<br />
1600 Hz<br />
113<br />
108<br />
0.5<br />
0.5<br />
0.9<br />
114<br />
109<br />
0.9<br />
1.0<br />
1.1<br />
dB SPL<br />
dB SPL<br />
%<br />
%<br />
%<br />
Telecoil sensitivity (SPLIV @ 31.6 mA/m) 91 93 dB SPL<br />
Equivalent input noise (w/o noise reduction) 23 24 dB SPL<br />
Frequency range (DIN 45605) 100– 100– Hz<br />
7110 6770<br />
Current drain (in test mode) 1.2 1.2 mA<br />
Gain<br />
(dB)<br />
Frequency (Hz)<br />
FULL-ON AND REFERENCE TEST GAIN<br />
2cc Coupler<br />
Full-on gain<br />
50 dB SPL input<br />
Reference test gain<br />
60 dB SPL input<br />
Maximum output (90 dB SPL input)<br />
Total harmonic distortion<br />
Max<br />
HFA<br />
500 Hz<br />
800 Hz<br />
1600 Hz<br />
118<br />
114<br />
1.4<br />
1.4<br />
1.1<br />
119<br />
114<br />
1.2<br />
1.6<br />
1.0<br />
dB SPL<br />
dB SPL<br />
%<br />
%<br />
%<br />
Telecoil sensitivity (SPLIV @ 31.6 mA/m) 96 98 dB SPL<br />
Equivalent input noise (w/o noise reduction) 23 23 dB SPL<br />
Frequency range (DIN 45605) 100– 100– Hz<br />
6790 6710<br />
Current drain (in test mode) 1.2 1.2 mA<br />
Gain<br />
(dB)<br />
Frequency (Hz)<br />
FULL-ON AND REFERENCE TEST GAIN<br />
2cc Coupler<br />
Full-on gain<br />
50 dB SPL input<br />
Reference test gain<br />
60 dB SPL input<br />
Data in accordance with ANSI S3.22–2003 and IEC 60118-7; Supply Voltage<br />
1.3 V, 2cc coupler<br />
Frequency (Hz)<br />
Data in accordance with ANSI S3.22–2003 and IEC 60118-7; Supply Voltage<br />
1.3 V, 2cc coupler<br />
Frequency (Hz)<br />
Open configuration<br />
Open configuration<br />
Closed configuration<br />
Closed configuration<br />
52 53
Warranty and repairs<br />
<strong>ReSound</strong> provides a warranty on hearing instruments in the event of defects in workmanship or materials,<br />
as described in applicable warranty documentation. In its service policy, <strong>ReSound</strong> pledges to secure functionality<br />
at least equivalent to the original hearing instrument. As a signatory to the United Nations Global<br />
Compact initiative, <strong>ReSound</strong> is committed to doing this in line with environment-friendly best practices.<br />
Hearing instruments therefore, at <strong>ReSound</strong>’s discretion, may be replaced by new products or products<br />
manufactured from new or serviceable used parts, or repaired using new or refurbished replacement parts.<br />
The warranty period of hearing instruments is designated on your warranty card, which is provided by your<br />
hearing care professional.<br />
For hearing instruments that require service, please contact your hearing care professional for assistance.<br />
<strong>ReSound</strong> hearing instruments that malfunction must be repaired by a qualified technician. Do not attempt<br />
to open the case of hearing instruments, as this will invalidate the warranty.<br />
Be aware of information marked with the warning symbol<br />
iWARNING points out a situation that could lead to serious injuries,<br />
CAUTION indicates a situation that could lead to minor and moderate injuries”<br />
i Advice and tips on how to handle your hearing instrument better.<br />
Equipment includes RF transmitter<br />
Product is a Type B applied part<br />
Temperature test, transport and storage information<br />
<strong>GN</strong> <strong>ReSound</strong> Hearing Instruments are subjected to various tests in temperature and damp heating cycling<br />
between -25 C and +70C according to internal and industry standards. During transport or storage, the<br />
temperature should not exceed the limit values of -20C to 60C and relative humidity of 90% RH, non condensing<br />
(for limited time). The air pressure between 500 and 1100 hPa is appropriate.<br />
Please ask your local hearing care professional<br />
concerning disposal of your hearing instrument<br />
54 55
400146000-GB-12.12-Rev.F<br />
Worldwide Headquarters<br />
<strong>ReSound</strong> A/S<br />
Lautrupbjerg 7<br />
DK-2750 Ballerup, Denmark<br />
Tel.: +45 45 75 11 11<br />
Fax: +45 45 75 11 19<br />
www.resound.com<br />
CVR no. 55082715<br />
United Kingdom<br />
<strong>GN</strong> <strong>ReSound</strong> Ltd.<br />
Kirtlington Business Centre<br />
Portway<br />
Kirtlington<br />
Oxon OX5 3JA<br />
Tel.: +44 1869 352 800<br />
Fax: +44 1869 343 466<br />
www.gnresound.co.uk<br />
Australia<br />
<strong>GN</strong> <strong>ReSound</strong> Pty. Ltd.<br />
Unit R1 Regents Park Estate<br />
391 Park Road<br />
Regents Park NSW 2143<br />
Tel.: (free) 1800 658 955<br />
Fax: +61 2 9743 7472<br />
www.gnresound.com.au<br />
New Zealand<br />
<strong>GN</strong> <strong>ReSound</strong> (NZ) Ltd.<br />
12 Parkway Drive<br />
Mairangi Bay<br />
Auckland<br />
Tel.: (free) 0800 900 126<br />
Fax: (free) 0800 007 695<br />
www.gnresound.co.nz<br />
Any issues relating to the EU Medical Device Directive<br />
93/42/EEC, or Council Directive 1999/5/EC on Radio<br />
Equipment and Tele communications terminal equipment<br />
should be directed to <strong>ReSound</strong> A/S