File Transfer Protocol Tool – FTP-WatchDog V3
File Transfer Protocol Tool – FTP-WatchDog V3
File Transfer Protocol Tool – FTP-WatchDog V3

You also want an ePaper? Increase the reach of your titles
YUMPU automatically turns print PDFs into web optimized ePapers that Google loves.
A. Introduction:<br />
<strong>File</strong> <strong>Transfer</strong> <strong>Protocol</strong> <strong>Tool</strong> <strong>–</strong> <strong>FTP</strong>-<strong>WatchDog</strong> <strong>V3</strong><br />
<strong>FTP</strong>-<strong>WatchDog</strong> is a reliable application program that can be used to send files using the <strong>File</strong> <strong>Transfer</strong> <strong>Protocol</strong>.<br />
<strong>FTP</strong>-<strong>WatchDog</strong> typically is used with software applications that periodically produce an image, data or text file.<br />
<strong>FTP</strong>-<strong>WatchDog</strong> detects the new file and automatically sends it to an <strong>FTP</strong> server on a website.<br />
The <strong>FTP</strong>-<strong>WatchDog</strong> user interface is in German, so if you are unable to read it, the translations and instructions<br />
below will help you. These instructions apply only to <strong>FTP</strong>-<strong>WatchDog</strong> version 3, which is slightly different than<br />
version 2. Not all variations in <strong>FTP</strong>-<strong>WatchDog</strong> setup are covered here.<br />
B. Installation:<br />
1. Download the free installation program ftp-watchdog-setup.exe from:<br />
http://toolsandmore.de/Central/Produkte/Software/Internet/Webmaster/<strong>FTP</strong>-Watchdog/.<br />
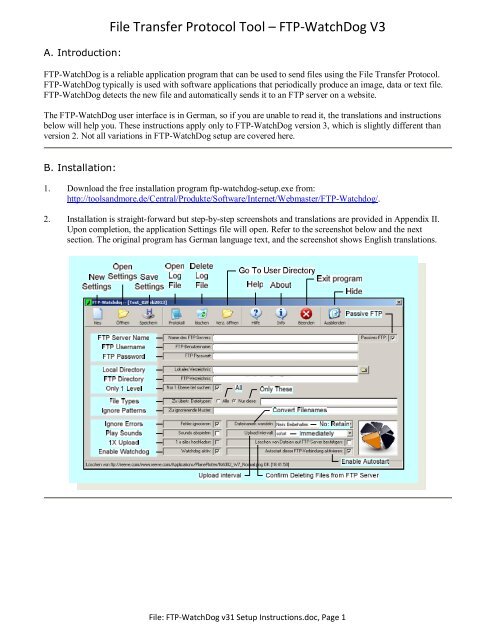
2. Installation is straight-forward but step-by-step screenshots and translations are provided in Appendix II.<br />
Upon completion, the application Settings file will open. Refer to the screenshot below and the next<br />
section. The original program has German language text, and the screenshot shows English translations.<br />
<strong>File</strong>: <strong>FTP</strong>-<strong>WatchDog</strong> v31 Setup Instructions.doc, Page 1
<strong>File</strong> <strong>Transfer</strong> <strong>Protocol</strong> <strong>Tool</strong> <strong>–</strong> <strong>FTP</strong>-<strong>WatchDog</strong> <strong>V3</strong><br />
C. Setup and Use <strong>FTP</strong>-<strong>WatchDog</strong> <strong>V3</strong>:<br />
1. The following describes each field and the action to be taken.<br />
a. Refer to the screenshot, and fill in or check the following fields (additional screenshots of actual setups<br />
are provided in Appendix I):<br />
<strong>FTP</strong> Server Name (use the domain name and extension, as in myserver.com)<br />
<strong>FTP</strong> Username (must match the username allowed access to your <strong>FTP</strong> site)<br />
<strong>FTP</strong> Password (must match the password allowed access to your <strong>FTP</strong> site)<br />
Passive <strong>FTP</strong> (if the PC running <strong>FTP</strong>-Watchdog is behind a router with Network Address<br />
Translation (NAT) enabled, checking this box will make file transfers much more reliable)<br />
b. Now fill in the following fields:<br />
Local Directory (full path where the files are located on your PC, example c:\myfiles\datafiles.<br />
Enter only the path, no filename; see par. c. Alternately, browse to the folder by clicking the Folder<br />
icon on the far right of the field)<br />
<strong>FTP</strong> Directory (full path on the remote site where the file is to be sent, typically a folder on your<br />
website, example /mydata/imagefiles). Enter only the path, no filename; see par. c. Note: The <strong>FTP</strong><br />
Directory must be setup before using <strong>FTP</strong>-<strong>WatchDog</strong>; <strong>FTP</strong>-<strong>WatchDog</strong> does not establish its own<br />
directories<br />
c. Select file types to be sent<br />
<strong>File</strong> Types, consisting of two radio buttons and a field<br />
Select the radio button All to send any file in the Local Directory (par. b) regardless of filename or<br />
extension. Do not enter any file types or extensions in the adjacent field.<br />
Select the radio button Only These to send the file types or filenames listed in the adjacent field. Enter<br />
all filenames and extensions in the adjacent field.<br />
Do not put any path information in the field (the path is specified in the <strong>FTP</strong> Directory field, see par. b).<br />
Be sure there are no other files in the Local Directory except the files to be sent. You can list more than<br />
one file or extension <strong>–</strong> separate them with a space.<br />
e-CALLISTO: To send time-stamped Callisto FITS data files specify only the extension with leading<br />
dot (or period), as in .fit. If FITS files are to be sent to more than one server or website, a separate setup<br />
file is needed for each location (see par. 2 for running multiple instances of <strong>FTP</strong>-<strong>WatchDog</strong>). See<br />
Appendix I for specific examples.<br />
SAM: To send only SAM magnetogram image files specify the filename sam_data.png. To send any<br />
PNG-type image file specify only the extension .png (be sure to include the leading dot or period). See<br />
Appendix I for specific examples.<br />
d. Leave the following field blank:<br />
Ignore Patterns (Use this field to specify directories or files in the Local Directory that you do not<br />
want sent to the <strong>FTP</strong> server. This is useful if you have a temporary folder or backup directory that<br />
you do not want sent to the <strong>FTP</strong> server, for example \temp or \backup. <strong>FTP</strong>-<strong>WatchDog</strong> will ignore<br />
these entries and not upload them. Separate multiple entries by spaces)<br />
e. Setup the following boxes and fields:<br />
Ignore Errors (check)<br />
Play Sounds unchecked (unless you want to be driven crazy, but this can be useful when<br />
troubleshooting <strong>FTP</strong> problems)<br />
<strong>File</strong>: <strong>FTP</strong>-<strong>WatchDog</strong> v31 Setup Instructions.doc, Page 2
<strong>File</strong> <strong>Transfer</strong> <strong>Protocol</strong> <strong>Tool</strong> <strong>–</strong> <strong>FTP</strong>-<strong>WatchDog</strong> <strong>V3</strong><br />
<br />
<br />
<br />
<br />
<br />
<br />
1X Upload (normally unchecked. Check this box to resend files in the Local Directory after an<br />
<strong>FTP</strong> server, PC or internet failure that prevented some of the files from being uploaded. <strong>FTP</strong>-<br />
<strong>WatchDog</strong> will upload all files and then automatically gray out the box when all files have been<br />
successfully uploaded. If a subsequent upload failure occurs, the unchecked box will become<br />
available so that this function may be used again)<br />
Enable <strong>WatchDog</strong> (check to allow <strong>FTP</strong>-<strong>WatchDog</strong> to send files; uncheck if you want it to<br />
stop)<br />
Change or Convert <strong>File</strong>name: From drop-down menu, select No: Retain (Nein: Beibehalten)<br />
Upload Interval: 10 seconds (10 Sekunden) for most applications. (This drop-down menu can be<br />
used to set the upload interval over a very wide range of time intervals from immediately (sofort) to<br />
seconds (Sekunden), minutes (Minuten), hours (Stunden) or days (Tage). The longer intervals could<br />
be useful where internet access is by dialup modem. The Immediately (sofort) setting is not<br />
recommended because of the CPU resources required to rapidly scan for appearance of new files)<br />
Confirm Deleting <strong>File</strong>s from <strong>FTP</strong> Server (normally uncheck. If you delete or rename a file in<br />
the Local Directory, <strong>FTP</strong>-<strong>WatchDog</strong> will delete them on the <strong>FTP</strong> server. If this box is checked,<br />
<strong>FTP</strong>-<strong>WatchDog</strong> will ask for confirmation before deleting the files from the server)<br />
Enable Autostart (check to cause <strong>FTP</strong>-<strong>WatchDog</strong> to automatically open and start sending<br />
when you reboot the PC; uncheck if you do not want the program to automatically open and<br />
start sending on reboot)<br />
f. After you have everything setup properly, click the Save icon on the <strong>Tool</strong>bar. The default filename is<br />
Unnamed <strong>FTP</strong>-Setting.ftpwd (in German). If desired, change to another name, such as<br />
My_Application_Setup (extension will be appended automatically). At this time <strong>FTP</strong>-<strong>WatchDog</strong> should<br />
start sending files. The howling dog icon in the taskbar system tray should turn green to indicate that<br />
<strong>FTP</strong>-<strong>WatchDog</strong> is active.<br />
2. You can setup different configurations and Save as many of them as you need. For most applications, one<br />
Settings file is sufficient; however, if you want to send files to more than one website or <strong>FTP</strong> server, you can<br />
run multiple instances of <strong>FTP</strong>-<strong>WatchDog</strong>. In this case, you would have a separate Settings configuration file<br />
for each one. Care is required when running multiple instances to avoid overloading CPU resources (do not<br />
use the Immediate upload interval).<br />
3. When <strong>FTP</strong>-<strong>WatchDog</strong> starts, it automatically loads the last used Settings file. You can manually load a<br />
Settings file by clicking the Open icon or setup a new file by clicking the New icon on the <strong>Tool</strong>bar. If setting<br />
up multiple instances, be sure to watch CPU usage. CPU usage depends on the Upload Interval with<br />
Immediate upload interval using the most CPU resources, but PC characteristics also will have an effect.<br />
4. If you have problems getting file transfers to work properly, click the Open Log <strong>File</strong> icon on the <strong>Tool</strong>bar.<br />
This opens a text file of all activity. Although the logs are in German, it should be apparent what is causing<br />
the problem (<strong>FTP</strong> server error responses may be in English anyway). Alternately, you can use<br />
http://translate.google.com/ to translate the logs. Copy the log entry in question and Paste it into the Google<br />
<strong>File</strong>: <strong>FTP</strong>-<strong>WatchDog</strong> v31 Setup Instructions.doc, Page 3
<strong>File</strong> <strong>Transfer</strong> <strong>Protocol</strong> <strong>Tool</strong> <strong>–</strong> <strong>FTP</strong>-<strong>WatchDog</strong> <strong>V3</strong><br />
text entry box. Be sure to select German > English translation in the dropdown boxes. If you want to start<br />
fresh logs, click the Delete Log <strong>File</strong> icon.<br />
Note: <strong>FTP</strong>-<strong>WatchDog</strong> log files grow as the program runs and should be regularly deleted so they do not get<br />
larger than 45 KB. Notepad cannot open a file that exceeds 54 KB and does not allow editing if the file size<br />
reaches between 45 and 54 KB.<br />
5. To hide the user interface, click the Hide icon on the <strong>Tool</strong>bar. This will hide the interface window but the<br />
program will continue to run in the background and it will be available from the taskbar. If you see a howling<br />
dog icon in the taskbar, <strong>FTP</strong>-<strong>WatchDog</strong> is running. If the icon is red, <strong>FTP</strong>-<strong>WatchDog</strong> is disabled and not<br />
sending; if the icon is green, it is enabled and sending.<br />
6. To shutdown and exit <strong>FTP</strong>-<strong>WatchDog</strong>, click the Exit icon on the taskbar. This will terminate the <strong>FTP</strong> session<br />
and shutdown the program. However, if Autostart Enabled is checked, <strong>FTP</strong>-<strong>WatchDog</strong> will automatically<br />
open when the PC is rebooted.<br />
7. To restart the program, from the main Windows screen go to Start <strong>–</strong> All Programs <strong>–</strong> <strong>Tool</strong>s&More <strong>–</strong> <strong>FTP</strong>-<br />
Watchdog <strong>–</strong> <strong>FTP</strong>-<strong>WatchDog</strong>. <strong>FTP</strong>-<strong>WatchDog</strong> automatically loads the last saved Settings file. If Enable<br />
<strong>WatchDog</strong> was checked in setup, the program will start sending immediately and the taskbar icon should be<br />
green. If Enable <strong>WatchDog</strong> was not checked, the icon will be red. Click the taskbar icon and the user<br />
interface window will appear. Check the Enable <strong>WatchDog</strong> box and click Save. The taskbar icon should<br />
turn green, indicating that the program is sending.<br />
8. If desired, you can put a Shortcut on your Desktop by right-dragging the <strong>FTP</strong>-<strong>WatchDog</strong>.exe file from the<br />
folder C:\Program <strong>File</strong>s\<strong>Tool</strong>s&More\<strong>FTP</strong>-Watchdog to the Desktop and selecting Create Shortcuts here.<br />
9. Test the Autostart Enabled feature by rebooting the PC. When the PC reboots, <strong>FTP</strong>-<strong>WatchDog</strong> should<br />
automatically open and start and you should see the howling dog icon in the taskbar. The icon should be<br />
green if Enable <strong>WatchDog</strong> is checked in the Settings file.<br />
10. When <strong>FTP</strong>-<strong>WatchDog</strong> sends a file, the howling dog icon momentarily turns from green to white and then<br />
back to green.<br />
11. To uninstall the program, from the main Windows screen go to Start <strong>–</strong> All Programs <strong>–</strong> <strong>Tool</strong>s&More <strong>–</strong> <strong>FTP</strong>-<br />
Watchdog <strong>–</strong> Deinstallieren.<br />
<strong>File</strong>: <strong>FTP</strong>-<strong>WatchDog</strong> v31 Setup Instructions.doc, Page 4
<strong>File</strong> <strong>Transfer</strong> <strong>Protocol</strong> <strong>Tool</strong> <strong>–</strong> <strong>FTP</strong>-<strong>WatchDog</strong> <strong>V3</strong><br />
Appendix I <strong>–</strong> Specific Application Setups<br />
e-CALLISTO FITS <strong>File</strong> sent to ETH-Zurich server. Note: Send only FITS files to ETH (below).<br />
e-CALLISTO Lightcurve Image <strong>File</strong>. Note: Lightcurves usually are sent to a user website (below).<br />
<strong>File</strong>: <strong>FTP</strong>-<strong>WatchDog</strong> v31 Setup Instructions.doc, Page 5
<strong>File</strong> <strong>Transfer</strong> <strong>Protocol</strong> <strong>Tool</strong> <strong>–</strong> <strong>FTP</strong>-<strong>WatchDog</strong> <strong>V3</strong><br />
SAM Magnetogram Image sent at 1 minute intervals (below)<br />
SAM Magnetogram Thumbnail Image sent at 2 minute intervals (below)<br />
<strong>File</strong>: <strong>FTP</strong>-<strong>WatchDog</strong> v31 Setup Instructions.doc, Page 6
<strong>File</strong> <strong>Transfer</strong> <strong>Protocol</strong> <strong>Tool</strong> <strong>–</strong> <strong>FTP</strong>-<strong>WatchDog</strong> <strong>V3</strong><br />
Appendix II <strong>–</strong> <strong>FTP</strong>-<strong>WatchDog</strong> Installation Sequence<br />
1. When you run the installation program (ftp-watchdog-setup.exe), you may see a security warning (below). If<br />
so, click Run.<br />
2. Upon seeing the Welcome screen (below), click Continue (Weiter). In this and following windows, click<br />
Cancel (Abbrechen) if you wish to abort or cancel the installation or Back (Zurűck) if you wish to go back..<br />
<strong>File</strong>: <strong>FTP</strong>-<strong>WatchDog</strong> v31 Setup Instructions.doc, Page 7
<strong>File</strong> <strong>Transfer</strong> <strong>Protocol</strong> <strong>Tool</strong> <strong>–</strong> <strong>FTP</strong>-<strong>WatchDog</strong> <strong>V3</strong><br />
3. Read and accept the License (select upper radio button, Ich akzeptiere die Bedingungen der<br />
Lizenzvereinbarung, in screen below), click Continue (Weiter).<br />
4. The next screen is Readme information, click Continue (Weiter).<br />
<strong>File</strong>: <strong>FTP</strong>-<strong>WatchDog</strong> v31 Setup Instructions.doc, Page 8
<strong>File</strong> <strong>Transfer</strong> <strong>Protocol</strong> <strong>Tool</strong> <strong>–</strong> <strong>FTP</strong>-<strong>WatchDog</strong> <strong>V3</strong><br />
5. Fill in the User Information (below), and click Continue (Weiter).<br />
6. Browse (Andern) to the target folder for the program files or accept the default (below), click Continue<br />
(Weiter).<br />
<strong>File</strong>: <strong>FTP</strong>-<strong>WatchDog</strong> v31 Setup Instructions.doc, Page 9
<strong>File</strong> <strong>Transfer</strong> <strong>Protocol</strong> <strong>Tool</strong> <strong>–</strong> <strong>FTP</strong>-<strong>WatchDog</strong> <strong>V3</strong><br />
7. Finish installation (below), click Complete (Fertigstellen).<br />
8. When installation is finished, the default Settings window will open (below). At this time, your installation is<br />
complete and the Settings file is ready to be edited for your system.<br />
<strong>File</strong>: <strong>FTP</strong>-<strong>WatchDog</strong> v31 Setup Instructions.doc, Page 10
Document Information:<br />
<strong>File</strong> <strong>Transfer</strong> <strong>Protocol</strong> <strong>Tool</strong> <strong>–</strong> <strong>FTP</strong>-<strong>WatchDog</strong> <strong>V3</strong><br />
Author: Whitham D. Reeve<br />
Revision: 0.0 (Original draft created, 2 Feb 2013)<br />
0.1 (Changed upload interval, 3 Feb 2013)<br />
0.2 (Minor edits, 5 Feb 2013)<br />
0.3 (Final draft, edits, added Appendix II, 26 Feb 2013)<br />
1.0 (Issued for distribution, 26 Feb 2013)<br />
<strong>File</strong>: <strong>FTP</strong>-<strong>WatchDog</strong> v31 Setup Instructions.doc, Page 11