micro, cdd - Power-One
micro, cdd - Power-One
micro, cdd - Power-One

You also want an ePaper? Increase the reach of your titles
YUMPU automatically turns print PDFs into web optimized ePapers that Google loves.
MICRO and<br />
Concentrator Data Device<br />
AURORA® ACADEMY<br />
1 Hour<br />
1
Training Objectives<br />
Micro<br />
250 W<br />
300 W<br />
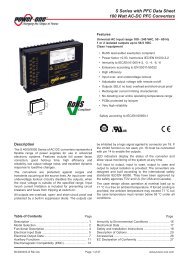
Specifications<br />
• Key Specs<br />
• Advantages<br />
Installation<br />
• Flexibility in Design<br />
• Cabling Solutions<br />
Communications<br />
• CDD Specifications<br />
• Configurations<br />
• Monitoring Solutions<br />
RELIABILITY DATA
Micro Introduction
Micro Introduction
MICRO Key Specifications<br />
Product name MICRO-0.25-I MICRO-0.3-I<br />
Rated <strong>Power</strong> (P ac,r ) 250W 300W<br />
Rated <strong>Power</strong> (P dc,r ) 265 W 320 W<br />
Operating Input Range 12-60V<br />
Full power MPPT range<br />
(V mppmax,r -V mppmin,r )<br />
25-60V 30-60V<br />
Max. Input Voltage V max,abs<br />
65V<br />
Adjustable Frequency<br />
Range<br />
57-60.5Hz<br />
Rated Output Voltage<br />
208 / 240 Vac<br />
Max. Eff. (η max ) 96.5%<br />
CEC Eff. (η CEC ) 96%<br />
Ambient Temperature<br />
Range<br />
-40°C to 65 °C / -<br />
40...+149°F<br />
-40°C to 65 °C / -<br />
40...+149°F<br />
Environmental Protection<br />
Rating<br />
NEMA 4X<br />
Cooling<br />
Natural<br />
Dimension (H x W x D)<br />
262mm x 244mm x 35mm /<br />
10.3’’ x 9.6’’ x 1.37’’<br />
Weight<br />
3.5 lb
Key Advantages of Micro<br />
High Performance<br />
• High CEC Efficiency – 96.5%<br />
• Fast and Precise MPP Tracking Algorithm<br />
High Reliability<br />
• High Reliability Capacitors (Electrolytic free)<br />
• NEMA 4X Enclosure Rating<br />
Fast Installation<br />
• Simple AC trunk cable solution<br />
• Field Selectable AC Voltage and Frequency<br />
Easy to Monitor<br />
• Wireless monitoring solution<br />
• Panel level monitoring<br />
6
Micro – Non Uniform Shadowing<br />
Module without shadow<br />
PPV<br />
+ -<br />
Pmax<br />
1 2 3 4<br />
VPV<br />
No Diodes in Bypass<br />
P max<br />
V OC<br />
VOC
Micro – Non Uniform Shadowing<br />
Module with corner shadow<br />
PPV<br />
+ -<br />
⅔ Pmax<br />
1 2 3 4<br />
VPV<br />
⅔ VOC<br />
VOC<br />
<strong>One</strong> Diode in Bypass<br />
⅔ P max<br />
⅔ V OC
Micro – Non Uniform Shadowing<br />
Module with strong shadow<br />
⅓ Pmax<br />
PPV<br />
+ -<br />
1 2 3 4<br />
⅓ VOC<br />
VOC<br />
VPV<br />
Two Diodes in Bypass<br />
⅓ P max<br />
⅓ V OC
Non Uniform Shading Effects<br />
Inverter Operating<br />
Voltage Range<br />
⅓ V MPP<br />
⅓<br />
P n<br />
⅓V OC<br />
⅔ V MPP<br />
⅔<br />
P n<br />
⅔V OC<br />
V MPP<br />
P n<br />
V OC<br />
Typical 245W Module Spec<br />
P n = 245W V MPP = 30.5V V OC = 37.5V<br />
Competitor 1<br />
Competitor 2<br />
MPP falls Out of uINV<br />
VDC range with<br />
1 diode in Bypass<br />
Competitor 3<br />
MPP can fall Out of<br />
uINV VDC range with<br />
1 diode in Bypass<br />
Competitor 4<br />
Competitor 5<br />
MPP falls Out of uINV<br />
VDC range only<br />
when two diodes are<br />
in Bypass<br />
<strong>Power</strong>-<strong>One</strong><br />
DC input<br />
Voltage<br />
10 20 30 40 50 60<br />
10
System Components<br />
MICRO-0.25-I<br />
MICRO-0.3-I<br />
AURORA CDD<br />
Data logger<br />
AC TRUNK<br />
PLUG CAP<br />
To seal unused<br />
junctions<br />
AC TRUNK CABLE<br />
To connect inverter to the grid<br />
Supports 60, 72 and 96 cell modules<br />
AC TRUNK<br />
END CAP<br />
To seal ends of<br />
trunk cable<br />
AC TRUNK<br />
UNLOCK TOOL<br />
To disconnect<br />
inverter from<br />
trunk cable<br />
11
AC Cabling Solution<br />
Drop Cable<br />
Ground<br />
Screw<br />
Trunk Cable<br />
4 wires, AWG10<br />
12<br />
Cable Pitch
High Design Flexibility: Portrait or Landscape<br />
13
MICRO AC cabling Solution<br />
Cable Length - Portrait Orientation<br />
1.05 m<br />
(60,72 or 96 cells module)<br />
14
MICRO AC cabling Solution<br />
Cable Length - Landscape Orientation<br />
1.70 m (60, 96 cells module)<br />
2.05 m (72 cells module)<br />
15
MICRO AC cabling Solution<br />
Accessories<br />
Waterproof Cap:<br />
IP67 cap used when one of the bus plug is not connected to a<br />
MICRO.<br />
To unlock waterproof caps unlocking tool is required.<br />
End Cap:<br />
Used to protect and seal exposed cable wires in case where installers need to<br />
cut trunk cable during the installation to adjust the length or number of the<br />
<strong>micro</strong>inverters used.<br />
End cap is IP67 rated and can be assembled only once, locking mechanism<br />
does not allow cap to be opened. Once used cap needed to be dispose a new<br />
cap is to apply.<br />
Start bus adapter cable glands & counterpart:<br />
Used to connect the installer cabling at the beginning of the AC<br />
bus.<br />
The adapter and the counterpart is IP67 rated.<br />
Unlocking tool:<br />
Used to disassemble mated connectors on the trunk cable and drop<br />
cable or bulkhead connector assembled to <strong>micro</strong>inverter.<br />
Tool is also used to unlock waterproof caps.
Plant Installation - Overview<br />
PV Module<br />
Mounting Rail<br />
Wiring Box<br />
End Waterproof Cap<br />
Drop Waterproof Cap<br />
Unlocking Tool<br />
MICRO Drop Cable<br />
DC Wires<br />
Micro Inverter<br />
AC Trunk Cable<br />
Temporary Cap<br />
Trunk Waterproof Cap<br />
17
Plant Installation steps<br />
1<br />
2 3<br />
Fix MICRO’s on the racking system, roll out the cable on the roof along the mounting rail and<br />
position the T-junctions opposite to the MICRO that are going to be connected to the Trunk<br />
cable.<br />
Be careful to respect the distances between<br />
MICRO’s and choose the right trunk cable pitch<br />
based on the size and orientation of the PV<br />
modules<br />
18
Plant Installation steps<br />
1 2 3<br />
2<br />
Secure T-junction with cable ties using<br />
the cavities of the overmold.<br />
Fix the end bus waterproof cap where<br />
needed.<br />
Cable<br />
ties<br />
19
Plant Installation steps<br />
1 2 3<br />
Align the mating connectors and<br />
join mating parts together.<br />
Roll out the ground cable connecting<br />
all the inverters<br />
20
Installation of System Grounding of Micro Inverters<br />
21
Installation of System Grounding of Micro Inverters<br />
22
Plant Installation steps<br />
Build a map of the plant, use the MAC<br />
address labels from each inverter, in bag<br />
and positioning them on the appropriate<br />
format<br />
ATTENTION: Do it before<br />
installing PV Modules!!<br />
Then, using the map, configure the plant<br />
country standard via AURORA CDD<br />
integrated Web server.<br />
23
MICRO AC cabling Solution<br />
Mounting Example<br />
Consider –<br />
UF Splice Kit<br />
End cap<br />
Cap cover<br />
Junction Boxes and<br />
Other BoS not<br />
provided<br />
24
Consider using UF splice kit and heat shrink sleeve to make connections<br />
sleek and clean.
MICRO - FAQ<br />
We use Amphenol Connectors but industry uses MC4.<br />
How do we counter this problem<br />
• Competition also uses Amphenol<br />
• We have 3 rd party test reports (TUV) for intermateability of<br />
MC4 and Amphenol<br />
Why don’t we offer Tyco connectors<br />
• Tyco connectors are not UL compliant for chassis mount<br />
solution yet<br />
26
MICRO - FAQ<br />
How many inverters can we connect on a Trunk Cable<br />
Model 208VAC 240VAC<br />
Max current<br />
measured<br />
Number of<br />
inverters on<br />
20A breaker<br />
(16A max)<br />
Max current<br />
measured<br />
Number of<br />
inverters on<br />
20A breaker<br />
(16A max)<br />
MICRO-0.25-I 1.20A 13 1.04A 15<br />
MICRO-0.3-I 1.44A 11 1.25A 12<br />
27
Micro Communication System Overview<br />
28
CDD (Concentrator Data Device) Overview<br />
29
CDD (Concentrator Data Device) Overview<br />
PARAMETER<br />
Inverter Communication<br />
CDD<br />
Standard Radio IEEE 802.15.4<br />
(2.4GHz)<br />
Sample Rate<br />
Max distance (free space)<br />
furthest Micro<br />
4 sec ...60 sec<br />
50m (can be extended 15m<br />
with external antenna )<br />
Maximum number of devices 30<br />
Communication to Modem/PC<br />
Wireless IEEE 802.11 (2.4GHz) /<br />
10Mbps<br />
Wired<br />
Inverter connection<br />
Data visualization<br />
<strong>Power</strong> Supply<br />
Other<br />
Ethernet / 10...100Mbps<br />
1 x RS485<br />
Aurora Web Server<br />
Ext Plug-in Adapter 5Vdc<br />
Enclosure NEMA 1<br />
Dimensions (WxHxD)<br />
Display<br />
180x155x25 mm<br />
16 characters x 2 lines OLED
Aurora CDD: Mesh Network Topology<br />
Automatic and Dynamic Reassignement Coverage<br />
Alarm!<br />
Up to 50m
CDD Layout<br />
32
CDD Layout<br />
33
Connect CDD to WIFI<br />
During the Registration of the CDD on Aurora Vision the “Radio Communication<br />
MAC Address” must be used.<br />
34
CDD Display Overview<br />
During normal Operation the<br />
CDD scrolls through five screens<br />
and displays general information<br />
35
By pressing any button<br />
during normal operation,<br />
you gain access to set up,<br />
basic informative screens<br />
related to the CDD<br />
36
CDD Display “STATISTICS” Overview<br />
To access the advanced menu, simultaneously<br />
press and hold the UP and DOWN buttons for 3<br />
seconds and then enter the password 0010<br />
37
CDD Display “VIEW INFORMATION” Overview<br />
38
CDD Display “CHANGE SETTINGS” Overview<br />
39
Connect CDD to WiFi<br />
1 2 3<br />
Attach the power supply to the CDD. The CDD will prompt you to enable WiFi. Once<br />
the WiFi is enabled, the CDD will automatically start scanning for available WiFi<br />
networks.<br />
40
Connect CDD to WiFi<br />
1 2 3<br />
Select the appropriate WiFi network. Enter the Network Security key if needed.<br />
This indicates the network signal strength<br />
41
Connect CDD to WiFi<br />
1 2 3<br />
The CDD gives you a Web Server IP. Record this information for future reference.<br />
NOTE: This will be different for every site.<br />
This is used to access the LOCAL User Interface (UI).<br />
NOTE: To access the UI Wirelessly, your PC has to<br />
be connected to the same network as the CDD.<br />
Be sure to confirm that the WiFi AutoConnect<br />
is on. If the network goes down, the CDD will<br />
have to be manually connected again.<br />
42
CDD Integrated Web server<br />
Enter the Web<br />
Server IP into the<br />
URL bar of any<br />
Browser<br />
Click Config and<br />
run the Aquasition<br />
Wizard<br />
43
CDD Integrated Web server<br />
Enter username/password<br />
(Default is admin/admin)<br />
44
CDD Integrated Web server<br />
CDD scanning for<br />
MICROs<br />
(20 mins + -)<br />
45
CDD Integrated Web server<br />
CDD shows the<br />
identified<br />
MICRO MAC<br />
address<br />
46
CDD Integrated Web server<br />
Stop Acquisition<br />
once all of the<br />
MICRO Inverters<br />
have been found<br />
47
CDD Integrated Web server<br />
Choose Country<br />
standard on<br />
MICRO Inverters<br />
48
CDD Integrated Web server<br />
USA 240 SplitPhase<br />
USA 208<br />
HAWAII 240 SplitPhase<br />
HAWAII 208<br />
CEI-021<br />
VDE-AR-N 4105<br />
VDE0126<br />
AUSTRALIA<br />
UK_G83-2<br />
Spanish_Cstd<br />
Benelux_GridStd<br />
HAWAII_HELCO 240V Split<br />
Phase<br />
HAWAII_HELCO 208V<br />
HAWAII_MECO 240V Split<br />
Phase<br />
HAWAII_MECO 208V<br />
HAWAII_KIUC 240V Split<br />
Phase<br />
HAWAII_KIUC 208V<br />
GreeceMainland<br />
Greece Islands<br />
Czech Republic<br />
49
CDD Integrated Web server<br />
Customer Self-<br />
Registration<br />
This allows the<br />
homeowner to track<br />
their system with<br />
Aurora Vision<br />
50
AURORA VISION Self Registration – Step 1<br />
Link to AURORA<br />
VISION Self-<br />
Registration<br />
Process<br />
Step 1:<br />
Instructions and<br />
personal<br />
information<br />
51
User Validation Email<br />
Activation email sent<br />
contains<br />
Link to ‘Register Plant’ page<br />
When user clicks on link then:<br />
• Create a user account<br />
• Log user in and place them in the<br />
‘Register Plant’ page.<br />
If User does not click on link after<br />
5 days then:<br />
• Send email to user that their<br />
registration timed out. Text: “Your<br />
registration request has timed out.<br />
Please restart the registration<br />
process if you wish to register your<br />
home solar power system at:<br />
http://URLGoesHere …<br />
52
AURORA VISION Self Registration – Step 2<br />
Step 2: Provide Site<br />
information<br />
53
AURORA VISION Self Registration – Step 3<br />
Step 3: Register CDD<br />
with Aurora Vision.<br />
All inverters associated<br />
with the CDD will<br />
automatically be<br />
populated.<br />
54
Registration Complete Email<br />
Confirmation sent email<br />
contains<br />
You have successfully registered your <strong>Power</strong>-<strong>One</strong> solar power<br />
equipment and can now monitory your system!<br />
Please bookmark the link below to view/monitory the energy<br />
created by your solar power system.<br />
http://acct.auroravision.net/act/pub/newUserSignup.svttoken=9bdc<br />
fcaf949a4e996fb1ff4900234a1b99ca2d9d<br />
Your installer’s name and contact info is: Name: xxx Phone: Email:<br />
Below is a list of the devices that have been registered to your<br />
home:<br />
Information about devices<br />
registered and link back to login<br />
page with suggestion on<br />
bookmarking the page.<br />
Link brings you to Aurora Easy<br />
View<br />
Name Serial# Dev Type Model<br />
CDD Default 1 1213421 Logger PVI_CDD_MOD1<br />
EDD Default 1 213423 Module PVI_EDD_MOD1<br />
EDD Default 2 3434534 Module PVI_EDD_MOD1<br />
EDD Default 3 6785677 Module PVI_EDD_MOD1<br />
55
Monitor MICROs with AURORA Easy View<br />
Plant summary and<br />
weather information<br />
Graphical display of<br />
power generation for<br />
day/week/month/year<br />
Module level monitoring<br />
performed here<br />
56
Check the CDD-to-MICRO Signal Strength<br />
Access the User<br />
Interface and<br />
select “View” then<br />
“RF Signal”
Check the CDD-to-MICRO Signal Strength<br />
58
Check the CDD-to-MICRO Signal Strength<br />
59
Check the CDD-to-MICRO Signal Strength<br />
Above 70% : No communication problems occur<br />
Between 40% and 70% : Communication runs; possible<br />
delay in data transfer and slower upgrade process<br />
Below 40% : low signal strength, the signal has to be boosted<br />
(ext.Ant or booster or move CDD)<br />
60
Check the CDD-to-MICRO Signal Strength<br />
61
Check the CDD-to-MICRO Signal Strength<br />
15m<br />
62
AURORA MICRO<br />
Design for Reliability
Micro – Design for Reliability Approach<br />
Design for<br />
Reliability<br />
• Components Selection: Film Capacitors increase Reliability<br />
• Conversion Topology: minimum number of components<br />
and soft-switching operation<br />
• Thermal Management: heat sinks, low losses components<br />
and distances, no fans or other moving parts<br />
MTBF and<br />
Testing<br />
• 1,233,700 hours (using Telcordia Issue 1)<br />
• Factory test on 100% of manufactured units: Burn-in ,<br />
Optical automatic Inspection, Insulation test, Functional<br />
Test.<br />
• Extensive factory and field reliability testing<br />
System<br />
Reliability<br />
• Panel level fault detection makes for easy<br />
troubleshooting<br />
• All system components covered under standard 10<br />
year warranty (MICRO, CDD, cables and accessories)<br />
65
AURORA MICRO Product Architecture<br />
Dual Stage Topology allows wide MPP<br />
Range and no DC input current ripple<br />
NEMA 4X<br />
Enclosure<br />
No fans or other<br />
moving parts<br />
Electrolyte-free power converter<br />
increases life expectancy and<br />
long term reliability
Reliability Tests: Life Test<br />
The life test is designed to demonstrate the MTBF evaluation. Every time the test<br />
is stopped to change parameter, components etc. you have to start from the<br />
beginning.<br />
• 55 inverters and 3 CDDs<br />
• Connected to 59.2Vdc (Vmp = 51.5Vdc), Imp = 6.2A<br />
• AC out put 230VAC, 50Hz grid<br />
• Constant 55°C ambient temperature<br />
• All inverters producing maximum continuous output power<br />
No failures recorded<br />
Date<br />
Number of DUT<br />
Hours worked<br />
(Each DUT)<br />
MTBF<br />
Demonstrated<br />
(hours)<br />
Total On/Off cycles Number of failure<br />
Life Test Status<br />
19/09/2012 - 19/10/2012 18 456:00:00 101267 456 0 20.50%<br />
22/10/2012 - 04/11/2012 55 278:16:49 289908 278 0 59.00%<br />
04/11/2012 - 15/11/2012 55 264:00:00 469050 542 0 95.00%<br />
15/11/2012 - 22/11/2012 55 175:27:05 587799 717 0 119.09%<br />
22/11/2012 - 28/11/2012 55 142:24:09 687548 860 0 138.75%
Reliability Tests: Strife/Overload Test<br />
The strife or overload test purpose is to define the power margins in all allowed<br />
functional condition in terms of: Output <strong>Power</strong>, Grid Voltage, Input voltage.<br />
• Environment temperature: 65°C<br />
• Working conditions:<br />
• DC Input: Five Vin steps (12V, 20V, 30V, 50V and 63V); Iin was gradually<br />
increased up to +20% of rated input current of condition under testing.<br />
• AC Output: Three output voltage steps (270V , 240V, 180V) , 60Hz<br />
simulated grid.<br />
• Requirements to switch to the next condition: Unit has to work for at least 4<br />
hours after reaching the thermal stabilization.<br />
No failures recorded
Reliability Tests: High Temperature Test<br />
In the High Temperature test, The Inverter will be considered meeting the STRIFE<br />
target, if it survives the testing with at least 10°C or +30% of rated operating<br />
ambient temperature (without derating) over the maximum specified<br />
temperature.<br />
<br />
The device was set on rated output voltage (240Vac),60Hz simulated grid.<br />
MPPT enabled : Vdc = 40V Idc = 7.9A<br />
<br />
<br />
All Temperature protection was disabled<br />
The device was tested at:<br />
1. 75°C (Maximum working temperature)<br />
2. 82.5°C(Tmax +10%)<br />
3. 90°C(Tmax+20%)<br />
4. 97.5°C(Tmax+30%)<br />
After the thermal stabilization the device must remain in each condition at least for 4<br />
hours.<br />
<br />
No Failures<br />
Reported!!!<br />
Top and bottom enclosure temperature, Microinverter internal temperature and<br />
environmental temperature were continuously monitored.
Reliability Tests: Low Temperature Test<br />
In the Low Temperature test, the MICRO Inverter will be considered meeting the<br />
strife requirements if it can turn-on and exports the maximum output power at a<br />
temperature at least 10°C below the minimum specified temperature.<br />
• Software protections were disabled<br />
• Inverter startup was tested for -40°C, -44°C, -48°C, -52°C ambient
Reliability Tests: Humidity Freeze Test<br />
In the Low Temperature test, the MICRO Inverter will be considered meeting the<br />
Humidity Freeze requirements if it can turn-on and exports the maximum output<br />
power without any variations on performance.<br />
• 59.2VDC, 230VAC, 50Hz, CDD communication active<br />
• -40°C to +85°C, 85%RH (relative humidity)<br />
• 10 thermal cycles of 20 hours high, 4 hours low temperature<br />
• Inverters producing full rated output power<br />
• No faults detected
Reliability Tests: Thermal Shock<br />
In the Thermal Shock test, is used to evaluate the boards assembly quality<br />
(soldering joints, components, etc.) once they are submitted to fast thermal shocks<br />
between -25°C and +100°C for a total of 1000 cycles.<br />
• Bare board of MICRO-I-0.3(0.25) OUTD placed on thermal shock chamber lift.<br />
Not operating<br />
• Temperature shock: from -25°C to +100°C in 10sec. ; dwell time 10 min. High<br />
Temp./ 10 min. Low temp., 1000 cycles.<br />
• Board temperature<br />
monitored by data-logger.<br />
• No faults detected
Reliability Tests: Vibration and Corrosion Test<br />
• Vibration test<br />
This test is designed to find any weakness on the<br />
mechanical assembly, component defects, as well as<br />
workmanship or manufacturing process issues can be<br />
uncovered and corrected.<br />
– 3-axis random vibration<br />
– DUT passed functional tests after vibration test<br />
• Corrosion test<br />
– Reference standard: ISO 21207 method B, mix salt<br />
and industrial contaminants.<br />
– Test duration: 5 week, simulating 27 years exposure<br />
in industrial environment<br />
– Inverter casing proven to ensure long term<br />
reliability
Phoenix beta test site<br />
• Testing duration 6 months<br />
• August 2012 – February 2013<br />
• Continuous monitoring using<br />
Aurora Vision<br />
• Inverters, CDD and cables<br />
undergoing analysis for wear and<br />
tear<br />
• No failures reported from any<br />
worldwide beta site
Reliability that is unmatched!<br />
All tests were well outside the limits of real-world<br />
operational conditions<br />
0 failures detected<br />
Currently no inverter failures have been reported-<br />
No RMAs have been issued<br />
75
MICRO: Summary<br />
Micro<br />
250 W<br />
300 W<br />
High Performance<br />
• High CEC Efficiency<br />
• Fast & Precise MPP Tracking Algorithm<br />
High Reliability<br />
• Electrolytic-free Capacitors<br />
• NEMA 4X Enclosure Rating<br />
Fast Installation<br />
• Simple AC trunk cable solution<br />
Easy to Monitor<br />
• Wireless monitoring solution<br />
• Panel level monitoring<br />
76
Thank You!<br />
Technical Training<br />
<strong>Power</strong> 77 <strong>One</strong> of North America<br />
training@power-one.com