magnilux - Astronomy Technology Today
magnilux - Astronomy Technology Today
magnilux - Astronomy Technology Today

You also want an ePaper? Increase the reach of your titles
YUMPU automatically turns print PDFs into web optimized ePapers that Google loves.
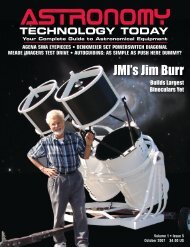
THE “HOME DEPOT” SCOPE<br />
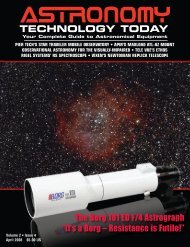
Image 3a-3c: A movable battery box serves as both power source for the cooling fan and adjustable counterweight for balancing the<br />
heaviest eyepieces. Details of the primary-mirror cell are available at www.rfroyce.com.<br />
stronger adhesive than glue.<br />
Next, I built the mirror mount using<br />
guidance from Bob Royce’s web site.<br />
Shower curtain rods were then cut to size,<br />
adding about two extra inches to allow for<br />
possible errors in my tube length calculations.<br />
They were placed in the holes of the<br />
mirror tube section end-rings and secured<br />
with screws. At this point, I coated both<br />
cardboard tube sections, the mirror<br />
mount and end plate, and the end rings<br />
on the mirror tube section with epoxy<br />
resin. End-rings on the front tube section<br />
were left uncoated. When the resin was<br />
dry, I installed the mirror, diagonal assembly,<br />
and focuser. The front tube section<br />
was then slid into position on the<br />
rods but was not secured, allowing for adjustment<br />
of the OTA length.<br />
With mirror, diagonal, and an eyepiece<br />
in place, the telescope was pointed at<br />
Polaris. The front tube section was then<br />
moved back and forth until the focal<br />
plane was just where I wanted it in the focuser<br />
tube. Then it was back to the garage,<br />
to lock the forward tube section in place<br />
with screws, and apply epoxy to the end<br />
rings. This pretty much completed the<br />
assembly of the OTA, except for two<br />
additional small aluminum tubes to provide<br />
extra stiffness in the altitude plane.<br />
That may have been overkill, but it<br />
seemed worthwhile to invest an additional<br />
five dollars to add more strength to the<br />
structure. There has been no detectable<br />
flexure of the tube, regardless of eyepiece<br />
weight.<br />
Design and construction of the<br />
mount was “Dob-basic,” with two exceptions:<br />
where the heavier 3/4-inch plywood<br />
was used, I made as many weight-saving<br />
cut-outs as I could without sacrificing<br />
much stiffness; and support boards for the<br />
altitude bearings are separate and removable<br />
from the box. This allowed me to use<br />
lighter-weight 1/2-inch plywood for the<br />
box, and gave me the option of changing<br />
the size or configuration of the altitude<br />
bearings if I wanted to, for any reason. In<br />
retrospect, this change from a basic box<br />
was probably unnecessary. But I’m pleased<br />
that the result is a very steady mount that<br />
weighs only fifteen pounds. And the largediameter<br />
altitude bearings provide smooth<br />
motion with relative insensitivity to<br />
balance.<br />
Some Accessories<br />
A recent addition to the mount<br />
(Image 2) is a set of simple and cheap<br />
wheelbarrow handles and wheel sets that<br />
allow the scope to be moved as a single<br />
unit. Materials included two 7-inch lawnmower<br />
wheels with mounting bolts, two<br />
1-inch by 2-inch pine boards, two small<br />
pieces of scrap 1/4-inch plywood, four<br />
hooks that screw into the handles, and<br />
four eyes that screw into the sides of the<br />
box. By mounting the wheels on the outside<br />
of the handles and the hooks on the<br />
underside of the handles, torque keeps the<br />
handles pushing firmly against the side of<br />
the box. Works well, was easy to make,<br />
and cost about twenty dollars. The 1-inch<br />
by 2-inch boards may seem a little small,<br />
<strong>Astronomy</strong> TECHNOLOGY TODAY 65