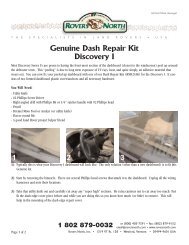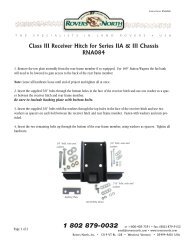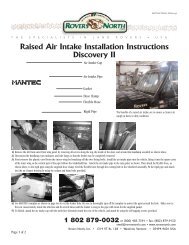
Range Rover Classic - Rackspace Hosting
Range Rover Classic - Rackspace Hosting
Range Rover Classic - Rackspace Hosting

Create successful ePaper yourself
Turn your PDF publications into a flip-book with our unique Google optimized e-Paper software.
TECH LINE<br />
[<strong>Rover</strong>s North staff receive phone calls daily asking for technical<br />
advice, parts and accessory recommendations, off roading questions,<br />
maintenance tips and repair diagnoses. Between calls, we<br />
asked the <strong>Rover</strong>s North staff to share some recent technical questions<br />
with us –ed.]<br />
Steve Haskell (’93 <strong>Range</strong> <strong>Rover</strong> <strong>Classic</strong>)<br />
Maintenance of the braking systems on <strong>Range</strong> <strong>Rover</strong>s, Defenders and<br />
Discoverys often involves installing new disc pads and turning rotors.<br />
All too often, you put it all back together only to find that you’re listening<br />
to squealing every time you apply the brakes. How can you<br />
avoid this problem<br />
As a Porche and Audi mechanic, I found myself frustrated by customers<br />
who disliked the noise emanating from their newly installed<br />
brakes. So I contacted Raybestos experts for advice.<br />
First, recognize that when brake rotors are turned [to level off<br />
their surfaces], they often become magnetic. Most enthusiasts and/or<br />
mechanics will rinse the rotors off quickly with distilled water or<br />
brake cleaner. The problem is that the surface never gets clean this<br />
way because the magnetism keeps metal shavings from the machining<br />
firmly attached to the surface.<br />
Step 1 - their recommendation to me was to use dishwashing<br />
liquid to create soapy water. Wash the rotors in the water and you’ll<br />
feel the rotor filings in the mix. Clean them this way first, and then<br />
spray a light coat of conventional brake cleaner.<br />
Step 2 – Use synthetic caliper grease sold at parts stores [e.g,<br />
Permatex or similar brands] rather than the normal grease, on the<br />
back of the brake pads. Brakes surfaces reach 400 – 500 degrees F;<br />
if you’re using antiseize compounds or conventional grease on the<br />
back of the pads, they will likely melt and drip off.<br />
Mike Koch (ex- MOD Series III 109”)<br />
Electrical problems can bedevil enthusiasts, particularly when the<br />
Previous Owner left no schematics in the car when it was sold.<br />
Recently, a customer called about his newly-purchased 2000 <strong>Range</strong><br />
<strong>Rover</strong>. It had Hella lights installed on the brush bar. The Hellas were<br />
wired to go on only when the high beams were engaged; however, the<br />
lights would only stay on when the owner actually held his finger on<br />
the switch. If he released the switch, the Hellas shut off.<br />
Step 1 - The starting point must be to trace the wiring from the<br />
brush bar though the grill.<br />
Step 2 - Look to see if a relay was installed; ideally, that will be<br />
the case.<br />
Step 3 - Test the relay to see if it works correctly.<br />
Step 4 - Test the switch for the Hella lights to determine if it is<br />
working properly<br />
My key point is that if you don’t take the time to trace the wiring,<br />
or have it done for you, you will not be able to diagnose the problem<br />
effectively. Replacing a part right off the bat is generally ineffective in<br />
electrical problems.<br />
A customer called with concerns that their gearbox had become<br />
stiff and difficult to engage smoothly. What steps should they take<br />
Step 1- It sounds so basic, but often this problem results from<br />
low hypoid oil levels in the gearbox. Check the level by removing the<br />
fill plug on the left side of the transmission case. More often than not,<br />
it’s quite low. If you can find any to examine, you want to see a glossy<br />
brown color. If you run the oil between your fingers, you should not<br />
feel grit or metal filings. If your fluid is quite dark consider draining<br />
it out and replacing it with new gear oil. If it’s milky, then it’s contaminated<br />
with moisture.<br />
Step 2 – Check the transfer case, too. That fill plug is on the back<br />
side of the transfer case, behind the transmission. If it is low, then fill<br />
it to level. Hint -if it gushes out at you and you have found the transmission<br />
down in level, then you have a bad seal between the transmission<br />
and the transfer case. Know that you will have to fill the transmission<br />
and release some from the transfer case until you remove both<br />
from the car and replace the seal.<br />
Step 4 – Make certain that your clutch fluid level is up to the fill<br />
line in the clutch reservoir. Look at the fluid color –if it’s gray or dark,<br />
you might have disintegration of the rubber seals inside the clutch<br />
master cylinder. Your fluid level will be normal but the clutch action<br />
will feel ineffective rather than spongy. Fluid is likely leaking past ineffective<br />
seals.<br />
Step 5 - If the fluid color is light brown and you have a firm<br />
pedal, then crawl underneath the right side of the car beneath the<br />
slave cylinder. If you have a Series I, II or II-A, you want to make certain<br />
that the adjustment nuts at the slave cylinder rod are at the correct<br />
length. The distance between the top of the slave cylinder to the<br />
adjustment nut [the top one of the two on the pushrod] will be 2 7/8<br />
inches. Use a set of calipers or even an elementary school compass to<br />
effect the measurement.<br />
Step 5 – If the fluid level in your reservoir is down, and you don’t<br />
have a firm pedal, then you might have a leak at the slave cylinder.<br />
Check for fluid leaks around the slave cylinder, or at the point where<br />
the rubber clutch line screws into the slave cylinder. Slave cylinders<br />
can be rebuilt, but you’ll need to make certain that the inner surfaces<br />
are very smooth and clean. If you have much pitting inside the cylinder,<br />
a rebuild kit probably won’t work.<br />
A customer replaced a Zenith carburetor with a Weber 34 ICH<br />
on a ’72 Series II-A. Why will it run only when the choke cable is<br />
pulled out<br />
Step 1 - Make certain that you have adjusted the mixture screw<br />
to the factory setting. Turn the mixture screw [the long screw at the<br />
bulkhead side of the carburetor] in all the way, and then back it off 2<br />
½ turns.<br />
Step 2 – Make certain that the carb is tightly installed on the<br />
intake manifold. Make certain that the top carb cover screws [there<br />
are 4] are tight, also.<br />
38