GV-IO Box 8 Ports - GeoVision
GV-IO Box 8 Ports - GeoVision
GV-IO Box 8 Ports - GeoVision

Create successful ePaper yourself
Turn your PDF publications into a flip-book with our unique Google optimized e-Paper software.
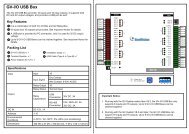
Output<br />
com.D<br />
DO 8<br />
DO 7<br />
DO 6<br />
DO 5<br />
com. C<br />
DO 4<br />
DO 3<br />
DO 2<br />
DO 1<br />
RS- 485 RX<br />
RX- 485 TX<br />
DC 12V<br />
D<br />
C<br />
Output<br />
com.D<br />
DO 8<br />
DO 7<br />
DO 6<br />
DO 5<br />
com. C<br />
DO 4<br />
DO 3<br />
DO 2<br />
DO 1<br />
RS- 485 RX<br />
RX- 485 TX<br />
DC 12V<br />
D<br />
C<br />
B<br />
A<br />
Input<br />
USB RX<br />
USB TX<br />
com .B<br />
DI 8<br />
DI 7<br />
DI 6<br />
DI 5<br />
com .A<br />
DI 4<br />
DI 3<br />
DI 2<br />
DI 1<br />
B<br />
A<br />
Input<br />
USB RX<br />
USB TX<br />
com .B<br />
DI 8<br />
DI 7<br />
DI 6<br />
DI 5<br />
com .A<br />
DI 4<br />
DI 3<br />
DI 2<br />
DI 1<br />
Output<br />
com.D<br />
DO 8<br />
DO 7<br />
DO 6<br />
DO 5<br />
com. C<br />
DO 4<br />
DO 3<br />
DO 2<br />
DO 1<br />
RS- 485 RX<br />
RX- 485 TX<br />
DC 12V<br />
D<br />
C<br />
Input<br />
USB RX<br />
USB TX<br />
com .B<br />
DI 8<br />
B DI 7<br />
DI 6<br />
DI 5<br />
com .A<br />
DI 4<br />
DI 3<br />
A<br />
DI 2<br />
DI 1<br />
<strong>GV</strong>-<strong>IO</strong>BOX 8<br />
Output<br />
com.D<br />
DO 8<br />
DO 7<br />
DO 6<br />
DO 5<br />
com.C<br />
DO 4<br />
DO 3<br />
DO 2<br />
DO 1<br />
RS- 485 RX<br />
RX- 485 TX<br />
DC 12V<br />
D<br />
C<br />
B<br />
A<br />
Input<br />
USB RX<br />
USB TX<br />
com .B<br />
DI 8<br />
DI 7<br />
DI 6<br />
DI 5<br />
com .A<br />
DI 4<br />
DI 3<br />
DI 2<br />
DI 1<br />
<strong>GV</strong>-<strong>IO</strong>BOX 8<br />
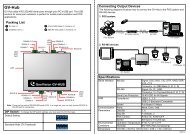
Connections to PC<br />
There are two ways to connect a <strong>GV</strong>-<strong>IO</strong> <strong>Box</strong> 8 to the PC:<br />
(1) Use the USB cable to connect to the PC, and<br />
(2) Through the option of <strong>GV</strong>-Hub, <strong>GV</strong>-COM, <strong>GV</strong>-NET Card or <strong>GV</strong>-NET/<strong>IO</strong> Card,<br />
use the RS-485 connectors to connect with the PC.<br />
Assigning Addresses to <strong>GV</strong>-<strong>IO</strong> <strong>Box</strong> 8<br />
Up to 9 pieces of <strong>GV</strong>-<strong>IO</strong> <strong>Box</strong> 8 can be chained together to expand the I/O<br />
capacity. Use the ID Switch to assign addresses 1~9 to the connected pieces of<br />
<strong>GV</strong>-<strong>IO</strong> <strong>Box</strong> 8.<br />
1. Use the USB cable to connect one <strong>GV</strong>-<strong>IO</strong> <strong>Box</strong> 8 to the PC.<br />
(Allowed for DC Output Voltage only)<br />
USB cable<br />
PC<br />
<strong>GV</strong>-<strong>IO</strong>BOX 8<br />
PC<br />
<strong>GV</strong>-<strong>IO</strong> <strong>Box</strong> 8<br />
Note: It is required to install the USB driver. See USB Driver Installation later in<br />
this document.<br />
RS-485 +/- RS-485 +/-<br />
RS-485 +/-<br />
2. Use the RS-485 connectors to connect one <strong>GV</strong>-<strong>IO</strong> <strong>Box</strong> 8 with the PC.<br />
(Allowed for AC/DC Output Voltage)<br />
<strong>GV</strong>-<strong>IO</strong> <strong>Box</strong> 8 (1) <strong>GV</strong>-<strong>IO</strong> <strong>Box</strong> 8 (2) <strong>GV</strong>-<strong>IO</strong> <strong>Box</strong> 8 (9)<br />
~<br />
ID Switch<br />
1. Addresses 0 and A to F are NOT functional.<br />
PC<br />
<strong>GV</strong>-Hub / <strong>GV</strong>-COM<br />
<strong>GV</strong>-NET Card /<br />
<strong>GV</strong>-NET/<strong>IO</strong> Card<br />
RS-485+<br />
RS-485-<br />
<strong>GV</strong>-<strong>IO</strong>BOX 8<br />
<strong>GV</strong>-<strong>IO</strong> <strong>Box</strong> 8<br />
E<br />
B<br />
ID<br />
2. Assign the addresses when the power is off.<br />
3. If you want to change the assigned address of the<br />
connected <strong>GV</strong>-<strong>IO</strong> <strong>Box</strong> 8, set the switch to the new<br />
address, and then re-plug the power adaptor.