GV-Hub - GeoVision
GV-Hub - GeoVision
GV-Hub - GeoVision

Create successful ePaper yourself
Turn your PDF publications into a flip-book with our unique Google optimized e-Paper software.
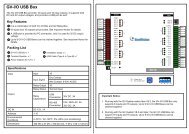
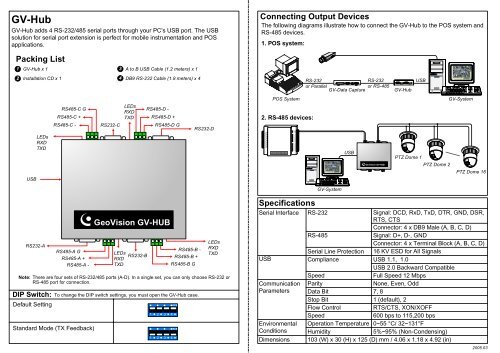
<strong>GV</strong>-<strong>Hub</strong><br />
<strong>GV</strong>-<strong>Hub</strong> adds 4 RS-232/485 serial ports through your PC's USB port. The USB<br />
solution for serial port extension is perfect for mobile instrumentation and POS<br />
applications.<br />
Packing List<br />
1<br />
2<br />
<strong>GV</strong>-<strong>Hub</strong> x 1<br />
Installation CD x 1 4<br />
USB<br />
LEDs<br />
RXD<br />
TXD<br />
RS232-A<br />
DIP Switch:<br />
Default Setting<br />
Standard Mode (TX Feedback)<br />
3<br />
A to B USB Cable (1.2 meters) x 1<br />
DB9 RS-232 Cable (1.8 meters) x 4<br />
RS485-C G<br />
LEDs<br />
RXD<br />
RS485-D -<br />
RS485-C +<br />
TXD RS485-D +<br />
RS485-C -<br />
RS232-C<br />
RS485-D G<br />
RS485-A G<br />
RS485-A +<br />
RS485-A -<br />
<strong>GeoVision</strong> <strong>GV</strong>-HUB<br />
LEDs<br />
RXD<br />
TXD<br />
RS232-B<br />
To change the DIP switch settings, you must open the <strong>GV</strong>-<strong>Hub</strong> case.<br />
1<br />
2 3 4<br />
1 2 3 4<br />
RS485-B -<br />
RS485-B +<br />
RS485-B G<br />
ECE<br />
ECE<br />
RS232-D<br />
LEDs<br />
RXD<br />
TXD<br />
Note:<br />
There are four sets of RS-232/485 ports (A-D). In a single set, you can only choose RS-232 or<br />
RS-485 port for connection.<br />
Connecting Output Devices<br />
The following diagrams illustrate how to connect the <strong>GV</strong>-<strong>Hub</strong> to the POS system and<br />
RS-485 devices.<br />
1. POS system:<br />
2. RS-485 devices:<br />
DI 1<br />
GN D<br />
DI 2<br />
GN D<br />
DI 3<br />
GN D<br />
DI 4<br />
GN D<br />
DI 5<br />
GN D<br />
DI 6<br />
GN D<br />
DI 7<br />
GN D<br />
DI 8<br />
GN D<br />
POS System<br />
<strong>GeoVision</strong> <strong>GV</strong>-IO<br />
RS -48 5-<br />
RS -48 5+<br />
DO 1 -1<br />
DO 2 -1<br />
DO 3 -1<br />
DO 4 -1<br />
DO 5 -1<br />
DO 6 -1<br />
DO 7 -1<br />
DO 8 -1<br />
DO 1 -2<br />
DO 2 -2<br />
DO 3 -2<br />
DO 4 -2<br />
DO 5 -2<br />
DO 6 -2<br />
DO 7 -2<br />
DO 8 -2<br />
Specifications<br />
RS-232<br />
RS-232<br />
or Parallel<br />
or RS-485<br />
<strong>GV</strong>-Data Capture <strong>GV</strong>-<strong>Hub</strong><br />
<strong>GV</strong>-System<br />
USB<br />
<strong>GeoVision</strong> <strong>GV</strong>-HUB<br />
PTZ Dome 1<br />
PTZ Dome 2<br />
PTZ Dome 16<br />
Serial Interface RS-232<br />
Signal: DCD, RxD, TxD, DTR, GND, DSR,<br />
RTS, CTS<br />
Connector: 4 x DB9 Male (A, B, C, D)<br />
RS-485<br />
Signal: D+, D-, GND<br />
Connector: 4 x Terminal Block (A, B, C, D)<br />
Serial Line Protection 16 KV ESD for All Signals<br />
USB Compliance<br />
USB 1.1, 1.0<br />
USB 2.0 Backward Compatible<br />
Speed<br />
Full Speed 12 Mbps<br />
Communication Parity<br />
None, Even, Odd<br />
Parameters Data Bit<br />
7, 8<br />
Stop Bit<br />
1 (default), 2<br />
Flow Control<br />
RTS/CTS, XON/XOFF<br />
Speed<br />
600 bps to 115,200 bps<br />
Environmental Operation Temperature 0~55 °C/ 32~131°F<br />
Conditions Humidity<br />
5%~95% (Non-Condensing)<br />
Dimensions 103 (W) x 30 (H) x 125 (D) mm / 4.06 x 1.18 x 4.92 (in)<br />
USB<br />
<strong>GV</strong>-System<br />
2005.03
Installing <strong>GV</strong>-<strong>Hub</strong> Drivers<br />
When you connect <strong>GV</strong>-<strong>Hub</strong> to the computer, the Found New Hardware Wizard will<br />
automatically detect the device. Once the wizard is open, follow these steps to install<br />
the hub drivers.<br />
1. Insert the installation CD to your computer.<br />
2. Select Install the software automatically, and then click Next.<br />
3. When this warning window appears, click Continue Anyway.<br />
4. When the installation is completed, click Finish.<br />
Note: In Windows 2000, the wizard at step 1 will only pop up once. In Windows<br />
XP, the wizard will totally pop up 4 times. Each time follow above steps to install<br />
the driver.<br />
To verify the drivers are installed correctly, go to Device Manager. Expanding the<br />
Ports field, you should see the 4 entries for Prolific USB-to Serial Bridge.<br />
2005.03