HDLCR - Niles Audio
HDLCR - Niles Audio
HDLCR - Niles Audio
Create successful ePaper yourself
Turn your PDF publications into a flip-book with our unique Google optimized e-Paper software.
EXISTING CONSTRUCTION: INSTALLING A BRACKET<br />
IMPORTANT: BEFORE YOU CUT INTO ANY WALL, REVIEW THE SECTIONS ON SPEAKER<br />
PLACEMENT ON PAGE 6 AND RUNNING THE SPEAKER WIRE IN NEW CONSTRUCTION ON<br />
PAGE 9. BE SURE NOT TO DRILL OR CUT THROUGH EXISTING WIRES, PIPES, OR STRUCTURE.<br />
IF YOU FEEL ANY EXTRA RESISTANCE AS YOU ARE DRILLING OR SAWING, STOP!<br />
1. Locate studs or joists by using a stud sensor or by hand knocking. Do not place the<br />
edge of the cutout directly next to a stud or joist, since the frame and bracket will<br />
extend beyond the cutout.<br />
16<br />
2. At the planned cutout site, drill a 1/8-inch pilot hole just barely through the wall, about<br />
an inch below the center of your proposed speaker location.<br />
NOTE: IN MOST HOMES, THE WALL THICKNESS IS 1/2 TO 5/8 INCH.<br />
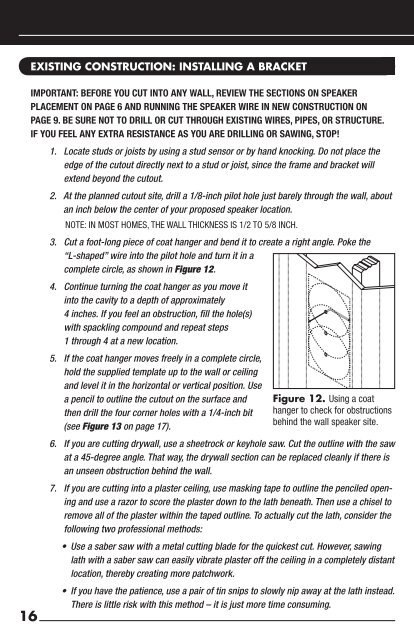
3. Cut a foot-long piece of coat hanger and bend it to create a right angle. Poke the<br />
“L-shaped” wire into the pilot hole and turn it in a<br />
complete circle, as shown in Figure 12.<br />
4. Continue turning the coat hanger as you move it<br />
into the cavity to a depth of approximately<br />
4 inches. If you feel an obstruction, fill the hole(s)<br />
with spackling compound and repeat steps<br />
1 through 4 at a new location.<br />
5. If the coat hanger moves freely in a complete circle,<br />
hold the supplied template up to the wall or ceiling<br />
and level it in the horizontal or vertical position. Use<br />
a pencil to outline the cutout on the surface and<br />
then drill the four corner holes with a 1/4-inch bit<br />
(see Figure 13 on page 17).<br />
Figure 12. Using a coat<br />
hanger to check for obstructions<br />
behind the wall speaker site.<br />
6. If you are cutting drywall, use a sheetrock or keyhole saw. Cut the outline with the saw<br />
at a 45-degree angle. That way, the drywall section can be replaced cleanly if there is<br />
an unseen obstruction behind the wall.<br />
7. If you are cutting into a plaster ceiling, use masking tape to outline the penciled opening<br />
and use a razor to score the plaster down to the lath beneath. Then use a chisel to<br />
remove all of the plaster within the taped outline. To actually cut the lath, consider the<br />
following two professional methods:<br />
• Use a saber saw with a metal cutting blade for the quickest cut. However, sawing<br />
lath with a saber saw can easily vibrate plaster off the ceiling in a completely distant<br />
location, thereby creating more patchwork.<br />
• If you have the patience, use a pair of tin snips to slowly nip away at the lath instead.<br />
There is little risk with this method – it is just more time consuming.


