WJ200 Series Brochure - Hitachi America, Ltd.
WJ200 Series Brochure - Hitachi America, Ltd.
WJ200 Series Brochure - Hitachi America, Ltd.

Create successful ePaper yourself
Turn your PDF publications into a flip-book with our unique Google optimized e-Paper software.
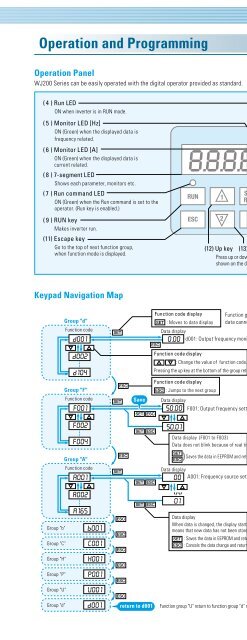
Operation and Programming<br />
Operation Panel<br />
<strong>WJ200</strong> <strong>Series</strong> can be easily operated with the digital operator provided as standard.<br />
( 4 ) Run LED<br />
ON when inverter is in RUN mode.<br />
( 5 ) Monitor LED [Hz]<br />
ON (Green) when the displayed data is<br />
frequency related.<br />
( 6 ) Monitor LED [A]<br />
ON (Green) when the displayed data is<br />
current related.<br />
( 8 ) 7-segment LED<br />
Shows each parameter, monitors etc.<br />
( 7 ) Run command LED<br />
ON (Green) when the Run command is set to the<br />
operator. (Run key is enabled.)<br />
( 9 ) RUN key<br />
Makes inverter run.<br />
(11) Escape key<br />
Go to the top of next function group,<br />
when function mode is displayed.<br />
(12) Up key (13) Down key<br />
Press up or down to sequence through parameters and functions<br />
shown on the display, and increment/decrement values.<br />
( 1 ) POWER LED<br />
ON (Green) while the inverter is receiving<br />
input power.<br />
( 2 ) ALARM LED<br />
ON (Red) when the inverter trips.<br />
( 3 ) Program LED<br />
ON (Green) when the display shows<br />
editable parameter.<br />
(15) USB port<br />
USB connector (mini-B) for PC communication.<br />
(10) Stop / reset key<br />
Makes inverter stop.<br />
(16) RS-422 port<br />
RJ45 jack for remote operator.<br />
(14) Set key<br />
Function code: Moves to the data display.<br />
Data code: Press to write the new value<br />
to EEPROM.<br />
Keypad Navigation Map<br />
Single-Digit Edit Mode<br />
Group "d"<br />
Function code<br />
Function code display Function group "d" is a monitor,<br />
: Moves to data display data cannot be changed.<br />
Data display<br />
d001: Output frequency monitoring<br />
If a target function code or data is far from current<br />
position, using the single-digit edit mode makes it<br />
quicker to navigate there. Pressing the up key and<br />
down key at the same time brings you into the<br />
digit-by-digit navigation mode.<br />
Function code display<br />
: Change the value of function code.<br />
Pressing the up key at the bottom of the group returns to the top of the group.<br />
Step1: Press both up key and down key at<br />
the same.<br />
Group "F"<br />
Function code<br />
Save<br />
Function code display<br />
: Jumps to the next group<br />
Data display<br />
F001: Output frequency setting<br />
1st digit will be blinking.<br />
Group "A"<br />
Function code<br />
Data display (F001 to F003)<br />
Data does not blink because of real time synchronizing<br />
) Saves the data in EEPROM and returns to function code display.<br />
Data display<br />
A001: Frequency source setting<br />
Step2: The blinking digit is moved by the<br />
ESC and SET key right and left.<br />
Use up/down keys to change the value<br />
of the digit.<br />
+1<br />
ESC<br />
SET<br />
Group "b"<br />
Group "C"<br />
Data display<br />
When data is changed, the display starts blinking, which<br />
means that new data has not been stored yet.<br />
: Saves the data in EEPROM and returns to function code display.<br />
: Cancels the data change and returns to function code display.<br />
Move cursor to left.<br />
-1<br />
Move cursor to right.<br />
Group "H"<br />
Group "P"<br />
Group "U"<br />
Step3: When the least significant digit is<br />
blinking, the SET key selects<br />
that parameter.<br />
SET<br />
Group "d"<br />
return to d001<br />
Function group "U" return to function group "d" next.<br />
9