billet free wheeling hub instructions wat.pdf - Superior Engineering
billet free wheeling hub instructions wat.pdf - Superior Engineering
billet free wheeling hub instructions wat.pdf - Superior Engineering

Create successful ePaper yourself
Turn your PDF publications into a flip-book with our unique Google optimized e-Paper software.
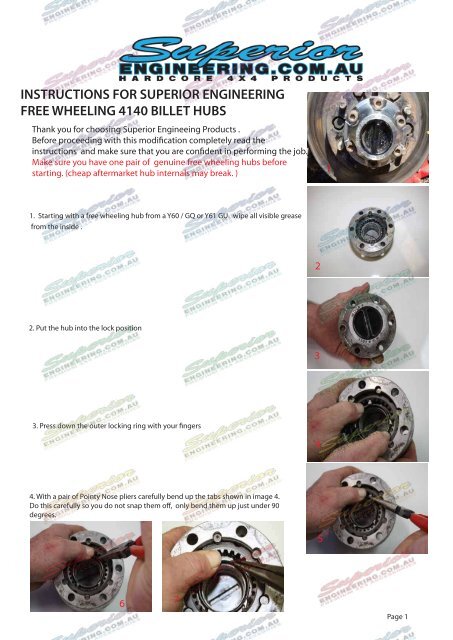
INSTRUCTIONS FOR SUPERIOR ENGINEERING<br />
FREE WHEELING 4140 BILLET HUBS<br />
Thank you for choosing <strong>Superior</strong> Engineeing Products .<br />
Before proceeding with this modification completely read the<br />
<strong>instructions</strong> and make sure that you are confident in performing the job.<br />
Make sure you have one pair of genuine <strong>free</strong> <strong>wheeling</strong> <strong>hub</strong>s before<br />
starting. (cheap aftermarket <strong>hub</strong> internals may break. )<br />
1<br />
1. Starting with a <strong>free</strong> <strong>wheeling</strong> <strong>hub</strong> from a Y60 / GQ or Y61 GU wipe all visible grease<br />
from the inside .<br />
2<br />
2. Put the <strong>hub</strong> into the lock position<br />
3<br />
3. Press down the outer locking ring with your fingers<br />
4<br />
4. With a pair of Pointy Nose pliers carefully bend up the tabs shown in image 4.<br />
Do this carefully so you do not snap them off, only bend them up just under 90<br />
degrees.<br />
5<br />
6<br />
7<br />
Page 1
5. The screwdriver is pointing towards the tabs that are bent up correctly.<br />
8<br />
6. Carefully tip the <strong>hub</strong> upside down and remove internal <strong>hub</strong><br />
9<br />
7. Shows the internal <strong>hub</strong> removed.<br />
10<br />
8. Using a flat screwdriver carefully lift<br />
up the flat circlip and remove<br />
12<br />
11<br />
9. Showing the circlip removed .<br />
Using your fingers push out the centre of the <strong>hub</strong> and your <strong>hub</strong> should<br />
now look like image 15<br />
13<br />
14 15<br />
Page 2
10. Tip the <strong>hub</strong> upside down and use a screwdriver to push up the dowel pins<br />
and remove , note image 16 the pin towards the top of the <strong>hub</strong> is part pushed<br />
out. Image 17 shows one of the pins removed.<br />
16<br />
17<br />
11. All the parts layed out ready for reassembly.<br />
Reassembly of <strong>Superior</strong> Billet Hubs<br />
18<br />
12. Smear grease into the <strong>Superior</strong> Billet Hubs<br />
19<br />
13. Shows the factory pins getting pushed into the <strong>Superior</strong> Billet <strong>hub</strong><br />
20<br />
Page 14. Smear grease onto the internal parts as well as the o-ring surface.<br />
21<br />
Page 3
15. Take note of where the screwdriver is pointing on the image, their is a machined<br />
area that must be located properly into the <strong>hub</strong>. Image 22 shows the locating pin.<br />
22<br />
23<br />
16. Push the original centre of the <strong>hub</strong> into the <strong>Superior</strong> Billet Hub and turn the <strong>hub</strong><br />
upside down as shown in image 24.<br />
24<br />
17. Push the original retaining clip in place , use a couple of screw drivers to<br />
assist you. Image 25 and 26<br />
25<br />
26<br />
18. Make sure the <strong>hub</strong> is positioned to the “<strong>free</strong>” position and turn over the <strong>hub</strong>,<br />
image 27<br />
27<br />
19. place the internal parts back into the Billet <strong>hub</strong> (image 28)<br />
28<br />
Page 4
19. Using a screwdriver or similar tool push the 4 locking tabs down to hold the <strong>hub</strong><br />
together, be carefull not to snap the tabs off . Image 29.<br />
29<br />
20. Image 30/31 shows the <strong>hub</strong> complete and fitted.<br />
30<br />
31<br />
COMPLETED BILLET HUB<br />
Thank you for choosing <strong>Superior</strong> <strong>Engineering</strong> products .<br />
Director - Michael Hayes<br />
page 5
1<br />
2<br />
3 4<br />
5 6<br />
7 8<br />
Page 6<br />
page 6
9 10<br />
11 12<br />
13 14<br />
15 16<br />
page 7
17 18<br />
19<br />
20<br />
21 22<br />
23 24<br />
page 8
25 26<br />
27 28<br />
29 30<br />
COMPLETED 4140 BILLET HUB<br />
31<br />
page 9