
You also want an ePaper? Increase the reach of your titles
YUMPU automatically turns print PDFs into web optimized ePapers that Google loves.
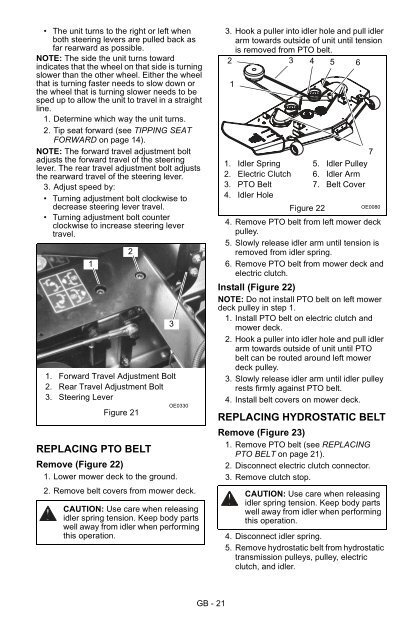
• The unit turns to the right or left when<br />
both steering levers are pulled back as<br />
far rearward as possible.<br />
NOTE: The side the unit turns toward<br />
indicates that the wheel on that side is turning<br />
slower than the other wheel. Either the wheel<br />
that is turning faster needs to slow down or<br />
the wheel that is turning slower needs to be<br />
sped up to allow the unit to travel in a straight<br />
line.<br />
1. Determine which way the unit turns.<br />
2. Tip seat forward (see TIPPING SEAT<br />
FORWARD on page 14).<br />
NOTE: The forward travel adjustment bolt<br />
adjusts the forward travel of the steering<br />
lever. The rear travel adjustment bolt adjusts<br />
the rearward travel of the steering lever.<br />
3. Adjust speed by:<br />
• Turning adjustment bolt clockwise to<br />
decrease steering lever travel.<br />
• Turning adjustment bolt counter<br />
clockwise to increase steering lever<br />
travel.<br />
1<br />
1. Forward Travel Adjustment Bolt<br />
2. Rear Travel Adjustment Bolt<br />
3. Steering Lever<br />
Figure 21<br />
OE0330<br />
REPLACING PTO BELT<br />
Remove (Figure 22)<br />
1. Lower mower deck to the ground.<br />
2. Remove belt covers from mower deck.<br />
2<br />
CAUTION: Use care when releasing<br />
idler spring tension. Keep body parts<br />
well away from idler when performing<br />
this operation.<br />
3<br />
3. Hook a puller into idler hole and pull idler<br />
arm towards outside of unit until tension<br />
is removed from PTO belt.<br />
2 3 4 5 6<br />
1<br />
1. Idler Spring<br />
2. Electric Clutch<br />
3. PTO Belt<br />
4. Idler Hole<br />
5. Idler Pulley<br />
6. Idler Arm<br />
7. Belt Cover<br />
Figure 22<br />
OE0080<br />
4. Remove PTO belt from left mower deck<br />
pulley.<br />
5. Slowly release idler arm until tension is<br />
removed from idler spring.<br />
6. Remove PTO belt from mower deck and<br />
electric clutch.<br />
Install (Figure 22)<br />
NOTE: Do not install PTO belt on left mower<br />
deck pulley in step 1.<br />
1. Install PTO belt on electric clutch and<br />
mower deck.<br />
2. Hook a puller into idler hole and pull idler<br />
arm towards outside of unit until PTO<br />
belt can be routed around left mower<br />
deck pulley.<br />
3. Slowly release idler arm until idler pulley<br />
rests firmly against PTO belt.<br />
4. Install belt covers on mower deck.<br />
REPLACING HYDROSTATIC BELT<br />
Remove (Figure 23)<br />
1. Remove PTO belt (see REPLACING<br />
PTO BELT on page 21).<br />
2. Disconnect electric clutch connector.<br />
3. Remove clutch stop.<br />
CAUTION: Use care when releasing<br />
idler spring tension. Keep body parts<br />
well away from idler when performing<br />
this operation.<br />
4. Disconnect idler spring.<br />
5. Remove hydrostatic belt from hydrostatic<br />
transmission pulleys, pulley, electric<br />
clutch, and idler.<br />
7<br />
GB - 21