QIG - Pixord
QIG - Pixord
QIG - Pixord

Create successful ePaper yourself
Turn your PDF publications into a flip-book with our unique Google optimized e-Paper software.
Quick Guide<br />
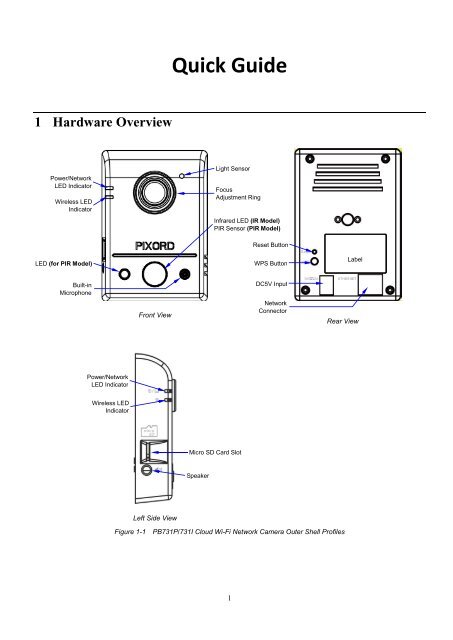
1 Hardware Overview<br />
Power/Network<br />
LED Indicator<br />
Wireless LED<br />
Indicator<br />
Light Sensor<br />
Focus<br />
Adjustment Ring<br />
Infrared LED (IR Model)<br />
PIR Sensor (PIR Model)<br />
LED (for PIR Model)<br />
Reset Button<br />
WPS Button<br />
Label<br />
Built-in<br />
Microphone<br />
Front View<br />
DC5V Input<br />
Network<br />
Connector<br />
Rear View<br />
Power/Network<br />
LED Indicator<br />
Wireless LED<br />
Indicator<br />
Micro SD Card Slot<br />
Speaker<br />
Left Side View<br />
Figure 1-1 PB731P/731I Cloud Wi-Fi Network Camera Outer Shell Profiles<br />
1
2 Connecting Camera to Network<br />
The PC host is required<br />
only to set up the camera<br />
with “Installation Guide<br />
Wizard” program when the<br />
camera Power/Network<br />
LED Indicator does not light<br />
up in green within few<br />
seconds after power on.<br />
LAN Router<br />
Power Adaptor<br />
Figure 2-1 Connecting Camera to Network with PC/Notebook/Ultrabook<br />
1. Prepare a smartphone/tablet or PC/notebook/ultrabook with Ethernet link to the local network.<br />
2. When using PC/notebook/ultrabook as host, connect the LAN port of the host to the network router<br />
with an RJ45 network cable ( ).<br />
NOTE: If you are going to use smartphone/tablet as monitoring device, the PC/notebook/ultrabook is<br />
required only to set up your camera with the “Installation Guide Wizard” program from the<br />
CD (included in the camera package) as described in Section 4.<br />
3. Plug the DC power jack of the power adaptor ( ) to Camera and connect the power adaptor to<br />
power outlet (110V or 220V).<br />
4. Connect the network router to the LAN port of Camera with an RJ45network cable ().<br />
5. With power switched on, check the status of the two LEDs at the left corner of camera:<br />
• If the Power/Network indicator (upper LED) turns into green color, it confirms that the Camera<br />
has successfully linked with the Internet. Then proceed to the next Section 3 “iPIXORD<br />
Registration” to register your newly installed camera.<br />
• If the camera is set up to work on Wi-Fi, the Wireless LED Indicator (lower LED) will light up in<br />
blue to indicate successful connection, while the upper LED remains in orange.<br />
Power/Network LED Indicator<br />
should light up in green to indicate<br />
successful link to the Internet<br />
Wireless LED Indicator lights up (in<br />
blue) only when the Camera is set<br />
up & connected to Wi-Fi<br />
Figure 2-2 Power/Network (Upper LED)& Wireless LED (Lower LED) Indicators<br />
2
• If the upper LED does not turn green (or the lower LED does not turn blue), it means your Camera<br />
failed to properly connect with Internet. Proceed to Section 4, “Installation Guide Wizard” for<br />
more detailed installation guide to help you achieve Internet connection successfully.<br />
3 iPIXORD Registration<br />
3.1 iPIXORD Registration by Smartphones/Tablets<br />
1. PIXORD offers a more convenient method of registering and monitoring your Camera through<br />
smartphones or tablets via “iPIXORD” software tool. It is done by simply touching the “APP<br />
Store” icon (for iPhone/iPad) or “Google Play” store icon (for Android Mobiles). Then key-in<br />
“iPIXORD” and the “iPIXORD App” icon will display.<br />
Or<br />
“iPIXORD”<br />
(iPIXORD App Icon)<br />
Figure 3-1 Accessing iPIXORD App from Smartphones/Tablets<br />
• Alternatively, you may scan the QR Code below to download URL and directly install<br />
“iPIXORD App” in your smartphone/tablet.<br />
Figure 3-2 Scan QR Codes to Directly Access iPIXORD App from Smartphones/Tablets<br />
3
2. Touch “iPIXORD App” icon to launch iPIXORD. The following dialog will then display.<br />
(iPhone/iPad Display)<br />
(Android Mobile Display)<br />
Figure 3-3 Creating & Registering New iPIXORD Account in iPIXORD App<br />
Then touch the “Create Account” button to create your new iPIXORD account.<br />
• Alternatively, if you already have a Google Account, you can click on the “Google Account”<br />
button to log-in and register with iPIXORD.<br />
NOTE: a) Google Account provides 5GB free space for recorded video storage. For more on<br />
setting details, please see the User’s Manual (available from the CD).<br />
b) If “Google Account” is used to create the iPIXORD account, you have to touch<br />
“Google Account” button every time you need to log-in iPIXORD again.<br />
c) Please make sure to use Gmail Address for Google Login<br />
4
3. With iPIXORD account successfully implemented, the “Camera List” dialog will display to<br />
prompt you to start the new Camera(s) registration process as described below:<br />
NOTE: Make sure the Camera(s) is properly connected with Internet.<br />
1) Touch the “Add Camera” button 2) Touch the “Next” button 3) Get ready to scan the new Camera<br />
QR Code card (see Figure 3-4<br />
below) with smartphone/tablet.<br />
4) After scanning the QR Code card, touch<br />
the “Next” button<br />
5) MAC Address of the new Camera<br />
will be treated as its default name.<br />
While new Camera is added to the<br />
existing list, just touch the Camera<br />
name to view the on-line video<br />
6) Live on-line video is now on display.<br />
• Activation card (with Activate Code and QR Code) is unique to each Camera. It is included in the<br />
Camera package. Note that the card contains data that are very crucial to initial and subsequent<br />
installations of your camera. Effort should be made to preserve the card.<br />
(Front Side View)<br />
(Rear Side View)<br />
Figure 3-4 Unique Activation Card for Each Individual Camera<br />
5
In case the QR Code card indeed got lost, contact PiXORD Technical Support website at<br />
http://www.pixord.com/contact2.asp<br />
3.1 iPIXORD Registration by PC/Notebook/Ultrabook<br />
You may use PC/Notebook/Ultrabook to register your new Camera account through browser, such as<br />
IE, Chrome, Firefox, etc. For details, please refer to the User’s Manual (available from the CD).<br />
4 Installation Guide Wizard<br />
When the Power/Network indicator (upper LED) does not turn GREEN which indicates that the Camera<br />
failed to properly connect with the Internet, insert the CD (included in the package) into your computer<br />
CD-ROM Drive and the “Installation Guide Wizard” program will launched automatically. The Wizard<br />
provides an easy step-by-step installation guide that will ensure successful connection of your Camera to<br />
Internet.<br />
Note that the Power/Network indicator (upper LED) will turn green color to confirm that the Camera has<br />
successfully linked with the Internet.<br />
Power/Network LED Indicator<br />
should light up in green to indicate<br />
successful link to the Internet<br />
Wireless LED Indicator lights up (in<br />
blue) only when the Camera is<br />
connected through and set to Wi-Fi<br />
Figure 4-1 Power/Network (Upper LED)& Wireless LED (Lower LED) Indicators<br />
You can also download the “Installation Guide Wizard” program by accessing PiXORD website at<br />
http://www.pixord.com/support/software.asp<br />
5 Advanced Settings<br />
For further information on latest advanced settings, please visit PiXORD FAQ website at<br />
http://www.pixord.com/support/faq.asp<br />
For other details and inquiries regarding guarantee and warranty matters, please visit PiXORD official<br />
website at http://register.pixord.com/register/<br />
6