Puffer Hubbard Lab Refrigerators Manual-FC-LR-RX - LABRepCo
Puffer Hubbard Lab Refrigerators Manual-FC-LR-RX - LABRepCo
Puffer Hubbard Lab Refrigerators Manual-FC-LR-RX - LABRepCo

You also want an ePaper? Increase the reach of your titles
YUMPU automatically turns print PDFs into web optimized ePapers that Google loves.
Thermo Scientific <strong>Puffer</strong> <strong>Hubbard</strong> <strong>Lab</strong>oratory <strong>Refrigerators</strong><br />
Installation and Operation<br />
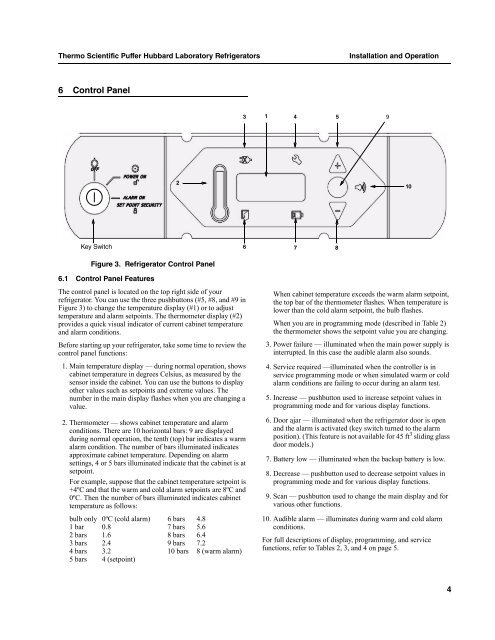
6 Control Panel<br />
1 3 4 5<br />
9<br />
2<br />
10<br />
Key Switch<br />
6 7 8<br />
Figure 3. Refrigerator Control Panel<br />
6.1 Control Panel Features<br />
The control panel is located on the top right side of your<br />
refrigerator. You can use the three pushbuttons (#5, #8, and #9 in<br />
Figure 3) to change the temperature display (#1) or to adjust<br />
temperature and alarm setpoints. The thermometer display (#2)<br />
provides a quick visual indicator of current cabinet temperature<br />
and alarm conditions.<br />
Before starting up your refrigerator, take some time to review the<br />
control panel functions:<br />
1. Main temperature display — during normal operation, shows<br />
cabinet temperature in degrees Celsius, as measured by the<br />
sensor inside the cabinet. You can use the buttons to display<br />
other values such as setpoints and extreme values. The<br />
number in the main display flashes when you are changing a<br />
value.<br />
2. Thermometer — shows cabinet temperature and alarm<br />
conditions. There are 10 horizontal bars: 9 are displayed<br />
during normal operation, the tenth (top) bar indicates a warm<br />
alarm condition. The number of bars illuminated indicates<br />
approximate cabinet temperature. Depending on alarm<br />
settings, 4 or 5 bars illuminated indicate that the cabinet is at<br />
setpoint.<br />
For example, suppose that the cabinet temperature setpoint is<br />
+4ºC and that the warm and cold alarm setpoints are 8ºC and<br />
0ºC. Then the number of bars illuminated indicates cabinet<br />
temperature as follows:<br />
bulb only 0ºC (cold alarm) 6 bars 4.8<br />
1 bar 0.8 7 bars 5.6<br />
2 bars 1.6 8 bars 6.4<br />
3 bars 2.4 9 bars 7.2<br />
4 bars 3.2 10 bars 8 (warm alarm)<br />
5 bars 4 (setpoint)<br />
When cabinet temperature exceeds the warm alarm setpoint,<br />
the top bar of the thermometer flashes. When temperature is<br />
lower than the cold alarm setpoint, the bulb flashes.<br />
When you are in programming mode (described in Table 2)<br />
the thermometer shows the setpoint value you are changing.<br />
3. Power failure — illuminated when the main power supply is<br />
interrupted. In this case the audible alarm also sounds.<br />
4. Service required —illuminated when the controller is in<br />
service programming mode or when simulated warm or cold<br />
alarm conditions are failing to occur during an alarm test.<br />
5. Increase — pushbutton used to increase setpoint values in<br />
programming mode and for various display functions.<br />
6. Door ajar — illuminated when the refrigerator door is open<br />
and the alarm is activated (key switch turned to the alarm<br />
position). (This feature is not available for 45 ft 3 sliding glass<br />
door models.)<br />
7. Battery low — illuminated when the backup battery is low.<br />
8. Decrease — pushbutton used to decrease setpoint values in<br />
programming mode and for various display functions.<br />
9. Scan — pushbutton used to change the main display and for<br />
various other functions.<br />
10. Audible alarm — illuminates during warm and cold alarm<br />
conditions.<br />
For full descriptions of display, programming, and service<br />
functions, refer to Tables 2, 3, and 4 on page 5.<br />
4