RPi Easy SD Card Setup - Raspberry PI Community Projects
RPi Easy SD Card Setup - Raspberry PI Community Projects
RPi Easy SD Card Setup - Raspberry PI Community Projects
You also want an ePaper? Increase the reach of your titles
YUMPU automatically turns print PDFs into web optimized ePapers that Google loves.
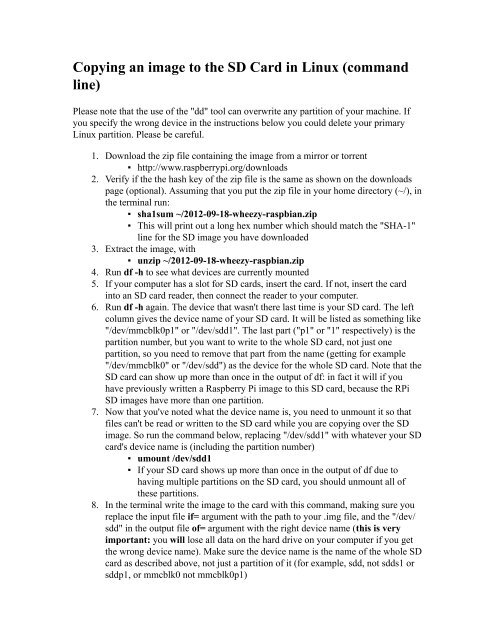
Copying an image to the <strong>SD</strong> <strong>Card</strong> in Linux (command<br />
line)<br />
Please note that the use of the "dd" tool can overwrite any partition of your machine. If<br />
you specify the wrong device in the instructions below you could delete your primary<br />
Linux partition. Please be careful.<br />
1. Download the zip file containing the image from a mirror or torrent<br />
▪ http://www.raspberrypi.org/downloads<br />
2. Verify if the the hash key of the zip file is the same as shown on the downloads<br />
page (optional). Assuming that you put the zip file in your home directory (~/), in<br />
the terminal run:<br />
▪ sha1sum ~/2012-09-18-wheezy-raspbian.zip<br />
▪ This will print out a long hex number which should match the "SHA-1"<br />
line for the <strong>SD</strong> image you have downloaded<br />
3. Extract the image, with<br />
▪ unzip ~/2012-09-18-wheezy-raspbian.zip<br />
4. Run df -h to see what devices are currently mounted<br />
5. If your computer has a slot for <strong>SD</strong> cards, insert the card. If not, insert the card<br />
into an <strong>SD</strong> card reader, then connect the reader to your computer.<br />
6. Run df -h again. The device that wasn't there last time is your <strong>SD</strong> card. The left<br />
column gives the device name of your <strong>SD</strong> card. It will be listed as something like<br />
"/dev/mmcblk0p1" or "/dev/sdd1". The last part ("p1" or "1" respectively) is the<br />
partition number, but you want to write to the whole <strong>SD</strong> card, not just one<br />
partition, so you need to remove that part from the name (getting for example<br />
"/dev/mmcblk0" or "/dev/sdd") as the device for the whole <strong>SD</strong> card. Note that the<br />
<strong>SD</strong> card can show up more than once in the output of df: in fact it will if you<br />
have previously written a <strong>Raspberry</strong> Pi image to this <strong>SD</strong> card, because the <strong>RPi</strong><br />
<strong>SD</strong> images have more than one partition.<br />
7. Now that you've noted what the device name is, you need to unmount it so that<br />
files can't be read or written to the <strong>SD</strong> card while you are copying over the <strong>SD</strong><br />
image. So run the command below, replacing "/dev/sdd1" with whatever your <strong>SD</strong><br />
card's device name is (including the partition number)<br />
▪ umount /dev/sdd1<br />
▪ If your <strong>SD</strong> card shows up more than once in the output of df due to<br />
having multiple partitions on the <strong>SD</strong> card, you should unmount all of<br />
these partitions.<br />
8. In the terminal write the image to the card with this command, making sure you<br />
replace the input file if= argument with the path to your .img file, and the "/dev/<br />
sdd" in the output file of= argument with the right device name (this is very<br />
important: you will lose all data on the hard drive on your computer if you get<br />
the wrong device name). Make sure the device name is the name of the whole <strong>SD</strong><br />
card as described above, not just a partition of it (for example, sdd, not sdds1 or<br />
sddp1, or mmcblk0 not mmcblk0p1)


