

920i Six Card Expansion Board Installation Instructions - Rice Lake ...
920i Six Card Expansion Board Installation Instructions - Rice Lake ...
920i Six Card Expansion Board Installation Instructions - Rice Lake ...

You also want an ePaper? Increase the reach of your titles
YUMPU automatically turns print PDFs into web optimized ePapers that Google loves.
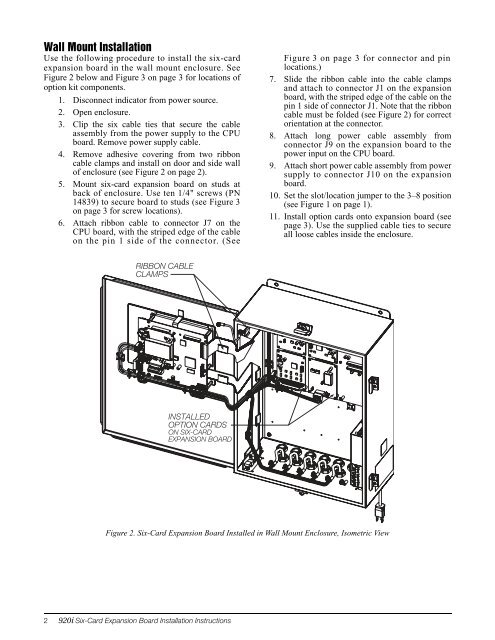
Wall Mount <strong>Installation</strong><br />
Use the following procedure to install the six-card<br />
expansion board in the wall mount enclosure. See<br />
Figure 2 below and Figure 3 on page 3 for locations of<br />
option kit components.<br />
1. Disconnect indicator from power source.<br />
2. Open enclosure.<br />
3. Clip the six cable ties that secure the cable<br />
assembly from the power supply to the CPU<br />
board. Remove power supply cable.<br />
4. Remove adhesive covering from two ribbon<br />
cable clamps and install on door and side wall<br />
of enclosure (see Figure 2 on page 2).<br />
5. Mount six-card expansion board on studs at<br />
back of enclosure. Use ten 1/4" screws (PN<br />
14839) to secure board to studs (see Figure 3<br />
on page 3 for screw locations).<br />
6. Attach ribbon cable to connector J7 on the<br />
CPU board, with the striped edge of the cable<br />
on the pin 1 side of the connector. (See<br />
Figure 3 on page 3 for connector and pin<br />
locations.)<br />
7. Slide the ribbon cable into the cable clamps<br />
and attach to connector J1 on the expansion<br />
board, with the striped edge of the cable on the<br />
pin 1 side of connector J1. Note that the ribbon<br />
cable must be folded (see Figure 2) for correct<br />
orientation at the connector.<br />
8. Attach long power cable assembly from<br />
connector J9 on the expansion board to the<br />
power input on the CPU board.<br />
9. Attach short power cable assembly from power<br />
supply to connector J10 on the expansion<br />
board.<br />
10. Set the slot/location jumper to the 3–8 position<br />
(see Figure 1 on page 1).<br />
11. Install option cards onto expansion board (see<br />
page 3). Use the supplied cable ties to secure<br />
all loose cables inside the enclosure.<br />
RIBBON CABLE<br />
CLAMPS<br />
INSTALLED<br />
OPTION CARDS<br />
ON SIX-CARD<br />
EXPANSION BOARD<br />
Figure 2. <strong>Six</strong>-<strong>Card</strong> <strong>Expansion</strong> <strong>Board</strong> Installed in Wall Mount Enclosure, Isometric View<br />
2 <strong>920i</strong> <strong>Six</strong>-<strong>Card</strong> <strong>Expansion</strong> <strong>Board</strong> <strong>Installation</strong> <strong>Instructions</strong>


