Aubusson AutumnQuilt - Spotlight Promotions
Aubusson AutumnQuilt - Spotlight Promotions
Aubusson AutumnQuilt - Spotlight Promotions

You also want an ePaper? Increase the reach of your titles
YUMPU automatically turns print PDFs into web optimized ePapers that Google loves.
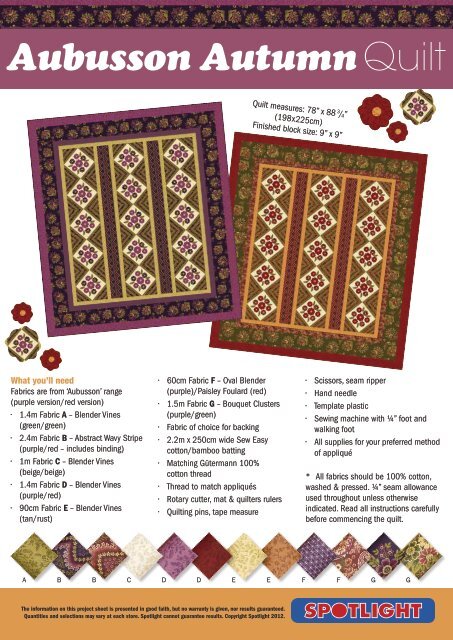
<strong>Aubusson</strong> Autumn Quilt<br />
Quilt measures: 78” x 88 3 / 4 ”<br />
(198x225cm)<br />
Finished block size: 9” x 9”<br />
What you’ll need<br />
Fabrics are from ‘<strong>Aubusson</strong>’ range<br />
(purple version/red version)<br />
• 1.4m Fabric A – Blender Vines<br />
(green/green)<br />
• 2.4m Fabric B – Abstract Wavy Stripe<br />
(purple/red – includes binding)<br />
• 1m Fabric C – Blender Vines<br />
(beige/beige)<br />
• 1.4m Fabric D – Blender Vines<br />
(purple/red)<br />
• 90cm Fabric E – Blender Vines<br />
(tan/rust)<br />
• 60cm Fabric F – Oval Blender<br />
(purple)/Paisley Foulard (red)<br />
• 1.5m Fabric G – Bouquet Clusters<br />
(purple/green)<br />
• Fabric of choice for backing<br />
• 2.2m x 250cm wide Sew Easy<br />
cotton/bamboo batting<br />
• Matching Gütermann 100%<br />
cotton thread<br />
• Thread to match appliqués<br />
• Rotary cutter, mat & quilters rulers<br />
• Quilting pins, tape measure<br />
• Scissors, seam ripper<br />
• Hand needle<br />
• Template plastic<br />
• Sewing machine with ¼” foot and<br />
walking foot<br />
• All supplies for your preferred method<br />
of appliqué<br />
* All fabrics should be 100% cotton,<br />
washed & pressed. ¼” seam allowance<br />
used throughout unless otherwise<br />
indicated. Read all instructions carefully<br />
before commencing the quilt.<br />
A B B C D D E E F F G G<br />
The information on this project sheet is presented in good faith, but no warranty is given, nor results guaranteed.<br />
Quantities and selections may vary at each store. <strong>Spotlight</strong> cannot guarantee results. Copyright <strong>Spotlight</strong> 2012.
CUTTING<br />
All strips are cut across the width of fabric unless otherwise stated.<br />
• From Fabric A cut 34 x 1¼” strips, crosscut 15 strips into<br />
60 x 10½” strips; crosscut 12 strips into 60 x 7 ½” strips;<br />
crosscut 7 strips into 60 x 4½” strips.<br />
• From Fabric B cut 9 x 2¼” strips for the binding and set<br />
aside. Refold the fabric to cut the following strips lengthways,<br />
parallel to the selvedge: two 5” wide x length of fabric.<br />
Refold remaining fabric to cut the following strips across the<br />
width: 38, 1¼” x 30” strips, crosscut 20 strips into 60 x<br />
9” strips; 12 strips into 60 x 6” strips, 6 strips into 60 x 3”<br />
strips.<br />
• From Fabric C cut 4 x 9½” strips, crosscut into 15 x<br />
9½”squares.<br />
• From Fabric D cut 9 x 3½” strips for the outer border.<br />
• From Fabric E cut 13 x 2” strips.<br />
• From Fabric F cut 7 x 2½” strips for the inner border.<br />
• From Fabric G cut 8 x 6 ½” strips for the middle border.<br />
• Reserve all remaining fabric for appliqué.<br />
APPLIQUÉ<br />
1. Using the paper patterns provided and template plastic,<br />
make templates for the large flower, small flower, leaf, large<br />
flower centre, and small flower centre shapes. Please note<br />
that the patterns are not reversed and do not include seam<br />
allowances. Repeat this procedure to make a template for<br />
the trimming triangle making sure that the triangle measures<br />
7¼” on each short side.<br />
2. Prepare the following motifs as necessary for your preferred<br />
method of appliqué: 15 x Fabric D large flowers, 45 x Fabric<br />
D small flowers, 45 x Fabric B small flowers, 60 x Fabric A<br />
leaves, 15 x Fabric E large flower centres, 90 x Fabric E small<br />
flower centres.<br />
3. Appliqué a large flower centre to the centre of each large<br />
flower and a small flower centre to the centre of each small<br />
flower.<br />
4. Using the quilts pictured as a guide, arrange 1 x large flower<br />
unit, 3 x Fabric D small flower units, 3 x Fabric B small flower<br />
units, and 4 x Fabric A leaves onto a 9½” Fabric C square,<br />
with the appliqué contents centered in the square. Appliqué<br />
motifs to background square using method of choice. Repeat<br />
to make a total of 15 x appliqué blocks.<br />
BLOCKS<br />
5. Fold each 1¼” Fabric A and Fabric B strip in half crosswise to<br />
mark the centre point. Matching centre points, stitch a 1¼”<br />
x 9” Fabric B strip to a 1¼” x 10½” Fabric A strip. Repeat<br />
this procedure to add one each of the following strips to the<br />
top of this unit in order: 1¼” x 7½” Fabric A strip, 1¼” x 6”<br />
Fabric B strip, 1¼” x 4½” Fabric A strip, 1¼” x 3” Fabric B<br />
strip<br />
6. Lay the trimming triangle template even with the bottom edge<br />
of the strip set making sure to line up the centre points. Cut<br />
one corner triangle as shown. Repeat to make a total of 4<br />
corner triangles. To prevent stretching, stitch 1 / 8 ” in from the<br />
outer edge all the way around each triangle.<br />
7. Matching the centre points of the triangles to the centre<br />
points of the background square, sew triangle units from<br />
step 2 to opposite sides of an appliqué square. Sew the<br />
remaining triangle units to the remaining sides of the square<br />
to complete one block.<br />
8. Repeat steps 5-7 to make a total of 15 blocks.<br />
QUILT TOP<br />
9. Arrange the blocks into 3 vertical rows with 5 blocks in each<br />
row. Stitch the blocks into rows. If necessary, adjust the<br />
seams so that all three block rows are the same length.<br />
10. Trim selvedges from 2” Fabric E strips. Sew strips together<br />
end to end to make a long 2” strip. From this long strip,<br />
cut 6 x 64¼” and 2 x 56½” lengths (if your measurements<br />
are different, cut to fit your quilt top). Sew the longer strips<br />
to the left and right sides of each of the 3 block rows.<br />
Matching centre points, stitch block row units and 5” wide<br />
Fabric B lengthwise cut strips together, alternating the two<br />
types of units. Trim the ends of Fabric B strips even with the<br />
block row units. Stitch the 2” x 56½” Fabric E strips to top<br />
and bottom of quilt top.<br />
BORDERS<br />
11. Trim selvedges from 2½” Fabric F strips and sew the strips<br />
together end to end to make a long 2½” strip. From this<br />
long strip, cut 2 x 67¼” and 2 x 60½” lengths (if your<br />
measurements are different, cut to fit your quilt top). Sew<br />
the longer strips to the left and right sides of the quilt top<br />
and the shorter strips to the top and bottom.<br />
12. Trim selvedges from 6½” Fabric G strips and sew the strips<br />
together end to end to make a long 6½” strip. From this<br />
long strip, cut 2 x 72½” and 2 x 71¼” lengths (if your<br />
measurements are different, cut to fit your quilt top). Sew<br />
shorter strips to left and right sides of the quilt top. Sew<br />
longer strips to the top and bottom.<br />
13. Trim selvedges from 3½” Fabric D strips and sew the strips<br />
together end to end to make a long 3½” strip. From this<br />
long strip, cut 2 x 83¼” and 2 x 78½” lengths (if your<br />
measurements are different, cut to fit your quilt top). Sew<br />
longer pieces to left and right sides of the quilt top. Sew<br />
shorter strips to the top and bottom.<br />
TO FINISH<br />
14. Layer backing, batting and quilt top, baste together. Quilt<br />
as desired. Join the 9 x 2¼” binding strips to make one long<br />
strip. Press in half lengthwise and bind mitering corners.<br />
Attach a label or sign and date your quilt.<br />
AUSTRALIA spotlight.com.au or call 1300 305 405<br />
NEW ZEALAND spotlight.co.nz or call 0800 276 222<br />
SINGAPORE spotlight.com.sg or call 6733 9808
PAPER PATTERNS