e - Spotlight Promotions
e - Spotlight Promotions
e - Spotlight Promotions

Create successful ePaper yourself
Turn your PDF publications into a flip-book with our unique Google optimized e-Paper software.
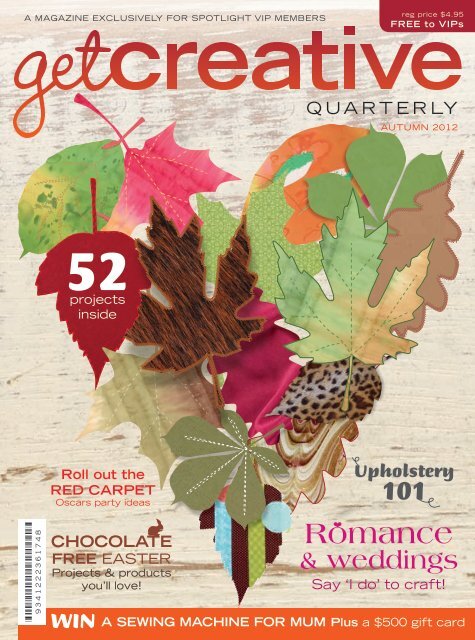
A MAGAZINE EXCLUSIVELY FOR SPOTLIGHT VIP MEMBERS<br />
reg price $4.95<br />
FREE to VIPs<br />
QUARTERLY<br />
AUTUMN 2012<br />
52<br />
projects<br />
inside<br />
Roll out the<br />
RED CARPET<br />
Oscars party ideas<br />
Upholstery<br />
101<br />
*9341222361748*<br />
9341222361748<br />
Chocolate<br />
FREE EASTER<br />
Projects & products<br />
you’ll love!<br />
Romance<br />
& weddings<br />
Say ‘I do’ to craft!<br />
WIN a sewing machine for mum Plus a $500 gift card
Make a<br />
creative gift<br />
Make an impact with your gifts this year by adding a personal touch.<br />
<strong>Spotlight</strong> has launched an exciting new range of pre-cut timber<br />
designs from Kaisercraft that make great wall decorations.<br />
Buy this<br />
FREE<br />
owl clock<br />
project<br />
available at<br />
spotlight.com.au<br />
Make this<br />
Make this<br />
Buy this<br />
Create a cute clock<br />
with a Shamrock clock<br />
movement shaft.<br />
Decorate<br />
an elephant<br />
Decorate<br />
a monkey<br />
Decorate a lion<br />
For your nearest store and for product details visit<br />
spotlight.com.au or call 1300 305 405
Craft news, profile stories<br />
intocraft.com<br />
Free<br />
Projects!<br />
Sydney March 8 – 11<br />
Rosehill Gardens Racecourse<br />
Auckland, NZ March 15 – 18<br />
ASB Showgrounds<br />
Brisbane March 22 – 25<br />
Brisbane Exhibition Centre,<br />
South Bank<br />
Melbourne April 12 – 15<br />
Royal Exhibition Building,<br />
Carlton Gardens<br />
Tasmania April 27 – 29<br />
Launceston Silverdome<br />
Perth<br />
May 23 – 27<br />
Perth Convention<br />
Exhibition Centre<br />
JUNE<br />
Brisbane June 9 – 11<br />
Brisbane Exhibition Centre,<br />
South Bank (long weekend)<br />
Sydney June 13 – 17<br />
Sydney Exhibition Centre,<br />
Darling Harbour<br />
Melbourne<br />
July 26 – 29<br />
Melbourne<br />
Exhibition Centre,<br />
Southbank<br />
Canberra August 9 – 12<br />
Exhibition Park In Canberra<br />
Newcastle August 16 – 19<br />
Newcastle Entertainment<br />
Centre, Broadmeadow<br />
Hamilton, NZ<br />
September 6 – 9<br />
Claudelands<br />
Conference &<br />
Exhibition Centre<br />
Townsville October 4 – 7<br />
Townsville Entertainment &<br />
Convention Centre<br />
Brisbane October 17 – 21<br />
Brisbane Exhibition Centre<br />
Melbourne October 25 – 28<br />
Caulfield Racecourse<br />
Adelaide<br />
November<br />
8 – 11<br />
Adelaide<br />
Showground<br />
For more information on these<br />
great events, visit:<br />
craftfair.com.au<br />
craftandsew.com.au<br />
aqc.com.au<br />
scrapbookexpo.com.au<br />
All these great events organised by Expertise Events, phone 02 9452 7575, or visit www.expertiseevents.com.au
• welcome<br />
creative<br />
QUARTERLY<br />
Project difficulty legend<br />
It’s all about Autumn...<br />
Hello and welcome to the sixth issue of Get<br />
Creative Quarterly; the one where we slip on our<br />
coat of many autumn colours and craft, create<br />
and decorate to our heart’s content.<br />
We’ve got some great competitions in this<br />
season’s issue; we’ll admit that off the bat.<br />
Do not go past page number 6 if you want to<br />
try and win a fantastic sewing machine and $500<br />
<strong>Spotlight</strong> card for your mum in our Mother’s Day<br />
Hamper competition. And, on page 94 you can win<br />
a great little library of crafty books linked to cake<br />
making and more. See our story on Cake Pops<br />
and be inspired.<br />
We’re celebrating the colours and themes of<br />
autumn this issue in everything from canvas art<br />
(page 26), to jewellery (page 29) to quilting (page<br />
37).<br />
On the topic of quilting – and sewing – we<br />
have some great information for you this issue,<br />
including news on exclusive designer patterns<br />
coming to a <strong>Spotlight</strong> near you and all the trend<br />
updates you’ll need to sew a gorgeous autumn<br />
winter wardrobe.<br />
For those in a romantic mood there’s a full<br />
romance and handmade wedding section. If you’re<br />
ready to tackle some home decorating projects<br />
you might want to check out the hallway makeover<br />
we’ve done on page 78 and then, on page 86,<br />
we’ve done a ‘chairlift’ – it’s like a facelift but the<br />
results are more reliable!<br />
We’ve got projects for Easter, ideas for<br />
a whacky Oscar’s party at home, news on<br />
the amazing work <strong>Spotlight</strong> is doing with<br />
disadvantaged communities here and abroad and<br />
a good round up of news and events for lovers of<br />
arts, crafts and community. We look forward to<br />
your feedback and ideas as always. Don’t forget<br />
to connect with us on Facebook and remember<br />
that any letter published in our ‘You Said It!’<br />
section (page 144) receives a $25 <strong>Spotlight</strong> gift<br />
card. What’s stopping you?<br />
Stay well and stay creative …<br />
The Get Creative Team<br />
Whether you’re a stranger to the knitting needle or an expert with the scissors we<br />
have a variety of projects to get you interested and keep you there.<br />
Easy<br />
Intermediate<br />
Challenging<br />
e A great project i Reach the next c You’ve done the k<br />
for beginners,<br />
13 and over.<br />
level by building on<br />
basic skills.<br />
time now craft<br />
sublime!<br />
Kids<br />
Projects to keep<br />
tiny hands busy.<br />
Adult supervision<br />
recommended.<br />
editorial<br />
EXECUTIVE EDITOR<br />
Jono Gelfand<br />
jono@getcreative.com.au<br />
EDITOR<br />
Jacquie Byron<br />
jacquieb@getcreative.com.au<br />
publishing, distribution<br />
& advertising<br />
PUBLISHER & AD SALES<br />
Vittoria Bendinelli<br />
vittoriab@spotlight.com.au<br />
Megan Kannegiesser<br />
megank@spotlight.com.au<br />
Elaine Sharman<br />
Gypsy Media & Marketing<br />
services 0411 550 808<br />
DISTRIBUTION<br />
Times Printers Private Ltd<br />
Ph: (65) 6311 2888<br />
creative<br />
CREATIVE COORDINATORS<br />
Kaye Wolf<br />
kayew@getcreative.com.au<br />
Gale Wickes<br />
galew@getcreative.com.au<br />
design & style<br />
GRAPHIC DESIGNERS<br />
Monica Tuohy<br />
Sonia Barras<br />
Danielle Lakeman<br />
PHOTOGRAPHY<br />
Emma Perry<br />
Melanie Harris<br />
Markus Weber<br />
Leah Wheelton<br />
STYLIST<br />
Cathy Chadwick<br />
GRAPHIC REPRODUCTION<br />
Gavin Hannaford<br />
Markus Zielonka<br />
Romell Catuaan<br />
Lok Leung<br />
contributors<br />
Joanna Baxter<br />
Helen Bradley<br />
Deb Cleveland<br />
Amanda Lefebure<br />
Jeannine Stein<br />
Mandy Stevens<br />
information<br />
ENQUIRIES<br />
Get Creative Quarterly, Locked<br />
Bag 4321, Sth Melb, VIC,<br />
3205. Call Toll Free 1300 662<br />
742 (in Aust) or email<br />
info@getcreative.com.au.<br />
Get Creative Quarterly<br />
magazine. For more, visit<br />
spotlight.com.au.<br />
Copyright by Get Creative<br />
Quarterly Publications Pty Ltd.<br />
All rights reserved. Published<br />
quarterly by Get Creative<br />
Publications Pty Ltd. For store<br />
locations call Toll Free 1300<br />
305 405 (in NZ call 0800<br />
276 222) or go to<br />
spotlight.com.au<br />
spotlight.co.nz<br />
spotlight.com.sg<br />
Please note: Due to varied<br />
buying patterns throughout<br />
Australia, New Zealand<br />
and Singapore some stock<br />
may vary between stores<br />
or sell out. Ask a <strong>Spotlight</strong><br />
employee at your nearest<br />
store for the best alternative.<br />
2 spotlight.com.au www.facebook.com/gcqmag
48<br />
contents •<br />
creative<br />
contents<br />
QUARTERLY<br />
8<br />
48<br />
make it<br />
10 Wedding jewellery<br />
Swarovski necklace & earrings.<br />
12 Wedding guest book<br />
14 Wedding cards<br />
16 Candlelit vase<br />
17 Flower girl frock<br />
20 Fabric & ribbon heart<br />
wreath<br />
21 Valentine’s card<br />
22 Love frame<br />
24 Wedding scrapbooking<br />
26 Autumnal collage canvas<br />
29 Leaf earrings<br />
32 Crochet flower scarf<br />
33 Crochet potpourri pouch<br />
34 Crochet head scarf<br />
35 Crochet dress<br />
37 Patchwork garden quilt<br />
45 Brother overlocked scarf<br />
Dr Seuss quilt<br />
50 Batik tote bag<br />
53 Button clock<br />
54 Quilted cushions<br />
76 Pyramid door stop &<br />
door sausage<br />
78 Hallway facelift<br />
82 Silk quilt & cushions<br />
86 Re-upholstered chair<br />
88 Ottoman covers<br />
95 Easter basket<br />
96 Hand painted eggs<br />
97 Kids’ Easter projects<br />
Easter bunting, easter egg hat &<br />
decofoam bunny & chick<br />
100 Easter card<br />
102 Fabric eggs<br />
104 Easter bunny softies<br />
108 Travel book<br />
111 Warhol inspired card<br />
113 Clothes decorating<br />
115 Mother’s Day mugs<br />
Get Creative Quarterly Autumn 2012 3
• contents<br />
42<br />
123 Throw an Oscars party<br />
Invitation, placecards & glass<br />
decorations<br />
128 Oscars appetizers<br />
132 Kitchen tea invite &<br />
basket liner<br />
136 Raspberry friands<br />
Dairy free recipe by Emily Rose<br />
product knowledge<br />
8 Bridal mannequin<br />
Make your dresses feel<br />
amazing with these beautiful<br />
fabrics.<br />
9 Wedding essentials<br />
28 Blankets<br />
Trends for the season.<br />
30 Crochet hooks<br />
41 Motifs & trims<br />
47 Denyse Schmidt fabrics<br />
52 Tool Talk<br />
68 Curtains<br />
70 Blinds<br />
72 Vive La France<br />
Parisienne-inspired décor<br />
& curtains for your home.<br />
74 Curtains & décor<br />
75 Brampton House towels<br />
85 Picnic fare<br />
90 Re-upholstery tools<br />
91 Guest room make-over<br />
92 Mini kitchen<br />
125 Party basics<br />
133 Kitchen helpers<br />
Competitions/<br />
Coupons<br />
6 Mother’s Day hamper<br />
Win a Toyota sewing machine and<br />
$500 gift card.<br />
94 WIN a copy of ‘Cake<br />
Pops’ by Carolyn White<br />
143 Vouchers<br />
creative words<br />
18 Handmade weddings<br />
Tips from the pros!<br />
31 ACS winners<br />
40 Quilt trends<br />
42 Meet Liesl Gibson<br />
Discover the Lisette Sew<br />
Your Style fabrics & pattern range<br />
coming soon to <strong>Spotlight</strong>.<br />
46 Australasian Quilt<br />
Convention<br />
56 Sew trends<br />
Autumn fabric fashions.<br />
58 Meet Monica Poole<br />
Quilt designer & teacher.<br />
60 YEP update<br />
60 Blogs to watch<br />
63 Ethical fashion<br />
The new trend in couture.<br />
66 <strong>Spotlight</strong> helps<br />
Australian design<br />
students overseas.<br />
94 Discover the delicious<br />
appeal of Cake Pops<br />
106 Journalling<br />
with Helen Bradley<br />
114 Mum’s the word<br />
by Amanda Lefebure<br />
116 Artyfacts<br />
Learn about paints<br />
118 Books<br />
120 Papercrafting<br />
With Joanna Baxter from Bella!<br />
122 Gift wrapping<br />
with Jeannine Stein<br />
126 Red carpet dressing<br />
130 Oscars party ideas<br />
134 News<br />
136 Healthy baking<br />
with Emily Rose<br />
138 <strong>Spotlight</strong> help out in<br />
Vietnam<br />
140 <strong>Spotlight</strong> store news<br />
142 Mother’s day stall ideas<br />
by Mandy Stevens<br />
144 Readers’ letters<br />
4 spotlight.com.au www.facebook.com/gcqmag
my accessories<br />
my fabric<br />
my cake<br />
my flowers<br />
my bonbonniere<br />
Create your dream<br />
Wedding<br />
<strong>Spotlight</strong> has everything you need to<br />
put together your perfect wedding.<br />
Visit one of our stores today to<br />
browse through our extensive range<br />
of products or chat to one of the<br />
team for inspiration!<br />
For your nearest store visit<br />
spotlight.com.au, spotlight.co.nz or spotlight.com.sg
• competition<br />
Mother’s Day<br />
Competition<br />
A Toyota ESG 325<br />
Sewing Machine and<br />
a $500 gift card<br />
A multi purpose machine<br />
that will sew every type<br />
of project. Includes<br />
specialised patchwork<br />
& quilting stitches and<br />
accessories plus all the<br />
other stitches and extras<br />
you could want or need.<br />
• Stitch length and stitch width controls.<br />
• 25 Stitch patterns including 5<br />
specialised stitches for patchwork<br />
& quilting.<br />
• Patchwork & quilting accessories<br />
included: walking foot, free motion<br />
stipling/darning foot,<br />
¼” piecing foot, open toe<br />
appliqué foot, piping/zipper &<br />
quilting guide.<br />
• Electronic foot control for more<br />
power stitching & control of speed.<br />
• Drop feed control.<br />
• Built-in needle threader.<br />
• One step button hole.<br />
• Machine extension table.<br />
• Twin needle sewing.<br />
Available exclusively from <strong>Spotlight</strong> stores.<br />
reg AU$499ea<br />
gift card<br />
$500<br />
The competition commences at 9.00am AEDT on Wednesday 1st February 2012 and closes at 5.00pm AWST on Monday<br />
30th April 2012 (the “Promotion Period”). During the Promotion Period, entrants must send in an envelope with their name,<br />
address and VIP number to: GCQ Magazine – Mother’s Day Hamper Giveaway Level 6, 111 Cecil Street, South Melbourne.<br />
6 spotlight.com.au www.facebook.com/gcqmag
product knowledge •<br />
Here<br />
comes the<br />
bride<br />
Celebrate romance<br />
& nuptials with our<br />
sweet selection<br />
of projects &<br />
products. •<br />
Get Creative Quarterly Autumn 2012 7
• product knowledge<br />
Blushing<br />
Bride<br />
Tackling gowns for bridal parties can be nerve-wracking<br />
but extremely rewarding. Apart from the pleasure that<br />
comes from participating in such a special way in someone’s<br />
wedding, it also gives sewers the chance to play with some<br />
of the most elegant and glamorous fabrics and patterns of<br />
their stitching life.<br />
First time gown sewers should consider making a toile of the<br />
garment before tackling the real thing. Toile, the dressmaker’s<br />
term for a trial garment in cheaper fabrics, can be made in different<br />
weights of calico. With this you can pre-empt any problems and<br />
gauge the drape and so forth of the gown.<br />
Silk dupion, as pictured here, lends itself perfectly to voluminous<br />
gowns or dressy garments that require structure. It’s great for<br />
strapless and corsetry-based pieces and can also be used for<br />
accessories such as clutch purses and headpieces. Beginner<br />
sewers should ensure they maintain substantial seam<br />
allowances to cope with any fraying.<br />
Made in Japan, <strong>Spotlight</strong>’s delustered satin is high<br />
quality, with a gorgeous heaviness that sculpts<br />
beautifully and holds its shape. It has a<br />
reputation as being highly flattering.<br />
Referred to in the fashion world<br />
as peau de soie (skin of silk),<br />
delustered satin has a lovely lustre<br />
but is less shiny than other satins,<br />
producing tasteful, elegant results.<br />
Romance lace is soft lightweight lace<br />
with the characteristics of traditional<br />
French corded lace. It’s great<br />
for overlaying and for select<br />
placement and, of course, can<br />
be beaded.<br />
Both are perfect for bridal<br />
garments. Remember to<br />
use good sharp scissors<br />
and a new universal sharp<br />
needle for sewing on the<br />
machine. Always use the edge<br />
joining foot on the machine when<br />
sewing lace. •<br />
Romance lace<br />
Japanese<br />
delustered satin<br />
Silk dupion<br />
8 spotlight.com.au www.facebook.com/gcqmag
product knowledge •<br />
Bride & Belle tiara<br />
Wedding charms<br />
Wedding<br />
essentials<br />
From beads to blooms, the aisles of your local<br />
<strong>Spotlight</strong> store offer all manner of things to<br />
help you create your own unique day.<br />
Organza bonbonniere<br />
Bridal trims & accessories<br />
Bride & Belle garters, gift bags & hair combs - all from <strong>Spotlight</strong><br />
Go to www.spotlight.com.au<br />
to download this flower<br />
arrangement project sheet.<br />
Get Creative Quarterly Autumn 2012 9
• make it<br />
e<br />
“I do”<br />
love jewellery!<br />
Swarovski wedding<br />
necklace & earrings<br />
10 spotlight.com.au www.facebook.com/gcqmag
make it •<br />
Materials<br />
1pk x Swarovski 15mm pendant crystal<br />
AB (1pc)<br />
2pk x Swarovski 11mm pendant crystal<br />
AB (2pcs)<br />
1pk x Swarovski 6mm pearls white (18pcs)<br />
2pk x Swarovski 6mm bicone crystal<br />
AB (7pcs)<br />
3pk x Swarovski 4mm bicone crystal<br />
AB (14pcs)<br />
1pk x Ribtex glass seed beads 1.8mm<br />
white rainbow (25g)<br />
1pk x Ribtex clasp round glitter 8mm<br />
bright silver (2pc)<br />
1pk x Ribtex earring shepherd hooks<br />
silver (10pcs)<br />
Beading thread<br />
Bead board<br />
Scissors<br />
Beading Needle<br />
NECKLACE<br />
1. Cut a piece of beading thread 2m<br />
long, thread on the 15mm pendant<br />
bead and then bring both ends<br />
together. The bead will now be half<br />
way down the thread. Hold both ends<br />
together and thread through the eye of<br />
the beading needle.<br />
2. Thread on the following sequence<br />
of beads: three seed beads, one 4mm<br />
bicone, one 6mm bicone, one 4mm<br />
bicone, one 6mm bicone, one 4mm<br />
bicone, three seed beads, one 6mm<br />
pearl, three seed beads and one 4mm<br />
bicone.<br />
3. Working on left-hand strand only,<br />
thread on five seed beads then the<br />
following sequence of beads: one 4mm<br />
bicone, three seed beads, one 6mm<br />
pearl, three seed beads, one 4mm<br />
bicone, one 6mm bicone, one 4mm<br />
bicone and three seed beads, loop<br />
through the 11mm pendant and then<br />
take the thread back through the bead<br />
sequence to create the drop. Repeat<br />
this pattern for the right-hand strand.<br />
4. Thread five seed beads onto the<br />
left-hand strand, then the following<br />
sequence of beads: one 4mm bicone,<br />
three seed beads, one 6mm pearl,<br />
three seed beads, one 4mm bicone,<br />
one 6mm bicone, one 4mm bicone,<br />
loop through one seed bead and then<br />
take the thread back through the bead<br />
sequence to create another drop.<br />
Repeat this process for the right-hand<br />
strand. You now have the five centre<br />
drops.<br />
5. Thread the following sequence of<br />
beads onto each side: ten seed beads,<br />
one 4mm bicone, one 6mm pearl, one<br />
4mm bicone, ten seed beads, one<br />
4mm bicone, one 6mm bicone, one<br />
6mm pearl, one 6mm bicone, one<br />
4mm bicone, twenty seed beads, one<br />
4mm bicone, one 6mm pearl, one<br />
6mm bicone, one 6mm pearl, one<br />
4mm bicone and finish with twenty-six<br />
seed beads.<br />
6. To attach the clasp to the necklace,<br />
thread the beading thread through<br />
the loop of the clasp and then back<br />
through the last seed bead three<br />
times. Tie a knot and cut off excess<br />
thread. Repeat for other side.<br />
EARRINGS<br />
1. Cut a piece of beading thread<br />
15cm long, thread on the 11mm<br />
pendant bead and then bring both ends<br />
together. The bead will now be half<br />
way down the thread. Hold both ends<br />
together and thread through the eye of<br />
the beading needle.<br />
2. Thread on the following sequence<br />
of beads: three seed beads, one 4mm<br />
bicone, one 6mm bicone, one 4mm<br />
bicone, three seed beads, one 6mm<br />
pearl and four seed beads.<br />
3. To attach to the shepherd hook,<br />
thread the beading thread through the<br />
loop of the shepherd hook and then<br />
back through the last seed bead three<br />
times. Tie a knot and cut off excess<br />
thread. Repeat for other earring. •<br />
Get Creative Quarterly Autumn 2012 11
• make it<br />
i<br />
Wedding guest book<br />
Materials<br />
Bella! Wedded paper range – 8 sheets<br />
assorted (4 for covers & 4 for pages)<br />
Bella! ribbon bucklez<br />
Bella! paper lace<br />
Fundamentals fancies – silver<br />
Fundamentals imprints embossed cards<br />
& envelopes<br />
Fundamentals card making vellum pad<br />
Fundamentals card making die cuts<br />
silver<br />
Fundamentals card making sparkles<br />
alphabet<br />
White A4 office copy paper<br />
Book board, strawboard or mat board<br />
Crafters Choice PVA glue<br />
Double-sided tape<br />
Paper trimmer<br />
Awl or small hole punch<br />
Bone folder<br />
Scrap card<br />
Pencil<br />
Large eye needle<br />
Gütermann topstitch thread – grey<br />
Sewing machine (optional<br />
Silver metallic thread (optional)<br />
12 spotlight.com.au www.facebook.com/gcqmag
5mm space<br />
Template for cover<br />
make it •<br />
Inside front cover<br />
spine<br />
Inside back cover<br />
5<br />
Step 1 Cut papers – decorative<br />
and copy, to measure 14.5cm x 28cm<br />
then fold in half to form the pages of<br />
the book. Fold vellum sheets in half<br />
for pages. Each signature contains<br />
1 decorative paper, 2 vellum sheets,<br />
2 copy pages, a decorated envelope<br />
pocket and an embossed card.<br />
Step 2 Fold the flap of an envelope<br />
over twice then secure in place with<br />
some zigzag stitches or double-sided<br />
tape. Cut a strip of decorative paper<br />
4cm x the width of the paper then fold<br />
in half and nest the envelope inside<br />
the fold attaching at the back with<br />
stitching or tape. Attach a silver fancy<br />
to the strip in the centre with stitching<br />
or tape. Create three signatures by<br />
nesting folded papers and envelope<br />
pocket inside an embossed card.<br />
Step 3 Create a template for<br />
stitching the signatures by using a<br />
scrap of card, trim the scrap to 14.5cm<br />
x 10cm then fold in half lengthways.<br />
Measure 2cm from the top edge and<br />
mark the spot, then measure 2cm from<br />
the bottom edge and mark. Divide the<br />
space between the marks into four and<br />
mark. Measure 1cm on both sides of<br />
the centre then recreate the marks.<br />
Use a hole punch to punch out the<br />
holes on the template.<br />
Step 4 Cut a piece of the decorative<br />
wedded paper 15cm x 15cm then fold<br />
in half. Place the folded template in<br />
the fold of the decorative paper and<br />
mark all the stitching holes then punch<br />
out. Place the template in the centre<br />
fold of the signatures and punch out<br />
the centre line of holes only in each<br />
signature. Stitch the signatures to the<br />
decorative paper using the topstitch<br />
thread beginning in the bottom hole<br />
then stitch in and out of the holes in<br />
order until the stitching ends back at<br />
the beginning then tie off the threads.<br />
Step 5 Create the cover. Cut two<br />
pieces of book board to measure<br />
15.5cm x 15.5cm and one piece to<br />
measure 15.5cm x 2.5cm. Cover<br />
the outside of the two larger pieces<br />
with the decorative paper using the<br />
PVA glue. Cut a 12cm x 20cm piece<br />
of decorative paper from a different<br />
patterned sheet, cover the wrong<br />
side of the paper with PVA glue then<br />
quickly lay the cover pieces on top of<br />
the glue with the spine piece in the<br />
centre aligning the covers on each<br />
side of the spine leaving a 5mm space<br />
(see diagram). Fold the excess paper<br />
top and bottom over to the inside of<br />
the cover and smooth down. Thread<br />
a buckle onto the silver ribbon then<br />
attach to the cover to hide the edge<br />
of the spine paper using double-sided<br />
tape, this is a good way to hide the<br />
edge if it is crooked.<br />
Step 6 Glue the decorative<br />
paper holding the signatures to the<br />
spine, centering the signatures and<br />
overlapping the front and back covers.<br />
Cut two pieces of paper 15cm x 15cm<br />
then glue in place on the inside<br />
of the covers hiding the ribbon<br />
ends and the paper holding the<br />
signatures. Decorate the cover with<br />
the sparkles alphabet and decorate<br />
the pages with tabs from the die<br />
cuts and paper lace. •<br />
Note: Create more signatures or add<br />
more pages to suit your requirements.<br />
Template for stitching<br />
3<br />
Above: Examples of pages.<br />
Get Creative Quarterly Autumn 2012 13
• make it<br />
e<br />
Wedding cards<br />
BRIDE & GROOM<br />
Materials<br />
Fundamentals imprint card &<br />
envelope - dots<br />
Bella! Wedding trims – black<br />
Bella! Wedding pearl stickers with<br />
silver rims<br />
Bella! Wedding cardstock sticker<br />
phrases – black and white<br />
Bella! Wedding cardstock sticker icons<br />
– black & white<br />
Bella! ribbon glue<br />
Bella! Wedding 4.5” x 6.5” mat stack<br />
– 48page<br />
Double-sided tape<br />
Foam squares<br />
Paper trimmer<br />
Scissors<br />
Step 1 Cut a 10cm x 6cm piece of<br />
the pink damask patterned paper from<br />
the wedding paper stack. Tear down<br />
the right-hand edge.<br />
Tear a 10cm x 1cm strip of glitter<br />
stripe paper. Place onto the pink<br />
pattern paper as shown.<br />
Adhere the two papers onto the imprint<br />
card 2cm from the left-hand edge, 1cm<br />
up from the bottom.<br />
Step 2 Cut two 16cm strips from<br />
the black trim and adhere to the<br />
card as shown then place three pearl<br />
stickers underneath each other on top<br />
of the black trim.<br />
Step 3 Place foam squares<br />
underneath ‘Memories are to be<br />
cherished’ sticker and adhere to the<br />
bottom left-hand corner. Attach bride<br />
and groom stickers to the pink pattern<br />
cardstock using foam squares.<br />
14 spotlight.com.au www.facebook.com/gcqmag
make it •<br />
HAPPILY EVER AFTER<br />
Materials<br />
Fundamentals black cardstock<br />
148 x 210mm<br />
Bella! Wedding cardstock sticker<br />
phrases – black & white<br />
Bella! Wedding trims – white<br />
Bella! ribbon glue (RG48)<br />
Bella! Wedding 4.5” x 6.5” mat stack<br />
– 48page<br />
Bella! ribbon bucklez – round<br />
Double-sided tape<br />
Foam squares<br />
White ink<br />
Paper trimmer<br />
Scissors<br />
Step 1 Fold black cardstock in half.<br />
Cut four rectangles from the black floral<br />
pattern paper as follows – two 9cm x<br />
2.5cm, one 9cm x 5cm and one 9cm x<br />
4cm. Ink edges of your rectangles and<br />
adhere as shown.<br />
Step 2 Place foam squares<br />
underneath ‘Happily Ever After’ sticker<br />
and adhere to the right-hand side of<br />
the card on top of the second and third<br />
rectangle sections.<br />
Step 3 Cut a 12cm strip from the<br />
white trim and feed through a round<br />
ribbon buckle. Adhere 2cm from the<br />
bottom of the card.<br />
WEDDING CAKE<br />
Materials<br />
Fundamentals white cardstock<br />
140 x 280mm<br />
Bella! Wedding narratives (BWT60)<br />
Bella! Wedding cardstock sticker<br />
phrases – black & white<br />
Bella! Wedding cardstock sticker icons<br />
– black & white<br />
Bella! Wedding pearl stickers with<br />
silver rims<br />
Bella! Wedding narratives black & white<br />
Bella! Wedding trims – black<br />
Bella! ribbon glue (RG48)<br />
Bella! Wedding 8” x 8” paper stack<br />
– 48 page<br />
Double-sided tape<br />
Foam squares<br />
Paper trimmer<br />
Scissors<br />
Journalling pen<br />
Step 1 Fold white cardstock in<br />
half and doodle around the edges with<br />
journalling pen. Cut a 13cm square<br />
from a silver patterned paper within<br />
your paper stack and adhere to card<br />
inside the journalling doodles.<br />
Step 2 Tear off a black and silver<br />
foiled narrative and adhere to the<br />
left side of the card as shown. Place<br />
a wedding cake sticker onto a foam<br />
square and adhere to the right-hand<br />
side of the narrative. Add a pearl<br />
sticker to the top of the cake.<br />
Step 3 Place foam squares<br />
underneath the ‘Always & Forever’<br />
sticker and adhere to the right-hand<br />
side of the card. Cut 20cm black trim,<br />
form a bow and adhere down the left<br />
side of the card as shown. •<br />
Get Creative Quarterly Autumn 2012 15
• make it<br />
e<br />
candlelit vase<br />
Materials<br />
4pk x Vivaldi Blossoms flower with large<br />
pearl & pearl spray white (6h/1bch)<br />
4pk x Vivaldi Blossoms flower with china<br />
knot centre metallic silver (6h/1bch)<br />
1pk x Vivaldi Blossoms flower acrylic<br />
heart bunch crystal (6h/1bch)<br />
1pk x Vivaldi Favours ribbon 6mm<br />
woven nylon metallic silver (23m)<br />
2pk x Critters butterfly gauze 10cm<br />
silver (2pcs)<br />
1pk x Ribtex memory neck wire 1mm<br />
silver (15g)<br />
Round vase<br />
Tealight candle holder<br />
Tealight candle<br />
Double-sided tape or blu-tac<br />
Scissors<br />
Wire cutters<br />
Step 1 Cut a piece of memory wire<br />
to the size of the inside of your vase.<br />
Alternating between the flowers with<br />
large pearls, the flowers with china<br />
knot and acrylic hearts, twist onto the<br />
memory wire to form a flower wreath.<br />
Step 2 Cut a 50cm length of ribbon<br />
or length to suit and weave through the<br />
flowers.<br />
Note: you need to ensure that the<br />
flowers are evenly spread and hiding<br />
the twisted stems.<br />
Step 3 Put a tealight into the<br />
candle holder and using double-sided<br />
tape or blu-tac stick the tealight holder<br />
into the vase. When the tealight holder<br />
is in position carefully place the flower<br />
wreath into the vase. If necessary<br />
reposition the flowers to hide any<br />
unsightly wires. To finish, place a few<br />
butterflies onto the flowers. •<br />
Caution: You need to ensure that the<br />
flowers and butterflies do not hang<br />
over the tealight section of the vase<br />
to ensure items do not catch fire when<br />
the candle is lit.<br />
16 spotlight.com.au www.facebook.com/gcqmag
make it •<br />
e<br />
flower girl frock<br />
Materials<br />
McCalls M5795 – View B size 4 or<br />
required size<br />
Fabric & notions as per pattern<br />
Sewing supplies<br />
Sewing machine with zipper foot<br />
Instructions<br />
Make as per pattern - no variations<br />
shown here. •<br />
To make this dress<br />
use pattern<br />
McCalls M5795<br />
Get Creative Quarterly Autumn 2012 17
• creative people<br />
Are you ready for a<br />
CRAFTY wedding?<br />
Below from left to<br />
right: Anna, Amy &<br />
Sarah Blessing<br />
A new book from Penguin Australia called<br />
‘Handmade Weddings’ got us thinking about just<br />
how realistic and achievable it is to introduce<br />
handmade elements to what is, for many of us,<br />
the biggest day of our lives.<br />
Handmade Weddings contains 40<br />
budget-friendly ideas and creative<br />
ways to give weddings a truly<br />
individual touch. Some ideas are<br />
elaborate, aimed at experienced<br />
crafters, and some are beautifully<br />
simple. Anna Blessing, one of the<br />
contributors to the book, is based in<br />
the USA where she and her sisters<br />
run a lovely and inspiring site called<br />
‘bbb craft’. When developing the idea<br />
for Handmade Weddings, Penguin<br />
came across this site and invited the<br />
Blessings to participate.<br />
While used to trying their hands<br />
at everything from knitting and<br />
needlepoint, to crocheting, paper<br />
arts and collage, Anna says she<br />
still considers the modern wedding<br />
a time when brides might feel too<br />
overwhelmed with the basics of<br />
planning to consider making some<br />
things by hand as well.<br />
Nevertheless, she says, the<br />
most memorable weddings that she<br />
and her siblings have attended are<br />
celebrations that do include “little<br />
details and thoughtful artful touches<br />
throughout the day”. “When you can<br />
get anything, from anywhere, with<br />
a phone call or click of the mouse,<br />
one-of-a-kind, handmade elements are<br />
more essential than ever,” she adds.<br />
Laura Maffeo is another expert in<br />
this area and she agrees. Her book,<br />
One-of-a-Kind Weddings, came out<br />
in 2008 – a time, she says, when<br />
the wedding market was growing, yet<br />
brides “seemed to be shying away<br />
from the over-the-top, typical wedding<br />
styles”.<br />
“They wanted to put their own<br />
personal stamp on the event,” says<br />
Laura whose background includes set<br />
dressing and decorating for television<br />
and film, styling and contributing<br />
to Martha Stewart Weddings, Vogue<br />
Knitting and more, plus authoring her<br />
own gorgeous books.<br />
“I think brides today<br />
are much more<br />
interested in being<br />
fun & unique than<br />
being traditional.”<br />
– Laura<br />
She says that, financially, no one<br />
she knew wanted to “shell out tonnes<br />
of money for a cookie cutter wedding<br />
design”. “I think brides today are<br />
much more interested in being fun<br />
and unique than being traditional,”<br />
she adds.<br />
Both Anna and Laura say that, as<br />
beautiful and special as handmade<br />
touches can be at a wedding,<br />
romanticism must make way for<br />
realism when projects are being<br />
chosen.<br />
“Whether you are capable of<br />
creating and making things yourself,<br />
or are a klutz with crafts, you need<br />
others to make a handmade wedding<br />
work,” advises Anna. “There is a big<br />
production element of making things<br />
for weddings and, to keep your sanity,<br />
you must enlist friends and family to<br />
be your assembly line. If you aren’t<br />
the naturally creative type, but have<br />
a friend who is, focus on one or two<br />
things that you’d like to make by hand<br />
and ask for his or her creative advice.”<br />
She also says that the size of a<br />
wedding plays a large part in what can<br />
be achieved. If it’s a big wedding and<br />
you want to make a lot of one thing<br />
then make sure you give yourself the<br />
time to do it. alternatively, just make<br />
one truly beautiful thing for the bride.<br />
Laura agrees that time is the<br />
crucial element but adds, “It’s also<br />
important to pick something fun<br />
that you actually want to create. “No<br />
one wants to dread the task. In my<br />
experience, the most popular thing<br />
to personalise has been favours (like<br />
place names for tables, keepsakes<br />
18 spotlight.com.au www.facebook.com/gcqmag
Left: Handmade Weddings contains<br />
stunning photographs, templates &<br />
step-by-step instructions for beautiful<br />
handmade details, including elegant<br />
invitations, quirky seating cards,<br />
simple decorations, & vintageinspired<br />
accessories.<br />
Penguin Australia - AUS$35 – available at<br />
bookstores and online. Right: Laura Maffeo<br />
creative people •<br />
Inside Laura’s crafty tool box<br />
“My kit for work is part craft box, part tool box<br />
and part sewing kit. You need to be prepared<br />
for anything so having a good variety of small<br />
hand tools, pens, wires, threads, papers and<br />
trims is essential. The most important thing<br />
for me is adhesives. A hot glue gun works for<br />
most everything! I also like having a variety<br />
of ribbons and other embellishments. I collect<br />
vintage trims and buttons so there is always<br />
something fun and unique to add to a project.”<br />
or bonbonniere). They say so much<br />
about the couple and the theme of the<br />
wedding. Also, there are so many fun<br />
and inexpensive ideas for these that<br />
will make the day really memorable.”<br />
She likes the idea of organising a craft<br />
night to tackle handmade wedding<br />
projects and get the job done.<br />
The Blessing sisters walk the talk<br />
and, when Anna got married, her mum<br />
said the sisters went “bonkers”. They<br />
did everything they could themselves,<br />
short of making the dress.<br />
“There were guest boxes stamped<br />
and filled with white and green - the<br />
wedding colours - we made seating<br />
cards that we hung from grosgrain<br />
ribbons anchored by roses in the<br />
garden, my mum knitted me a white<br />
shrug for the evening, I made my<br />
earrings (and was finishing them the<br />
morning of!) the list goes on ... ”<br />
In Handmade Weddings the sisters<br />
created fabric invitations, headbands,<br />
table markers and napkins. They<br />
chose to keep the colour schemes<br />
neutral for the most part and focus on<br />
using different textures, shapes and<br />
patterns for contrast.<br />
“We are in love with the<br />
headbands, because they’d be so<br />
pretty on a bride, but you could make<br />
simpler variations for bridesmaids and<br />
flower girls. Or - just for a fun cocktail<br />
party,” says Anna. “Creative table<br />
numbers and seating cards are a sure<br />
way to make a creative mark on your<br />
celebration. It’s the small, thoughtful<br />
handmade elements that make the<br />
difference. When a bride considers<br />
her guests, and thinks about how to<br />
make the most festive, welcoming<br />
party she can, handmade touches are<br />
the best way to do that. No matter<br />
what, a wedding is all about the<br />
bride. Creating handmade elements<br />
throughout the party make it all about<br />
your friends and family too.”<br />
“Creative table<br />
numbers & seating<br />
cards are a sure<br />
way to make a<br />
creative mark on your<br />
celebration. It’s the<br />
small, thoughtful<br />
handmade elements<br />
that make the<br />
difference.”<br />
– Anna<br />
In terms of the most memorable<br />
handmade wedding item Anna has yet<br />
to see she cites her cousin and his<br />
bride who used a vintage typewriter to<br />
create more than two hundred savethe-date<br />
notes and invitations.<br />
“With inserts!” she declares. “This<br />
was the most ambitious, enormous<br />
task I could imagine doing – with the<br />
most unbelievably fantastic results.<br />
She (the bride) also used vintage,<br />
unused stamps on the envelopes<br />
for mailing. We all kept our beautiful<br />
invites and have them posted on our<br />
bulletin boards. Those are the kinds<br />
of things that will truly be remembered<br />
for ever.”<br />
Laura has had her share of<br />
memorable weddings too. Well known<br />
for her table top design skills, she<br />
once acquiesced for a dear friend<br />
who wanted live goldfish in her<br />
centrepieces. “They were actually<br />
quite beautiful and modern – round<br />
bowls with gold fish next to striking<br />
bouquets of calla lilies and tea lights,”<br />
she says. “The only problem was not<br />
all the goldfish made it through the<br />
event. Not the most festive outcome!”<br />
There’s a lesson somewhere there... •<br />
LINKS<br />
• bbbcraft.blogspot.com<br />
• www.lauramaffeo.com<br />
Get Creative Quarterly Autumn 2012 19
• make it<br />
e<br />
ALL HEART<br />
fabric & ribbon wreath<br />
WREATH<br />
Materials<br />
Assorted coordinated fabrics – cotton,<br />
organza, tulle & satin or raw silk<br />
Assorted coordinating ribbons –<br />
organza, satins<br />
1m length of ribbon for hanging<br />
Wire heart – 300mm<br />
Scissors, tape measure<br />
Optional - rotary cutter, cutting mat &<br />
quilters ruler<br />
Step 1 Cut strips from fabric and<br />
ribbons 20cm long by 2cm wide. The<br />
number of strips required will depend<br />
on how full you want the wreath to<br />
look; start with 100 strips and add<br />
more as required.<br />
Step 2 Tie and knot the centre<br />
of each strip around the wire heart<br />
shape. Tie them in a random or regular<br />
pattern, adding more strips until<br />
desired fullness is achieved. Twist and<br />
fluff out strips as desired.<br />
Step 3 Tie and knot the end of<br />
hanging ribbon around the top middle<br />
point of the heart, and trim the long<br />
end of the ribbon to desired hanging<br />
length.<br />
A HEART FOR THE<br />
BRIDE’S WRIST<br />
1. To make a matching ‘good luck’<br />
heart for the bride, use the same<br />
method as for the large heart wreath<br />
but using a 100mm wreath instead.<br />
2. Use strips left over from the large<br />
heart but trimming the strips down<br />
to a length of 10cm. Or if cutting new<br />
strips, cut strips 10cm long by 1cm<br />
wide.<br />
3. Loop a 50cm length of ribbon and<br />
tie the ends to the top point of the<br />
heart. •<br />
20 spotlight.com.au www.facebook.com/gcqmag
Valentine’s<br />
card<br />
Materials<br />
Bella! pink fusion papers<br />
Bella! pink fusion trimming<br />
Remarks rub on alphabet<br />
Jenny B collection hearts<br />
White Kaisercard<br />
Double-sided tape<br />
Scissors<br />
Paper trimmer<br />
Step 1 Cut the pink fusion<br />
cardstock 21cm x 15cm then fold<br />
in half to form the card. Cut a 6cm<br />
x 15cm strip of white cardstock and<br />
attach to the front of the card.<br />
Step 2 Attach the pink rickrack<br />
along the top edge of the white card<br />
strip.<br />
Step 3 Attach the hearts to the<br />
front of the card then rub on the words<br />
make it •<br />
be mine in the centre. •<br />
e<br />
Get Creative Quarterly Autumn 2012 21
• make it<br />
e<br />
love<br />
frame<br />
Materials<br />
Kaisercraft BTP nine frame photo display<br />
Kaisercraft wooden flourishes – swirls<br />
Kaisercraft wooden flourish packs –<br />
mannequins, Eiffel Tower, elm tree<br />
Kaisercraft 6½” paper pads - Vintage<br />
Timeless, Black & White Timeless<br />
Kaisercraft paper blooms – butter cream<br />
Kaisercraft Timeless rub ons – doilies,<br />
treasures, borders<br />
Kisercraft pearl flourish<br />
Scrap of red paper<br />
Scrap of cream card<br />
Spotted cream grosgrain ribbon<br />
Scrap of lace trim<br />
4 brown buttons<br />
Cream thread<br />
Cream paint<br />
Stazon ink pads – saddle brown, black<br />
UHU glue stick<br />
Crafters Choice PVA glue<br />
Double-sided tape<br />
Mounting tape<br />
4 clamps or large bulldog clips<br />
Fiskars scalloped edge heart punch<br />
Hole punch<br />
Scissors<br />
Paper trimmer<br />
Paint brush<br />
Pencil<br />
Sponge<br />
Step 1 Using a pencil, trace around<br />
the inside of each frame onto the<br />
backing board. Select the desired<br />
papers for each frame and remove<br />
them from the paper pads. Trace the<br />
frame for each paper on the back of<br />
the papers then cut out roughly leaving<br />
a small border around the pencil line so<br />
when the frame piece is replaced the<br />
edges of the papers are hidden under<br />
22 spotlight.com.au www.facebook.com/gcqmag
Diagram<br />
make it •<br />
1<br />
2<br />
3<br />
4<br />
5 8<br />
7<br />
6 9<br />
the borders. Attach the papers to the<br />
backing board with double-sided tape<br />
using the pencil lines as a guide.<br />
Step 2 Paint the frame cream and<br />
set aside to dry. When the frame is<br />
thoroughly dry, smudge some brown<br />
ink from the ink pad around the edges<br />
and corners to create an aged look<br />
then apply a little black ink directly<br />
from the pad to the outside edges<br />
and at random spots. When the inks<br />
are dry apply a little PVA glue to the<br />
back of the frame, take care not to<br />
use too much glue as it will seep out<br />
onto the papers, then carefully place<br />
it on top of the paper covered backing<br />
board aligning the edges. Clamp it all<br />
together with clamps or large bulldog<br />
clips and set aside to dry. When glue is<br />
dry remove clips.<br />
Step 3 Decorating the<br />
inside of each frame<br />
1. Decorate frame one by attaching a<br />
mannequin shape to the centre with<br />
the glue stick and adding a grosgrain<br />
bow to the waist.<br />
2. Cut out a butterfly from the vintage<br />
paper pad and attach it to the centre of<br />
frame two.<br />
3. Punch a heart shape from the red<br />
scrap paper and attach to the centre<br />
of frame three. Find the LOVE word in<br />
the vintage paper pad then add to the<br />
heart using mounting tape.<br />
4. Attach the Eiffel Tower to the center<br />
of frame four.<br />
5. Attach some scrap lace to the paper<br />
of frame five then add some buttons.<br />
6. Cut out the BLISS word from the<br />
paper, smudge some brown ink onto<br />
the word, and then add black ink<br />
around the edges to create a border.<br />
Attach to frame six using mounting<br />
tape.<br />
7. The elm tree is slightly too wide<br />
for the frame so carefully remove the<br />
outermost leaf from the left side and<br />
it should fit nicely. Attach the trimmed<br />
tree at the bottom of frame seven.<br />
Create one large tag and two smaller<br />
tags from the scrap cream card, punch<br />
a hole at the top of each tag then<br />
smudge with brown ink. Add some<br />
black ink to the larger tag. Add rub ons<br />
to the small tags. Find the FAMILY word<br />
from the same page as before and<br />
attach to the large tag. Tie the small<br />
tags to the large tag then attach the<br />
lot to the top of frame seven above<br />
the tree.<br />
8. Rub on the cameo and a rose then<br />
add the pearl flourish to frame eight.<br />
9. Attach three butter cream blooms to<br />
the bottom corner of frame nine using<br />
mounting tape. Rub on a flourish and<br />
a bird.<br />
Decorating the outer frame<br />
Attach a swirl to the bottom left corner<br />
of the frame and another to the border<br />
between frames two and three. Add<br />
some doily rub ons to a mannequin<br />
then cut out a butterfly and attach to<br />
the back of the mannequin as wings.<br />
Find the LIFE word from the same page<br />
as before and attach to the mannequin<br />
at the waist. Attach the mannequin to<br />
the right-hand side of the frame. Add<br />
rub ons to the frame if desired.<br />
Note: Add your own photos and<br />
mementos to personalize the display. •<br />
Get Creative Quarterly Autumn 2012 23
• make it<br />
e<br />
WEDDING SCRAPBBOOK<br />
Materials<br />
Bella! Wedding embossed stripes<br />
black cardstock<br />
Bella! Wedding pearl stickers with<br />
silver rims<br />
Bella! Wedding cardstock sticker<br />
phrases – black and white<br />
Bella! Wedding trims – silver<br />
Bella! Wedding 12” x 12” paper pad<br />
– 48page<br />
Bella! Wedding tokens<br />
Bella! ribbon glue<br />
Double-sided tape<br />
White chipboard alphabet<br />
11 different size photos<br />
Paper trimmer<br />
Scissors<br />
Left side layout<br />
1. Cut text patterned paper 27cm<br />
x 9cm and tear the bottom edge.<br />
Adhere this in the centre of the black<br />
cardstock 9cm down from the top.<br />
2. Cut a 28cm x 3cm strip of the silver<br />
flourish patterned paper and adhere<br />
over the top of the words paper as<br />
shown. Then place a pearl sticker on<br />
each end of the strip.<br />
24 spotlight.com.au www.facebook.com/gcqmag
make it •<br />
3. Place multi sized photos around the<br />
page and adhere some ribbon across<br />
the top of one photo using a pearl<br />
sticker.<br />
4. Using the leaf glitter paper,<br />
decorate the page by cutting leaves<br />
out individually. Continue this onto the<br />
next page of the double layout.<br />
Right side layout<br />
1. Cut a 30cm x 3cm strip of silver<br />
flourish pattern paper and adhere 2cm<br />
up from the bottom edge of the black<br />
cardstock. Cut a 28cm x 1.5cm strip<br />
from the text patterned paper, tear the<br />
bottom edge and overlay on top of the<br />
silver pattern paper.<br />
2. Add ribbon to this paper strip and<br />
three pearl stickers (left side) as<br />
shown.<br />
3. Adhere a wedding heart token to<br />
the bottom right corner of the page<br />
on top of the patterned cardstock you<br />
have just attached. Place the “Cherish’<br />
cardstock sticker on the left side of<br />
the token, adding another pearl sticker<br />
to the left side of the sticker.<br />
4. Place photos around the page and<br />
continue on with leaves from the first<br />
page.<br />
5. Add a title using chipboard alphabet<br />
letters to each page so that the first<br />
part of the sentence begins on page<br />
one and ends on page two e.g. ‘A Day<br />
to Celebrate’ or ‘Our Wedding Day’. •<br />
Get Creative Quarterly Autumn 2012 25
• make it<br />
e<br />
autumnal<br />
canvas<br />
Collect fabric scraps synonymous with<br />
the season & create some simple wall<br />
art to hang.<br />
26 spotlight.com.au www.facebook.com/gcqmag
make it •<br />
Materials<br />
12” x 16” Renoir stretched canvas<br />
20cm x 40cm piece of fabric for the<br />
trunk<br />
Assorted coordinating fabric scraps<br />
50cm x 30cm wide vliesofix<br />
Fine tip fabric marker<br />
Pencil & plain white paper<br />
Sharp scissors<br />
Iron<br />
Step 1 Using the template<br />
provided, trace the tree trunk shape<br />
onto the paper side of the vliesofix. Cut<br />
out the trunk from the vliesofix allowing<br />
Large<br />
Medium<br />
Small<br />
an extra 1cm around the edges. Using<br />
the iron, fuse the trunk shape to the<br />
wrong side of the trunk fabric and allow<br />
to cool.<br />
Step 2 Using sharp scissors cut<br />
out the fabric tree trunk shape. Peel<br />
off the backing paper and place right<br />
side up onto the middle of the canvas,<br />
aligning the bottom edge of the trunk<br />
with the bottom edge of the canvas.<br />
Carefully place the white paper over<br />
the canvas (this protects the canvas<br />
from the iron scorching it) and gently<br />
Autumn tree<br />
template<br />
enlarge by 195%<br />
press with the iron to fuse the trunk to<br />
the canvas. Allow to cool.<br />
Step 3 Using the leaf template and<br />
the same method as for the trunk,<br />
cut out an assortment of leaves in a<br />
variety of fabrics and sizes. Arrange<br />
leaves and fuse onto canvas as per<br />
picture or as desired. Draw thin dashed<br />
lines 2mm in from the edges of all<br />
leaves and the trunk to give the look<br />
of stitching using a fine tip permanent<br />
fabric marker. •<br />
Get Creative Quarterly Autumn 2012 27
• product knowledge<br />
Ever Rest cellular cotton blanket<br />
Cover up!<br />
Ever Rest plain dye mink blankets<br />
<strong>Spotlight</strong>’s collection of blankets<br />
& throws adds warmth, colour &<br />
texture to any room. •<br />
Ever Rest faux wool blanket<br />
Ever Rest cotton waffle blankets<br />
Koo fleece<br />
blanket<br />
Justlink coral fleece blankets<br />
Ever Rest printed dye mink blankets<br />
Please note: Due to varied buying patterns throughout Australia and New Zealand<br />
some stock may vary between stores or sell out. Ask a <strong>Spotlight</strong> employee at<br />
your nearest store for the best alternative.<br />
28 spotlight.com.au www.facebook.com/gcqmag
make it •<br />
Textural leaf<br />
Materials<br />
Scraps of wool felt, suiting, corduroy,<br />
organza & net<br />
2 x earring shepherd hooks – boho gold<br />
Sharp scissors<br />
Pins, hand needle<br />
Sewing machine<br />
Sewing thread<br />
Step 1 Using the templates<br />
provided, cut two large leaves from each<br />
of the wool and organza scraps and two<br />
small leaves from each of the suiting,<br />
corduroy and net scraps.<br />
Step 2 Layer the cut fabric leaves<br />
on top of each other, with the wool felt<br />
on the bottom, followed by the suiting,<br />
then the corduroy, organza and the net<br />
on the top.<br />
Turn each leaf outwards slightly to either<br />
side, but keep the top points of the<br />
leaves aligned. Pin leaves in place when<br />
happy with arrangement of leaf shapes.<br />
Step 3 Starting from the top point<br />
of the leaves, sew a straight line of<br />
stitching half way down the leaves,<br />
reverse the line of stitching back to the<br />
top and repeat again with the stitching<br />
ending back at the top, leaving the ends<br />
of the threads long.<br />
Using the long threads, hand sew the<br />
base of the shepherd hook to the top of<br />
Fabric scraps in various<br />
textures form the bulk of these<br />
distinctive & stylish earrings.<br />
the sewn leaves shapes. •<br />
earrings<br />
e<br />
Large<br />
Small<br />
Leaf earring templates<br />
enlarge by 125%<br />
Get Creative Quarterly Autumn 2012 29
• product knowledge<br />
hooked<br />
on crochet<br />
Crochet comes from an old French word<br />
meaning ‘hook’. These hooks, by Boye<br />
& available at <strong>Spotlight</strong>, are high-grade,<br />
light weight & made from aluminium.<br />
They come in packs of six, in assorted<br />
sizes & colours. We love ‘em! •<br />
30 spotlight.com.au www.facebook.com/gcqmag
ACS winners •<br />
Clockwise from right: The<br />
winning entries by Dawn<br />
Spencer, Venetia Elbourne-<br />
Hobbs and Linda Castles.<br />
They knitted their way<br />
to a generous cash prize<br />
Last winter <strong>Spotlight</strong> and<br />
Australian Country Spinners ran a<br />
joint competition called ‘Knit your<br />
way to a share of $30,000’. Get<br />
Creative Quarterly promoted the<br />
competition in issue number three.<br />
The competition was, in part, a<br />
celebration of the annual World Wide<br />
Knit in Public Day. This issue we are<br />
proud to introduce you to the three<br />
successful knitters who shared in the<br />
prize pool:<br />
• Venetia Elbourne-Hobbs (Horsham,<br />
Victoria) - Winner of the Baby, Child &<br />
Teen category<br />
• Linda Castles (South Melbourne,<br />
Victoria) - Winner of the Men’s &<br />
Women’s Fashion category<br />
• Dawn Spencer (Swan Hill, Victoria)<br />
- Winner of the Homewares & Pet<br />
category<br />
Venetia Elbourne-Hobbs was taught<br />
to knit by her mother and grandmother<br />
but took it up seriously once her own<br />
children had arrived. “I decided that<br />
it would be nice for me to knit each of<br />
my children a jumper,” says Venetia.<br />
“I knitted the two boys jumpers and<br />
then all four children received an<br />
Australian animal toy.”<br />
Venetia doesn’t confine her creative<br />
pursuits to knitting, she also loves<br />
to design and began designing and<br />
knitting her own patterns because<br />
she couldn’t find commercial ones for<br />
her girls that she liked. “So I created<br />
‘mini mae knitwear’ two years ago to<br />
produce, publish and sell my designs.<br />
You can see them at<br />
www.minimaeknitwear.com.au”<br />
For this competition Venetia<br />
entered her ‘One Knit Wonder dress<br />
and hat’ design. “You just knit the<br />
two pieces and then sew the shoulder<br />
straps and side seams together. The<br />
idea was to make a cute, simple dress<br />
and matching hat, with basic stitches<br />
for a novice knitter - busy mums like<br />
me, who may have previously only<br />
attempted a scarf.”<br />
And what’s Venetia’s best tip for<br />
novice knitters? “I think the best way<br />
to improve your skills is to try different<br />
things, and perhaps get involved with<br />
other knitters.”<br />
Linda Castles is the daughter of a<br />
knitter so probably had her first set of<br />
needles before she owned a school<br />
bag. Lately Linda has been knitting<br />
lace scarves and shawls with very fine<br />
yarns and, she says, the competition<br />
gave her an excuse to extend that to<br />
a dress.<br />
“Something I wouldn’t usually<br />
have reason to knit,” she explains.<br />
“It wasn’t made for anyone in<br />
particular, but was made specifically<br />
for the competition.”<br />
And her tip for success in<br />
knitting? “Just lots of practice, and<br />
persistence,” says Linda.<br />
Dawn Spencer was at primary<br />
school during the 1930s and she<br />
remembers how, in the upper school,<br />
the class was regularly divided into<br />
boys and girls so the lads could learn<br />
woodwork and the girls could study<br />
sewing and knitting.<br />
“This was probably my earliest<br />
knitting experience,” says Dawn.<br />
“My mother and grandmother (a<br />
tailoress) were very good at sewing<br />
and crochet but I don’t remember<br />
seeing them knit.”<br />
One of Dawn’s earliest creations,<br />
of which she was very proud, was a<br />
green brushed wool scarf that she<br />
often wore, regardless of whether it<br />
matched her outfit. “It was because<br />
I remember people admiring it,”<br />
she concedes.<br />
“I love knitting so much that I take<br />
it almost everywhere,” says Dawn<br />
who describes her pastime as both<br />
relaxing and satisfying. “In the car on<br />
a long journey my late husband would<br />
sometimes say, ‘Would you please<br />
stop that click – clack for a while?’”<br />
Dawn says that “involved patterns<br />
do not combine well with conversation”<br />
so if she is watching television,<br />
catching public transport or sitting at<br />
the football she tends to knit cushions<br />
or rugs to use as gifts. In fact it was at<br />
a football game – whilst watching her<br />
grandson Thomas play for Lake Boga<br />
(near Swan Hill) – that she came up<br />
with her winning project. His team is<br />
black and white hence the black and<br />
white rug and matching cushion were<br />
created. •<br />
Get Creative Quarterly Autumn 2012 31
• make it<br />
e<br />
CROCHETED<br />
FL WER SCARF<br />
Materials<br />
*Assorted DMC tapestry wool<br />
3.50mm crochet hook<br />
Scissors<br />
Yarn needle<br />
*1 skein (8m) makes – 4 x centres (1st & 2nd<br />
rnds) or 2 x 3rd rnds or 1 x 4th rnd.<br />
Note: This can also be made by using up scraps of<br />
left over yarn.<br />
Abbreviations<br />
beg = beginning; ch = chain; lp = loop;<br />
Rnd = round; sl st = slip stitch; sp = space;<br />
st/s = stitch/es; tr = treble;<br />
Instructions<br />
Using 3.50mm crochet hook work 4ch and join with<br />
a sl st to form a ring.<br />
Rnd 1: 4ch, (1tr in ring, 1ch) 7 times, sl st to 3rd ch<br />
at beg of round.<br />
Rnd 2: (1tr into 1-ch sp, 2ch) 8 times, sl st into top<br />
1st tr.<br />
Rnd 3: Change colour, (4tr into 2-ch sp, 1ch) 8<br />
times, sl st to top of 1st tr.<br />
Rnd 4: Change colour, (4ch, sl st under 1-ch sp) 8<br />
times, sl st to 1st ch.<br />
Petals: (6 tr under 4-ch lp, 1ch, sl st in 1-ch sp as<br />
before) 8 times, 1ch.<br />
Fasten off leaving long tail for joining flowers. Weave<br />
in yarn ends of colours 1 and 2 using the yarn<br />
needle.<br />
Create 20 (or desired number) flowers in assorted<br />
colours then stitch together to create a scarf. •<br />
32 spotlight.com.au www.facebook.com/gcqmag
crochet<br />
potpourri pouch<br />
make it •<br />
e<br />
Materials<br />
2 x 50g balls ‘Moda Vera’ Bamboo<br />
Cotton<br />
5.50mm crochet hook<br />
Scissors, yarn needle, pins<br />
Your choice of potpourri<br />
Abbreviations<br />
blp = back loop; ch = chain; dc =<br />
double crochet; htr = half treble; inc<br />
= increase; lp = loop; Rnd = round; sk<br />
= skip; sl st = slip stitch; sp = space;<br />
st/s = stitch/es; tr = treble; yoh =<br />
yarn over hook; dec = decrease over<br />
next 2 dc = (pull up lp in next st) twice,<br />
yoh, pull through all 3 lps;<br />
Instructions<br />
Lining Row 1: Make 31ch.<br />
Row 2: 1dc in 2nd ch from hook, 1dc<br />
in each st to end, turn.<br />
Row 3: 1ch, 1dc in each st to end, turn.<br />
Rows 4-43: Repeat row 3.<br />
Row 44: 1ch, 1dc in blp only in each st<br />
to end, turn.<br />
Outer Covering Row 45: 1dc,<br />
2ch in 1st st, (1tr, 1htr in next st, sk<br />
next st, 1dc, 2ch in next st) 9 times,<br />
1tr, 1htr in next st, 1dc in last st, turn.<br />
Row 46: 1dc, 2ch, 1tr, 1htr in 1st dc,<br />
(1dc, 2ch, 1tr, 1htr in next 2-ch lp) 9<br />
times, 1dc in last 2-ch lp, turn.<br />
Rows 47-66: Repeat row 46.<br />
Row 67: 1dc, 2ch in 1st dc, (1dc, 2ch,<br />
1tr, 1htr in next 2-ch lp) 9 times, 1dc in<br />
last 2-ch lp, turn.<br />
Rows 68-74: Repeat row 67, turn.<br />
Fasten off.<br />
Bring the bottom of lining up to meet<br />
the last row of body and sew both side<br />
seams from the outside using a whip<br />
stitch. Now fold the outer covering<br />
back over the lining and pin in place.<br />
Join yarn with a sl st into the bottom<br />
right-hand corner and work a row of dc<br />
up the right sides to seam the back<br />
and front of the bag, then work across<br />
the front flap before joining the left<br />
seam in the same manner, turn the<br />
work around and work another row of<br />
dc back to give the bag a stable edge.<br />
Fasten off and sew in all ends.<br />
Flower Magic Circle (used when<br />
you want a tight circle with no hole in<br />
the middle) = wrap yarn twice around<br />
your finger & work a sl st into the lp,<br />
slip the lp off your finger and work the<br />
first round into the ring (over the two<br />
strands), sl st into 1st st when round is<br />
finished, pull the yarn tail to tighten the<br />
lp to create an invisible centre.<br />
shell A = (1dc, 1htr, 2tr, 1htr, 1dc) in<br />
same st;<br />
shell B = (1dc, 1htr, 5tr, 1htr, 1dc) in<br />
same st;<br />
Rnd 1: 12dc into magic circle, sl st<br />
into 1st dc.<br />
Rnd 2: (1dc in next dc, 2ch, sk 1dc) 6<br />
times, sl st in 1st 2-ch lp.<br />
Rnd 3: shell A in same lp, (shell A in<br />
next lp) 5 times, 1ch, working behind<br />
the petals just made sl st into 1st<br />
skipped dc of row 2.<br />
Rnd 4: 1dc in same st, (3ch, 1dc in<br />
next skipped dc) 5 times, 3ch, sl st<br />
into 1st 3-ch lp.<br />
Rnd 5: shell B in same lp, (shell B in<br />
next lp) 5 times, fasten off.<br />
Sew in all ends.<br />
Sew flower to front flap of the bag.<br />
Pop the potpourri inside the pouch<br />
then sew closed along the base of<br />
the flap. •<br />
Get Creative Quarterly Autumn 2012 33
• make it<br />
e<br />
BAMBOO<br />
headband<br />
Materials<br />
1 x 50g ball ‘Moda Vera’ Bamboo Cotton<br />
5.50mm crochet hook<br />
Scissors, yarn needle<br />
Abbreviations<br />
ch = chain; dc = double crochet; htr =<br />
half treble; inc = increase; lp = loop;<br />
sk = skip; sl st = slip stitch; sp =<br />
space; st/s = stitch/es; tr = treble;<br />
yoh = yarn over hook; dec = decrease<br />
over next 2 dc = (pull up lp in next st)<br />
twice, yoh, pull through all 3 lps;<br />
Instructions<br />
Row 1: Work 36ch, sl st into 2nd ch<br />
from hook, sl st into each of next 34<br />
ch, turn work 90°.<br />
Row 2: 1ch, 2dc in side of work, turn.<br />
Row 3: 1ch, inc in next st, 1dc in next<br />
dc, turn.<br />
Row 4: 1ch, inc in next st, 1dc in each<br />
of next 2 dc, turn.<br />
Row 5: 1ch, inc in next st, 1dc in each<br />
of next 3 dc, turn.<br />
Row 6: 1ch, inc in next st, 1dc in each<br />
of next 4 dc, turn.<br />
Keep increasing in this manner until<br />
you have 12 dc, turn.<br />
Row 13: 1ch, 1dc in 1st st, (1htr in<br />
next st, sl st in next st) 5 times, 1dc in<br />
last st, turn.<br />
Repeat row 13 until you have 40 rows<br />
of pattern, turn.<br />
Row 43: 1ch, 1dc in 1st st, 1dc in<br />
each of next 9 dc, dec 1dc, turn.<br />
Row 44: 1ch, 1dc in 1st st, 1dc in<br />
each of next 8 dc, dec 1dc, turn.<br />
Row 45: 1ch, 1dc in 1st st, 1dc in<br />
each of next 7 dc, dec 1dc, turn.<br />
Keep decreasing in this manner until<br />
you have dec 1dc over the last 2 sts.<br />
Work 36ch, sl st into 2nd ch from hook,<br />
sl st into each of the next 34 ch, sl st<br />
into top of band, fasten off and sew in<br />
all ends. •<br />
Ionna Charalambous, <strong>Spotlight</strong><br />
Braybrook, VIC, has been with<br />
the company for 13 years & is a<br />
dyed in the wool crafter. “Craft<br />
is a labour of love. I especially<br />
love making knitted toys that<br />
bring joy & happiness to those<br />
who receive them. Hopefully,<br />
I pass on my passion to our<br />
customers.”<br />
34 spotlight.com.au www.facebook.com/gcqmag
make it •<br />
cream<br />
bamboo dress<br />
ei<br />
Materials<br />
13 x 50g balls ‘Moda Vera’ Bamboo Cotton<br />
5.50mm crochet hook<br />
Scissors, yarn needle<br />
Abbreviations<br />
ch = chain; dc = double crochet; htr = half<br />
treble; lp = loop; Rnd = round; sk = skip; sl<br />
st = slip stitch; sp = space; st-ch = starting<br />
chain; st/s = stitch/es; tr = treble; yoh = yarn<br />
over hook; dec 2tr = decrease over next 2 tr<br />
= (yoh, pull up lp in next st, yoh pull through 2<br />
lps) twice, yoh, pull through all 3 lps; dec 3tr =<br />
decrease over 3 tr = (yoh, pull up lp in next st,<br />
yoh pull through 2 lps) 3 times, yoh, pull through<br />
all 4 lps; fdc = foundation row worked in dc =<br />
2ch, pull up lp in 1st ch, * yoh, pull through 1 lp<br />
(ch made), yoh, pull through both lps (dc made),<br />
pull up lp in last ch made, and repeat from* for<br />
each foundation st required; shell = (1tr, 1ch,<br />
1tr, 1ch, 1tr) in same st; v-st = (1tr, 1ch, 1tr) in<br />
same st;<br />
Magic Circle (used when you want a tight<br />
circle with no hole in the middle) = wrap yarn<br />
twice around your finger & work a sl st into the<br />
lp, slip the lp off your finger and work the first<br />
round into the ring (over the two strands), sl st<br />
into 1st st when round is finished, pull the yarn<br />
tail to tighten the lp to create an invisible centre.<br />
Instructions<br />
Back Yoke Row 1: Work 44 fdc.<br />
Row 2: 1dc, 1ch in 1st st, (1tr in next st, sk 2<br />
sts, shell in next st, sk 2 sts, 1tr in next st) 6<br />
times, 1 tr in last st, turn.<br />
Row 3: 1dc, 1ch in 1st st, (1tr in next st, sk tr<br />
& ch, shell in next tr, sk ch & tr, 1tr in next tr) 6<br />
times, 1tr in last st, turn.<br />
Rows 4-14: Repeat row 3 eleven times. Fasten off.<br />
Front Yoke Row 1: Work 44 fdc.<br />
Row 2: 1dc, 1ch in 1st st, (1tr in next st, sk 2<br />
sts, shell in next st, sk 2 sts, 1tr in next st) 6<br />
times, 1 tr in last st, turn.<br />
Row 3: 1dc, 1ch in 1st st, (1tr in next st, sk tr<br />
& ch, shell in next tr, sk ch & tr, 1tr in next tr) 6<br />
times, 1tr in last st, turn.<br />
Rows 4-11: Repeat row 3 eight times.<br />
Get Creative Quarterly Autumn 2012 35
• make it<br />
Diagram<br />
Right Front Row 12: 1dc, 1ch in<br />
1st st, 1tr in next st, sk tr & ch, shell in<br />
next tr, sk ch & tr, 1tr in each of next 2<br />
tr, sk tr & ch, 1tr in next tr, turn.<br />
Row 13: sk 1st tr, 1dc, 1ch in next tr,<br />
1tr in next st, sk tr & ch, shell in next<br />
tr, sk ch & tr, 1tr in each of last 2 tr.<br />
Row 14: sk 1st tr, 1dc, 1ch in next tr,<br />
1tr in next st, sk tr & ch, shell in next<br />
tr, sk ch & tr, 1tr in each of last 2 tr.<br />
Fasten off.<br />
Left Front Row 12: sk 20 sts, join<br />
yarn with a sl st into middle tr of 2nd<br />
last shell, 3ch, 1tr in each of next 2 tr,<br />
sk tr & ch, shell in next tr, sk ch & tr,<br />
1tr in each of next 2 tr, sk tr & ch, 1tr<br />
in last tr, turn.<br />
Row 13: sk 1st tr,<br />
1dc, 1ch in next tr, 1tr<br />
in next st, sk tr & ch,<br />
shell in next tr, sk ch<br />
& tr, 1tr in each of last<br />
2 tr, turn.<br />
Row 14: sk 1st tr,<br />
1dc, 1ch in next tr, 1tr<br />
in next st, sk tr & ch,<br />
shell in next tr, sk ch &<br />
tr, 1tr in each of next 2<br />
tr. Fasten off.<br />
SKIRT The skirt<br />
is made up of 15<br />
large motifs, 10<br />
small motifs and 5<br />
half motifs, all sewn<br />
together to form a<br />
tube.<br />
Large Motif<br />
(make 15)<br />
Rnd 1: 8dc into a<br />
magic circle, sl st in<br />
1st dc.<br />
Rnd 2: 3ch, 2tr in<br />
same st, (1ch, 3tr in<br />
next st) 7 times, 1ch,<br />
sl st into 3rd ch of<br />
st-ch,<br />
Rnd 3: 3ch in same<br />
st, 3tr in next tr, 1tr in next tr, (2ch, 1tr<br />
in next tr, 3tr in next tr, 1tr in next tr) 7<br />
times, 2ch, sl st in 3rd ch of st-ch.<br />
Rnd 4: 2ch in same st, 1tr in each of<br />
next 2 tr, dec 2tr, (3ch, 1dc in 2-ch lp,<br />
3ch, dec 2tr, 1tr in next tr, dec 2tr) 7<br />
times, 3ch, 1dc in 2-ch lp, 3ch, sl st in<br />
1st tr of round.<br />
Rnd 5: 2ch in same st, dec 2tr, (3ch,<br />
1dc in 3-ch lp, 3ch, 1dc in 3-ch lp, 3ch,<br />
dec 3tr) 7 times, 3ch, 1dc in 3-ch lp,<br />
3ch, 1dc in 3-ch lp, 3ch, sl st in top of<br />
dec 2tr.<br />
Rnd 6: 1dc in same st, [(3ch, 1dc in<br />
3-ch lp) 3 times, 3ch, 1dc in top of<br />
dec 3tr] 7 times, (3ch, 1dc in 3-ch lp)<br />
3times, 3ch, sl st into 1st dc, (32 lps).<br />
Fasten off.<br />
Small Motif (make 10)<br />
Rnd 1: 6dc into a magic circle, sl st in<br />
1st dc.<br />
Rnd 2: 4ch, 1tr in same st, 1ch, (v-st in<br />
next st) 5 times, 1ch, sl st in 3rd ch of<br />
st-ch, sl st into 1st 1-ch lp.<br />
Rnd 3: 1dc in same lp, (3ch, 1dc in<br />
next 3-ch lp) 11 times, 3ch, sl st in 1st<br />
dc, (12 lps). Fasten off.<br />
Half Motif (make 5) Rnd 1: 3dc<br />
into a magic circle, sl st in 1st dc.<br />
Rnd 2: 4ch, 1tr in same st, 1ch, (v-st in<br />
next st) twice, turn.<br />
Rnd 3: (3ch, 1dc in next 3-ch lp) 5<br />
times, 3ch, sl st in 3rd ch of st-ch, (6<br />
lps). Fasten off.<br />
Pin motifs together, as per diagram,<br />
(a – a to join the big motifs together,<br />
1-1 to join the small motif in the middle<br />
of four motifs, & 1 -1 to join the half<br />
motifs) (coloured stitch markers are<br />
ideal for pinning together as you can<br />
use the different colours to make the<br />
joins recognizable).<br />
When pinned in place, use a needle<br />
to sew each loop to its corresponding<br />
loop, weaving the yarn through the<br />
chains to get to the next loop, and so<br />
on. It is advisable to join only a few<br />
motifs together at a time so that the<br />
work does not become too heavy. Sew<br />
in all ends.<br />
Laying the tube flat, pin the front and<br />
back yokes in place leaving a little<br />
space on each side for the armholes.<br />
Sew in place. Sew up shoulder seams.<br />
Join yarn with a sl st into the bottom<br />
of one armhole and work a row of dc<br />
evenly around the armhole to neaten<br />
the edges, work another row to finish<br />
off. Repeat for second armhole and<br />
also for the neck opening. Sew in all<br />
ends. •<br />
36 spotlight.com.au www.facebook.com/gcqmag
make it •<br />
e<br />
patchwork<br />
garden<br />
Paula Stewart, quilting<br />
department, <strong>Spotlight</strong><br />
Bairnsdale ,VIC, works in<br />
manchester & home décor & is<br />
an avid quilter. “I love to create<br />
quilts from materials I see at<br />
<strong>Spotlight</strong>. These great African<br />
prints are so bright I thought<br />
they’d be great for a ‘stack &<br />
slash’ & make a great gift.”<br />
Get Creative Quarterly Autumn 2012 37
• make it<br />
A<br />
B<br />
C<br />
D<br />
E<br />
F<br />
G<br />
1.2m Sew Easy cotton/bamboo batting<br />
Matching Gütermann 100% cotton<br />
thread<br />
Rotary cutter, mat & quilters rulers<br />
Quilting pins, tape measure<br />
Scissors, seam ripper<br />
Hand needle<br />
Sewing machine with ¼” foot and<br />
walking foot<br />
All fabrics should be 100% cotton,<br />
washed & pressed.<br />
¼” seam allowance used throughout<br />
unless otherwise indicated.<br />
Read all instructions carefully before<br />
commencing the quilt.<br />
CUTTING<br />
All strips are cut across the width of<br />
fabric unless otherwise stated.<br />
• From each of the six Allover Floral<br />
and Floral Bouquet fabrics (A-F) cut 1 x<br />
6½” strip, crosscut each into 3 x 6½”<br />
squares (18 squares in total), 3 x 4½”<br />
squares (18 squares in total), and 2 x<br />
3½”squares (12 squares in total).<br />
• From each of the six Floral Wavey<br />
and Little Floral fabrics (G-L) cut – 1<br />
x 2½” strip, crosscut each into 15 x<br />
2½” squares (90 squares in total); 1 x<br />
3½” strip, crosscut each into 7 x 3½”<br />
squares (42 squares in total).<br />
Quilt measures:<br />
42½” x 42½” (108cm x 108cm)<br />
• From navy homespun cut 5 x 2½”<br />
strips for binding.<br />
Diagram 1<br />
Diagram 3<br />
Diagram 4<br />
Diagram 2<br />
Materials<br />
Fabrics are from the Rendevous range<br />
20cm Allover Floral – green/lilac (Fabric A)<br />
20cm Allover Floral – red/tan (Fabric B)<br />
20cm Allover Floral – blue/grey (Fabric C)<br />
20cm Floral Bouquet – green/lilac (Fabric D)<br />
20cm Floral Bouquet – red/tan (Fabric E)<br />
20cm Floral Bouquet – blue/grey (Fabric F)<br />
20cm Floral Wavey – green/lilac (Fabric G)<br />
20cm Floral Wavey – red/tan (Fabric H)<br />
20cm Floral Wavey – blue/grey (Fabric I)<br />
20cm Little Floral – blue (Fabric J)<br />
20cm Little Floral – red/tan (Fabric K)<br />
20cm Little Floral – navy (Fabric L)<br />
2.4m Paisley – red (for backing) (Fabric M)<br />
40cm Prima Homespun – navy (for binding)<br />
BLOCKS<br />
1. Take 72 x 2½” squares and<br />
randomly sew together in pairs<br />
(Diagram 1). Press seams to one side<br />
and set 18 units aside.<br />
2. Take the remaining 18 units and<br />
randomly sew together in pairs to<br />
create 9 x four-patch blocks<br />
(Diagram 2).<br />
3. Take the 18 remaining 2½” squares<br />
and sew one to each of the 18 units<br />
set aside in step 1 to create 18 x<br />
3-square units (Diagram 3).<br />
38 spotlight.com.au www.facebook.com/gcqmag
make it •<br />
H<br />
I<br />
J<br />
K<br />
L<br />
M<br />
Diagram 5<br />
Diagram 6<br />
4. Sew a 3-square unit to one side<br />
of each 6½” square to create Unit A<br />
(18 units). Press seams to the large<br />
square. (Diagram 4)<br />
5. Take 18 x 4½” squares and<br />
randomly sew together in pairs then<br />
sew a four-patch block to one end<br />
to create Unit B (9 units). Press<br />
seams to away from four-patch block.<br />
(Diagram 5)<br />
6. Arrange 2 x A Units and 1 x B Unit<br />
as shown in Diagram 6. Sew together<br />
the two A Units then sew to the B<br />
unit. Make 9 blocks.<br />
QUILT TOP<br />
7. Arrange the blocks into 3 rows of<br />
3 blocks, rotating blocks as shown<br />
in Diagram 7, or rotating blocks as<br />
desired.<br />
8. Sew the blocks in each row<br />
together then sew the 3 rows<br />
together.<br />
9. For the border strips take the<br />
54 x 3½” squares, randomly sew<br />
together in two sets of 12 and two<br />
sets of 14 then discard the remaining<br />
two squares. Press seams in one<br />
direction.<br />
10. Sew one 12-strip to each side<br />
of the quilt top then one 14-strip<br />
to the top and bottom as shown in<br />
Diagram 8.<br />
11. Cut red Paisley backing fabric into<br />
2 x 1.2m lengths, trim off selvedges<br />
and sew together along the length.<br />
Press seam open.<br />
12. Layer backing, batting and quilt<br />
top, baste together. Quilt as desired.<br />
Join the 5 x 2½” binding strips<br />
together on the bias to make one long<br />
strip. Press in half lengthwise and<br />
bind mitering corners. Attach a label<br />
or sign and date your quilt. •<br />
Diagram 7<br />
Diagram 8<br />
Get Creative Quarterly Autumn 2012 39
• quilt trends<br />
Below: Cross stitch<br />
Home<br />
Sweet<br />
Home<br />
New quilt fabrics<br />
salute<br />
Australian cities<br />
The linen-look trend continues and<br />
<strong>Spotlight</strong>’s quilting customers will<br />
love the new collections arriving in<br />
store this season.<br />
Add your own stitching or<br />
embellishment to this cute cross<br />
stitch fabric to make great pockets<br />
for aprons, borders on table<br />
cloths, or simply add cross stitch<br />
detail to quilts or garments.<br />
Regular <strong>Spotlight</strong> shoppers<br />
might have already purchased<br />
the gorgeous cotton linen blend<br />
picturing London cityscapes<br />
that’s been in stores recently.<br />
That fabric proved so popular<br />
that a collection is now<br />
blossoming, exclusive to<br />
<strong>Spotlight</strong>, and the Australian<br />
cities of Sydney and Melbourne<br />
are the new stars.<br />
Both new fabrics feature<br />
iconic Sydney and Melbourne<br />
imagery: Sydney with the Harbour<br />
Bridge, Centrepoint Tower (also<br />
known as Sydney Tower Eye) and<br />
the surf at Bondi, Melbourne<br />
with Flinders Street Station, the<br />
Melbourne Cricket Ground, the<br />
trams and, of course, coffee.<br />
“This will be fantastic for<br />
home quilting but I see it as a<br />
really great design for people<br />
wanting to make things to send<br />
overseas to family and friends<br />
as well,” says <strong>Spotlight</strong>’s<br />
quilt fabric buyer, Miriam.<br />
The cityscape fabrics can be<br />
manipulated for use in small<br />
and big projects, paper crafts<br />
(what great postcards they could<br />
make), sewn into travel purses<br />
and more. We love the idea of<br />
a sweet dress or nappy pants<br />
for a newborn friend in another<br />
country.<br />
Linen-look quilt fabrics<br />
with their wholesome feel and<br />
distinctive, fun designs are<br />
also making their way into the<br />
nursery. <strong>Spotlight</strong> has introduced<br />
charming and innocent designs<br />
including Hey Diddle Diddle,<br />
Humpty Dumpty, Little Red Riding<br />
Hood and The Three Little Pigs.<br />
Once again the scope for use<br />
with these fabrics is tempered<br />
only by your imagination.<br />
Obviously small bed quilts would<br />
be gorgeous but so would wall<br />
hangings, nappy bags, soft<br />
furnishings, patches on clothes<br />
and more. Creative sewers might<br />
even be able to make fabric<br />
books using the characters on<br />
the fabrics.<br />
The other lovely linen-look<br />
fabric arriving this season<br />
features a cross stitch design,<br />
once again on the distinctive<br />
seeded or unbleached base.<br />
“I think people might have fun<br />
adding dimension to this textile<br />
by adding real cross stitch and<br />
other stitched embellishments<br />
onto the pattern,” says Miriam<br />
(see example to the left). “The<br />
nice, natural look of this fabric<br />
– it’s a bit like grandma’s cross<br />
stitch – will appeal on many<br />
levels I think.” •<br />
40 spotlight.com.au www.facebook.com/gcqmag
new season product •<br />
Greetings from Sydney<br />
a cool<br />
patch<br />
Above: Icon<br />
Sydney.<br />
Left: Icon<br />
Melbourne.<br />
From a love tattoo to a skull & crossbones,<br />
Leutenegger has the perfect iron-on<br />
patch for you to ROCK any outfit. See the<br />
collection at <strong>Spotlight</strong>.<br />
Greetings from Melbourne<br />
Above: Make a<br />
unique luggage tag<br />
with Icon fabric.<br />
Above: Snake trim–by MT & Rock<br />
n Roll motifs Below: Grandma<br />
labels.<br />
Above: Nursery range (clockwise from top left) Hey Diddle Diddle, Humpty<br />
Dumpty, Little Red Riding Hood & Three Little Pigs.<br />
Please note: Due to varied buying patterns throughout Australia and New<br />
Zealand some stock may vary between stores or sell out. Ask a <strong>Spotlight</strong><br />
employee at your nearest store for the best alternative.<br />
Get Creative Quarterly Autumn 2012 41
• creative lives<br />
meet liesl<br />
YOUR NEW FAVOURITE DESIGNER<br />
Once a designer for top international fashion brands,<br />
America’s Liesl Gibson now heads up her own company<br />
Liesl + Co. and is bringing her distinctive fabrics and<br />
patterns exclusively to <strong>Spotlight</strong> in 2012.<br />
With a distinctive design signature<br />
that has made her popular with<br />
sewers worldwide, Liesl describes<br />
herself as “a very practical girl” who<br />
loves good design and style.<br />
“I like a little playfulness,” she<br />
says, “but I’m not big on passing<br />
fancies and fleeting trends. I like<br />
things to last, so quality is important<br />
to me. And I believe that other people<br />
appreciate good design too.”<br />
A graduate of New York’s Fashion<br />
Institute of Technology, Liesl began<br />
shopping around for sewing patterns<br />
when her daughter was born and was<br />
disappointed with what she found in<br />
the shops. Her company, Oliver + S,<br />
was created and soon her pattern<br />
collection was joined by an Oliver +<br />
S fabric range. Since then Leisl has<br />
released her Lisette fabrics collection<br />
(both adult and children’s versions)<br />
and all of these will be available at<br />
<strong>Spotlight</strong>.<br />
“Lisette has it completely covered,<br />
collaborating with only A-grade<br />
business partners,” says Tim<br />
Hanrahan, Senior Buyer in <strong>Spotlight</strong>’s<br />
Sew department. “We’ll be able to<br />
present customers with a range of<br />
beautiful printed apparel fabrics in<br />
cord, canvas, drills and soft poplins.<br />
They’re all printed and developed by<br />
the famous American quilt brand,<br />
Fabric Traditions.<br />
“To completely round off the<br />
experience, Lisette has teamed up<br />
with the super brand, Simplicity,<br />
to provide a complete collection of<br />
patterns for women and children which<br />
are not only inspirational but truly<br />
original and developed by Liesl herself.<br />
The experience is like working in a<br />
design studio from home – we love it!”<br />
Liesl grew up around a mother and<br />
sisters who sewed but, she says, it<br />
wasn’t until her daughter was born<br />
and she left her design job that she<br />
noticed the resurgence of interest<br />
that sewing was enjoying. Knitters,<br />
who had been growing in numbers in<br />
the few years leading up to this, were<br />
recognising the creative possibilities<br />
of sewing and Liesl discovered it was<br />
“a perfect time to be launching a<br />
pattern line”.<br />
Aware that sewing isn’t a part of<br />
life like it was in her mother’s youth,<br />
instructions in Liesl’s patterns don’t<br />
assume anything. “I explain what an<br />
edge stitch is, when to finish the seam<br />
allowances, etcetera,” she says. “But<br />
I also like to include little dressmaking<br />
details that aren’t usually found in<br />
sewing patterns. Those details might<br />
take a little more effort to sew, but<br />
the result is such a beautiful garment<br />
and gives you such a feeling of<br />
accomplishment. So the patterns are<br />
appropriate for sewists of all levels.”<br />
When Liesl’s collections arrive in<br />
<strong>Spotlight</strong> stores there will already be<br />
plenty of Australian sewers familiar<br />
with her work. “Australians seem to<br />
be a very creative bunch,” she says.<br />
“Right from the start, due to the global<br />
nature of the Internet and sewing<br />
blogs, I heard from lots of Australian<br />
customers who loved our patterns.”<br />
“A year or so after launching Oliver<br />
+ S, we added a discussion forum<br />
section to the website to allow our<br />
customers to get to know each other<br />
and to talk about sewing, ask and<br />
answer sewing questions, offer tips,<br />
etc. Now there is quite an active group<br />
on the discussion board, including<br />
sewists from all over the world who<br />
congregate digitally to talk about a<br />
range of topics. Many of the most<br />
active members are from Australia.”<br />
Liesl’s friend Laurel, who initially<br />
suggested she publish sewing<br />
patterns, now lives in Australia too.<br />
“Her son is the Oliver of Oliver + S,”<br />
explains the designer, “so I always<br />
feel a special connection to Australia,<br />
since our Oliver lives there!”<br />
Liesl’s daughter – the ‘S’ in Oliver<br />
+ S – is six-years-old now so too big to<br />
be the house model for her mother’s<br />
Oliver + S collection (the base size<br />
is a size 3T) but she is still the girl<br />
paper doll and she often serves as an<br />
assistant.<br />
42 spotlight.com.au www.facebook.com/gcqmag
creative lives •<br />
“Australians seem to be a very creative bunch,” she<br />
says. “Right from the start, due to the global nature<br />
of the Internet and sewing blogs, I heard from lots of<br />
Australian customers who loved our patterns.”<br />
“We visit her old preschool for<br />
all the Oliver + S fittings, so I let<br />
her choose whether to act as the<br />
photographer or help to dress the<br />
children when we go,” says Liesl.<br />
“And lately she’s really enjoyed<br />
the photography and styling, so I’ll<br />
certainly be curious to see what she<br />
does with all these experiences.”<br />
The experiences and influences that<br />
come together to fuel each of Liesl’s<br />
new collections are diverse.<br />
“Before I start a collection I tend<br />
to collect a lot of inspiration, pulling<br />
ideas from found objects, things that<br />
I’ve seen or photographed, scribbled<br />
notes and drawings in my sketchbook,<br />
and then I let them all marinate<br />
together for a while before something<br />
starts to come out,” explains the<br />
designer. “I have some giant bulletin<br />
boards in my studio where everything<br />
gets pinned up and moved around and<br />
stared at for a long time before I really<br />
start to work ... It’s difficult to explain<br />
what exactly happens in there, which<br />
is probably why my husband calls it<br />
nebulous, but it takes a lot of time and<br />
can be a lot of fun or quite painful at<br />
times. I guess that’s just typical of the<br />
creative process, right?”<br />
Even now, with being a wife and<br />
mother and running her own business,<br />
Liesl still “absolutely” finds time to do<br />
some sewing.<br />
“I may only get to sew a seam here<br />
and there, but I always have at least<br />
one project I’m working on and usually<br />
many more than just one,” she says.<br />
“I need to sew to feed my own creative<br />
impulses, and I feel strongly that a<br />
designer of sewing patterns should<br />
also be a sewer if I’m going to develop<br />
good patterns. Plus, I just love to sew!<br />
“I’ve been making lots of Lisette<br />
patterns for myself and every Friday<br />
on the Lisette blog we have a feature<br />
called ‘Wear your Style’ where we<br />
show how I or someone else has<br />
assembled an outfit around a Lisette<br />
style. It’s lots of fun to do, so I’m<br />
always thinking of different ways to<br />
sew up the patterns and to show the<br />
fabrics.” •<br />
LIESL’S TOP TIP FOR<br />
BEGINNER SEWERS:<br />
“I’ve taught a lot of beginning<br />
sewers and my advice to them is<br />
to be fearless. It’s just fabric, after<br />
all! Take a chance, try something<br />
you’ve never tried, and you’ll learn<br />
something new. It’s the best way to<br />
develop new skills and knowledge<br />
and it’s not a terribly expensive<br />
pursuit, even if you make a mistake.<br />
It never hurts to take a class or read<br />
a sewing book but I’ve found that<br />
experimentation will teach you all<br />
sorts of great things.”<br />
www.sewlisette.com<br />
@<br />
Get Creative Quarterly Autumn 2012 43
So much more than just edges with the 3034D Overlocker<br />
Sew seams, trims excess fabric and overlocks raw edges, all in one easy step. Featuring 3 or 4 thread<br />
cut-and-sew over lock stitches, easy to-follow threading and F.A.S.T. lower looper threading system.<br />
With the free-arm/flat bed convertible sewing surface for easy control when over locking cuffs and<br />
sleeves, you’ll save time and produce professional results.
make it •<br />
e<br />
overlocked<br />
scarf<br />
Materials<br />
Brother 3034D overlocker (using rolled hem feature)<br />
Lightweight fabric 30cm x 115cm<br />
2 small squares of Velcro to blend with<br />
fabric colour<br />
3 reels matching thread<br />
Hand sewing needle with a large eye<br />
Scissors<br />
Pins<br />
Step 1 Set the overlocker to<br />
rolled hem stitch with blades<br />
disengaged then thread the<br />
machine.<br />
Step 2 Roll hem<br />
all four sides of the<br />
fabric, use hand sewing<br />
needle with a large eye<br />
to weave in any threads on<br />
the corners back into the<br />
rolled hem.<br />
Step 3 Measure 23cm from<br />
each end along the top edge and<br />
mark with a pin. Measure 6.5cm<br />
from each end along the bottom<br />
edge and mark with a pin. Create<br />
six pleats along the angle between<br />
the pins on the left-hand side until the<br />
pins meet. Pin and sew the Velcro in<br />
place catching in the pleats. Repeat for<br />
the right-hand side. •<br />
23cm<br />
23cm<br />
6.5cm<br />
Bottom<br />
6.5cm<br />
Get Creative Quarterly Autumn 2012 45
• AQC news<br />
Below clockwise: ‘Pemberley’ (detail) by Katrina<br />
Hadjimichael, ‘Garden Party’ by Philippa Naylor &<br />
‘Northern Lights’ by Rita Hutchens.<br />
AQC<br />
question time<br />
The Australasian Quilt Convention<br />
(AQC), now in its eighth year, comes<br />
to Australia again in 2012, from April<br />
12 to 15 at Melbourne’s historic<br />
Royal Exhibition Building. Judy<br />
Newman, Craft Consultant and AQC<br />
organiser, answers a few questions<br />
and explains what the 15,000<br />
expected attendees will discover in<br />
the aisles and classrooms of this<br />
annual celebration of the stitch:<br />
GCQ: How has the quilting scene<br />
in Australia changed since AQC first<br />
began?<br />
Judy: Australian quilters have<br />
become more acknowledged and<br />
highly regarded, and the standard of<br />
knowledge of quilters in classes is<br />
high. I think that quilters in Australia<br />
also recognise the quality of our local<br />
tutors; international tutors are no<br />
longer always the first to book out<br />
- bookings are more evenly spread<br />
across the entire tutor faculty.<br />
GCQ: What are some of the<br />
highlights this year in terms of the<br />
tutor programme?<br />
Judy: It’s hard to pick - the tutors<br />
are all fabulous and that’s why they<br />
were selected. Noriko Endo is the first<br />
Japanese tutor we’ve had and her<br />
work is wonderful. There are a lot of<br />
excited people booked into the four<br />
day ‘masterclass’ with Kay Haerland,<br />
all looking forward to making some<br />
fantastic landscape quilts. Philippa<br />
Naylor from the UK is highly acclaimed<br />
and we haven’t seen her before so<br />
we are looking forward to her classes<br />
and to seeing her quilts. Sue Daley<br />
and Katrina Hadjimichael are teaching<br />
beautiful quilts with a traditional<br />
flavour and, at the other end of the<br />
spectrum and definitely not traditional,<br />
is Lesley Riley with her textile art<br />
techniques. Lesley has loads of clever<br />
things to teach. Lesley is teaching on<br />
two days but will be demonstrating on<br />
a stand in the AQC Expo on the other<br />
days.<br />
GCQ: What are your top tips for<br />
getting the most out of AQC for the<br />
first time attendee?<br />
Judy: I would suggest jump in<br />
and book a Gold Pass - you get to<br />
experience the classes, the lunches<br />
and all the functions in the most<br />
economical way. Some people book<br />
a Gold Pass but leave one day free of<br />
classes so they can go shopping and<br />
that can be a good idea too. There are<br />
a few people who are concerned about<br />
coming to the Gala Dinner alone but<br />
we assure them they will be seated<br />
with other quilters and I’m sure they<br />
won’t be lonely - everyone is friendly<br />
and out to have fun.<br />
If full day classes aren’t your thing,<br />
there are plenty of short seminars to<br />
do and hands-on sessions. Of course<br />
the shopping is fantastic and the Quilt<br />
Show is a unique opportunity to see<br />
high quality quilts - many that will not<br />
be seen anywhere else in Australia.<br />
GCQ: Could you tell us a little about<br />
the Travelling Friendship Quilt?<br />
Judy: Eight empty suitcases left<br />
Maleny, Queensland, in January<br />
2011 for a one-year journey around<br />
Australia, returning full of completed<br />
blocks which are then being made<br />
into a friendship quilt. The quilt should<br />
prove to be an interesting snapshot of<br />
women’s lives around the country. We<br />
plan to tour it at all of our Craft & Quilt<br />
Fairs in 2012 so if people visit www.<br />
craftfair.com.au they will be able to<br />
check if it is coming to a city nearby.<br />
GCQ: If you could bring anything in<br />
the world to Australian stitchers for a<br />
future AQC - if time and money were<br />
not in the equation - what would be<br />
your dream acquisition?<br />
Judy: I’d love to bring more<br />
traditional American quilts - old ones<br />
- and also modern quilts from Japan.<br />
I think vintage American quilts have<br />
such a lot of homeliness and classic<br />
beauty and the Japanese ones are<br />
loved for their intricacy and artistic<br />
composition. The detail that many<br />
modern Japanese quilters have in their<br />
work is astounding. •<br />
www.aqc.com.au<br />
@<br />
EXTRA EXTRA<br />
Don’t miss the Craft and Sewing<br />
Shows in 2012 which are touring<br />
the new exhibition ‘Beneath the<br />
Southern Sky’ and also featuring<br />
Brenda Gael Smith as guest artist.<br />
www.craftandsew.com.au<br />
46 spotlight.com.au www.facebook.com/gcqmag
new season product •<br />
DS Quilts Collection<br />
Now available exclusively to <strong>Spotlight</strong><br />
in Australia.<br />
See the fabulous DS Quilts Collections in store now –<br />
Salty Aire, Windy Roads, Picnic and Fairground.<br />
Denyse Schmidt has set the quilting<br />
world on fire. Her fresh, modern<br />
approach to this timeless craft has<br />
inspired a whole new generation of<br />
sewers and quilters. Denyse is a<br />
former graphic designer and graduate<br />
of the Rhode Island School of Design.<br />
Denyse has been sewing since her<br />
mother taught her as a young girl. As<br />
a professional seamstress, Denyse<br />
has stitched everything from tutus<br />
and bishop’s miters, to fine clothing.<br />
Not merely confined to beds, Denyse<br />
Schmidt’s Couture quilts have recently<br />
been featured in the Ralph Pucci<br />
International Gallery Nine in New York<br />
City and the University of Bridgeport’s<br />
Arnold Bernhard Center Gallery, among<br />
many others.<br />
A trailblaser in the current<br />
Modern Quilt movement, Denyse<br />
has inspired a new type of quilter –<br />
young, unconventional, cutting edge,<br />
contemporary. Her unique pairing of<br />
fresh, modern colours and fabrics with<br />
traditional quilt patterns results in<br />
singular designs, instantly recognisable<br />
as Denyse Schmidt Quilts. Her studioproduced<br />
patterns for the home crafter<br />
which include ‘Single Girl’ and ‘Stacking<br />
the Odds’, are at once fresh and rooted<br />
in tradition.<br />
Producing both custom and couture<br />
quilts since 1996, Denyse Schmidt<br />
Quilts continues to grow. Her licensing<br />
partnerships include books and<br />
stationery with Chronicle Books, and<br />
a new book – featuring twenty of her<br />
favorite traditional quilt patterns – will<br />
be published in 2012 by STC Craft.<br />
Her modern line of quilts for Denyse<br />
Schmidt Designs for Sarita Handa are<br />
sold in specialty boutiques worldwide<br />
and through catalogues including Crate<br />
and Barrel, Pottery Barn, Land of Nod,<br />
Sundance, Neiman Marcus, Maine<br />
Cottage Furniture and ABC Carpet and<br />
Home. Denyse designs a vintage-inspired<br />
fabric line for independent shops with<br />
Free Spirit/Westminster/Rowan, and<br />
her newest venture – a fabric collection<br />
designed especially for specialty chains<br />
for Fabric Traditions. Her first quilt<br />
pattern for McCall Craft will launch in<br />
spring 2012.<br />
A gifted teacher, Denyse inspires<br />
new as well as seasoned crafters<br />
with her frequent touring and homebased<br />
workshops. Her ‘Improvisational<br />
Patchwork Workshop’ introduces<br />
students to her intuitive approach to<br />
quilting. Her encouragement of risktaking<br />
and exploration in class reveals<br />
students’ creativity in fresh and<br />
surprising ways.<br />
Raised in a textile mill town in central<br />
Massachusetts, Denyse’s studio is<br />
located in the historic American Fabrics<br />
Building in Bridgeport Connecticut. •<br />
Please note: Due to varied buying patterns throughout Australia and New Zealand some stock may vary between<br />
stores or sell out. Ask a <strong>Spotlight</strong> employee at your nearest store for the best alternative.<br />
Get Creative Quarterly Autumn 2012 47
• make it<br />
e<br />
Cat in the hat<br />
QUILT<br />
Dr Seuss licensed quilting<br />
fabrics now at <strong>Spotlight</strong><br />
48 spotlight.com.au www.facebook.com/gcqmag
make it •<br />
A<br />
B<br />
C<br />
D<br />
E<br />
F<br />
G<br />
H<br />
I<br />
Quilt measures: 43” x 47”<br />
(109cm x 119cm)<br />
Materials<br />
Fabrics are from ‘Dr Seuss’ range<br />
Dr Seuss panel – Fabric A<br />
40cm Fabric B – Cat in the Hat Mess<br />
(yellow)<br />
50cm Fabric C – Cat in the Hat Spot<br />
(blue)<br />
30cm Fabric D – Cat in the Hat Wavey<br />
Stripe<br />
40cm Fabric E – The Cat in the Hat<br />
Words (red)<br />
40cm Fabric F – Celebrate Seuss Words<br />
(multi) for binding<br />
1.3m Fabric G backing– Cat in the Hat<br />
Allover (blue)<br />
20cm Prima Homespun – marine (H)<br />
20cm Prima Homespun – white (I)<br />
1.3m Sew Easy cotton/bamboo batting<br />
Matching Gütermann 100% cotton<br />
thread<br />
Rotary cutter, mat & quilters rulers<br />
Quilting pins, tape measure<br />
Scissors, seam ripper<br />
Hand needle<br />
Sewing machine with ¼” foot and<br />
walking foot<br />
All fabrics should be 100% cotton,<br />
washed & pressed.<br />
¼” seam allowance used throughout<br />
unless otherwise indicated.<br />
Read all instructions carefully before<br />
commencing the quilt.<br />
All strips are cut across the width of<br />
fabric unless otherwise stated.<br />
BLOCKS<br />
1. Fussy cut ten blocks from the panel.<br />
Arrange into 3 rows – 3 blocks in top<br />
row, 4 narrow blocks in middle row and<br />
remaining 3 blocks in bottom row.<br />
2. Trim the 3 blocks in top row to the<br />
same height. Trim the 4 blocks in the<br />
middle row to the same height.<br />
3. Cut 2½” strips from marine and<br />
white homespun and use to add<br />
borders to blocks in bottom row. Trim<br />
on an angle making all 3 blocks the<br />
same height.<br />
SASHING<br />
4. From Fabric B cut 3 x 4½” wide<br />
sashing strips the height of the blocks<br />
in the middle row. Arrange blocks in<br />
desired order and sew one sashing<br />
between blocks 1 and 2, and one<br />
between 3 and 4. Sew 3rd sashing<br />
between blocks 2 and 3. Press seams<br />
to sashings.<br />
5. From Fabric A cut 2 x 4½” wide<br />
sashing strips the height of the blocks<br />
in the top row. Arrange blocks in<br />
desired order and sew one sashing<br />
between blocks 1 and 2, the 2nd<br />
sashing between blocks 2 and 3. Cut 2<br />
x 3½” sashing strips the height of the<br />
blocks and sew one to each end of the<br />
row. Trim row to be the same length as<br />
the middle row.<br />
6. From Fabric A cut 2 x 5¼” sashing<br />
strips the height of the blocks in the<br />
bottom row. Arrange blocks in desired<br />
order and sew one sashing between<br />
blocks 1 and 2, the 2nd sashing<br />
between blocks 2<br />
and 3. Trim row to<br />
be the same length<br />
as the middle row.<br />
7. From Fabric C cut<br />
2 x 4½” strips. Sew<br />
one strip between<br />
the top and middle<br />
rows and the other<br />
strip between the<br />
middle and bottom<br />
rows.<br />
BORDERS<br />
8. From Fabric D<br />
cut 4 x 3½” strips.<br />
Sew one border<br />
strip to each side<br />
of the quilt. Press<br />
seams towards<br />
border and trim off<br />
any excess fabric.<br />
Sew remaining border strips to the top<br />
and bottom of the quilt, press and trim<br />
off any excess fabric.<br />
QUILTING<br />
9. Layer backing, batting and quilt top<br />
together and baste. Quilt as desired.<br />
FINISHING<br />
10. From Fabric E cut 5 x 2½” strips<br />
for binding. Join the strips on the bias<br />
to make one long strip. Press in half<br />
lengthwise and bind mitering corners.<br />
Attach a label or sign and date your<br />
quilt. •<br />
Introducing the new<br />
licensed quilting range<br />
The new Dr Seuss licensed quilting<br />
fabrics are ideal for a fun children’s<br />
quilt as well as cheeky library bags &<br />
gorgeous nappy pants. Check back<br />
regularly for more family favourites<br />
in the <strong>Spotlight</strong> licensed quilting<br />
range. Coming soon: Beatrix Potter’s<br />
beloved Peter Rabbit and Australian<br />
favourite, Gumnut babies.<br />
Get Creative Quarterly Autumn 2012 49
• make it<br />
i<br />
beautiful batik<br />
Quilted tote bags are as practical as they are<br />
pretty. Easy to store, wash and care for, with<br />
enough strength to carry a decent swag of<br />
goodies, you’ll find yourself making these for<br />
yourself, family & friends.<br />
50 spotlight.com.au www.facebook.com/gcqmag
make it •<br />
Materials<br />
60cm batik fabric – autumn tones<br />
1.2m batik fabric – neutral tones<br />
70cm x 250cm quilters muslin<br />
1m x 90cm medium weight iron-on<br />
pellon<br />
Gütermann variegated sulky thread<br />
– autumn tones<br />
Gütermann quilting thread – neutral<br />
tone<br />
Rotary cutter, ruler & cutting mat<br />
Sewing machine with drop feed dog<br />
feature<br />
Darning/free-motion foot for machine<br />
Iron<br />
Quilters safety pins<br />
Step 1 Cut a piece of the neutral<br />
batik fabric 35cm x 55cm. Cut a piece<br />
of both quilters muslin and pellon<br />
slightly larger (approx 45cm x 65cm)<br />
than the batik then fuse the pellon to<br />
the muslin. With pellon right side up,<br />
centre the batik on top right side up.<br />
Use safety pins to secure the layers<br />
together.<br />
Step 2 Thread machine with<br />
neutral thread, attach darning foot and<br />
drop the feed dogs then set machine<br />
to straight stitch. Begin stitching<br />
in the centre of the piece and work<br />
towards the outer edges in circles<br />
approximately the size of a five cent<br />
piece. Continue stitching until the<br />
entire piece is quilted.<br />
Step 3 Cut a piece of autumn<br />
tone batik 80cm x 50cm. Cut a piece<br />
of both quilters muslin and pellon<br />
slightly larger (approx 90cm x 60cm)<br />
than the batik then fuse the pellon to<br />
the muslin. With pellon right side up,<br />
centre the batik on top right side up.<br />
Use safety pins to secure the layers<br />
together.<br />
Step 4 Thread the machine with<br />
the variegated sulky thread. Raise the<br />
feed dogs and replace the darning foot<br />
with the regular sewing foot. Begin<br />
straight stitching lines across the<br />
fabric at varying widths until the entire<br />
piece is quilted. Add some diagonal<br />
lines of stitching if desired.<br />
Step 5 Cut the neutral piece<br />
(top section) into two pieces each<br />
measuring 16.5cm x 48cm. Cut the<br />
autumn tone piece (bottom section)<br />
into two pieces each measuring<br />
35.5cm x 48cm. Place each top and<br />
bottom section together, right sides<br />
facing, pin and stitch together using<br />
1cm seam allowance. Press seams<br />
open. With right sides facing and<br />
matching seams at side, pin then sew<br />
bag pieces together along sides and<br />
across the bottom.<br />
To create the base, flatten out the<br />
bottom and match the side seam to<br />
the seam at the bottom of the bag.<br />
Pin together and mark 5.5cm down<br />
from the point and rule across to form<br />
a triangle to create an 11cm base<br />
for bag. Stitch across end then add a<br />
second row of stitching 5mm from the<br />
first. Trim seam to 1.5cm, cutting off<br />
the point. Repeat for the other end of<br />
the base. Turn right side out and press.<br />
Fold top edge over 4cm, press and pin<br />
in place.<br />
Step 6 For the handles cut two<br />
10cm x 80cm strips and two 4cm x<br />
80cm pieces of pellon. Fuse pellon to<br />
the centre of wrong side of the fabric.<br />
Fold one long edge of fabric over the<br />
pellon, press other long edge 1cm to<br />
the wrong side then fold over pellon.<br />
Stitch down the centre of the handle<br />
to secure then add one more row of<br />
stitching on each side approximately<br />
5mm from edges. Fold each end of<br />
handles over 2cm to the back and<br />
press. Stitch handles to front and back<br />
of the bag 10cm in from side seams<br />
aligning bottom of the handles with<br />
bottom of the top section of the bag.<br />
Step 7 To create lining for bag cut<br />
two 48cm x 52cm pieces from the<br />
neutral batik. Stitch side seams and<br />
bottom seam then create the base<br />
same as for the bag but do not turn<br />
right side out. Fold top edge over 4cm<br />
to wrong side and press. Insert lining<br />
into bag matching side seams, pin<br />
and stitch lining to bag around the top<br />
edge. •<br />
Note: Quilt the fabrics as much or as<br />
little as desired.<br />
What is Batik?<br />
Batik is the process of dyeing<br />
fabric that has patterns drawn on<br />
it with wax. The wax resists the<br />
dye, creating beautiful organiclooking<br />
finishes. It orginates from<br />
Indonesia and examples of the<br />
technique can be found everywhere<br />
from Asia to Egypt and Nigeria.<br />
For a gorgeous modern take on traditional prints, check out our ‘Earth’ & ‘Ocean batik fabrics, in store now.<br />
Please note: Due to varied buying patterns throughout Australia and New Zealand some stock may vary between stores or sell out.<br />
Ask a <strong>Spotlight</strong> employee at your nearest store for the best alternative.<br />
Get Creative Quarterly Autumn 2012 51
• product knowledge<br />
Tool talk<br />
1 5<br />
2 3<br />
4<br />
1.Beeswax & holder<br />
Used for hand quilting, this product<br />
keeps threads from tangling and helps it<br />
glide through fabric when hand sewing.<br />
2. Button hole spacer<br />
This little measuring tool has a couple<br />
of different uses. Most commonly you<br />
would use it at the sewing machine or<br />
with fabric spread on an ironing board<br />
to ensure your seams are uniform in<br />
size but also, of course, it’s for ensuring<br />
you’re creating an even amount of space<br />
between button holes and that you have<br />
enough room to get the button through<br />
the hole in the garment or object you’re<br />
sewing.<br />
3. Magnetic seam guide<br />
This little charmer helps you stitch<br />
even seams, tucks, and pleats without<br />
marking. It’s great if your eyesight’s not<br />
perfect but, really, can be useful to any<br />
sewer. You put the fabric against the<br />
edge<br />
of the guide and<br />
stitch away. You’ll always<br />
achieve uniform seam widths.<br />
Not for use on computerised<br />
machines.<br />
4.Loop turner<br />
This long wire with a tiny hook turns<br />
fabric ‘tunnels’ so you can create<br />
spaghetti straps, or other narrow cords<br />
or straps. A ‘must have’ for sewers the<br />
turner is also handy for anyone needing<br />
to retrieve elastic or cording that has<br />
gone ‘awol’.<br />
5. Hemming tape<br />
For beginner sewers and sewing<br />
emergencies – this is another essential<br />
in your sewing kit. Great for quick<br />
hemming jobs; you just iron it on. The<br />
double-sided adhesive on hemming tape<br />
creates a strong bond to last through<br />
repeated washes. It’s great for patching<br />
garments or for saving time when it<br />
comes to hemming curtains. •<br />
52 spotlight.com.au www.facebook.com/gcqmag
make it •<br />
e<br />
Button o’clock<br />
Materials<br />
21cm wooden embroidery hoop<br />
Bella! red fusion paper<br />
12 white buttons in assorted sizes<br />
Clock hands & clock movement<br />
Scissors<br />
Double-sided tape<br />
Tailors awl<br />
Step 1 Unscrew and remove<br />
the outer frame of embroidery<br />
hoop then apply a strip of doublesided<br />
tape around the outside<br />
of the inner hoop. Cut a circle of<br />
paper to fit around the inner hoop<br />
and fold over the edge of the<br />
hoop, cut short slits at the edge<br />
to ease the paper over the edge.<br />
Remove the backing paper from<br />
the tape and stick the paper in<br />
place.<br />
Step 2 Replace the outer<br />
frame and screw to secure in<br />
place. Attach buttons for numbers<br />
on the face of the covered hoop.<br />
Step 3 Mark the centre of the<br />
hoop and use an awl to poke a<br />
hole through the paper. Attach the<br />
clock movement and hands, put<br />
in a battery and set the time. •<br />
Option – Cover the inner hoop<br />
with fabric instead of paper.<br />
Get Creative Quarterly Autumn 2012 53
• make it<br />
i<br />
quilted<br />
cushion covers<br />
54 spotlight.com.au www.facebook.com/gcqmag
make it •<br />
Materials (for 1 cushion)<br />
8 x assorted spots & stripes fabrics<br />
60cm white Prima homespun<br />
60cm x 60cm square white quilters<br />
muslin<br />
60cm x 60cm square Sew Easy cotton/<br />
bamboo batting<br />
White Gütermann 100% cotton thread<br />
Rotary cutter, mat & quilters rulers<br />
Quilting pins, tape measure<br />
Scissors, seam ripper<br />
Sewing machine with ¼” foot &<br />
walking foot<br />
All fabrics should be 100% cotton,<br />
washed & pressed.<br />
¼” seam allowance used throughout<br />
unless otherwise indicated.<br />
Read all instructions carefully before<br />
commencing the quilt.<br />
CUTTING<br />
• From white homespun cut – two<br />
18½” x 15” pieces for cushion back<br />
and set aside; 8 x 5” squares; 4 x 2”<br />
squares (Block A) and 4 x 2½” squares<br />
(Block B).<br />
• From each of 4 stripe fabrics cut –<br />
two 2” x 5” strips (Block A) and 2 x 2”<br />
squares (Block A).<br />
• From each of 4 remaining spot/<br />
stripe fabrics cut – two 1¾” x 5”<br />
strips (Block B) and two 1¾” x 2½”<br />
rectangles (Block B).<br />
BLOCKS<br />
Block A – make 4<br />
1. Sew a 2” stripe fabric square (Block<br />
A) to one side of a 2” white homespun<br />
square. Sew the matching 2” stripe<br />
fabric square to the opposite side<br />
of the white square. Press seams to<br />
stripe fabric.<br />
2. Sew a 2” x 5” strip of the same<br />
stripe fabric to the top and bottom<br />
of step 1. Press seams to the stripe<br />
fabric.<br />
Block B – make 4<br />
3. Sew a 1¾” x 2½” spot/stripe fabric<br />
rectangle (Block B) to one side of a<br />
2½” white homespun square. Sew the<br />
matching 1¾” x 2½” spot/stripe fabric<br />
rectangle to the opposite side of the<br />
white square. Press seams to spot/<br />
stripe fabric.<br />
4. Sew a 1¾” x 5” strip of the same<br />
spot/stripe fabric to the top and<br />
bottom of step 3. Press seams to the<br />
spot/stripe fabric.<br />
FRONT<br />
5. Arrange blocks A and B alternating<br />
with white 5” squares as desired.<br />
6. Sew 4 blocks in each row together.<br />
Press seams in each row in opposite<br />
direction to row before.<br />
7. Sew rows together; press seams in<br />
one direction.<br />
QUILTING<br />
8. With batting on top of quilters<br />
muslin place cushion front on top of<br />
batting and smooth out any creases.<br />
Pin together in the centre of Blocks A<br />
and B and quilt as desired. Trim away<br />
excess batting and muslin.<br />
BACK<br />
9. Take the two 18½” x 15” pieces of<br />
white homespun and along one 18½”<br />
long edge of each piece, press under<br />
½” then another ½” and topstitch.<br />
Press.<br />
10. With front facing right side up place<br />
one back piece face down with raw<br />
edges aligned at top and sides and<br />
hemmed edge across the centre. Place<br />
remaining back piece face down on top<br />
aligning raw edges at bottom and sides<br />
with centre edge overlapping. Pin and<br />
sew together on all four sides using<br />
¼” seam allowance. Trim corners, turn<br />
through to right side and press. Place<br />
insert into cushion cover with back<br />
edges overlapping. •<br />
Block A<br />
Block B<br />
Block C<br />
Get Creative Quarterly Autumn 2012 55
• sew trends<br />
Starlet<br />
Film Noir<br />
SEW STORY<br />
<strong>Spotlight</strong>’s autumn winter fabric collections represent<br />
the hottest fashion trends, translated into weights and<br />
colours chosen specifically for Australasian climates.<br />
New fabrics at <strong>Spotlight</strong> this<br />
season reflect the more moderate<br />
climate we generally experience<br />
here as opposed to our European and<br />
North American fashion loving friends.<br />
As Tim Hanrahan, business manager<br />
in <strong>Spotlight</strong>’s Sew department<br />
explains, the season in our region<br />
can be quite short but we still want<br />
to take part in international fashion<br />
trends. To this end lightweight and<br />
trans-seasonal fabrics have been<br />
sourced that suit current fashion<br />
looks.<br />
Starlet, Pop Colour, Femme Fatale,<br />
The Hunter, The Free Spirit and<br />
Film Noir are the six fun collection<br />
names that have been designed for<br />
<strong>Spotlight</strong>’s autumn winter fashion<br />
fabric collections.<br />
Starlet takes sewers into the<br />
‘Mad Men’ era of the 1960s with looks<br />
like the classic Chanel boucle tweed<br />
knit jacket, lots of matching garments<br />
– skirts and jackets – in lovely peach<br />
and pinks. The fabrics in this collection<br />
are very textured and suits of colour<br />
can be worn in similar tones but in<br />
different textures. As Tim explains,<br />
these fabrics will be introduced slowly<br />
through autumn and winter and will<br />
remain a great choice for garments<br />
leading into summer.<br />
Pop Colour describes a group<br />
of colours and designs reminiscent<br />
of Warhol’s pop art days and the<br />
fabric designs of the ‘Mod’ era. On<br />
the floor at your local <strong>Spotlight</strong> store<br />
you’ll find loads of polyester sheers,<br />
plenty of clear colours and great<br />
geometric patterns. These designs<br />
suit homewares as much as garments<br />
so consider using ‘pops’ of colour<br />
throughout the house.<br />
Femme Fatale is part of a general<br />
return to grown-up, sophisticated<br />
and glamorous forms. Rich jewel-like<br />
colours such as gold and purple are<br />
presented in equally lustrous fabrics<br />
– velvet and textured pile in particular.<br />
Look at these fabrics for scarfs,<br />
cushions and bedspreads as well as<br />
complete garments. Tone down bright<br />
colours with attractive astrakhan<br />
collars or wide waist-cinching belts.<br />
The Hunter is another true<br />
winter collection that brings to mind<br />
images of wild green woods, bracing<br />
country walks and views through rain<br />
spattered windows. “This is a less<br />
serious version of the equestrian or<br />
hunting lodge looks we have seen<br />
previously,” says Tim. “There are lots<br />
of tonal classics here, tonal layering<br />
and an underlying free spirit.” Tweeds,<br />
herringbone, pinstripes, brushed felts<br />
and melton wool (95 per cent wool,<br />
five per cent nylon) can all be found<br />
in this collection. These are great for<br />
making jackets and heavy looking,<br />
light weight coats. And they’re much<br />
easier to sew than some of the satins<br />
and chiffons that have been popular in<br />
previous seasons. “These will be great<br />
for homewares too,” says Tim.<br />
Also in The Hunter area you will find<br />
trims – faux snakeskin for example –<br />
as well as iron on motifs (black and<br />
gold tattoo designs), real brocade and<br />
jacquards and a lot of faux fur. Much<br />
of the fur is now in pre-cut formats so<br />
you can buy as much or as little as you<br />
like (perfect for adding to collars and<br />
cuffs etcetera).<br />
The Free Spirit is a look tailormade<br />
for the creative rebels out there.<br />
Decorative patterns, hand crafted<br />
elements, raw finishes and tribal<br />
influences define this collection. Ikat<br />
and chunky yarn dyed patterns fall<br />
within this collection as do natural<br />
fibres including linen. The colour<br />
pool includes green, blue, ochre, tan,<br />
orange and gorgeous fuchsia.”<br />
56 spotlight.com.au www.facebook.com/gcqmag
sew trends •<br />
SIMPLICITY, defined ...<br />
While in the USA recently <strong>Spotlight</strong>’s Sew team met<br />
with Judy Raymond, the senior vice president of brand<br />
management and licensing for the Simplicity Creative Group.<br />
Blown away by the remarkable trend-setting standards now<br />
found within Simplicity patterns, and inspired by Judy’s<br />
passion about the future of home sewing, we asked her to<br />
explain something of the Simplicity philosophy...<br />
Film Noir is the well dressed villain<br />
in the autumn winter fashion story. All the “Our approach is essentially<br />
sewers who hated the maxi dress and to offer designs that attract the<br />
the free-flowing and billowy silhouettes fashion forward gals (of all ages)<br />
of recent summers will be rubbing their who really respond to trends, while<br />
hands together with glee over this trend. keeping our long term customer on<br />
<strong>Spotlight</strong> loves ‘killer’ fashion too so<br />
board, satisfying her fashion needs<br />
the Sew department is presenting the and raising her sewing skill level,”<br />
colour palette – silver, black, ash and says Judy. “For our design team<br />
charcoal – plus the trims – faux leather, it’s a constant, massive editing job<br />
houndstooth – to bring this look to life. to understand the trends and their<br />
“Classic patterns, conservative but with a evolution from season to season<br />
subversive twist, is how I would describe (or decade to decade). The trends<br />
this trend,” says Tim. “I’d love to see<br />
are everywhere and accessible to<br />
confident sewers trying their hand at stab everyone so it’s important to be in<br />
stitch jackets that shape and flatter, as sync with our shoppers.<br />
well as the androgynous suits and so<br />
“Our ‘Inspired by Project<br />
forth that will be dominant. “Wait til you<br />
see our blown out hounds tooth patterns.<br />
Once again a lot of these fabrics can be<br />
used in garments but would make great<br />
bags and soft furnishings.” •<br />
Please note: Due to varied buying patterns throughout Australia and New<br />
Zealand some stock may vary between stores or sell out. Ask a <strong>Spotlight</strong><br />
employee at your nearest store for the best alternative.<br />
Runway’ collection has really<br />
pushed the pattern envelope (so<br />
to speak), enabling us to provide<br />
the latest and greatest looks with<br />
some intricate fashion details<br />
that make each item special. Our<br />
‘Suede Says’ collection (as seen<br />
in issue four of GCQ) is super cool,<br />
young and hip ... and Suede is<br />
out there, meeting, greeting and<br />
teaching, so he’s been a terrific<br />
partner. And – news flash - we’ve<br />
just signed the season five Project<br />
Runway winner, Leanne Marshall,<br />
to design for Simplicity! Leanne’s<br />
looks will be featured in our spring<br />
2012 collection with an emphasis<br />
on the prettiest party dresses with<br />
a couture touch.”<br />
Judy says that another important<br />
activity for Simplicity is sewing<br />
education. “We really must enable<br />
and empower more people to sew,<br />
especially teens,” she explains.<br />
“Sewing does so much for self<br />
esteem so we are very involved<br />
with sewing camps and classes -<br />
getting the word and techniques<br />
out there.”<br />
Judy thinks the next five<br />
years will bring home sewing<br />
to even greater levels. ‘Apps’<br />
(downloadable applications for<br />
phones, laptops and more) related<br />
to sewing will grow and sewing<br />
machines will be more fun than<br />
ever, featuring touch pads and<br />
maybe even voice activation.<br />
“Creativity will remain the<br />
number one reason to sew,” she<br />
says. “Economics will become<br />
more important, not in the sense<br />
of ‘saving by sewing’ but in the<br />
sense of having more stuff through<br />
sewing and being a force for self<br />
expression.” •<br />
Get Creative Quarterly Autumn 2012 57
• creative people<br />
dream job<br />
Above: The reversible wrap<br />
Ever stood entranced in front of a range<br />
of mouth-watering fabrics, as if in a<br />
sweetie shop, thinking about how you<br />
could put them together?<br />
Designer and teacher Monica Poole is no<br />
different – she even dreams about quilt<br />
and fashion designs and follows them up<br />
the next day.<br />
“I recently dreamt about a little<br />
girl’s skirt – it had a pocket with frills<br />
and a little A-line skirt with a frill<br />
around the hem,” says the mum of<br />
two teenagers who spends three days<br />
a week teaching and the other two at<br />
home working on designs. That dream<br />
is now featured on one of her many<br />
sewing patterns.<br />
“I often dream about designs,<br />
then I’ll source the fabric, come<br />
to the studio and start cutting up<br />
and drawing and<br />
taking notes and<br />
photographs,” says<br />
Monica, who was<br />
taught to sew as<br />
a teenager by her<br />
Mum and later went<br />
on to study pattern<br />
making and design<br />
and worked as a<br />
designer before her<br />
daughter, now 18,<br />
was born.<br />
She is now<br />
based on the Central Coast in NSW,<br />
designing from her home studio,<br />
and has a website: www.moonshinedesigns.com.<br />
Monica loves cotton quilting fabric.<br />
She uses it in most of her designs,<br />
ranging from funky bags and colourful<br />
reversible wrap skirts to quilts that<br />
“I often dream about<br />
designs, then I’ll source<br />
the fabric, come to<br />
the studio and start<br />
cutting up and drawing<br />
and taking notes<br />
and photographs”,<br />
says Monica<br />
make you want to reach into your<br />
stash and get sewing.<br />
Her first book, Quilt As You Go - The<br />
Moonshine Way, makes quilting even<br />
easier. Often a problem for quilters<br />
(novices and devotees) is they spend<br />
so much time doing the creative stuff<br />
– the patchwork and/or appliqué on<br />
the top of the quilt – that finishing off<br />
the quilt with batting, the back and<br />
the binding seems a chore.<br />
The technique of quilt as you go<br />
– at the same<br />
time as piecing<br />
the top of the<br />
quilt, you also<br />
sew together the<br />
three layers of<br />
top, batting and<br />
back so when<br />
you finish all you<br />
need to do is the<br />
binding round the<br />
sides - is by no<br />
means exclusive<br />
to Monica as<br />
it’s been used by quilters all over the<br />
world for generations.<br />
But her designs using the<br />
technique – sewing ‘trams’ of bias<br />
strips with fusible web over the<br />
exposed seams on the top of the<br />
quilt - offer the possibility of throwing<br />
together a quilt in just a day or<br />
two. Yes, you’d have to spend the<br />
58 spotlight.com.au www.facebook.com/gcqmag
creative people •<br />
Left: The day tripper. Below from top:<br />
Fancy Free and Peacock’s Garden quilts..<br />
Monica loves cotton quilting fabric. She uses it in<br />
most of her designs, ranging from funky bags and<br />
colourful reversible wrap skirts to quilts that make<br />
you want to reach into your stash and get sewing.<br />
previous day doing all the cutting and<br />
organising of the bias tape, but once<br />
you start sewing, the hard bit is over.<br />
To make the quilts she uses a<br />
one-inch bias tape, which she makes<br />
with her Clover bias tape maker. Other<br />
favourite tools for sewing in general<br />
include her Japanese Kai scissors –<br />
she likes the micro serration which<br />
stops the fabric from slipping and<br />
uses the larger size for cutting fabric.<br />
Like all sewers, she has a favourite<br />
machine and hers is the Pfaff<br />
Expression 4. Most-used presser feet<br />
are the open toe for appliqué, the<br />
quarter inch for piecing, the walking<br />
foot for quilting, the zipper foot for<br />
piping and the ruffler foot for sewing<br />
frills on hems. She also loves her<br />
overlocker for the professional finish<br />
on seams.<br />
For those new to quilting, she<br />
suggests buying a cutting board,<br />
rotary cutter and ruler (sold at<br />
<strong>Spotlight</strong>) and starting off by cutting<br />
out squares and sewing them<br />
together. She’s seeing a “sewing<br />
revolution” with younger women<br />
coming to quilting and wanting to sew<br />
and make their own home decorations<br />
as well as kids’ clothes.<br />
Her day starts at 5am with two<br />
hours spent writing up patterns in her<br />
home studio, before getting her son<br />
ready for school. She has an ideas<br />
board where she’ll pin fabrics for<br />
inspiration, or she lays rolls of fabrics<br />
on the floor to get a feel of what<br />
combinations work best.<br />
Ask her whether her studio is tidy,<br />
she laughs. “Sometimes – although<br />
every time I start a new project I tidy<br />
my sewing room so I’m working in a<br />
clean environment.” Fabric is stored<br />
in big plastic tubs, “though all of my<br />
more recent ones are sitting on a<br />
shelf in the studio – that way I can<br />
look at them all the time and think<br />
about how I’ll use them,” she adds.<br />
Threads are kept in a large plastic<br />
fruit bowl so she can quickly find the<br />
ones she wants. And presser feet for<br />
her sewing machine are stored in a<br />
little sewing box. “I love my special<br />
equipment and I keep it nicely,” she<br />
About our columnist<br />
Sydney-based Deb Cleveland is a journalist<br />
who writes mostly on finance but is mad<br />
about sewing. Taught by her mum Patti to sew<br />
as a teenager in Cape Town, South Africa,<br />
she sews quilts, clothes and has too many<br />
UFOs (unfinished objects) to count.<br />
says with a smile. •<br />
Get Creative Quarterly Autumn 2012 59
• design news<br />
RMIT students<br />
design nursery fabrics for <strong>Spotlight</strong><br />
b l o g s<br />
& sites to watch.<br />
Last year <strong>Spotlight</strong> was a proud<br />
participant in RMIT’s Young Essentials<br />
Project (YEP), a programme aimed<br />
at providing merchandising students<br />
with the opportunity to work to a<br />
commercial brief for leading Australian<br />
fashion retailers. <strong>Spotlight</strong> gave one<br />
group of students the opportunity to<br />
see their class work transformed into<br />
a real product line. This innovative<br />
course gives students a broad based<br />
understanding of critical areas such<br />
as fashion product development,<br />
supply chain, marketing, CAD/IT,<br />
merchandising and planning.<br />
Right: Christine Clark, Quentin Gracanin,<br />
Robyn Lyons & Zac Fried.<br />
Left: (From left to right)<br />
Rachel Alfonsi, Francesca<br />
Gelai, Cheyney Herron,<br />
Jordana-Lee Pearce, Alicia<br />
Chan and Rima Al-Bay are<br />
the members of HATCH,<br />
students from the Royal<br />
Melbourne Institute of<br />
Technology’s Associate<br />
Degree in Fashion and<br />
Textiles Merchandising.<br />
Their collection of printed<br />
fabrics for the nursery<br />
will be produced and for<br />
sale in <strong>Spotlight</strong> stores<br />
nationally in February and<br />
it will be called HATCH.<br />
The students behind the HATCH fabric<br />
design are aged 19 to 23. Their work was<br />
chosen to go into production by <strong>Spotlight</strong><br />
because, after an intensive feedback<br />
process, it so exactly matched the<br />
company’s brief. According to the students,<br />
the HATCH concept is “based on kids and<br />
creativity and what they (the consumers)<br />
actually want to buy”.<br />
Left: Part of the presentation kit from HATCH.<br />
“Our Mums are certainly<br />
proud and can’t help but<br />
tell everyone they know!”<br />
says the HATCH team.<br />
www.pepperdesignblog.com (a<br />
collage of handmade projects<br />
and DIY ideas – great for home<br />
renovators), sallycampbelltextiles.<br />
blogspot.com (after 25 years<br />
designing sets and costumes for<br />
Australian films, this blogger now<br />
designs handmade textiles), www.<br />
quiltdad.com (delightful musings<br />
of a New York father of three who<br />
loves to make quilts), ispy-diy.<br />
blogspot.com (Manhattan’s Jenni<br />
works at a fashion magazine and<br />
uses DIY techniques to emulate<br />
the fashion looks of New York’s<br />
most stylish women), littlesnoring.<br />
blogspot.com (one Tassie gal’s<br />
collections of favourite ideas<br />
to fuel her jewellery, toy sewing<br />
and homeware making hobbies),<br />
handmaderomance.blogspot.com<br />
(Melbourne graphic designer posts<br />
about her own handmade creations<br />
as well as inspiration), yarnchick.<br />
blogspot.com (irreverent sci-fi<br />
loving crochet addict).<br />
60 spotlight.com.au www.facebook.com/gcqmag
100% DANCE<br />
100% DANCE<br />
100% DANCE<br />
Designing for dress ups at home<br />
or outfitting a complete dance<br />
troupe, gymnastic team, callisthenics<br />
team or school production, <strong>Spotlight</strong> is<br />
now home to all your dance needs.<br />
With our 100% Dance range you<br />
can create the simplest to the most<br />
extravagant of costumes. Our range has<br />
been designed in collaboration with one<br />
of the most respected importers in the<br />
business.<br />
Digital<br />
Spandex<br />
Polyester<br />
Chiffon<br />
Glitter Chiffon<br />
Two Way<br />
Stretch Velvet<br />
Shiny Nylon<br />
Spandex<br />
Printed Spot<br />
Spandex<br />
Two Way<br />
Stretch Mesh<br />
Glass Organza<br />
Start with a basic Shiny Nylon Spandex,<br />
add our exclusive Digital range, drape<br />
with our matching chiffon and trim with<br />
our satin, finish it off with our gorgeous<br />
glass organza and you’re ready to<br />
perform. We also offer a fabulous fashion<br />
rotation in Glitter Velvets and Hologram<br />
Spandex’s. These ranges change four<br />
times a year so get in quick.<br />
<strong>Spotlight</strong> backs up this comprehensive<br />
fabric collection with patterns and relevant<br />
haberdashery including sequins, rhinestones,<br />
feathers, netting, limelight trims and more.<br />
Polyester<br />
Satin<br />
Polyester<br />
Chiffon<br />
Shiny Nylon<br />
Spandex<br />
For your nearest store visit<br />
spotlight.com.au, spotlight.co.nz or spotlight.com.sg
Prima plain dyed cotton homespun is<br />
the quilter’s first choice when selecting a<br />
premium fabric.<br />
With over 50 shades available in store,<br />
explore and co-ordinate with our large range<br />
of colours and prints.<br />
Prima homespun is available by the metre,<br />
as well as in flat fats and fabric bundles.<br />
Our fabric contains mercerised cotton<br />
that has been pre-shrunk, quality tested<br />
and dyed with superior dyestuffs.<br />
Available exclusively at<br />
email: sales@caprice.com.au<br />
Phone: 03 99 222 500
creative living •<br />
we’re in a transitional period of awareness<br />
So does this mean consumers, her<br />
readers, are truly interested in the<br />
provenance of their garments?<br />
“Yes and no,” she says. “I don’t<br />
have any statistics, of course, but I<br />
feel we’re in a transitional period of<br />
awareness, with half of the world still<br />
not giving a toss where their polyester<br />
comes from ... and the other half<br />
seeing the issues in a sophisticated,<br />
futuristic and more caring way.”<br />
The latter half, of which she<br />
considers herself a part, are “trying<br />
to slow down spending on fad fashion<br />
and thinking more about quality, backorganic<br />
& ethical...<br />
ETHICS – THE NEW TREND IN FASHION<br />
There was a time when the words ethics and fashion had no business being neighbours in the same<br />
sentence. There was a time when the world’s poorest people would have no involvement with the world’s<br />
richest fashion houses. There was a time when discarded materials or ‘recyclable’ objects would never make<br />
their way to the windows of department stores. There was a time when cashed-up fashion consumers cared<br />
only how their garments looked, not what their impact on the earth and its inhabitants was. Times change...<br />
These days we’re expected to<br />
know the origins of so many of the<br />
products we use, from the milk we<br />
serve our children to the wood that’s<br />
used in our kitchen tables. And<br />
fashion is no different. Each week we<br />
learn of new organisations that are<br />
focussing on the behind-the-scenes<br />
of fashion production and many<br />
designers are doing amazing things<br />
to give back to the communities<br />
around the world who have long<br />
provided labour in the name of style.<br />
Jan Breen Burns, fashion editor<br />
at The Age newspaper in Melbourne,<br />
says the ethical fashion concept “has<br />
been kicking around for a decade or<br />
so” but used to be very niche and the<br />
products often somewhat anti-fashion<br />
- “hippy sacks” as she calls them.<br />
“In the past four to six years there’s<br />
been a steady increase in the number<br />
of good boutique fashion brands also<br />
mentioning ‘eco-friendly’ practices and<br />
organic and ethical processes in their<br />
marketing material,” says Jan. “I think<br />
this is a natural consequence of global<br />
conversations getting louder around<br />
pollution and toxic industries, climate<br />
change, Armageddon etc... .”<br />
Get Creative Quarterly Autumn 2012 63
• creative living<br />
fashion &<br />
sustainability...<br />
story and the life-cycle of clothes, and<br />
are willing to pay more for it all”.<br />
The Clean Clothes Campaign is an<br />
example of a group concerned with<br />
the rights and health of workers in<br />
the global garment and sportswear<br />
industries. It raises issues with<br />
governments, the media and<br />
consumers and encourages fashion<br />
producers to examine their practices.<br />
Such was the case when Versace,<br />
Gucci and Levi decided to stop using<br />
sandblasted denim. The sandblasting<br />
that gives jeans a used or worn look<br />
also contributes to a potentially lethal<br />
pulmonary disease in the workers who<br />
carry it out.<br />
On the opposite side of the coin are<br />
the individual designers or labels that<br />
are going directly into impoverished<br />
communities and working with them<br />
to create decorative components or<br />
complete garments and accessories<br />
that benefit everyone involved.<br />
The Polly & Me collection, ‘Peace<br />
of Cake’, was launched at the 2011<br />
Rosemount Australian Fashion Week.<br />
Australian designer Cath Braid began<br />
Polly & Me in 2003 as a social<br />
enterprise, working with around 1000<br />
female embroiderers in 19 centres<br />
across the remote valley of Chitral<br />
in Pakistan, to create the signature<br />
hand-embroidered cloth that adorns<br />
the label’s handbags, clutches and<br />
wallets. The aim is to encourage rural<br />
artisans to utilise their traditional craft<br />
in a contemporary way, promoting selfsufficiency<br />
and dignity.<br />
After the<br />
catastrophic 2010<br />
earthquake in Haiti<br />
American designer,<br />
Donna Karan,<br />
visited the island.<br />
According to Jan Breen Burns,<br />
other local fashion designers working<br />
hard to do the right thing are Alex<br />
Trimmer from Sosume, Rachel Bending<br />
from Bird Textiles and Lisa Gorman<br />
(Gorman).<br />
“These are all interesting designers<br />
who could tell you about the struggle<br />
to stick to your green principles, and<br />
the kind of compromises they will and<br />
won’t make, to compete in a market<br />
that still privileges fast, cheap, fashion<br />
with no ethics to speak of,” says Jan.<br />
Overseas the trend is developing<br />
in exciting ways too. Last year<br />
Deana Bianco, the UK-based editor<br />
of Runawaynow.com, a trend setting<br />
travel website, wrote an article about<br />
Ilaria Venturini Fendi (from the famous<br />
Fendi Italian fashion house) who was<br />
creating handbags made 100 per cent<br />
in Africa.<br />
“I wrote the article for the Eco<br />
Tourism section of our site,” explains<br />
Deana. “I write with my friends in<br />
mind; places they want to visit, things<br />
they want to do. People want to travel<br />
but they want to know they aren’t<br />
leaving a carbon footprint wherever<br />
they visit.”<br />
Deana says Stella McCartney<br />
was one of the first designers she<br />
remembers discussing ethical fashion.<br />
“I remember reading that she wouldn’t<br />
use leather or fur in her collection and<br />
I thought that was pretty punk,” says<br />
Deana. “The term really stuck with me<br />
64 spotlight.com.au www.facebook.com/gcqmag
creative living •<br />
Changing lives<br />
one stitch at a time<br />
This bag is hand-made<br />
and fair labour item lovingly<br />
created by women in the<br />
Stitch In Time<br />
program in Cambodia.<br />
Jan Breen Burns,<br />
fashion editor, The Age<br />
because it combines two things I loved<br />
- fashion and sustainability. I don’t<br />
know who first coined it but bravo to<br />
them!”<br />
In Deana’s mind the popularity<br />
of environmentally conscious labels<br />
shows that consumers care about<br />
the story behind the creation of their<br />
garment. “We are conscious of the<br />
food we eat so why not think about<br />
what we wear in the same light?”<br />
she asks.<br />
After the catastrophic 2010<br />
earthquake in Haiti American designer,<br />
Donna Karan, visited the island,<br />
looking for ways to help the community<br />
use its natural resources and artisans<br />
to get back on its feet. As she wrote<br />
in a blog on her website, “ ... the<br />
vision for Haiti is simple: help Haiti<br />
help itself ... create business models<br />
that can be properly marketed and<br />
distributed throughout the US and<br />
Europe. As an American designer and<br />
businesswoman, I have a good sense<br />
of what makes a product desirable<br />
to the western consumer”. Donna’s<br />
spring 2012 collection was all Haitian<br />
inspired, assisted by famous Haitian<br />
artist Philippe Dodard.<br />
Last year Dame Vivienne<br />
Westwood, now 70, turned her<br />
attention to the people of Nairobi.<br />
She described the endeavour as, “Not<br />
charity, just work” and created the<br />
Ethical Fashion Africa Collection of<br />
handbags and totes using everything<br />
from old rubber thongs to roadside<br />
advertising banners and old tent<br />
fabric. The bags are available online.<br />
The collection was produced in<br />
collaboration with The Ethical Fashion<br />
Programme, a joint agency of the<br />
United Nations and the World Trade<br />
Organisation, which connects some of<br />
the world’s most marginalised people<br />
to fashion’s international movers and<br />
shakers. It enables communities of<br />
artisans and micro-manufacturers -<br />
the majority of them women - to thrive<br />
in association with the talents of the<br />
fashion world. •<br />
LINKS<br />
• www.cleanclothes.org<br />
• www.pollyandme.com<br />
• www.fairlabor.org<br />
<strong>Spotlight</strong> and<br />
Fair Trade<br />
<strong>Spotlight</strong>’s Stitch in Time bags,<br />
available in your local <strong>Spotlight</strong><br />
store, are made by women living<br />
in impoverished circumstances in<br />
various regions.<br />
<strong>Spotlight</strong> first took sewing<br />
machines and sewing teachers<br />
overseas (to Uganda) via its Stitch<br />
in Time (SIT) programme in 2008.<br />
Since then Cambodia, Vietnam and<br />
Australia’s Northern Territory have<br />
all become involved. Down the track<br />
Nepal and Kabul could also receive<br />
SIT centres.<br />
As <strong>Spotlight</strong>’s director of<br />
marketing, Jono Gelfand, says,<br />
“The idea is to empower these<br />
women to make an income. We<br />
enter into commercial and fair trade<br />
agreements where, for instance,<br />
the sewers in Cambodia make<br />
1,000 bags per month. Our aim is<br />
that we are simply their first clients<br />
and, once people see the work the<br />
women are capable of, they can<br />
grow their business.” •<br />
@ www.spotlight.com.au/<br />
community-support<br />
Get Creative Quarterly Autumn 2012 65
• spotlight news<br />
Designs by Laura Anderson<br />
<strong>Spotlight</strong> helps new<br />
Australian designers<br />
explore the world<br />
In the last two years <strong>Spotlight</strong> has presented Melbourne Spring Fashion Week’s (MSFW) RMIT Student Prize.<br />
This Prize goes to an outstanding graduating RMIT fashion student & includes a one month internship in Milan,<br />
Melbourne’s sister-city & a hotspot for global fashion design. <strong>Spotlight</strong> provides thousands of dollars<br />
in sponsorship funds to assist the winner to reach his or her potential.<br />
The 2010 winner<br />
was Laura Anderson<br />
who spent a month<br />
with Costume<br />
National in Milan.<br />
She returned to<br />
Melbourne in March<br />
2011 to fulfill an ambassadorial role<br />
with MSFW before returning to Milan to<br />
undertake additional study at Istituto<br />
Marangoni, one of the city’s leading<br />
design schools. Now based in Sydney<br />
where she is working to further her<br />
career, Laura took time out recently<br />
to speak to Get Creative Quarterly<br />
about the impact the Award has had<br />
on her life.<br />
GCQ: How did both Costume<br />
National and Istituto Marangoni affect<br />
your design process and your work?<br />
Laura: One of the best parts of this<br />
experience was seeing how the design<br />
system works in Italy and the way that<br />
design is taught. Istituto Marangoni<br />
is an incredibly well regarded school<br />
in Milan (and internationally), in fact<br />
many of the designers at Costume<br />
National studied there. Their approach<br />
to design is commercially based but<br />
always with exceptional quality.<br />
The access to fabrics and trims was<br />
also incredible. I think commercial<br />
viability whilst innovating was<br />
something I definitely took from this<br />
– as well as working with a lot more<br />
colour!<br />
GCQ: How has winning the award<br />
impacted on you overall?<br />
Laura: The award gave me an<br />
incredible opportunity to experience<br />
Europe and see how my work fits<br />
into an international context. It was<br />
also an incredible recognition of what<br />
I’m doing which has given me the<br />
confidence to keep pushing it and<br />
pursuing what I love.<br />
GCQ: We have many young readers<br />
keen to pursue careers in fashion<br />
design. When choosing courses what<br />
would you tell them are the most<br />
important things to look for in course<br />
structures and what skills will they<br />
most need once they enter “the real<br />
world”?<br />
Laura: I think when you are<br />
studying fashion there are two really<br />
important areas to learn. The first<br />
is how to develop really original<br />
concepts and work that is innovative<br />
and challenging. I think this area is<br />
about developing ‘design thinking’ and<br />
looking at the many different forms<br />
fashion can take. The second set of<br />
skills that I consider important in the<br />
‘real world,’ is having a good business<br />
understanding as well as the technical<br />
knowledge to execute your work. It’s<br />
an important balance to have and to<br />
look for when choosing a course.<br />
GCQ: What are you doing now<br />
in Sydney? What are your plans for<br />
2012?<br />
Laura: After coming back from<br />
Europe I really felt like moving to a new<br />
city and seeing what opportunities<br />
might come from it. Currently I am<br />
looking at collaborating with the<br />
Danish company MUUSE, which is a<br />
great platform for helping graduate<br />
designers move into the next stage<br />
with their work. I have also just found<br />
out I am a finalist for the incredible<br />
Australians In New York Fashion<br />
Foundation (AINYFF) Award, which<br />
is extremely exciting and a great<br />
opportunity to produce new work. So<br />
my plans for 2012 could hopefully<br />
see me in New York and, if not,<br />
66 spotlight.com.au www.facebook.com/gcqmag
spotlight news •<br />
Above & left: Laura Anderson designs<br />
then definitely pursuing new work/<br />
collaboration opportunities.<br />
GCQ: When in Milan, where was your<br />
favourite shopping haunt?<br />
Laura: Milan was incredible for<br />
shopping but Corso Como 10 was by far<br />
my favourite. It was founded by gallery<br />
owner and publisher Carla Sozzani and<br />
is dedicated to art, fashion and design.<br />
An incredible and inspiring space with<br />
some of the world’s best designers - I<br />
visited many times!<br />
GCQ: What was the name of the<br />
collection you submitted to win the<br />
award and what would you say set your<br />
work apart?<br />
Laura: The collection was my major<br />
graduate project and was called Minimal<br />
Surface. This collection was based<br />
around an initial bodysuit I created for<br />
the Triumph Inspiration Awards - an<br />
international lingerie competition. The<br />
bodysuit was formed around the idea<br />
of visual sensation and inspired by the<br />
work of early 20th century geometric<br />
chronophotographer, Etienne Jules-<br />
Marey, who explored the documentation<br />
of movement through his pioneering<br />
photographic techniques.<br />
Below: 2011 winner Anisha Bhoyro.<br />
Left: Anisha’s winning design style.<br />
What I took from Marey’s work was<br />
And meet the<br />
an idea of exploring visual movement,<br />
specifically applied to lingerie through 2011 winner ...<br />
print. I started working on the stand<br />
Twenty three-year-old Anisha<br />
with scaled print photocopies to<br />
Bhoyro is the epitome of the<br />
design the garment and began to<br />
industrious, ingenious and hard<br />
develop a method of creating the print working modern student. She<br />
through patternmaking, whereby each completed the pieces entered<br />
component informed the other. The<br />
for Melbourne Spring Fashion<br />
print I created was formed through the Week’s RMIT Student Prize<br />
use of manual heat sublimation transfer whilst working in retail, studying<br />
printing; a paper based print process, and doing an internship at<br />
which results in each pattern piece<br />
avant-garde Melbourne design<br />
being an individual print.<br />
studio, MATERIALBYPRODUCT.<br />
This first bodysuit piece, and the<br />
Anisha’s winning collection,<br />
subsequent textile research to create Precious Threads, was designed<br />
it, informed the making of the rest of around the idea of removing<br />
the collection as I began to design<br />
wastage from the fashion<br />
around the idea of integrating it into design and production process.<br />
my graduate show. Through applying<br />
“I wasn’t sure of my chances<br />
techniques such as laser cutting into when I entered my pieces,” she<br />
leather and wool felt I was able to<br />
says. “My work is quite subtle,<br />
experiment and extend the possibilities it lacks the traditional ‘wow’<br />
of the print as well as see how it<br />
factor and I wondered if that<br />
translated into garments beyond<br />
would work against it.”<br />
lingerie. This collection was in many<br />
Stay tuned for updates from<br />
ways inspired by design process, textile Anisha when she too completes<br />
and lingerie technique research, and her Milan internship!<br />
the early exploration into the idea of<br />
•<br />
visual sensation. •<br />
Get Creative Quarterly Autumn 2012 67
• product knowledge<br />
Inspire, decorate and create the<br />
new season look with Custom<br />
Made curtains from <strong>Spotlight</strong>.<br />
Consultants from <strong>Spotlight</strong>’s Custom Made department<br />
at team training at Roman Empire.<br />
The possibilities of the type of curtains you can choose<br />
are almost endless. We offer a versatile range of<br />
fabric, from bold, rich colours to smooth neutrals for<br />
an understated look. Curtains offer an effective way to<br />
reduce heat loss through your windows and create a<br />
block out effect with the use of our quality curtain linings.<br />
Please note: Due to varied buying patterns throughout Australia and New Zealand some stock may vary<br />
between stores or sell out. Ask a <strong>Spotlight</strong> employee at your nearest store for the best alternative.<br />
68 spotlight.com.au www.facebook.com/gcqmag
product knowledge •<br />
custom<br />
Individually made for you<br />
Custom made curtains, blinds and<br />
shutters bring the ultimate designer look<br />
into your home, allowing you to create<br />
window furnishings uniquely made for you.<br />
We’ll come to you!<br />
Across Australia and New Zealand,<br />
<strong>Spotlight</strong> has over 100 trained<br />
professionals who can advise you on<br />
curtains and blinds to suit your home,<br />
style and budget.<br />
We offer a free of charge, obligation-free,<br />
in-home measure and quote service.<br />
Make an appointment today for a<br />
home consultation and:<br />
· Explore a designer world of fabrics from<br />
around the world – Australia, Turkey, Italy,<br />
India, Pakistan and more<br />
· Discover different blind types, new<br />
technologies and fabrications available.<br />
· Bring the outdoors in with our<br />
customised window solutions<br />
· Find the perfect decorator<br />
rods and finials<br />
WE CAN DO IT ALL...<br />
• Curtains & Sheers<br />
• Curtain tracks<br />
• Swags & Tails<br />
• Valances<br />
• Pelmets<br />
• Tie backs<br />
• Roman Blinds<br />
• Roller Blinds<br />
• Aluminium Venetians<br />
• Timber Venetians<br />
• Vertical Blinds<br />
• Panel Blinds<br />
• Cellular Blinds<br />
• Austrian Blinds<br />
• Motorised Blinds<br />
• Outdoor Blinds<br />
• Shutters*<br />
• Sheer Roller Blinds<br />
• Bedspreads<br />
*Not available at all stores.<br />
We’ll come to you!<br />
AUS CALL 1300 305 405<br />
NZ CALL 0800 776 854<br />
to book your FREE in-home<br />
measure and quote<br />
or visit us instore for advice on curtains & blinds<br />
custom<br />
Get Creative Quarterly Autumn 2012 69
• product knowledge<br />
custom<br />
Enjoy life in Custom Made style<br />
Bring the ultimate designer look into your home with Custom Made blinds and shutters.<br />
Allowing you to create window furnishings uniquely made for you. Come in store to talk to<br />
our friendly team or book a free no obligation in home visit.<br />
Panel Blinds<br />
Gliding across the window<br />
to give you total privacy, or<br />
stacked back to welcome<br />
the view, panel blinds are a<br />
versatile option that can be<br />
used on windows or as<br />
room dividers.<br />
Roman Blinds<br />
Roman Blinds give a unique look to your room while<br />
also providing energy efficient benefits. Select from<br />
our wide range of furnishing fabrics or our canvas<br />
collection and accessorise with battens or trims.<br />
Roller Blinds<br />
Roller blinds add clean, contemporary style to any<br />
room. Dual roller blinds give double the benefits by<br />
featuring both a sunscreen and a block-out blind on<br />
the one window. Sheer roller blinds give you privacy<br />
while allowing soft light to filter into rooms.<br />
Please note: Due to varied buying patterns throughout Australia and New Zealand some stock may vary<br />
between stores or sell out. Ask a <strong>Spotlight</strong> employee at your nearest store for the best alternative.<br />
70 spotlight.com.au www.facebook.com/gcqmag
product knowledge •<br />
Aluminium<br />
Sheer<br />
colour range<br />
From left to right: chocolate,<br />
cherry, gold, chesnut, sugar<br />
maple, beech, cedar image<br />
dark, cedar image medium,<br />
eggshell & white.<br />
Venetian Blinds<br />
At <strong>Spotlight</strong> you’ll find an extensive<br />
range to suit all budgets and<br />
décor. Choose from cedar, jarrah<br />
image, timber look, aluminium and<br />
our new sheer Venetian range.<br />
Venetians allow you to open and<br />
close the slats to any position,<br />
giving you perfect control over light<br />
and security in any room.<br />
Shutters*<br />
The designer’s favourite – shutters can add value<br />
to your home and produce an immediate and stylish<br />
update. Control the light throughout the day and<br />
give your windows a distinctive look by installing<br />
Custom Made shutters from <strong>Spotlight</strong>. This chic<br />
window covering suits many interiors and provides the<br />
immediate ‘wow’ factor. *Shutters not available in all stores.<br />
Outdoor Blinds<br />
Protect and cool your home from the harshest sunlight<br />
with <strong>Spotlight</strong>’s block-out canvas fabrics. Our extensive<br />
screen range offers great protection while still allowing<br />
you to look through the awning and enjoy your view.<br />
<strong>Spotlight</strong> Custom Made - We come to you for all your window furnishing needs.<br />
Aus Call 1300 305 405 NZ Call 0800 776 854 for a free measure & quote.<br />
Get Creative Quarterly Autumn 2012 71
• new season product<br />
Vive la<br />
France!<br />
Bring a touch of Parisienne<br />
flair to your home with<br />
<strong>Spotlight</strong>’s latest collection of<br />
chic soft furnishings. •<br />
72 spotlight.com.au www.facebook.com/gcqmag
new season product •<br />
Left & below: Omega ready to hang pencil pleat curtains<br />
arrive in store 22/2/12, Tower memo board, door stop,<br />
assorted cushions, assorted object d’art and tea light<br />
holders - all from <strong>Spotlight</strong>.<br />
Please note: Due to varied buying patterns throughout Australia and New Zealand some<br />
stock may vary between stores or sell out. Ask a <strong>Spotlight</strong> employee at your nearest<br />
store for the best alternative.<br />
Get Creative Quarterly Autumn 2012 73
• new season product<br />
simply<br />
stylish<br />
Above: Peru pencil pleat curtains, Jumbo wall clock, assorted cushions, Natura wire<br />
candle holder, Tara chenille throws, Cabana floor rug and Opinici jacquard ottoman.<br />
Please note: Due to varied buying patterns throughout Australia and New Zealand some stock may vary<br />
between stores or sell out. Ask a <strong>Spotlight</strong> employee at your nearest store for the best alternative.<br />
74 spotlight.com.au www.facebook.com/gcqmag
product knowledge •<br />
towels<br />
Brampton House cotton towels<br />
from <strong>Spotlight</strong>. •<br />
Please note: Due to varied buying patterns throughout Australia and New Zealand some<br />
stock may vary between stores or sell out. Ask a <strong>Spotlight</strong> employee at your nearest<br />
store for the best alternative.<br />
Linda Coombes from the<br />
Henderson store in NZ,<br />
is new to the company &<br />
works in the manchester<br />
department. This doesn’t stop<br />
her exploring the craft aisles<br />
though! Meet Henry, the<br />
wonderful pooch she sewed<br />
using a tool kit put together<br />
from <strong>Spotlight</strong>.<br />
Get Creative Quarterly Autumn 2012 75
• make it<br />
e<br />
pyramid doorstop<br />
& door sausage<br />
Take another look at furnishing fabrics this season when<br />
you’re making small projects for the home. This gorgeous<br />
canvas print will keep out the autumn chills and add colour<br />
and style. (*Dug the pug not included!)<br />
76 spotlight.com.au www.facebook.com/gcqmag
make it •<br />
Pyramid<br />
door stop<br />
templates<br />
enlarge by 220%<br />
Sides<br />
(CUT 4)<br />
Base<br />
1.5cm seam allowance<br />
(CUT 1)<br />
PYRAMID DOORSTOP<br />
Materials<br />
20cm x 112/120cm+ wide coordinated<br />
plain & printed canvas fabric<br />
(allow extra for pattern matching<br />
or placement)<br />
13cm x 26mm wide cotton/herringbone<br />
tape<br />
1 kg raw uncooked rice or plastic toy<br />
stuffing pellets<br />
Sewing thread<br />
Sewing machine<br />
Pins, hand sewing needle<br />
Scissors, tape measure<br />
Iron<br />
Step 1 Using template provided,<br />
cut out 4 x triangles and 1 x square<br />
base from canvas fabric. Transfer dot<br />
markings from template.<br />
Step 2 With right sides together, sew<br />
two of the triangles together between<br />
the dot markings along one side only.<br />
Press seam open. Repeat with the<br />
remaining two triangle pieces.<br />
Step 3 Fold tape in half and place<br />
ends of tape at raw edge at the top<br />
on the right side of one sewn triangle<br />
piece between the two marked side<br />
dots. Baste in place.<br />
With right sides together pin the other<br />
sewn triangle piece on top aligning all<br />
raw edges. Sew pieces together at the<br />
sides between the two marked dots. At<br />
the top, stitch straight across between<br />
the two side seams securing the loop<br />
in place. Trim away excess fabric above<br />
this straight line of stitching. Press<br />
seams open.<br />
Step 4 Open out pyramid and with<br />
right sides together pin the pyramid to<br />
the square base aligning all dots at the<br />
corners of the squares. Stitching one<br />
side at a time, sew between the dots,<br />
being careful not to sew the pressed<br />
out side seams within the stitching.<br />
Leave a 7cm opening along the last<br />
side for turning through.<br />
Step 5 Clip corners, turn pyramid<br />
right side out and press. Fill pyramid<br />
with uncooked rice or stuffing pellets<br />
to desired fullness. Hand sew opening<br />
closed.<br />
DOOR SAUSAGE<br />
Materials<br />
20cm x 112/120cm+ wide coordinated<br />
plain & printed canvas fabric<br />
2 kg raw uncooked rice or plastic<br />
stuffing pellets<br />
Sewing thread<br />
Sewing machine<br />
Pins, hand sewing needle<br />
Scissors<br />
Iron<br />
Step 1 Cut a piece of fabric 90cm<br />
wide by 20cm high.<br />
Step 2 Fold fabric in half lengthways,<br />
right sides together. Using a 2cm seam<br />
allowance sew long sides together and<br />
across one of the shorter ends, leaving<br />
one short end open for turning through.<br />
Step 3 Clip corners and turn fabric<br />
snake right way out. Press flat and<br />
press in 2cm along the open end<br />
raw edges. Fill firmly then topstitch<br />
open end closed with two rows of<br />
stitching. •<br />
Get Creative Quarterly Autumn 2012 77
• make it<br />
i<br />
HALLWAY facelift<br />
The hallway of an Edwardian house gets a makeover when its 1980’s dusky<br />
pink floral cushions are transformed by the GCQ team using mattress ticking<br />
stripe drill on the seat, plus burgundy drill, toile & roses furnishings linen on<br />
the cushions.The result, as you can see, retains the romantic mood but with<br />
a clean, fresh 2012 update.<br />
CUSHION COVERS<br />
FOR SEAT<br />
Materials<br />
*Mattress ticking drill fabric burgundy<br />
& cream<br />
Matching sewing thread<br />
*Cotton piping cord (optional)<br />
*Matching zip by the metre<br />
Tape measure<br />
Scissors<br />
Pencil & paper<br />
Calico to create a toile (optional)<br />
Seam ripper<br />
Sewing machine with zipper foot<br />
Iron<br />
*Quantities required will depend on<br />
the dimensions of the cushions.<br />
Step 1 To use the existing cushion<br />
cover as a guide/pattern for creating<br />
the new covers unpick the existing<br />
cover. Alternatively draft a new pattern<br />
using pencil and paper then create a<br />
toile from calico to check that pattern<br />
is correct.<br />
Step 2 Create the desired length<br />
of covered cord (piping) for the edge<br />
of the cushion covers by cutting strips<br />
of fabric approximately 6cm wide then<br />
sew together end to end. Fold in half<br />
lengthways around the cotton piping<br />
78 spotlight.com.au www.facebook.com/gcqmag
make it •<br />
Before<br />
BOLSTER CUSHION<br />
COVERS<br />
Materials per bolster<br />
55cm x 45cm plain fabric in colour of<br />
your choice<br />
Two 55cm x 12cm pieces contrasting<br />
fabric for ends (plus scrap for yo-yo’s)<br />
60mm yo-yo maker<br />
1.3m piping in matching colour<br />
2 tassels<br />
2 large buttons<br />
Matching sewing thread<br />
50cm x size 3 (3mm) cotton piping cord<br />
Tape measure<br />
Safety pin<br />
Scissors<br />
Sewing machine with zipper foot<br />
Iron<br />
Bolster cushion insert<br />
cord then sew in place along the length<br />
as close to the cord as possible using<br />
the zipper foot on the sewing machine.<br />
Step 3 Sew the covered piping<br />
cord to the top of the cushion cover<br />
with the raw edges aligned matching<br />
the stripes of the fabric, then sew the<br />
piping to the bottom in the same way.<br />
Insert a zip along the back edge of the<br />
side piece. With zip open slightly join<br />
the top and bottom to the side section<br />
matching the stripes where possible.<br />
Turn through the open zip and insert<br />
the foam cushion.<br />
Note: Matching stripes can be difficult<br />
for inexperienced sewers; if this is the<br />
case choose fabrics without stripes.<br />
Seat covers can also be made without<br />
piping cord.<br />
Step 1 To attach piping, place<br />
piping on long end (55cm) on right side<br />
of main fabric aligning raw edges so<br />
the cord is facing inward. Pin in place<br />
and using the zipper foot on the sewing<br />
machine, stitch close to the cord.<br />
Repeat on the opposite end.<br />
Step 2 Finish one long (55cm) side<br />
of each end piece with a 1cm folded<br />
and stitched edge. Fold the edge over<br />
again and stitch to form a small casing<br />
for gathering later.<br />
Get Creative Quarterly Autumn 2012 79
• make it<br />
For a pieced or bordered cushion<br />
cover, create a pieced fabric then cut<br />
into a 43cm square for the front and<br />
complete as per below.<br />
Step 3 With right sides facing,<br />
match raw edge of end piece to raw<br />
edge of piping and pin in place. Stitch<br />
close to cord using zipper foot.<br />
Open out then fold in half lengthways<br />
aligning the long raw edges and<br />
matching the cord and ends. Sew<br />
together to create a long open ended<br />
tube, taking care when sewing over the<br />
thick cord. Turn through to right side.<br />
Step 4 Thread the cotton cord<br />
through the casing at the ends of the<br />
tube using the safety pin. Insert the<br />
bolster cushion insert then pull the<br />
cord ends to gather around the ends of<br />
the insert, tie to secure then tuck the<br />
ends inside.<br />
Step 5 Create two yo-yos using<br />
the contrasting fabric and following<br />
the instructions in the packet. Attach<br />
buttons or tassels to the centre of<br />
the yo-yos then hand stitch the yo-yos<br />
to the ends of the bolster to hide the<br />
gathered opening.<br />
CUSHION COVERS<br />
Materials<br />
50cm patterned fabric in colour of<br />
choice<br />
Matching sewing thread<br />
Tape measure<br />
Scissors<br />
Sewing machine<br />
Iron<br />
Size 16 (41cm) cushion insert<br />
Step 1 Cut a 43cm square of fabric<br />
for the front. Cut the remaining fabric<br />
in into two 36cm x 43cm pieces. Along<br />
one 43cm long edge of each of the two<br />
back pieces, press under 1cm then<br />
another 1cm and topstitch.<br />
Step 2 With front right side up<br />
place one back piece face down with<br />
raw edges aligned at top and sides and<br />
hemmed edge across the centre. Place<br />
remaining back piece face down on top<br />
aligning raw edges at bottom and sides<br />
with centre edge overlapping.<br />
Step 3 Pin then sew together on all<br />
four sides using 2cm seam allowance.<br />
Trim corners, turn through to right side<br />
and press. Place insert into cushion<br />
cover with back edges overlapping. •<br />
80 spotlight.com.au www.facebook.com/gcqmag
MARNI
• make it<br />
i<br />
Elvie Browne, <strong>Spotlight</strong><br />
Hoppers Crossing, VIC, works<br />
in the furnishings & sew<br />
centre. She is the ‘go-to’ girl<br />
for demonstrations because<br />
she always has the best ideas.<br />
She makes decorations for the<br />
store, including display quilts.<br />
Her favourite trick is creating<br />
fabric ‘stories’ to help explain<br />
& sell new ranges.<br />
82 spotlight.com.au www.facebook.com/gcqmag
make it •<br />
Silk quilt<br />
with matching cushion covers<br />
Let the fabric speak for itself in this dramatic, glamorous quilt that is<br />
surprisingly easy to make. We’ve used an overlocker to create the quilt<br />
top & cushions, speeding up the process & avoiding frayed seams.<br />
Get Creative Quarterly Autumn 2012 83
• make it<br />
the quilting is finished. Use the quilting<br />
guide to help maintain even lines of<br />
stitching. Change the thread colour for<br />
the different silks. Thread the tails onto<br />
a needle then sew through to the back<br />
and tie ends together, or gently pull<br />
through to the back then tie together.<br />
Materials<br />
2m silk dupion – red<br />
2m silk dupion – pink<br />
2m silk dupion – purple<br />
2m red homespun (plus extra for backs<br />
of cushion covers if desired)<br />
2m purple homespun<br />
2.4m x 250cm wide unbleached<br />
quilters muslin<br />
2.4m Sew Easy cotton/bamboo wadding<br />
Elna 664 overlocker<br />
Sewing machine with walking foot &<br />
quilting guide<br />
4 reels red thread for overlocker<br />
Gütermann sulky rayon 30 thread<br />
– purple, red, pink<br />
Rotary cutter, ruler & cutting mat<br />
Basting spray<br />
Quilters safety pins<br />
Scissors<br />
Hand sewing needle<br />
Note: This quilt is not made in the<br />
traditional way as it is made on an<br />
overlocker due to the fraying nature<br />
of the silk. Therefore the seam<br />
allowance is approximately ½”, not<br />
the usual ¼” found in most quilt<br />
patterns.<br />
QUILT Step 1 Cut two 35cm<br />
(15”) x 2m strips from each of the<br />
three colours of silk dupion. Set aside<br />
the remaining fabric to create pieced<br />
cushion covers to match the quilt.<br />
Step 2 Stitch the strips together<br />
alternating the colours using the<br />
overlocker, removing approximately<br />
¼” as you stitch and cut. After all the<br />
strips have been stitched together,<br />
overlock around the outside edges to<br />
prevent fraying.<br />
Step 3 Lay the muslin out flat then<br />
lay the batting on top, smooth out any<br />
creases then spray with the basting<br />
spray. Lay the pieced quilt top on top of<br />
the batting smoothing out any creases<br />
then pin around the outer edges only<br />
as the basting spray will hold the quilt<br />
top in place.<br />
Step 4 Quilting the top<br />
Using the matching sulky thread quilt<br />
the top in even long lines of straight<br />
stitch lengthways down the quilt,<br />
starting in the centre and working out<br />
towards the edges. Leave long tails of<br />
thread to sew through to the back once<br />
Step 5 Remove the selvedges<br />
from the red and purple homespun<br />
and stitch together lengthways (down<br />
the 2m length) for the backing. Trim<br />
the excess wadding and muslin from<br />
the quilt top and remove the quilting<br />
pins. Lay the homespun backing on<br />
top of the quilt top right sides together<br />
matching the centre points at the top<br />
and bottom. Stitch around the quilt<br />
top approximately ½” (1.5cm) from<br />
the raw edges leaving a 60cm opening<br />
along the bottom edge to turn the quilt<br />
through. Carefully trim excess from<br />
the corners then turn quilt through.<br />
Turn seam allowance in along edge of<br />
opening and topstitch all around the<br />
outer edges of the quilt securing the<br />
opening closed. Change thread and<br />
bobbin colour to match the fabric if<br />
desired.<br />
Tip<br />
More quilting can be added in the<br />
ditch at this stage, if desired, by<br />
machine. Some oversized straight<br />
stitches across the quilt using<br />
contrasting embroidery threads can<br />
be added by hand.<br />
Cushion covers Piece<br />
together strips of the left over fabrics<br />
to create different cushion covers to<br />
complement the quilt. Create the top<br />
only in the silk fabric then back with<br />
red or purple homespun. Create covers<br />
in different sizes for added interest.<br />
Use the cushion instructions on page<br />
80 to complete the covers. •<br />
84 spotlight.com.au www.facebook.com/gcqmag
Summer Brights<br />
set of 4 dinner plates<br />
product knowledge •<br />
Summer Brights<br />
salad bowl & salad servers<br />
romance on<br />
the grass<br />
It doesn’t have to be Valentine’s Day to<br />
suggest a romantic picnic in the park ...<br />
but it’s as good an excuse as any! •<br />
Summer Brights<br />
set of 4 tumblers<br />
Go Vino<br />
neoprene double<br />
bottle bag<br />
Summer Brights<br />
set of 4 bowls<br />
4 Person picnic cooler<br />
backpack with set<br />
includes setting for 4<br />
4 Person picnic cooler basket<br />
set includes 4(ea) of plates, wine<br />
glasses, forks, knives, & spoons.<br />
Salt & pepper shakers, waiters<br />
friend, cutting board & cheese knife<br />
Get Creative Quarterly Autumn 2012 85
• make it<br />
i<br />
Try a chair lift<br />
Breathe new life into dull or<br />
damaged furniture using <strong>Spotlight</strong>’s<br />
furnishing fabrics & upholstery<br />
tools, plus a little imagination.<br />
86 spotlight.com.au www.facebook.com/gcqmag
make it •<br />
As chairs vary in<br />
shape & size we<br />
have provided the<br />
process & not the<br />
measurements,<br />
fabric quantity or<br />
zipper length you<br />
will require.<br />
Materials<br />
Upholstery fabric – Texas, colour Pepper<br />
145cm wide<br />
Continuous zipper by the metre<br />
Thread to match fabric<br />
Hand sewing needle<br />
Tape measure<br />
Seam ripper<br />
Scissors<br />
Sewing machine with zipper foot<br />
Paper & pencil<br />
Step 1 Remove any cushions from<br />
the chair. If the cushion has a zipper,<br />
undo the zipper and remove the insert<br />
(these are often foam) from the cover.<br />
Unpick all seams on the cover and lay<br />
the fabric out flat. If the cushion does<br />
not have a zipper carefully unpick one<br />
long seam, remove the insert and<br />
proceed as above.<br />
Step 2 To remove the back cover,<br />
turn the chair upside down and<br />
carefully unpick the seam along the<br />
bottom edge at the back. Remove<br />
any staples (our chair didn’t have<br />
staples). Check to see if the back<br />
cover is attached at the sides and<br />
if so carefully unpick. Ensure that<br />
all necessary sections are unpicked<br />
before pulling the cover off the back of<br />
the chair. For this chair it was possible<br />
to pull the cover along with the insert<br />
up off the frame. Unpick all other<br />
seams and lay the fabric out flat.<br />
For this chair we then removed the<br />
fabric covering the arms.<br />
Before<br />
Step 3 Measure the quantity of<br />
fabric needed, consider that extra<br />
fabric may be required if you choose a<br />
directional print.<br />
You can use the old fabric as a<br />
template to cut out the new fabric<br />
pieces or if preferred use the paper<br />
and pencil to make a pattern.<br />
Step 4 Cut pieces from new<br />
fabric and stitch together adding<br />
zipper length to cushion if necessary.<br />
Reassemble the chair in reverse. •<br />
Tips<br />
• Take digital photos of the chair<br />
before you begin, then progress shots<br />
to help remember how the cover was<br />
constructed.<br />
• If the old foam inserts are<br />
disintegrating purchase new ones.<br />
Casey Farrell, assistant<br />
buyer blinds, tracks,<br />
accessories & sheers is an<br />
artist at heart. When not<br />
devising her next fantastical<br />
tattoo she’s thinking about<br />
home DIY projects to save<br />
money & look great.<br />
Get Creative Quarterly Autumn 2012 87
• make it<br />
i<br />
cover story<br />
Choose from the canvas fabric<br />
collection at <strong>Spotlight</strong> for quirky &<br />
quick makeover jobs.<br />
88 spotlight.com.au www.facebook.com/gcqmag
make it •<br />
Visit your local<br />
<strong>Spotlight</strong> store<br />
for all your<br />
upholstery<br />
fabric needs to<br />
FURNISH your<br />
latest project.<br />
Before<br />
Materials<br />
Canvas fabric – navy, lime & printed<br />
Navy piping<br />
Elastic<br />
Calico to create toile (optional)<br />
Tape measure<br />
Scissors<br />
Sewing machine with zipper foot<br />
Paper & pencil<br />
Step 1 Create a pattern using<br />
pencil and paper to make a slip<br />
cover for the item, in this case a foot<br />
stool. If desired, cut out the pattern<br />
in calico and sew it together to check<br />
that the pattern fits properly. When<br />
the pattern is correct, cut out fabric<br />
pieces.<br />
Step 2 To attach piping, place<br />
piping on right side of canvas for the<br />
top of the stool aligning raw edges of<br />
piping fabric and canvas so the cord<br />
is facing inward. Pin in place and<br />
using the zipper foot on the sewing<br />
machine, stitch close to the cord.<br />
Stitch the side piece to the top, right<br />
sides together, using the zipper foot<br />
and again stitching close to the cord.<br />
Step 3 Cut a piece of fabric the<br />
same length as the side piece and<br />
approximately 10cm wide, finish<br />
each end with a folded and straight<br />
stitched edge then fold and press<br />
in half lengthways. Match the raw<br />
edges with the side piece then<br />
stitch in place to create a casing for<br />
elastic. Place the slip cover onto the<br />
stool then thread the elastic through<br />
the casing and stitch or tie ends<br />
together. •<br />
Note: Creating a slip cover rather<br />
than reupholstering makes for easy<br />
removal for cleaning or updating for<br />
a new look.<br />
Get Creative Quarterly Autumn 2012 89
• product knowledge<br />
Upholstery Tacks<br />
Twist pins<br />
upholstery<br />
tools<br />
<strong>Spotlight</strong> carries tools for projects big & small.<br />
Visit the furnishings area of your nearest store<br />
& start exploring. •<br />
Heavy duty stapler<br />
Staples<br />
Biotex & Durapel<br />
fabric protectors<br />
Foam<br />
Please note: Due to varied buying patterns throughout Australia and New<br />
Zealand some stock may vary between stores or sell out. Ask a <strong>Spotlight</strong><br />
employee at your nearest store for the best alternative.<br />
90 spotlight.com.au www.facebook.com/gcqmag
From spare<br />
to special<br />
It’s the time of year when house guests<br />
descend & the spare room becomes a guest<br />
room. Some new bedding, something on the<br />
wall & one or two throw cushions can be<br />
transformative. Visit <strong>Spotlight</strong> for affordable<br />
ideas today. •<br />
Pictured: Avant lamp, Rapee throw and cushions &<br />
KOO pintuck quilt cover set - available at <strong>Spotlight</strong>.<br />
Please note: Due to varied buying patterns throughout Australia and New Zealand some stock may vary between<br />
stores or sell out. Ask a <strong>Spotlight</strong> employee at your nearest store for the best alternative.<br />
Get Creative Quarterly Autumn 2012 91
• product knowledge<br />
Wiltshire Little Chef<br />
silicone jigsaw dinosaur<br />
baking mould<br />
d.line assorted<br />
shapes cookie<br />
cutters<br />
Great products from<br />
<strong>Spotlight</strong> to get the kids<br />
cooking up a storm.<br />
Wiltshire Little Chef<br />
let’s bake a jigsaw<br />
mermaid<br />
Ladelle Cheeky<br />
Owls & Truck childsize<br />
aprons<br />
Wiltshire Easybake<br />
mini springform pan<br />
Wiltshire 2 tier cooling rack<br />
Please note: Due to varied buying patterns throughout Australia and New<br />
Zealand some stock may vary between stores or sell out. Ask a <strong>Spotlight</strong><br />
employee at your nearest store for the best alternative.<br />
92 spotlight.com.au www.facebook.com/gcqmag
product knowledge •<br />
Wiltshire Little Chef<br />
silicone jungle animals<br />
baking moulds<br />
Mode 8 piece mixing<br />
bowl set<br />
Wiltshire Party Bake<br />
cupcake carry case<br />
(From left to right) Wiltshire Party Bake: a number cake pan, 24 cup mini<br />
muffin pan, decorate me cupcake pan, petit fours & chocolate tray.<br />
Get Creative Quarterly Autumn 2012 93
• creative people<br />
Carolyn’s book<br />
is published by<br />
David & Charles<br />
(RRP AU$19.99)<br />
& available at<br />
good book stores<br />
& online.<br />
EVERYONE’S<br />
BAKING ...<br />
CAKE POPS!<br />
Once upon a time all anyone<br />
could talk about was cupcakes<br />
when it came to tasty, trendy<br />
baked goods. Now cake pops<br />
are on the rise, tiny globes of<br />
deliciousness that just beg to<br />
be decorated. The UK’s Carolyn<br />
White, owner of a company<br />
called Cakes 4 Fun, has a new<br />
book out - Bake me I’m yours ...<br />
Cake Pops - so we’ve asked her<br />
to explain just what all the fuss<br />
is about.<br />
GCQ: When did cake pops first<br />
start appearing in the UK and how<br />
popular are they?<br />
Carolyn: Cake pops started to<br />
appear in 2008. Early 2010 is<br />
when we started to design our<br />
cake pops. They are two of my<br />
biggest passions combinedchocolate<br />
and cake! We started<br />
running classes with pigs and<br />
reindeers (making them, not<br />
teaching them). The success<br />
of these led to our book. Cake<br />
pops are very popular in the<br />
UK- everyone is still looking<br />
for something to take over the<br />
success of the hugely popular<br />
cupcake.<br />
GCQ: Can you explain what they<br />
actually are?<br />
Carolyn: Gorgeous cake, delicious<br />
butter cream and decadent<br />
ganache all enrobed in Belgian<br />
chocolate.<br />
GCQ: Who is your book aimed<br />
at - beginner cooks or the more<br />
experienced?<br />
Carolyn: Complete beginners<br />
through to those who have<br />
dabbled in cake pops who are<br />
looking for more inspiration.<br />
GCQ: Who likes cake pops more -<br />
adults or children?<br />
Carolyn: Anyone aged from three<br />
to one hundred.<br />
GCQ: If you had to choose your<br />
last meal, what cake would be<br />
served?<br />
Carolyn: Something with<br />
chocolate orange ganache; our<br />
‘death by chocolate’ sponge<br />
covered in it! And I’d choose<br />
carrot cake with lemon cream<br />
cheese frosting - as a second<br />
choice.<br />
GCQ: While we have you we<br />
just have to ask about weddings<br />
... what’s the most unusual or<br />
difficult cake your company has<br />
been asked to produce for a<br />
wedding?<br />
Carolyn: We did a ‘knights and<br />
ladies’ cake - a castle with a lady<br />
wearing a very tight corset top<br />
and her knight in shining armour.<br />
A Fiat car with people in it is<br />
another memorable one but there<br />
WIN CAROLYN’S<br />
BOOK & MORE!<br />
Thanks to Capricorn Link Australia, we have<br />
FIVE packs, each containing the following<br />
titles to give away:<br />
• Bake Me I’m Yours…Cake Pops<br />
• Bake Me I’m Yours - Cookie<br />
• Bake Me I’m Yours - Cupcake Love<br />
• Bake Me I’m Yours - Whoopie Pies<br />
has been a few. •<br />
• Make me I’m yours: Just for fun:<br />
20 handmade projects to stitch, knit & craft<br />
To enter simply send an envelope addressed<br />
to GCQ Magazine Cake Pop Competition, Level<br />
6, 111 Cecil Street, South Melbourne. Victoria,<br />
Australia 3205. On the back give your name,<br />
address, telephone and <strong>Spotlight</strong> VIP number.<br />
Entries close 30 April 2012.<br />
94 spotlight.com.au www.facebook.com/gcqmag
make it •<br />
easter baskets<br />
e<br />
Materials – for each basket<br />
25cm x 63cm of printed felt or cotton<br />
fabric (outer)<br />
25cm x 63cm of printed felt or cotton<br />
fabric (lining)<br />
65cm jumbo rickrack<br />
2 x 65cm coordinating small rickrack<br />
65cm pompom trim<br />
23cm x 63cm medium pellon<br />
Two 45cm x 23mm grosgrain ribbon<br />
(handle)<br />
43cm x 12mm wide boning<br />
1m x 38mm ribbon (bow)<br />
Scissors, pins<br />
Sewing machine<br />
Matching sewing threads<br />
Step 1 Pin the jumbo rickrack along<br />
the length of the outer fabric 8.5cm<br />
down from the top edge and topstitch<br />
in place. Pin a length of small rickrack<br />
above and below jumbo rickrack and<br />
topstitch in place.<br />
With pompoms facing down, align the<br />
edge of the pompom trim with the top<br />
edge of the outer fabric above the<br />
rickrack. Stitch in place 1cm down from<br />
the top edge.<br />
Step 2 With the outer fabric right<br />
(trims) side down, lay the pellon on top<br />
2cm down from the top edge with side<br />
edges aligned. Pin then baste pellon to<br />
the outer fabric 1cm in from each side<br />
edge.<br />
Fold the outer fabric in half lengthways<br />
with the right (trims) side to the inside,<br />
side edges aligned. Sew side and<br />
bottom edges together using a 1.5cm<br />
seam allowance.<br />
Clip corners, and press seams open.<br />
Step 3 To create the base, flatten<br />
out the bottom, match side seam to<br />
bottom seam and pin together. Mark<br />
7.5cm down from the point, rule across<br />
to form a triangle and stitch across.<br />
Trim seam to 1.5cm, cutting off the<br />
point. Repeat for the other end of the<br />
base. Turn right side out.<br />
Step 4 Omitting the trims and<br />
pellon, sew the lining in the same<br />
method, but do not turn right side out.<br />
Step 5 With the 2 x 45cm lengths<br />
of grosgrain ribbon on top of each<br />
other, sew along both long edges 2mm<br />
in from the edge. Sew one of the short<br />
ends closed. Push the boning into the<br />
ribbon through the open end. Sew<br />
the open end of ribbon<br />
closed with boning<br />
inside.<br />
Step 6 Turn top<br />
edge of basket and<br />
lining 2cm to the wrong<br />
side and press. Pin one<br />
end of the ribbon handle<br />
2cm down on the inside of<br />
the basket side seam and<br />
baste in place along seam<br />
allowance. Pin the other end<br />
of the handle to the opposite<br />
side in the middle 2cm down<br />
from top edge, baste.<br />
Place the lining inside the basket, pin<br />
in place aligning seams and top edges.<br />
Topstitch both layers together 5mm<br />
in from the top folded edge, securing<br />
handle within stitching.<br />
Tie a bow around the base of one<br />
side of the handle using coordinating<br />
ribbon. •<br />
Get Creative Quarterly Autumn 2012 95
• make it<br />
k<br />
hand painted eggs<br />
Materials<br />
Decofoam eggs<br />
Assorted colours Jo Sonia’s paints<br />
Paint brushes & palette<br />
Wooden skewers<br />
Empty tissue box or tall glass or jar<br />
Step 1 Push a skewer into the base<br />
of the egg just enough to hold in place<br />
then paint with a base coat of colour<br />
using the skewer to hold the egg. Stab<br />
the other end of the skewer into the<br />
tissue box or stand in a tall glass or jar<br />
to allow paint to dry thoroughly. Repeat<br />
for as many eggs as required. Paint<br />
eggs with a second coat if needed.<br />
Step 2 Paint little flower designs or<br />
designs of choice on the dry painted<br />
surface of the eggs then return skewer<br />
to the tissue box or glass to dry.<br />
Step 3 When the paint is dry<br />
remove skewers. •<br />
96 spotlight.com.au www.facebook.com/gcqmag
make it •<br />
Junior<br />
easter projects<br />
Take the kids’ minds off chocolate this<br />
season with some simple crafty ideas.<br />
k<br />
Get Creative Quarterly Autumn 2012 97
• make it<br />
EASTER GARLANDS/<br />
BUNTING<br />
Materials<br />
Coordinating plain/printed card/papers<br />
1cm wide ribbon or trim<br />
Adhesive alphabet letters<br />
Single hole punch<br />
Pencil<br />
Scissors<br />
1. Using the template provided cut<br />
out 24 bunny head shapes from<br />
coordinating card/papers. Use single<br />
hole punch to punch a hole in each<br />
bunny ear 1cm down from the top<br />
edge.<br />
2. Cut end of ribbon on an angle and<br />
thread ribbon through the holes of 11<br />
bunny heads for the top bunting. Space<br />
bunny heads as desired leaving extra<br />
ribbon before the first and after the<br />
last bunny head. To make a hanging<br />
loop at each end of ribbon, loop over<br />
10cm and tie a firm knot.<br />
3. Repeat with remaining 13 bunny<br />
heads on another length of ribbon to<br />
make lower garland. Again allow extra<br />
ribbon at each end enough so that it<br />
will hang lower than the top garland.<br />
4. Hang garlands and adjust bunny<br />
heads to the centre and balance the<br />
garlands.<br />
Stick on adhesive letters as desired.<br />
EASTER EGG HATS<br />
Use for chocolate eggs or as a gift card<br />
for eggs.<br />
Materials<br />
Coordinating plain/printed card/papers<br />
Coordinating ribbons<br />
Adhesive alphabet letters<br />
Crafters Choice Craft glue<br />
Pencil & ruler<br />
Scissors<br />
Gift egg<br />
1. Using the template provided cut<br />
out one bunny head shape per gift egg<br />
from coordinated card/papers. Cut a<br />
3cm wide strip from printed papers.<br />
Glue one end of the paper strip to the<br />
centre back of paper bunny head, allow<br />
to dry.<br />
2. Wrap the strip around the gift egg<br />
and allowing enough overlap at the<br />
centre back of the paper bunny head<br />
trim excess paper strip. Remove egg<br />
and glue the overlapping end of the<br />
strip to the back of the bunny head.<br />
Allow to dry.<br />
3. Embellish the front of the bunny<br />
head by gluing on ribbon bows.<br />
DECOFOAM EGG CHICK<br />
& BUNNY<br />
Materials<br />
Crafters Choice PVA glue<br />
Sharp pencil<br />
Scissors<br />
Wire cutting pliers<br />
Bunny<br />
75mm decofoam egg<br />
3 x white chenille sticks<br />
3 x hot pink chenille sticks<br />
1 x small white pompom<br />
1 x medium white pompom<br />
1 x pair of joggle eyes<br />
Coordinating ribbon<br />
Chick<br />
75mm decofoam egg<br />
2 x yellow chenille sticks<br />
1 x orange chenille stick<br />
1 x pair of joggle eyes<br />
Coordinating ribbon<br />
Bunny<br />
1. To make bunny’s feet, bend a white<br />
chenille stick in half. Make two loops<br />
by bringing each end back to the bend<br />
in the middle. Twist the ends around<br />
98 spotlight.com.au www.facebook.com/gcqmag
make it •<br />
the middle to secure loops. Lay feet<br />
flat and place a small amount of glue<br />
on top of the twisted section. Place<br />
the egg onto the glue, adjusting the<br />
position of the egg so it can stand<br />
freely on the feet. Glue a medium<br />
pompom to the back of the egg to<br />
make the bunny’s tail covering up the<br />
raw end of the bunny feet. Allow glue<br />
to dry.<br />
2. Loop another white chenille stick<br />
to desired ear height and twist to<br />
secure. Twist a hot pink chenille stick<br />
into a slightly smaller loop and place<br />
inside white loop, twist ends to secure.<br />
Repeat for the other ear. Trim away<br />
excess of twisted sticks leaving a<br />
1.5cm end.<br />
3. Using a sharp pencil, poke a hole<br />
into the top of the egg. Place a small<br />
amount of glue inside the hole and<br />
push the twisted ends of the ears into<br />
hole. Adjust ears to desired angle.<br />
Allow to dry.<br />
4. Tie a ribbon bow around the base<br />
of the ears to hide where the ears are<br />
attached to the top of the foam egg.<br />
5. Cut a hot pink chenille stick in half.<br />
Twist and join each stick together in<br />
the centre to make the whiskers. Trim<br />
to desired length. Glue whiskers to<br />
the centre front of foam egg. For the<br />
nose, glue small pompom on top of the<br />
whiskers. Glue joggle eyes onto eggs<br />
above the nose and whiskers, allow<br />
glue to dry<br />
Chick<br />
1. To make chick’s feet, cut an orange<br />
chenille stick in half. Bend one of the<br />
sticks in the middle. Cut two 4cm<br />
small lengths from the other half of<br />
the stick. Twist these around each of<br />
the ends of the bent stick to make the<br />
toes. Trim to desired length.<br />
2. Glue the bend in the middle of the<br />
legs to the base of a foam egg. Allow<br />
to dry.<br />
3. To make wings, bend a yellow<br />
chenille stick in half. Make two loops<br />
by bringing each of the ends back to<br />
the middle. Twist the ends around the<br />
middle to secure loops. Bend loops<br />
into wing shapes.<br />
4. Using a sharp pencil, poke a hole<br />
into the centre back of the egg. Place<br />
a small amount of glue inside the hole<br />
and push the twisted ends of the wings<br />
into hole. Allow to dry.<br />
5. Cut a yellow chenille stick in half.<br />
Bend one of the sticks in half. Make<br />
two loops by bringing each end back<br />
to the bend middle. Twist the ends<br />
around the middle to secure loops.<br />
Shape loops into a pointed beak<br />
shape. Poke a hole in the centre front<br />
of the egg and place a small amount of<br />
glue inside. Push the twisted ends of<br />
the beak into hole. Allow to dry.<br />
6. Glue joggle eyes onto egg above<br />
the beak, allow glue to dry. Tie a bow<br />
with ribbon and glue to the top of the<br />
chick’s head, allow to dry. •<br />
Bunny<br />
head template enlarge by 155%<br />
Get Creative Quarterly Autumn 2012 99
• make it<br />
e<br />
easter card<br />
A basket full of eggs makes a delightfully<br />
different design for this season’s stand out card.<br />
100 spotlight.com.au www.facebook.com/gcqmag
make it •<br />
Basket & egg<br />
templates<br />
enlarge by 185%<br />
facing up arrange seven eggs on the<br />
pink card as though the eggs were<br />
inside the basket. Use double-sided<br />
tape to stick eggs in place then attach<br />
the remainder of the basket to the<br />
card.<br />
Materials<br />
Kaisercard– pink, white<br />
Coordinated bright printed papers<br />
Coordinating rickrack<br />
Kaisercard pearls – hot pink<br />
Double-sided tape<br />
Foam adhesive dots<br />
Cutting knife & cutting mat<br />
Scissors<br />
Pencil & ruler<br />
Hot pink sewing thread<br />
Sewing machine<br />
Front of card<br />
Step 1 From the template provided,<br />
cut out 1 x basket shape from white<br />
weave cardstock. Using a long stitch<br />
on the sewing machine and hot pink<br />
thread, sew around the basket shape<br />
5mm in from the outer edge and also<br />
5mm in from the inner edge of the hole<br />
in the middle of the paper basket. Tie<br />
loose threads to back of paper basket.<br />
Topstitch lengths of rickrack across the<br />
base of the basket as in picture or as<br />
desired. Trim ends of rickrack in line<br />
with the edge of the basket.<br />
Step 2 Cut a 22cm x 30cm piece of<br />
pink weave cardstock and fold in half<br />
widthways to form card. Apply doublesided<br />
tape along the bottom edge of<br />
basket and stick basket to the centre<br />
front at the base of the card.<br />
Using egg template provided, cut out<br />
nine eggs from coordinating bright<br />
printed papers. With card flat and front<br />
Step 3 Stick the remaining two<br />
paper eggs to the left corner of basket<br />
using foam dots. Further embellish<br />
the card by cutting out paper flowers<br />
from printed papers or cut the flowers<br />
from a flower printed paper then attach<br />
to the basket using foam dots to give<br />
the flowers height and depth. Stick<br />
adhesive pearls to the centres of the<br />
paper flowers.<br />
Inside of card<br />
Step 4 Cut an 18cm x 12cm piece<br />
of white weave cardstock then using<br />
a long stitch on the sewing machine<br />
and hot pink thread, sew around outer<br />
edge of the card 5mm in from the outer<br />
edge. Tie loose threads to back of<br />
card. Stick to the inside of card using<br />
double sided tape.<br />
Cut out two more eggs from printed<br />
card and adhere to the bottom left<br />
corner of the sewn edges. •<br />
Get Creative Quarterly Autumn 2012 101
• make it<br />
e<br />
FABRIC<br />
eggs<br />
Quilting fabrics are<br />
perfect for small,<br />
decorative sewn items.<br />
102 spotlight.com.au www.facebook.com/gcqmag
make it •<br />
TOP<br />
•<br />
Materials<br />
10cm x 30cm pieces of printed<br />
cotton fabric<br />
Matching sewing thread<br />
Sewing machine<br />
Scissors<br />
Pins<br />
Hand needle<br />
Fiskars fingertip rotary cutter<br />
Cutting mat<br />
Iron<br />
Hobby fill<br />
Step 1 Using the pattern<br />
provided cut out one pattern piece<br />
from 4 different coordinating<br />
fabrics for each fabric egg.<br />
Step 2 With right sides facing,<br />
pin two pieces together along one<br />
side from the top marked point<br />
to the bottom marked point. Sew<br />
together between the points using<br />
a 5mm seam allowance.<br />
Step 3 Open out sewn pieces<br />
and with right sides facing pin<br />
the next piece to one of the sewn<br />
pieces. Sew together as before<br />
along one edge between marked<br />
points.<br />
Step 4 Repeat with the<br />
remaining piece of fabric leaving a<br />
5cm opening along the final seam.<br />
Step 5 Trim and clip all seams,<br />
turn right side out and press.<br />
Firmly stuff the fabric eggs with<br />
hobby fill and hand stitch the<br />
opening closed. •<br />
Fabric egg pattern<br />
Cut 4<br />
5mm seam allowance<br />
•<br />
bottoM<br />
Fiskars new stylish rotary cutters and Eco<br />
friendly cutting mats are designed to ensure<br />
maximum comfort and style.<br />
The iconic loop handle design<br />
of the Titanium Softgrip<br />
Rotary Cutter ensures a<br />
better fit for all hand sizes with<br />
the design being slightly larger.<br />
new<br />
Self-healing<br />
surface<br />
Fiskars Eco-Friendly<br />
Cutting Mats are lightweight<br />
and 100% recyclable. The<br />
Self-healing surface is textured<br />
on both sides to provide cutting<br />
stability which means that the<br />
mat has ‘Twice the Life’!<br />
iconic loop<br />
handle design<br />
range available now in<br />
<strong>Spotlight</strong> Stores Nationally
• make it<br />
e<br />
bunny<br />
babies<br />
If you like making soft toys then try<br />
some simple non-fattening bunnies as<br />
gifts this Easter.<br />
Lorraine Barry from<br />
NZ’s Rotorua store sees<br />
<strong>Spotlight</strong>’s calico teddy<br />
bears as a blank canvas<br />
waiting to be explored in<br />
patchwork. A large teddy<br />
bear takes approximately<br />
14 days to complete.<br />
104 spotlight.com.au www.facebook.com/gcqmag
make it •<br />
Bunny template<br />
enlarge by 150%<br />
Materials – for one bunny<br />
20cm wool felt or wool flannel fabric<br />
Scraps of printed cotton fabrics<br />
Vliesofix<br />
Pencil<br />
Scissors, pins, handle needle<br />
Sewing machine<br />
Sewing thread<br />
Iron<br />
Hobby fill<br />
Step 1 Using the template provided cut 2<br />
x bunny shapes from wool felt/flannel fabric.<br />
Using templates provided trace one of each ear<br />
shape and one heart onto the paper side of the<br />
Vliesofix then cut out leaving 1.5cm around all<br />
edges. Iron vliesofix shapes onto wrong side<br />
of the fabric scraps and cut out shapes. Peel<br />
backing paper off each shape and place on top<br />
of the front bunny shape as per the position on<br />
the template. To fuse shapes to bunny, press<br />
with a warm iron. Topstitch around the shapes,<br />
2-3mm from the edge. Tie off loose threads at<br />
the back of the fabric.<br />
Step 2 To make fabric pompom, cut a piece<br />
of cotton fabric 15cm long x 4cm wide. Using<br />
a long straight stitch, sew a straight line down<br />
the length of the fabric strip in the centre,<br />
leaving long tails of thread. Cut a fringe along<br />
the long edges of the fabric to a width of 4mm,<br />
stopping the cut 2mm from the stitching line.<br />
Gather the fabric by pulling on the long threads<br />
to make a pompom shape. Tie and knot threads<br />
to secure, still leaving threads long. Using the<br />
long threads, hand sew the pompom to the back<br />
bunny piece.<br />
Step 3 With wrong sides facing, pin the front<br />
and back bunny pieces together. Using a 5mm<br />
seam allowance, sew the two pieces together,<br />
leaving an 8cm opening along the bottom of the<br />
bunny for stuffing. Stuff the bunny with hobby fill<br />
to desired fullness.<br />
Hand sew or machine stitch opening closed. •<br />
Get Creative Quarterly Autumn 2012 105
• from Helen’s desk<br />
Below: Helen Bradley’s<br />
travel journal cover.<br />
Left: Inside the journal.<br />
Ink on your fingers<br />
and words on the page<br />
Helen Bradley suggests that, in an increasingly digital world,<br />
the process of putting pen to paper has never been more important.<br />
I bought an autograph album a few<br />
years ago at a flea market. It dates<br />
from 1882 and the autographs and<br />
poems are written in pen and ink. Just<br />
flipping through the pages puts you in<br />
touch with the young girl, Mary, who<br />
owned the book.<br />
This book now lives in my studio. I<br />
don’t know much about Mary; there is<br />
no record of what she did or thought<br />
or what she hoped for but her old<br />
autograph book is there to remind<br />
me daily of the beauty of handwriting<br />
and the living legacy that handwritten<br />
notes provide.<br />
About Helen<br />
Australian-born, Californian-based Helen<br />
Bradley is a globetrotting photography,<br />
computer and Photoshop whiz with a<br />
penchant for paper crafting and jewellery<br />
making. Her projects appear on pages<br />
108 - 112 of this issue as well as in<br />
countless publications internationally.<br />
See: www.http-design.com<br />
and www.helenbradley.com<br />
One thing the scrapbook movement<br />
gave us was a forum for writing our<br />
stories as we scrapbook our photos.<br />
Of course, not everyone does this and<br />
Angie Pederson, best-selling author<br />
of The Book of Me, Growing Up Me,<br />
and The Book of Us, worries when she<br />
is shown scrapbook pages without<br />
journalling. She explains, “I ask who is<br />
in the photos or what was happening<br />
at this time and I wonder, why aren’t<br />
their stories written down and what will<br />
happen to them when the scrapbooker<br />
is gone?”<br />
One thing I think that stops some<br />
of us writing a lot is we don’t like<br />
our handwriting. It is so easy to print<br />
text neatly from the computer that<br />
it takes an effort to embrace the<br />
beauty in handwriting. At one time I<br />
wrote everything on my computer and<br />
printed it - and then I got over myself!<br />
Now I do exactly the opposite and,<br />
wherever possible, I handwrite using<br />
a black permanent marker straight<br />
onto the project. If I make a mistake,<br />
I just scratch it out and keep going –<br />
it’s liberating to actually celebrate its<br />
imperfection.<br />
Angie agrees “… think of a recipe<br />
in your collection, written in your<br />
grandmother’s handwriting. Do you<br />
look at it and think, ‘I wish she<br />
wouldn’t have handwritten this… it<br />
looks awful’? No, you look at it and<br />
smile because it makes you think of<br />
her. Your handwriting is a part of who<br />
you are - why deny someone else that<br />
connection with you? “<br />
Of course scrapbooks aren’t the<br />
only outlets for journalling our lives.<br />
Many of us journal because we have<br />
an inherent need to do it. I always take<br />
a journal with me when I travel – it is<br />
always a new book for each trip and I<br />
spend a few weekends before I leave<br />
decorating the book ready for the<br />
trip. In consequence I have a magical<br />
jumble of books bursting with precious<br />
memories stacked on my shelves.<br />
Many people journal daily and<br />
incorporate their art into their work.<br />
Dawn DeVries Sokol, author of 1000<br />
Artist Journal Pages, Doodle Diary:<br />
Art Journaling for Girls and Doodle<br />
Sketchbook: Art Journaling for Boys<br />
explains, “I art journal to document, to<br />
experiment, to brainstorm, to create.<br />
Art journalling has become such a<br />
part of me that it’s almost as if I have<br />
to art journal.” Dawn makes all her<br />
own journals - some are filled with<br />
watercolour paper for paint journalling<br />
and others are built from scraps of<br />
paper.<br />
Designer, Julie Fei-Fan Balzer, also<br />
journals every day. She says, “Some<br />
106 spotlight.com.au www.facebook.com/gcqmag
from Helen’s desk •<br />
Below: Olivia Bray’s journal pages.<br />
Left: Helen Bradley’s autograph book.<br />
Above: Dawn Solok’s stack of her<br />
hand made journals.<br />
days I write about my feelings… other<br />
days I write a list of ‘to dos’… some<br />
days I stamp out the date, scribble<br />
down some thoughts and walk away.<br />
Whatever the day holds I know that<br />
my daily journalling is a place to<br />
express myself, vent my frustrations,<br />
weigh my options, confess my<br />
insecurities, and be honest.<br />
Journalling has become as regular a<br />
habit as brushing my teeth.”<br />
Nana Campana’s journal stash<br />
includes one she has dubbed her<br />
‘For the sake of memory loss’<br />
journal’. In this she jots down the<br />
events she doesn’t want to forget.<br />
“I sometimes draw or attach pictures<br />
to make the memory more vivid. I am<br />
pretty sure I am not going to lose my<br />
mind anytime soon, but I sure am<br />
preparing for it.”<br />
I love that our journals are a<br />
rich visual and historical record<br />
of our lives. Young Olivia Bray has<br />
been building her collection for<br />
years and she’s only six! Her mum,<br />
Laura, explains that Olivia has been<br />
journalling since she could hold a<br />
pencil. “Olivia has always watched<br />
me work on my journals so, of<br />
course, she wanted to do it too. She<br />
uses spiral bound books and when<br />
she first started she would fill her<br />
journal pages with drawings and<br />
paper scraps and images. As she got<br />
older, she would write a jumble of<br />
letters and numbers and I would joke<br />
that she was taking dictation from<br />
outer space. She’s in first grade now<br />
and simple sentences have replaced<br />
her alien dictation. Teaching her to<br />
journal has given her an outlet for<br />
her emotions and sometimes I’ll see<br />
her scribbling away after she’s been<br />
reprimanded. I am so glad she has<br />
a way to get her emotions out in a<br />
positive way.”<br />
So, next time you’re tempted to<br />
write something down – do it! And if<br />
you’re tempted to type a letter or type<br />
some journalling on the computer,<br />
think about getting out a pen and<br />
paper and hand write it instead – your<br />
great-grand-children will thank you –<br />
one day. •<br />
LINKS<br />
Julie Fei-Fan Balzer<br />
www.balzerdesigns.typepad.com<br />
Angie Pedersen<br />
Twitter: @AngiePedersen<br />
GeekCrafts.com<br />
Dawn Sokol<br />
www.dawndsokol.com<br />
Twitter: @dawndsokol<br />
Nana Campana<br />
www.youniquereflections.blogspot.com/<br />
Laura Bray<br />
www.katydiddys.blogspot.com<br />
READ ALL ABOUT IT<br />
Available at local bookshops and<br />
online, these new titles explore and<br />
celebrate the art that is the journal!<br />
The Weekend Crafter:<br />
Books and Journals: 20<br />
Great Weekend Projects<br />
by Constance E Richards<br />
Geared specifically to the beginner,<br />
this book offers a variety of simple<br />
and attractive projects, ranging from a<br />
traditionally bound wedding album to a<br />
trendy ‘jelly bean’ book, all accompanied by<br />
easy-to-follow instructions, colourful, howto<br />
photographs, plus templates.<br />
Publisher: Lark Books. Distributor: Capricorn<br />
Link Australia. RRP AU$12.99.<br />
The Art Journal Workshop<br />
by Traci Bunkers<br />
The beautiful illustrations in this book<br />
break down the entire working process of<br />
journalling with step-by-step photos and<br />
instructions from start to finish. You’ll learn<br />
how to use different media such as paint,<br />
photographs, and collage, while following<br />
journalling prompts and exercises to help<br />
you dig deeper and enrich the process and<br />
experience. You also get a DVD featuring<br />
the author as she creates many of the<br />
journal pages shown throughout the book.<br />
Publisher: Quarry. Distributor: Capricorn Link<br />
Australia. RRP AU$29.99.<br />
Elemental Journal:<br />
Composing Artful<br />
Expressions from Items Cast<br />
Aside by Tammy Kushnir<br />
This book shows you how to craft a wide<br />
variety of journals to hold your secrets or<br />
express your inner thoughts and shows<br />
you new ways to use wood, paper, fabric,<br />
plastic and metal in your art. It includes 15<br />
projects using everything from tree bark to<br />
dismantled photo albums and even tin boxes.<br />
Publisher: North<br />
Light Books.<br />
Distributor:<br />
Capricorn Link<br />
Australia. RRP<br />
AU$29.99<br />
Note: Books<br />
available<br />
all good<br />
bookstores or<br />
check online.<br />
Australian<br />
price guides<br />
given where<br />
possible.<br />
Get Creative Quarterly Autumn 2012 107
•<br />
e<br />
make it<br />
TRAVEL<br />
A book made from large envelopes provides room<br />
for photos & a place to keep trip memorabilia.<br />
108 spotlight.com.au www.facebook.com/gcqmag
page 1 doublesided<br />
insert<br />
make it •<br />
Materials<br />
Wallet size photos<br />
Chipboard book with envelopes<br />
Memorabilia including paper bags<br />
Assorted alphabet & swirl rub-ons<br />
Heavy paper shapes & journalling blocks<br />
Black felt tip pen<br />
Scrapbook paper with lines and tabs<br />
Adhesives<br />
Scissors<br />
Paper trimmer<br />
page 1– back<br />
The inspiration for this design was a<br />
souvenir concertina black cardboard<br />
display of seven Amsterdam house<br />
shapes. These were cut into individual<br />
houses so they could be used in the<br />
book. Paper bags and catalogues<br />
from the museums visited were also<br />
used making the book a living piece of<br />
memorabilia.<br />
page 2 – back<br />
The foundation is a purchased book<br />
that came with ten large envelopes<br />
inside. We pulled the book apart, put<br />
aside unwanted envelopes, decorated it<br />
and then reassembled it.<br />
You can create the same effect with<br />
large envelopes and chipboard or<br />
corrugated cardboard covers and book<br />
rings.<br />
Each envelope was covered on the<br />
front with pieces of paper cut from gift<br />
shop paper bags, and a house was<br />
glued on top. The house name was<br />
added using a permanent marker. The<br />
house mounted on dark blue paper has<br />
a reversed sheet of paper mounted<br />
underneath it so it can be seen more<br />
easily. One other house shows small<br />
images cut from a museum catalogue<br />
in its windows.<br />
This book has two different views. If<br />
you flip through it face first you see<br />
the house shapes and a simple colour<br />
block design. Go from the back to the<br />
page 3 – back<br />
front and the look changes to less<br />
structured and it is stuffed with photos,<br />
pockets of memorabilia and things to<br />
pull out and view.<br />
Here’s how we decorated the back of<br />
the envelopes and their inserts:<br />
Page 1 – back<br />
Trim a piece of scrapbooking paper<br />
with a tab to the page size, round<br />
corners and add photos, rub-ons and a<br />
cardboard journalling block.<br />
Cut the flap off the envelope and used<br />
the string as a pull for the insert.<br />
Page 1 – double-sided insert<br />
Trim matching paper cut to size and<br />
adhere photos to both sides and add a<br />
journalling block.<br />
Page 2 – back<br />
Trim a piece of scrapbook paper to the<br />
envelope size and create a tab from<br />
a scrap of paper. Adhere to the page.<br />
Add photos and a journalling block.<br />
Apply a large rub-on letter to decorate.<br />
Page 3 – back<br />
Trim a sheet of paper with tabs to<br />
size and then adhere to the page. Add<br />
photos, rub-ons and journalling.<br />
Page 4 – back<br />
Cover envelope with paper, add<br />
photos and a rub-on and a cut in half<br />
journalling block.<br />
Page 5 – back<br />
Cover envelope with scrapbook paper,<br />
add images, rub-ons and a shaped<br />
cardboard arrow.<br />
Get Creative Quarterly Autumn 2012 109
• make it<br />
page 5 – insert<br />
page 4 – back<br />
page 5 – back<br />
page 6 – back<br />
page 7<br />
cover<br />
page 6 – insert<br />
You don’t need to use all the envelopes<br />
in this book for memorabilia. For<br />
extra interest, trim the flap from some<br />
envelopes and slot in additional pages<br />
of related photos. The envelopes will<br />
hold the pages tightly enough that they<br />
won’t fall out. Leave some envelopes<br />
intact for stuffing with museum tickets,<br />
maps, receipts etc.<br />
Page 5 – insert<br />
Trim a piece of double-sided<br />
scrapbooking paper to smaller than<br />
envelope size. Add a tab and string<br />
pull. Add photos and journalling and a<br />
rub-on.<br />
Page 6 – back<br />
Cut a piece of scrapbooking paper to<br />
size and adhere to the page. Add a tab<br />
shape over the top of the paper. Apply<br />
photos and a rub-on to the page.<br />
Page 6 – insert<br />
Cut a piece of double-sided paper to<br />
smaller than envelope size. Add a tab<br />
and write ‘PULL’ on it. Add photos,<br />
journalling, assorted cardboard shapes<br />
and rub-ons.<br />
Page 7 – back<br />
Cover the page with scrapbooking<br />
paper and add a tab cut from a second<br />
sheet of paper. Cut photos to size and<br />
adhere. Apply a large rub-on letter,<br />
hang a tag from the tie and add some<br />
tickets stapled together.<br />
Cover<br />
For the front cover, print a photo just<br />
smaller than the cover width, trim to<br />
size and glue. Use rub-on letters for<br />
the title and a heart shape cut from a<br />
souvenir.<br />
back cover<br />
Back Cover<br />
Print an interesting photo slightly<br />
smaller than the back cover, trim and<br />
affix. •<br />
110 spotlight.com.au www.facebook.com/gcqmag
Warhol inspired<br />
make it •<br />
e<br />
printing<br />
Create this Warhol inspired<br />
card with a fun & simple<br />
printing process.<br />
Get Creative Quarterly Autumn 2012 111
• make it<br />
1 2<br />
Materials<br />
Acrylic paints – 5 different colours<br />
2 x A4 sheets cream Kaisercard<br />
A4 sheet black canford paper<br />
Black permanent ink calligraphy<br />
marker<br />
Thin foam sheet<br />
Canson Sketching & tracing paper<br />
Paintbrush<br />
Adhesives<br />
Craft knife & cutting mat<br />
Paper trimmer<br />
Scissors<br />
Step 1 On a sheet of paper<br />
draw a 5cm x 5cm square and<br />
inside this draw an apple with a<br />
stem, leaf and some highlights.<br />
Use some tracing paper to trace<br />
this shape.<br />
Transfer the apple shape to the<br />
thin foam piece.<br />
Trim the foam to 5.5cm x 5.5cm.<br />
Using craft knife cut out the<br />
shapes making sure to leave all<br />
pieces intact – any excess cuts<br />
will show in the printing process.<br />
Step 2 Trim one sheet of<br />
cream paper into 5cm squares –<br />
you want to print lots more pieces<br />
than you will actually use.<br />
Paint the outside of the foam<br />
piece with one colour paint, place<br />
one sheet of paper on the foam<br />
and burnish it to print it. Repeat<br />
with different colours of paint so<br />
you get 8-12 background prints –<br />
in a range of colours.<br />
Step 3 Take the apple shape<br />
and print it over the top of the<br />
printed background (step 2).<br />
In each case, print the second<br />
shape in a different colour to the<br />
one you used for the background.<br />
Continue to build up the prints,<br />
printing first the background, then<br />
the apple, then the stem, leaf and<br />
finally the highlights using all five<br />
colours on each print.<br />
Step 4 When the prints are<br />
completely dry, draw around all the<br />
edges of the design with a black<br />
permanent calligraphy marker.<br />
Trim a piece of cardstock 25cm<br />
x 12.5cm. Fold in half and paint<br />
over one half of the card in one of<br />
the colours that you used in the<br />
design.<br />
Step 5 Select the best four<br />
prints making sure each is a<br />
different colour combination.<br />
Adhere the shapes to a piece<br />
of black cardstock trimmed to<br />
13.5cm x 13.5cm.<br />
When dry, adhere the black<br />
cardstock design over the painted<br />
card. •<br />
You can adapt this printing<br />
process to any simple design.<br />
Draw a design using simple<br />
shapes and allowing enough<br />
design elements so you can use<br />
a palette of five to six colours to<br />
print it.<br />
3<br />
4<br />
5<br />
112 spotlight.com.au www.facebook.com/gcqmag
thank you<br />
for freedom of expression<br />
Rarely does a simple marker give free rein to your<br />
creative instincts! That’s why the Pébéo Setaskrib+ fabric<br />
marker range is so special. They allow you to unleash all<br />
those fashionable ideas you’ve kept inside, with the<br />
simple stroke a pen.<br />
Fashionable Designs<br />
These felt tip markers for fabrics are particularly practical<br />
for decorating T-shirts and cottons, but are also well<br />
suited to accessories such as bags and shoes, or even<br />
household items like cushions, curtains, tea towels,<br />
napkins and table cloths. You can add your own personal<br />
touch to any outing or event. They are also perfect for<br />
the younger artists around your home as they are easy to<br />
handle and easier to clean. You’ll have no more trouble<br />
with bored kids during the holiday period!<br />
Choose fine or broad brush tips to draw translucent or<br />
fluorescent colours with various lines and effects. They<br />
are also perfect for outlining letters.<br />
SETASKRIB+<br />
fact sheet<br />
Colour mixabile: Yes. Drying: Air dry 30 mins.<br />
Finish: Matt.<br />
Opacity: Transparent<br />
Surfaces: Suits all clean and dry light fabrics.<br />
Fixing: Use an iron (cotton position), pressing for 2-3<br />
minutes on the reverse of the decorated fabric.<br />
Caring (decorated fabric): 48 hours after fixing,<br />
the colours are resistant to washing machine at 40°C.<br />
Use your clothes, bags, shoes, and even the curtains<br />
and cushions in your home to express your ideas; draw<br />
on them, write on them! Give free rein to your creativity!<br />
It’s easy with PébéoSetaskrib+ felt tip fabric markers.<br />
Materials:<br />
• Setaskrib+ markers<br />
• Paper & Pencil<br />
• White cotton fabric<br />
T-shirt or singlet<br />
with Pébéo Setaskrib+<br />
02<br />
Orange<br />
08<br />
Lt Green<br />
09<br />
Green<br />
Completion time: 2 hours<br />
Drying time: 30 minutes<br />
Cleaning of tools: soap and water<br />
Colour fixing: with a household iron<br />
10<br />
Brown<br />
1<br />
2<br />
Step 1: Use a pencil and paper to draw your design to use<br />
as a guide under your fabric.<br />
01<br />
Yellow<br />
02<br />
Orange<br />
03<br />
Red<br />
04<br />
Magenta<br />
05<br />
Violet<br />
06<br />
Light Blue<br />
Step 2: Make sure your fabric is clean, smooth and free<br />
from dust. Place your design inside/under the material as a<br />
guide and to avoid the paint from staining through the other<br />
side. Then simply use your Setaskrib+ markers to colour<br />
over your design as desired.<br />
3<br />
07<br />
Blue<br />
08<br />
Light Green<br />
09<br />
Green<br />
10<br />
Brown<br />
11<br />
Grey<br />
12<br />
Black<br />
Step 3: Allow to dry for 30 minutes and remove the<br />
backing guide. Once dry fix on the reverse side using an iron<br />
on cotton position for 2-3 minutes. 48 hours after fixing, the<br />
colours are resistant to washing machine at 40°C (100°F).<br />
13 14 15<br />
Fluoro Yellow Fluoro Orange Fluoro Pink<br />
16<br />
Fluoro Violet<br />
17<br />
Fluoro Blue<br />
18<br />
Fluoro Green<br />
5A<br />
Colours shown may vary in accordance with the printing process.<br />
Range available may vary in each store.<br />
For more creative projects visit www.pebeo.com<br />
or see the Pébéo display in your nearest <strong>Spotlight</strong> store.<br />
NAMAD-152
• crafting with kids<br />
Mum’s<br />
the word<br />
They say a picture is worth a thousand<br />
words, but a single word can trigger a<br />
thousand pictures or memories if spoken<br />
and written with feeling from the heart.<br />
As a child, when it came to<br />
special occasions in our house,<br />
greeting cards were not bought from<br />
a store. Whether it was birthdays,<br />
anniversaries, Easter or, of course,<br />
Mother’s Day, handmade cards or<br />
gifts were essential. My mother<br />
always insisted that a card made by<br />
my brother and I, filled with words<br />
spoken from our hearts, was worth<br />
more than any expensive card or gift.<br />
Now a mother myself, I try not to<br />
buy store bought cards if I can help it<br />
and my kids are happy to make and<br />
write their own cards. Their words<br />
are true and honest and from their<br />
heart, although unfortunately not<br />
always tactful; they love to state how<br />
old everyone is ... all over the front of<br />
their cards in bold marker pen ... for<br />
everyone to see.<br />
The longevity of a card isn’t as long<br />
as we’d like it to be. Before too long it<br />
gets thrown out, recycled or - if you are<br />
like me - stored away in a keepsake<br />
box. Once children are old enough<br />
to write or at least draw something<br />
that looks like a letter or two, they<br />
can make all sorts of wonderful gifts<br />
incorporating their words. These can<br />
be poems or stories or my daughter’s<br />
current favourite - pop love songs.<br />
Words can also be used to embellish<br />
décor items such as frames, cushions,<br />
painted mugs (see our project on page<br />
115) and canvases.<br />
Once children are old<br />
enough to write or at<br />
least draw something<br />
that looks like a letter<br />
or two, they can make<br />
all sorts of wonderful<br />
gifts incorporating<br />
their words.<br />
I made a present for my own mother<br />
for her 60th birthday, just using words.<br />
I wanted to make something special<br />
About Amanda<br />
A freelance stylist, project designer and creative<br />
consultant, Amanda Lefebure is a qualified visual<br />
merchandiser and a crafter par excellence. Her work<br />
appears in publications such as New Idea, That’s Life and<br />
Total Girl and she’s a regular project contributor to the<br />
Herald Sun Home Magazine. Amanda has two children,<br />
aged eight and five, and still sews on her mum’s old<br />
sewing machine ... 25 years and counting!<br />
for her that she could keep and, every<br />
time she looked at it, she’d remember<br />
me and the love and appreciation I<br />
have for her.<br />
I painted a large wooden frame and<br />
found an old photo of her from when<br />
she was sixteen-years-old. I borrowed<br />
her life story that she had written in<br />
her note book, got myself a paint pen<br />
and started writing her story around<br />
the frame edges. I only wrote single<br />
words, dates or small phrases, but<br />
there was enough information for<br />
mum to read to ignite her memories of<br />
those times. I continued to write filling<br />
the frame, spiralling inwards towards<br />
her photo. As I got near the end, I<br />
wrote a few words that described my<br />
feelings towards her, along with our<br />
hopes and dreams for the future.<br />
She treasures that frame as it<br />
hangs on a wall in my old bedroom<br />
at her house. My kids love reading it,<br />
swivelling their heads upside down and<br />
around as they read and asking Nanny<br />
what each word means to her. I’m<br />
not sure if they have ever got through<br />
the whole frame. With thousands of<br />
stories to be told, it may take a while.<br />
Happy Mother’s Day! •<br />
114 spotlight.com.au www.facebook.com/gcqmag
make it •<br />
Kids Mother’s<br />
Day Mugs<br />
e<br />
Materials<br />
China or porcelain mug<br />
Pebeo Porcelaine paint pens – scarlet red<br />
& black<br />
Oven (with help from an adult)<br />
Tips<br />
Step 1<br />
Wash and dry mug thoroughly.<br />
Step 2<br />
Using Porcelaine paint pens, write<br />
wording onto the outside of the mugs and<br />
allow to dry for 24 hours.<br />
Step 3<br />
Bake in an oven as per the<br />
manufacturer’s instructions. •<br />
• If a mistake is made, the writing will<br />
wipe clean off the mug before it is baked.<br />
• If the writing is only required<br />
temporarily, just for the occasion, don’t<br />
bake the mug and simply wash clean<br />
when finished with.<br />
You can also write a message around<br />
the rim of plates (not where the food is<br />
placed) and wash clean after use if not<br />
required permanently.<br />
Get Creative Quarterly Autumn 2012 115
• product knowledge<br />
ARTyFACTS<br />
Instalment<br />
No.2 in<br />
getting to know your<br />
way around palettes,<br />
paints, papers & other<br />
artistic paraphernalia<br />
Entering the paint aisle at<br />
your local <strong>Spotlight</strong> store can be<br />
overwhelming; there are so many<br />
exciting toys to choose from but<br />
what suits which art form and what’s<br />
the best tool for your painterly<br />
project? This issue GEORGIA<br />
MANDARINO, general manager of<br />
marketing, sales and service for<br />
Rossdale, an Australian owned and<br />
operated supplier of fine art and craft<br />
materials, continues to demystify<br />
this topic and inspire you to try<br />
interpreting the world through your<br />
own artistic perspective.<br />
WATERCOLOUR PAINT<br />
This paint is made with pigment<br />
and a binder called Gum Arabic which<br />
is solidified tree sap; additives such<br />
as glycerin, honey and ox gall all<br />
change the viscosity of the paint,<br />
making it thick or thin.<br />
The distinguishing feature of this<br />
paint is that, when mixed with water<br />
or used on wet paper, the colour<br />
disperses and gives a watery-like<br />
finish.<br />
Artists sometimes use masking<br />
fluid to block out areas of colour as,<br />
unlike with other paints, you can’t<br />
paint over an area because you want<br />
to retain the transparency of the paper<br />
and see the paper underneath.<br />
Paper has been the surface of<br />
watercolour artists but, recently,<br />
a watercolour canvas has been<br />
developed (Renoir Watercolour<br />
Canvas) which allows artists to paint<br />
their work and hang it immediately<br />
upon drying.<br />
116 spotlight.com.au www.facebook.com/gcqmag
product knowledge •<br />
Above: Watercolour by the famous William<br />
Blake (English 1757–1827)<br />
Dante running from the three beasts 1824–27<br />
illustration to The Divine Comedy by Dante<br />
Alighieri (Inferno I, 1-90) 1824–27<br />
Pen & black ink and watercolour over pencil<br />
37.0 x 52.8 cm (sheet)<br />
National Gallery of Victoria, Melbourne<br />
Felton Bequest, 1920<br />
Right: Samuel Prout<br />
(English 1783–1852)<br />
Bridge of Sighs 1825–52<br />
Watercolour, pen and brush & brown ink with<br />
touches of gouache & gum arabic<br />
National Gallery of Victoria, Melbourne<br />
Felton Bequest, 1932<br />
Many watercolour works have<br />
survived the years, especially those<br />
kept under glass and framed. This<br />
style of painting lends itself to<br />
botanical work, seascapes and<br />
landscapes. As the paint is loose and<br />
transparent there is no body or texture<br />
to it and the skill is in the layering<br />
up of colour while keeping the fluid,<br />
transparent look<br />
CRACKLE MEDIUM<br />
Crackle medium is a special<br />
formulation that makes the paint<br />
shrink and crack in certain areas. If<br />
another colour is painted underneath<br />
then that colour will show through<br />
when the crackle medium is applied.<br />
VARNISH<br />
Varnish is a clear coating usually<br />
applied to the last layer of artwork.<br />
Varnish can have several effects such<br />
as matt, satin and gloss and can be<br />
brushed on or sprayed. This layer<br />
protects the paint from fading, being<br />
subjected to temperature fluctuations,<br />
and to dust and dirt. In many cases<br />
there is no need to varnish acrylic<br />
paint as it is very durable and usually<br />
has some gloss to the finish. Oil paint<br />
is usually enhanced by varnish but<br />
Damar based resins and varnishes<br />
yellow over time and do not do<br />
justice to the work underneath. The<br />
best varnishes are ones that can<br />
be removed at a later time such as<br />
Gamvar. Gamvar is a low molecular<br />
weight synthetic-resin gloss varnish<br />
originally developed by conservation<br />
scientists at the National Gallery in<br />
Washington, USA.<br />
IRIDESCENT MEDIUM<br />
This medium gives any paint colour<br />
a pearlised effect or sheen. It usually<br />
also lightens the paint colour but<br />
creates an attractive shimmer to it.<br />
FLOW MEDIUM<br />
This is a medium which makes<br />
paint colour looser or thinner. It will<br />
not lessen the intensity of the pigment<br />
but will make it easier to brush on and<br />
move around.<br />
MARBLING GEL<br />
This is a clear gel which suspends<br />
paint colour and allows you to create<br />
marble-like effects. This gel can also<br />
be used to add texture and depth to<br />
already loose or runny paint.<br />
PUMICE<br />
This is ground stone which gives<br />
paint a coarse, sand-like texture. It<br />
can be applied to the canvas to create<br />
texture and then be painted on or<br />
mixed into the paint colour to create<br />
gritty effects.<br />
FABRIC MEDIUM<br />
This medium makes the paint<br />
permanent on fabric so you can take<br />
your ordinary paint colour and, when<br />
mixed with this medium, it is able to<br />
be applied to clothing and iron set.<br />
NEXT ISSUE ... We will put<br />
paints to use in a project. •<br />
Janis Cathcart, craft<br />
department, <strong>Spotlight</strong><br />
Hamilton NZ, takes her<br />
scrapbooking seriously &<br />
has been in a scrapbooking<br />
club for many years. She<br />
presents demonstrations<br />
in-store whenever possible.<br />
All the paints & some of<br />
the scrapbook papers in<br />
these works from Janis<br />
came from her <strong>Spotlight</strong><br />
stash.<br />
Get Creative Quarterly Autumn 2012 117
• bookshelf<br />
b o o k<br />
shelf<br />
New books to help you get creatively carried away.<br />
feature<br />
read<br />
Tailoring - The classic<br />
guide to sewing the<br />
perfect jacket by the<br />
editors of Creative<br />
Publishing International<br />
Written for the intermediate<br />
sewer who wants to move on to<br />
more challenging projects, this book<br />
ensures success with detailed, stepby-step<br />
instructions, more than 400<br />
photos, plus in-depth discussions<br />
about products and how to use<br />
them. The book offers guidance for<br />
every aspect of tailoring a jacket:<br />
fitting and pattern alteration, fabrics<br />
and tools, interfacings, interlinings,<br />
seams and finishes, hand stitches,<br />
collars, pressing, topstitching, shaping shoulders, setting in sleeves,<br />
sewing pockets, vents, and making perfect buttonholes.<br />
Publisher: CPI. Distributor: Capricorn Link Australia. RRP AU$24.99<br />
The Bead Jewellery Bible<br />
by Dorothy Wood<br />
Dorothy Wood is an expert beader,<br />
crafter and author from Scotland who<br />
has written over 20 books on a variety of<br />
subjects. In this one she provides nine<br />
technique-focused chapters, including<br />
a chapter on making your own beads,<br />
and a tenth chapter containing step-bystep<br />
instructions for 12 brand new bead<br />
jewellery projects.<br />
Publisher: David & Charles. Distributor:<br />
Capricorn Link Australia. RRP AU$29.99.<br />
Notebooks<br />
by Betty Churcher<br />
Betty Churcher was Director of the<br />
Art Gallery of Western Australia and the<br />
National Gallery of Australia and she also<br />
wrote and presented several television<br />
series on art. Now, in this gorgeously<br />
illustrated book, Betty takes us on a<br />
personal tour of her most beloved works,<br />
including masterpieces by Rembrandt,<br />
Goya, Manet, Velázquez, Courbet, Vermeer<br />
and Cézanne. A trained artist, Betty’s<br />
sketches reveal the secrets within the<br />
artworks and the processes of their<br />
creation. With the gift for making art<br />
accessible that characterised her popular<br />
television series, she gently leads your<br />
eye to these paintings’ intimate details,<br />
describing their kinship with other<br />
masterpieces and their place in the history<br />
of art.<br />
Publisher: Melbourne University Publishing.<br />
RRP AU$44.99.<br />
The Contemporary Cake<br />
Decorating Bible<br />
by Lindy Smith<br />
Based in the UK, Lindy Smith is an<br />
established name in ‘sugarcrafting’<br />
who teaches all over the world. Here,<br />
she covers every must-know technique,<br />
starting with basic tools and ingredients<br />
and finishing with advanced modelling and<br />
decorating. She also includes techniques<br />
and inspiration for cupcakes and cookies,<br />
as well as cakes. Take a peep at her<br />
website: www.lindyscakes.co.uk.<br />
Publisher: David & Charles. Distributor:<br />
Capricorn Link Australia. RRP AU$39.99<br />
Georgie Porgie<br />
by George Calombaris<br />
In this new book Chef and MasterChef<br />
Australia judge, George Calombaris, offers<br />
family favourites like spaghetti bolognese,<br />
pita bread and berry ice cream through<br />
to dinner-table dazzlers like slow-roasted<br />
pork belly, braised chicken and chocolate<br />
marshmallow souffles. He also adds fast<br />
cooking facts and equipment lists.<br />
Publisher: Penguin Australia. RRP AU$39.95.<br />
101 Tees: Restyle +<br />
Refashion + Revamp<br />
by Cathie Filian<br />
Try your hand at more than 101 ways<br />
to embellish, customise and transform<br />
the everyday t-shirt into something truly<br />
fashionable. Great projects for beginners,<br />
10 technique-themed chapters give<br />
118 spotlight.com.au www.facebook.com/gcqmag
ookshelf •<br />
Hop Skip Jump<br />
by Fiona Dalton<br />
Fiona Dalton, author of the<br />
hugely-popular blog of the same<br />
name, shows us how to make<br />
gorgeous soft toys using natural<br />
and repurposed materials.<br />
Characters to sew include Arnold<br />
the penguin, Doris the sausage<br />
dog and Harriet the tortoise.<br />
They’re all beautifully designed;<br />
inspired by the handcrafted toys<br />
of yesteryear but with some<br />
modern twists. With simple<br />
patterns, clear instructions<br />
and detailed information about<br />
sourcing and using repurposed<br />
crafters plenty to choose from. Cut, stitch,<br />
embroider, paint, dye, image transfer, or<br />
add trims for gorgeous results.<br />
Publisher: Lark. Distributor: Capricorn Link<br />
Australia. RRP AU$16.99<br />
Colour in Art Quilts<br />
by Janet Twinn<br />
This beautiful book is for quilters<br />
who want a deeper understanding of<br />
colour. Renowned art quilter, Janet Twinn,<br />
covers everything from colour theory and<br />
harmonising fabrics to colouring methods,<br />
using colour to evoke atmosphere and<br />
place, and working in both monochrome<br />
and two colour. Stunning images from<br />
today’s top quilt makers demonstrate a<br />
range of creative possibilities<br />
Publisher: B.T. Batsford . Distributor:<br />
Capricorn Link Australia. RRP AU$39.99.<br />
feature<br />
read<br />
and sustainable materials, beginners<br />
and experienced crafters alike will<br />
find it’s easy being green.<br />
Publisher: Penguin Australia. RRP AU$35.00.<br />
More 90 Minute Quilts<br />
by Meryl Ann Butler<br />
This follow-up book to Meryl’s<br />
90-Minute Quilts is designed to add a new<br />
dimension to your quilts by incorporating<br />
triangles into the designs, while still using<br />
the authors 90-minute methods. Inside<br />
you’ll find ‘how-to’ techniques for creating<br />
a basic 90-minute quilt, including several<br />
methods for easy half-square triangle units.<br />
There is also step-by-step instructions for<br />
over 20 quilt projects, including baby quilts,<br />
lap quilts, tablecloths, wall hangings,<br />
pillows and community service quilts.<br />
Publisher: KP Books. Distributor: Capricorn<br />
Link Australia. RRP AU$29.99.<br />
Note: Books available all good bookstores or check<br />
online. Australian price guides given where possible.<br />
BOOKS TO BUY AT<br />
SPOTLIGHT<br />
Cute Creatures to Knit<br />
and Crochet<br />
by Search Press<br />
Create a whole menagerie of<br />
creatures, from cute and cuddly mice,<br />
dogs, bears, cats and penguins to<br />
the weird and wacky world of Fanfan<br />
the elephant, Antoinette the chicken<br />
and Felix the Martian dog. There are<br />
35 creatures to make using knitting,<br />
crochet, and French knitting applied to<br />
a fabric base. Clear notes on the basic<br />
techniques used as well as step-by-step<br />
instructions and templates for each<br />
creature round out the book.<br />
Publisher: Search Press Australia.<br />
60 Quick Baby Knits<br />
Blankets, booties,<br />
sweaters and more<br />
by Sixth & Spring Books<br />
From cosy cardigans and a whimsical<br />
blanket shaped like a sheep to a<br />
pinwheel beret, embroidered booties and<br />
tiny legwarmers, this book has something<br />
for everyone knitting for tots aged 0 to<br />
24 months.<br />
Publisher: Sixth & Spring. Distributor:<br />
Capricorn Link Australia.<br />
Huggable Crochet<br />
by Christine Lucas<br />
Using simple stitches and<br />
construction techniques, this book shows<br />
you how to make 19 different animals,<br />
measuring from thirty to forty-six<br />
centimetres. Crochet a snuggly squirrel,<br />
cow, penguin, dolphin, lion, giraffe, koala<br />
and more!<br />
Plus, each<br />
pattern is<br />
done in two<br />
different<br />
colour<br />
schemes:<br />
realistic and<br />
fanciful.<br />
Publisher:<br />
KP Books.<br />
Distributor:<br />
Capricorn Link<br />
Australia.<br />
Get Creative Quarterly Autumn 2012 119
• creative living<br />
Finding<br />
inspiration<br />
& sanity<br />
– through papercrafting<br />
Below: Teresa Collins (front row fouth from left) and<br />
Inspiration Unlimited event participants.<br />
Our columnist, Joanna Baxter, creative<br />
director of BELLA! Fynmark PTY<br />
LTD, reconnects with her passion for<br />
papercrafting at a two day event at a ranch<br />
resort in Nevada ... and loves it!<br />
I have to say some days work<br />
is fabulous and I feel lucky. But<br />
other days it just seems like an<br />
ongoing bundle of stress. Meeting<br />
design deadlines for manufacturing,<br />
generating projects for photo shoots<br />
on a hot day when the glue won’t<br />
stick and nothing looks right, finding<br />
out a shipment of product you’re<br />
desperate for has missed the boat …<br />
those days really pile on the pressure.<br />
That’s when I question how much<br />
I now love what started out as a<br />
relaxing hobby!<br />
When it all gets a bit much I try<br />
to take the opportunity to spend<br />
some time indulging my passion<br />
for papercraft with others, by either<br />
spending a day or two at a retreat or<br />
sponsoring an event I’d like to attend.<br />
I then have a ‘work’ excuse to attend<br />
something that will connect me back<br />
into the enjoyment of it all; I can<br />
scrapbook for pleasure like everyone<br />
else.<br />
Recently our company was lucky<br />
enough to get involved with Teresa<br />
Collins’ Inspiration Unlimited event in<br />
Las Vegas, USA. Teresa is a wellknown<br />
designer in the US, famous<br />
for her ‘blingage’ and girly girl<br />
product. She runs a luxurious two day<br />
scrapbooking marathon once a year<br />
and what a marathon it is. Here’s the<br />
rundown:<br />
Friday<br />
6:00am<br />
Dragging myself out of bed, jet lag<br />
kicking in. Need coffee … thank<br />
goodness there’s a food court in the<br />
hotel. Love this Green Valley Ranch<br />
Casino – extra large vanilla latte –<br />
mmmm. I can’t believe how heavy my<br />
scrapbooking tote is – I need to find<br />
the registration desk so I can get my<br />
lanyard and put this tote down!<br />
7:30am<br />
Woohoo I’m in the Bling Babes group<br />
– looks like a full class. Where to sit?<br />
This looks good – three other USA<br />
scrapbooking enthusiasts – we’re<br />
all here on our lonesome – but not<br />
anymore.<br />
8:00 to 11:00am<br />
Nothing like a three hour workshop<br />
first up. I love mini books and ‘The<br />
Story of Us’ by Janet Hopkins is a<br />
challenge to one very jet lagged brain;<br />
lots of folding pockets and envelopes.<br />
Love the book binding technique at the<br />
end – must remember that for future<br />
projects. Love the Cricut cartridge<br />
giveaway. Note to self: buy a Cricut.<br />
11:00 to 12:00pm<br />
There’s Sussan and April – so great<br />
to catch up with them; haven’t seen<br />
them since last year’s Creative<br />
Escape. Starving so we’re all off to<br />
the cafe outside the Casino – woohoo<br />
the shopping centre also has Pottery<br />
Barn and Anthropologie – two of my<br />
favourite stores – be back later for a<br />
visit.<br />
12:00 to 3:00pm<br />
Amber Packer’s layout class – and<br />
double-layouts to boot. Love the<br />
papers, vintage with lots of glitter. Not<br />
too sure about that jute flower I just<br />
made – think I might replace it with<br />
something from my stash at home.<br />
Sewing never was my strong point.<br />
Wish I’d brought photos to finish these<br />
layouts – they’re awesome. More RAKs<br />
(random acts of kindness) – those<br />
sanding blocks from Coordinations<br />
are huge – all the better to sand that<br />
embossed cardstock with and the dust<br />
mat will be very handy.<br />
3:00 to 3:30pm<br />
Break...stretch those legs … more<br />
coffee required!<br />
3:30 to 6:30pm<br />
Teresa Collins’ Travel Album – this gal<br />
never ceases to amaze me with her<br />
calm demeanour while teaching quite<br />
detailed projects. There’s a lot to do –<br />
can I get it finished? No, not quite but<br />
I want to add pictures anyway so, all<br />
good. Are those lolly buckets for us?<br />
6:30 to 8:00pm<br />
Dinner – a quick walk down to<br />
Wholefoods Market. Chicken noodle<br />
soup, salad and dessert. Just a<br />
wee bit warm outside – the Nevada<br />
weather never disappoints.<br />
8:00 to 11pm<br />
Not sure about this Friday Night<br />
120 spotlight.com.au www.facebook.com/gcqmag
creative living •<br />
Above (clockwise):<br />
Displays at the event,<br />
Joanna teaches a<br />
Christmas card make and<br />
take on the Friday night<br />
using Aussie product and<br />
participants crafting.<br />
Crop Party – I think lots of people<br />
will head down the Strip. I think I<br />
have way too much product for the<br />
number of people that will turn up for<br />
the session I’m teaching. Hang on a<br />
minute – is that a line out the door of<br />
people waiting for our Fundamentals<br />
Christmas Card session? So much for<br />
thinking I’ll be out of here at 9pm. Flat<br />
out till 11.30pm<br />
Saturday<br />
8:00 to 11:00am<br />
First up this morning Layle Koncar’s<br />
Observations class. Ooh very<br />
technique based, misting, fussy<br />
cutting, sewing and stamping. Two<br />
double layouts – we’ve got our work<br />
cut out for us. Love the embossed<br />
cardstock. Is that Bazzill album for<br />
me? How much product do these guys<br />
give away? Amazing.<br />
11:00 to 12:00pm<br />
Back to that cafe for the best turkey<br />
sandwich ever.<br />
12:00 to 3:00pm<br />
Always a fan of everything Bazzill<br />
does. They put so much into this<br />
industry and are just the nicest<br />
people. Joey Otlo’s Divinely Sweet<br />
album is cute, cute, cute. I’m so<br />
tired though. I play around with the<br />
chipboard cover and cover the inside<br />
chipboard pages. I don’t scrap them,<br />
just keep it simple. Bonus at the<br />
end of the class is when we get a<br />
Christmas paper pack in the same<br />
colours – now I know what I’ll use this<br />
album for.<br />
3:00 to 3:30pm<br />
More coffee for me – need to keep<br />
these eyes open. Ann confessed to<br />
a drink and a win on the pokies in<br />
the casino on her return – where else<br />
could you scrap and win money during<br />
an afternoon tea break?<br />
3:30 to 6:30pm<br />
The A-Z Workshop - I’ve seen this<br />
book of Teresa’s all weekend as other<br />
groups completed it in class. It’s<br />
beautiful and I love the whole idea<br />
of creating a book from A to Z about<br />
me. We have around seven minutes to<br />
complete each page and then we get<br />
to bind it in the new Provo Craft Your<br />
Story Machine – love it! Teresa rocks<br />
as always – this is my favourite class.<br />
Heaps of giveaways too – my sister is<br />
going to love some of these goodies.<br />
6:30 to 8:00pm<br />
Burgers and beer at Fatburger with the<br />
girls – I reckon we deserve it. On to<br />
the prizes and presentations - I feel so<br />
blessed to have been in the company<br />
of such a talented group of women,<br />
sharing their love for things worth<br />
remembering. I have so many ideas<br />
and new techniques up my sleeve.<br />
I have received such inspiration<br />
from the last 48 hours - I’m a lucky<br />
(albeit very tired) girl. Wondering how<br />
I’m going to get all this stuff in my<br />
suitcase to bring home!<br />
Upon review these few days<br />
recorded in my travel diary really do<br />
summarise how I feel about papercraft<br />
and scrapbooking 99 per cent of the<br />
time. With papercraft, if you share the<br />
process, the product and the passion,<br />
you do come away with a renewed<br />
sense of self. They say scrapbooking<br />
is cheaper than a psychiatrist – I<br />
now know it to be true! Inspiration<br />
Unlimited? It certainly was. •<br />
About Joanna<br />
Joanna, who has been working at Fynmark<br />
since 2002, got hooked on scrapbooking<br />
from the first class she attended and<br />
was designing her own products shortly<br />
thereafter. An interest in archiving family<br />
memorabilia inspired her to create<br />
affordable product for the Australian<br />
market at a time when USA products<br />
dominated. Today her company sells<br />
products throughout Australia and NZ,<br />
the USA, UK and Europe. “I have the best<br />
job in the world, designing and sourcing<br />
product for our BELLA!, Fundamentals and<br />
Ruby Rock-it brands,” she says.<br />
Get Creative Quarterly Autumn 2012 121
• creative people<br />
Left: Sour cream container by Sharon Burkert.<br />
Below: Paint chip sample box by Jessica Jones.<br />
wrapped in<br />
imagination<br />
Putting a gift in a plain wrapper goes against everything<br />
our columnist, USA papercrafter and author JEANNINE<br />
STEIN, “aesthetically” believes in. But, she says, there’s<br />
only so much you can do with gift wrap, ribbon and<br />
embellishments and so much more you can do by making<br />
the actual package yourself …<br />
Paper packaging takes wrapping to<br />
a whole new level. The ‘wow’ factor<br />
is huge, the creative satisfaction is<br />
enormous, and you can tailor the<br />
package to the recipient or occasion,<br />
such as a friend’s birthday, a wedding,<br />
or even for a trade among your crafty<br />
friends. Think dressed-up paper<br />
cones made from scrapbook paper,<br />
origami boxes made out of elegant<br />
Japanese paper and sewn paper bags<br />
and envelopes made from vintage<br />
ephemera, or stuff found around the<br />
house.<br />
Making a container doesn’t even<br />
require that much more time and<br />
effort than decorating a pre-made box<br />
or bag, and the materials are probably<br />
already in your stash.<br />
One of the most popular wraps<br />
right now is the sour cream container,<br />
so called because in the U.S. that’s<br />
how sour cream used to be packaged.<br />
While it looks complex it’s the<br />
simplest package to make: start with<br />
a square or rectangular piece of paper<br />
or cardstock and join two ends to form<br />
a tube using a strong adhesive such<br />
as double stick tape. Pinch one end<br />
About Jeannine<br />
Jeannine Stein has been making books for<br />
more than 15 years, exploring bindings, mediums<br />
and techniques. In addition to teaching<br />
book binding, she is an award-winning journalist<br />
and has written extensively about paper crafts,<br />
artists’ books, scrapbooking, rubber stamping<br />
and letterpress. Her books include Re-Bound:<br />
Creating Handmade Books From Recycled and<br />
Repurposed Materials and Adventures in Bookbinding:<br />
Hand Crafting Mixed-Media Books. She<br />
lives in Los Angeles, California.<br />
closed, again adhering with tape, fill<br />
the package, then pinch and seal the<br />
other end perpendicular to the first.<br />
Secure the ends with a paper crimper<br />
or ribbon.<br />
Use these containers for small<br />
gifts, sweets or jewellery and<br />
embellish them with flowers, punches,<br />
tags and charms. Try making them<br />
with a printed transparency for a great<br />
see-through look. Sharon Burkert<br />
features a tutorial and several ideas<br />
for the containers on her blog, using<br />
bold patterned cardstock and flower<br />
dyes to dress up her containers.<br />
Making a container<br />
doesn’t even require<br />
that much more<br />
time and effort than<br />
decorating a pre-made<br />
box or bag, and the<br />
materials are probably<br />
already in your stash.<br />
Need a quick box? Graphic and<br />
textile designer Jessica Jones shows<br />
how to make a colourful box and lid<br />
out of paint chip<br />
samples on her<br />
blog, How About<br />
Orange. Using<br />
a template, all<br />
that’s required<br />
are a few cuts<br />
with a craft<br />
knife and some<br />
double-stick<br />
tape. These<br />
are perfect for<br />
party favours.<br />
Paper cones are also easy to<br />
assemble and can be filled with small<br />
treats or potpourri. Start with a square<br />
piece of double-sided cardstock and<br />
bring two opposite corners together,<br />
wrapping them until a cone forms.<br />
Fasten together with double-stick tape<br />
(or a couple of staples that can be<br />
hidden) and decorate to your heart’s<br />
content.<br />
One of my favorite packages is a<br />
sewn gift bag or envelope made from<br />
old book pages, maps or vintage sheet<br />
music. If the pages are large enough<br />
they can be stitched as is into a bag<br />
or envelope shape on the sewing<br />
machine or by hand, using embroidery<br />
floss or yarn and a whip stitch or<br />
straight stitch. Or, sew pieces together<br />
patchwork-style for a funkier look.<br />
When I need some inspiration I<br />
head to my nearest gourmet food store<br />
and check out the packaging. Or, I’ll<br />
peruse graphic design and packaging<br />
books, which always offer great ideas<br />
and templates. Next time you give a<br />
gift, skip the generic box and create<br />
something unique. •<br />
LINKS<br />
www.howaboutorange.blogspot.com<br />
Paint chip tutorial on How About<br />
Orange:<br />
www.howaboutorange.blogspot.<br />
com/2011/07/how-to-make-boxesfrom-paint-swatches.html<br />
Sharon Burkert blog: www.sharon<br />
burkert.com/as_the_ink_dries/<br />
Sour cream container tutorial:<br />
www.sharonburkert.com/as_the_ink_<br />
dries/2011/03/flashback-friday-sourcream-containers.html<br />
122 spotlight.com.au www.facebook.com/gcqmag
make it •<br />
OSCARS<br />
party<br />
e<br />
Celebrate the silver screen or<br />
use Hollywood as a theme for<br />
your next party. Roll out the<br />
red carpet & enjoy ...<br />
Get Creative Quarterly Autumn 2012 123
• make it<br />
INVITATION<br />
Materials<br />
Kaisecard – black & white<br />
A4 matt double-sided gold paper/card<br />
3mm matt gold satin ribbon<br />
Small gold alphabet & number stickers<br />
Small gold star stickers<br />
White paper for computer printer<br />
Double-sided tape<br />
Paper trimmer<br />
Scissors<br />
Pencil & ruler<br />
Computer & printer<br />
Front of invite<br />
Step 1 Cut a piece of gold card<br />
10cm x 21cm (DL size). Cut a piece<br />
of black weave cardstock 9.5cm x<br />
20.5cm and adhere to the middle of<br />
the gold card using double-sided tape.<br />
Cut white weave cardstock 8.5cm x<br />
19.5cm and stick to the centre of the<br />
mounted black card.<br />
Step 2 Using the template<br />
provided cut a full trophy shape from<br />
black weave cardstock.<br />
Cut only the statuette from gold card<br />
and attach to the black trophy. Cut<br />
a small length of ribbon and stick<br />
to the base of the trophy. Embellish<br />
below the base with letter and star<br />
stickers. Adhere the trophy to the<br />
centre front of the invite. Further<br />
embellish front with star stickers<br />
Back of invite<br />
Step 3 Print invite wording from<br />
computer onto white paper and cut<br />
to 8.5cm x 19.5cm.<br />
Stick a length of ribbon across the<br />
invite 1cm down from the top and<br />
another 1cm up from the base.<br />
Step 4 Cut black weave<br />
cardstock 9.5cm wide x 20.5cm<br />
and stick to the centre back of the<br />
invite. Attach printed white paper<br />
to the centre of the black card and<br />
embellish with star stickers.<br />
GLASS DECORATION/<br />
PLACE CARDS<br />
Materials<br />
Kaisecard – black<br />
A4 matt double-sided gold paper/card<br />
Small gold star stickers<br />
White paper for computer printer<br />
Small wooden peg<br />
Crafters ChoiceCraft glue<br />
Black ribbon (for champagne/wine glass)<br />
Double-sided tape<br />
Paper trimmer<br />
Scissors<br />
Pencil & ruler<br />
Computer & printer<br />
Step 1 Using the template provided<br />
cut a full trophy shape from black weave<br />
cardstock.<br />
Cut only the statuette from gold card and<br />
attach to the black trophy shape with<br />
double-sided tape.<br />
Step 2 Print name from a computer<br />
onto white paper and trim to 1.5cm high<br />
x 5cm long.<br />
Stick name to the black base of the<br />
trophy and embellish with star stickers.<br />
Step 3 Glue a small wooden peg to<br />
the back of the head of the trophy and<br />
allow glue to dry.<br />
tie black ribbon around the stem of the<br />
glass and when glue is dry, peg trophy to<br />
the rim of the glass.<br />
PLACE CARDS<br />
Materials<br />
Weave cardstock – black & white<br />
A4 matt double-sided gold paper/card<br />
White envelopes (1 per person)<br />
White paper for computer printer<br />
Double-sided tape<br />
Paper trimmer<br />
Scissors<br />
Computer & printer<br />
Step 1 Cut piece of gold card 10cm<br />
x 6.5cm.<br />
124 spotlight.com.au www.facebook.com/gcqmag
product knowledge •<br />
Cut black weave cardstock 9cm x<br />
6cm and stick to the centre of the<br />
gold card using double-sided tape.<br />
Step 2 Print wording from the<br />
computer onto white paper (or<br />
handwrite if preferred) then trim<br />
paper to 8.5cm x 5cm. Stick the<br />
printed white paper to the centre of<br />
the mounted black card.<br />
PARTY<br />
basics<br />
Koo 3-tier glass<br />
cake stand<br />
Step 3 Attach place card to<br />
the back of an envelope with the<br />
top corner slightly underneath the<br />
envelope flap. Repeat for required<br />
number of place cards. •<br />
Koo Platinum<br />
white & red<br />
wine glass &<br />
champagne<br />
flute<br />
Invitation/placecard<br />
template<br />
enlarge by 145%<br />
Koo Stainless<br />
steel water<br />
pitcher<br />
Koo Ceramic<br />
serving bowl<br />
set<br />
Koo Ceramic<br />
cake stand<br />
Get Creative Quarterly Autumn 2012 125
• creative people<br />
red carpet<br />
More and more the ‘red carpet’ has<br />
become synonymous with the epitome<br />
of glamour and fantasy. From the<br />
Brownlow Medal to teen parties and<br />
school formals, red carpet dressing has<br />
become an obsession. With the Oscars<br />
around the corner, we’ve decided to<br />
dress up and become part of the<br />
glitterati ... but what does it take?<br />
An Australian in Hollywood<br />
Australian designer Johanna<br />
Johnson made a splash last<br />
year during the Emmy Awards<br />
when ‘Mad Men’ actress<br />
Christina Hendricks sashayed<br />
down the carpet in her heavy<br />
silk satin gown that was<br />
embellished with Swarovski<br />
crystals and screamed ‘old<br />
school Hollywood’. The<br />
Sydney Morning Herald’s<br />
Fashion Editor, Georgina<br />
Safe, declared Johanna’s<br />
dress a “red carpet<br />
stunner” and quoted the<br />
designer as saying events<br />
such as these, and the<br />
immediate subsequent media<br />
coverage, has such an impact<br />
it can make sales jump<br />
overnight.<br />
Johanna Johnson’s label<br />
was founded in 2005 with<br />
the aim of bringing the<br />
sophistication and glamour of<br />
the golden era of Hollywood<br />
to Australian brides. Now<br />
that modern Hollywood has<br />
discovered her who knows<br />
what the future holds for this<br />
mother of two?<br />
@ www.johannajohnson.com<br />
www.smh.com.au<br />
AAP Image/Jennifer Graylock<br />
126 spotlight.com.au www.facebook.com/gcqmag
creative people •<br />
Above: Kerry O’Brien (right) with colleague<br />
dressing<br />
A woman with a bird’s eye view<br />
Melbourne-based publicist Kerry<br />
O’Brien has been front and centre<br />
on countless red carpets. National<br />
publicist for five Logie Award<br />
Ceremonies and five Australian<br />
Film Institute Awards, she says<br />
that managing the red carpet is a<br />
“huge job” with close to 200 media<br />
representatives accredited to be on<br />
site and reporting each year.<br />
From 2000 onwards Kerry says<br />
red carpet dressing in Australia<br />
became “incredibly glamorous”. She’s<br />
“impressed and stunned at the effort<br />
that goes into dressing the stars” and<br />
says many local designers are using<br />
this avenue as a marketing tool for<br />
their labels.<br />
“I believe the Internet has helped<br />
because there are enormous<br />
increases in the amount of media<br />
coverage received from a red carpet<br />
event; photos and footage can be<br />
distributed to the world media in a<br />
matter of minutes,” says Kerry.<br />
Reluctant to choose just one<br />
Australia favourite, the publicist says<br />
Collette Dinnigan, Lisa Ho and J’Aton<br />
are among her top choices.<br />
“Did you see Asher Keddie’s Logies<br />
outfit last year?” she asks. “It was<br />
truly stunning! Kat Stewart also always<br />
looks amazing, as does Jennifer<br />
Hawkins – of course! These women<br />
are stylish and it’s not about how<br />
much skin they are showing but the<br />
perfect gowns they choose. I have also<br />
had Naomi Watts and Cate Blanchett<br />
on my red carpets and they are always<br />
stunning.”<br />
While Kerry’s work ensemble is<br />
normally limited to sharp suits and<br />
shoes that can keep her on her feet<br />
for 12 to 14 hours at her time, she<br />
personally loves Lisa Ho and chose<br />
one of her gowns to get married in,<br />
one she spied on Rebecca Gibney on<br />
the Logies red carpet.<br />
And, after all these years watching<br />
starlets come and go, via memorable<br />
moments, wardrobe malfunctions and<br />
pure glamour, what is Kerry’s idea<br />
of successful red carpet dressing?<br />
“Don’t over accessorise, make the<br />
gown the hero. Less is more is my<br />
motto!” she declares. •<br />
www.kerryobrienpublicity.com.au<br />
@<br />
“Kat Stewart (above) also<br />
always looks amazing, as<br />
does Jennifer Hawkins – of<br />
course! These women are<br />
stylish and it’s not about<br />
how much skin they are<br />
showing but the perfect<br />
gowns they choose”<br />
– Kerry<br />
Get Creative Quarterly Autumn 2012 127
• make it<br />
OSCARS<br />
appetizers<br />
1. Tortilla chips with chorizo<br />
and cherry tomato and<br />
jalapeño salsa<br />
Ingredients<br />
Oil for cooking<br />
1 chorizo, sliced<br />
12 cherry tomatoes<br />
2 tbsp lemon juice<br />
2 tbsp chopped coriander<br />
1 jalapeno, finely diced<br />
Tortilla chips (corn chips)<br />
Note: If you can’t find jalapenos simply<br />
use a long green chilli. A mix of cherry<br />
tomatoes will bring additional colour to<br />
these canapés.<br />
Instructions<br />
1. Heat a heavy-based frying pan over<br />
a medium heat. Add sliced chorizo,<br />
no need to add oil, and cook for 3–4<br />
minutes on each side until golden<br />
brown and fat renders out. Drain and<br />
set aside.<br />
2. Cut cherry tomatoes into quarters or<br />
halves depending on their size. When<br />
chorizo is cool cut slices in halves and<br />
mix with cherry tomatoes, lemon juice,<br />
coriander and jalapeno, season with<br />
salt and freshly ground black pepper.<br />
3. To serve, spoon chorizo mix onto<br />
tortilla chips and serve.<br />
Makes 15-18<br />
2. Prawn and chorizo<br />
pinchos<br />
Ingredients<br />
1 small baguette<br />
Olive oil for cooking<br />
1 punnet cherry tomatoes<br />
Salt<br />
1 chorizo, sliced<br />
12 cooked prawns, peeled & deveined<br />
4 tbsp chopped parsley<br />
250ml (1 cup) mayonnaise<br />
1 tsp smoked paprika<br />
1tbsp lime juice<br />
Instructions<br />
1. Preheat oven to 180ºC.<br />
2. Take the baguette, slice thinly, brush<br />
with olive oil and toast in preheated<br />
oven for 8–10 minutes until crispy.<br />
3. Take a punnet of cherry tomatoes,<br />
look for smaller ones if possible,<br />
or cut in half. Drizzle with olive oil,<br />
and sprinkle with salt and roast in<br />
preheated oven for 10–12 minutes, or<br />
until slightly soft.<br />
4. Slice the chorizo thinly and either<br />
grill or barbecue until crispy on each<br />
side. Drain on absorbent paper to<br />
remove excess fat. Cut prawns in half<br />
lengthways. Make smoked paprika<br />
mayonnaise by mixing mayonnaise with<br />
smoked paprika and lime juice.<br />
5. To assemble lay out bread<br />
slices, spread with smoked paprika<br />
mayonnaise, top with a slice of chorizo,<br />
128 spotlight.com.au www.facebook.com/gcqmag
half a prawn, a cherry tomato and<br />
sprinkle with chopped parsley.<br />
Makes 24<br />
3. Tostades with chipotle<br />
chicken and guacamole<br />
Ingredients<br />
4 corn tortillas<br />
Oil for cooking<br />
1 skinless chicken breast fillet<br />
3 tsp chipotle powder<br />
1 tbsp olive oil<br />
Note: Chipotle powder can be found<br />
at many specialist spice stores or<br />
try online at www.usafoods.com.au .<br />
Alternatively try a Mexican chilli powder<br />
from your supermarket.<br />
1. Preheat oven to 180ºC. Brush<br />
tortillas with oil and cut into 6 wedges.<br />
Bake in preheated oven for 5–6<br />
minutes until crispy.<br />
1<br />
2. Mix chipotle powder with oil and season<br />
with salt and pepper. Pour over chicken<br />
fillets.<br />
3. Heat a heavy-based frying pan over a<br />
medium heat. Add chicken fillets and cook<br />
for 3–4 minutes on each side until golden<br />
brown. Place in preheated oven and cook<br />
for a further 5–8 minutes until cooked<br />
through. Remove and allow to cool.<br />
2<br />
Guacamole<br />
Ingredients<br />
1 avocado<br />
2 tbsp lime juice<br />
2 tbsp chopped coriander<br />
Dash of Tabasco<br />
¼ red capsicum, finely diced<br />
1. Make guacamole by removing the<br />
flesh from the avocado, place in a<br />
bowl and mash roughly. Add limejuice,<br />
coriander, Tabasco, capsicum, spring<br />
onions, salt and freshly ground black<br />
pepper and mix to combine.<br />
3<br />
2. To serve spoon guacamole onto<br />
tostadas, top with a slice of chicken<br />
and serve.<br />
Makes 12–15<br />
4. Coriander salmon on<br />
white corn tortillas<br />
Ingredients<br />
1 x 200g salmon fillet, skin removed<br />
Finely grated zest of 1 lime<br />
2 spring onions, thinly sliced<br />
2 tbsp chopped coriander leaves<br />
Salt & freshly ground black pepper<br />
4<br />
White corn tortillas<br />
Coriander leaves to garnish<br />
Instructions<br />
1. Finely dice salmon and mix with<br />
lime zest, spring onions, coriander,<br />
salt and pepper.<br />
2. Spoon mixture onto tortillas,<br />
garnish with coriander leaves and<br />
serve.<br />
Makes 15 •<br />
make it •<br />
Get Creative Quarterly Autumn 2012 129
• product knowledge<br />
Host an Oscars<br />
Party at home<br />
Looking for a fun excuse to pop on a<br />
feather boa and crack open the bubbles<br />
with good friends this February?<br />
The 84th Academy Awards will be held in<br />
Hollywood at the Kodak Theatre on Sunday,<br />
the 26th of February, with comedian Billy<br />
Crystal as the host. More and more people<br />
are getting on board the silver screen<br />
theme by hosting Oscars parties, some at<br />
home and some in glamorous hotel suites<br />
rented just for the night.<br />
<strong>Spotlight</strong> has a great selection of<br />
Hollywood, award night and movie themed<br />
novelty items in its Spartys section.<br />
Whether you choose to host a movie<br />
themed trivia night, a riotous viewing of the<br />
Academy Awards television coverage or a<br />
pre-event voting night with friends, you’ll<br />
find loads of inspiration at <strong>Spotlight</strong>.<br />
Invitation front (left) &<br />
Invitation inner (right)<br />
Clapper board<br />
And the nominations for<br />
favourite party ideas are...<br />
• Dress up dinner – come as your favourite<br />
star, present or past, or give guests an era<br />
– say the 1940s – to base their costumes on.<br />
• Roll out the red carpet outside the house<br />
for an Oscars themed dinner party. Take<br />
guests’ photos with a digital camera and<br />
email them out afterwards or turn them into<br />
commemorative cards.<br />
• Create your own award themed party<br />
invitations and DIY ballot cards. Type the<br />
words - print your own oscars ballot – into<br />
your favourite search engine and you will<br />
find ready-to-go pdfs that are perfect for<br />
party purposes.<br />
• Eat popcorn in front of the television –<br />
dress up your pyjamas with a feather boa<br />
and serve yourself some cinnamon and<br />
sugar dusted popcorn and get ready to<br />
critique those red carpet fashions.<br />
• Hire a hotel room for the screening of<br />
the Academy Awards and get everyone to<br />
chip in. Let the hotel staff wash up the wine<br />
glasses! After all, you’re a star for the night.<br />
• Use these websites for inspiration<br />
and information: www.oscars.org and<br />
Koo Domed short & Long<br />
tumblers & Platinum<br />
Champagne Flute<br />
Ripple<br />
Bowls<br />
Wigs<br />
oscar.go.com •<br />
Hollywood glasses<br />
130 spotlight.com.au www.facebook.com/gcqmag
Centrepiece<br />
cascade<br />
product knowledge •<br />
Feather Boas<br />
& Marabous<br />
Crepe streamers<br />
& latex balloons<br />
Party Creator<br />
flapper dress<br />
Star award<br />
Star door decoration<br />
& confetti<br />
Disposable tableware<br />
& serviettes<br />
Get Creative Quarterly Autumn 2012 131
• make it<br />
e<br />
Time for a<br />
Kitchen Tea<br />
Get Creative’s Facebook friends share<br />
the following creative kitchen tea ideas:<br />
“I’ve seen crocheted & knitted tea<br />
sets. The crocheted one had little tea<br />
cakes, crocheted cake stand & tiny<br />
snacks. The knitted tea set just had tea &<br />
a slice of cake.”<br />
Irene Ho - Hamlyn Terrace, NSW<br />
Manda Maczi credits her sisters - Fiona &<br />
Teagan - from Soldiers Point, NSW, with<br />
this idea: “A nice homemade recipe book<br />
with recipes from the people who are<br />
coming to the party (& even those that<br />
can’t make it). My sisters made me one<br />
for my kitchen tea & it was awesome.”<br />
LIKE us on Facebook & say g’day to<br />
fellow readers: www.facebook.com/<br />
gcqmag<br />
BASKET LINER<br />
All baskets vary in shape and size.<br />
This is a basic idea that will suit most<br />
basket shapes. It will need to be<br />
adjusted in measurements to suit the<br />
particular basket used.<br />
Materials<br />
Medium basket with handle<br />
Gingham fabric (45cm x 60cm)<br />
Matching ribbon<br />
Firm cardboard, pencil<br />
Wadding & craft glue/hot glue gun<br />
Tea towel<br />
Scissors, pins, hand needle, tape<br />
measure<br />
Sewing machine, sewing thread<br />
Iron<br />
Step 1 To gauge what size fabric<br />
piece is needed to line the basket,<br />
place a tea towel inside the basket, in<br />
the middle and pushed in all the way to<br />
the bottom of the basket. Make note of<br />
how much more or less in length and<br />
width than the tea towel is needed to<br />
line the basket.<br />
Cut a piece of gingham fabric to the<br />
tea towel measurements (making<br />
adjustments where necessary) and add<br />
2cm on each side for hem allowance.<br />
Double hem fabric on all sides by<br />
pressing under 1cm then another 1cm<br />
then stitch in place. Press.<br />
Step 2 To make the inner base of<br />
the basket, trace the bottom of the<br />
basket onto the cardboard and cut out<br />
slightly smaller so it fits snuggly inside<br />
the base of the basket.<br />
132 spotlight.com.au www.facebook.com/gcqmag
d.line silicone whisk<br />
product knowledge •<br />
d.line granite<br />
mortar & pestle<br />
Kitchen<br />
Cut a piece of wadding to the same size<br />
as the cardboard base and glue to the<br />
top of the cardboard shape.<br />
Helpers<br />
Place the padded side of the base<br />
face down on extra fabric then cut out<br />
fabric allowing 1.5cm extra around the<br />
edge of the shape. Bring the edges<br />
of the fabric up onto the back of the<br />
cardboard and glue firmly in place.<br />
Allow glue to dry.<br />
Step 3 Place the hemmed gingham<br />
d.line potato ricer<br />
liner inside the centre of the basket<br />
then put the padded base into the base<br />
of the basket. Adjust the gathers/folds<br />
of the liner for desired look. If needed<br />
hand sew the liner to the basket to<br />
keep in place.<br />
Tie a bow with matching ribbon around<br />
the base of each side of the handles.<br />
d.line nylon tipped food tongs<br />
Optional – glue the base to the inside<br />
of the basket, but by doing this you<br />
won’t be able to remove the base later<br />
to wash the liner.<br />
KITCHEN TEA<br />
d.line<br />
INVITATION<br />
stainless steel 5<br />
Materials<br />
cup flour sifter<br />
White weave cardstock<br />
Jenny B collection – cup cake<br />
embellishments<br />
Koo Timber index cutting board<br />
Crafters Choice chipboard flowers<br />
d.line<br />
Bella! pink fusion trimming<br />
ceramic pie weights<br />
Remarks rub on alphabet<br />
Double-sided tape<br />
Scissors<br />
Paper trimmer<br />
Step 1 Cut the white weave<br />
cardstock 21cm x 10.5cm and attach<br />
a strip of gingham ribbon along the left<br />
edge of the card.<br />
Step 2 Rub on the words for the<br />
invitation then embellish with the stick<br />
on chipboard flowers and Jenny B<br />
embellishments.<br />
d.line blow torch<br />
Step 3 Fill in the details by hand. •<br />
Please note: Due to varied buying patterns throughout Australia and New Zealand some stock<br />
may vary between stores or sell out. Ask a <strong>Spotlight</strong> employee at your nearest store for the best alternative.<br />
Get Creative Quarterly Autumn 2012 133
• news<br />
n e w s<br />
Events, updates & announcements to inspire.<br />
Above: Grace Kelly 1954. Image courtesy of<br />
Philippe Halsman/Magnum Photos/Snapper Media<br />
Grace Kelly comes to<br />
Bendigo<br />
The Victoria & Albert Museum’s<br />
highly successful ‘Grace Kelly: Style<br />
Icon’ exhibition has been secured<br />
exclusively in Australia by Bendigo Art<br />
Gallery.<br />
The exhibition, which attracted<br />
more than 200,000 visitors in the UK,<br />
features costumes from films such as<br />
Alfred Hitchcock’s ‘Rear Window’, plus<br />
Grace’s haute couture gowns from<br />
Dior, Balenciaga, Chanel and Givenchy,<br />
alongside tailored suits and American<br />
casual wear.<br />
A range of glamorous special<br />
events will be developed in association<br />
with the L’Oreal Melbourne Fashion<br />
Festival to coincide with the exhibition.<br />
This exceptional exhibition, comprising<br />
more than 100 items, includes<br />
dresses and accessories that will be<br />
showcased in four of the gallery’s main<br />
spaces.<br />
• Takes place from 10 March – 17<br />
June, 2012<br />
• www.bendigoartgallery.com.au<br />
The Mad Square: Modernity<br />
in German Art 1910 – 37<br />
This summer the National Gallery of<br />
Victoria presents the first exhibition in<br />
Australia to explore the radical avantgarde<br />
art movements that emerged<br />
in Germany during one of the most<br />
important and chaotic periods of the<br />
twentieth century.<br />
The Mad Square: Modernity in<br />
German Art 1910–37 brings together<br />
an experimental, provocative and<br />
utterly compelling collection of over<br />
200 paintings, photographs, prints,<br />
films, sculptures and decorative arts<br />
pieces with loans from museums and<br />
private collections around the world.<br />
• Takes place 25 November 2011<br />
until 4 March 2012. Admission fees<br />
apply.<br />
• www.ngv.vic.gov.au<br />
Adelaide Festival<br />
The Festival brings the very best<br />
in theatre, dance, opera, literature,<br />
music, film and the visual arts to<br />
Adelaide, turning the city into a place<br />
of annual pilgrimage for arts lovers the<br />
world over. The programme features<br />
68 events, including world premieres<br />
and Australian premieres both in the<br />
visual and performing arts. Highlights<br />
from the theatre program include<br />
French screen legend Isabelle Huppert<br />
in ‘A Streetcar’ and Tony Award winning<br />
British actor Jonathan Pryce Harold<br />
Pinter’s ‘The Caretaker’.<br />
• Takes place 2 – 18 March, 2012<br />
• Bookings adelaidefestival.com.au<br />
or BASS 131 246<br />
Tea Cosy Competition<br />
Queensland’s self proclaimed Tea<br />
Cosy capital Miles, situated 340<br />
kilometres west of Brisbane, is again<br />
seeking the world’s best tea cosies<br />
for its World Tea Cosy Competition.<br />
In previous years entries have been<br />
received from Australia, England,<br />
Scotland, Ireland, the United States,<br />
South Africa, New Zealand and France.<br />
Enter your work into one of four<br />
categories: knitting and/or crochet,<br />
embroidery, novelty and colour<br />
themed. The winner of each category<br />
receives $200, with an extra $300<br />
to the overall winner who becomes,<br />
therefore, the champion.<br />
• The entry form is available from the<br />
website www.milesrac.org or you can<br />
write to Mrs Ann Gibbons, ‘Mirrabook’,<br />
Miles, 4415, Queensland, Australia.<br />
All entries must reach Miles by 30<br />
June 2012.<br />
• For more information, contact Ann<br />
Gibbons on (07 4627 1707) or email<br />
tedgibbons@bigpond.com<br />
Above: Water Stains on the Wall. Performed by Cloud Gate Dance Theatre of Taiwan, photo by LIU<br />
Chen-hsiang. Above right: raoul 5-09 0562 A4, photo by Richard Haughton.<br />
134 spotlight.com.au www.facebook.com/gcqmag
Left: Felix Nussbaum–German 1904–1944. The<br />
mad square 1931, oil on canvas– 97.0 x 195.5<br />
cm. Berlinische Galerie, Landesmuseum für<br />
Moderne Kunst, Fotografie und Architektur. ©<br />
Felix Nussbaum/VG Bild-Kunst, Bonn. Licensed by<br />
Viscopy, Sydney.<br />
news •<br />
Right: Conversations with Creative Women by<br />
Tess McCabe.<br />
Ovarian Cancer Awareness<br />
Month<br />
Each year in February Ovarian<br />
Cancer Australia runs a national<br />
Awareness Month campaign to<br />
highlight the symptoms of ovarian<br />
cancer and to raise funds for their<br />
support and research programs. In<br />
<strong>Spotlight</strong> stores in February you can<br />
purchase emery boards and special<br />
teal coloured ribbons to show your<br />
support. Proceeds go to Ovarian<br />
Cancer Australia. This year Teal Ribbon<br />
Day falls on Wednesday 29 February.<br />
Information about the symptoms of<br />
ovarian cancer and the work of Ovarian<br />
Cancer Australia and details of how to<br />
host an Afternoon Teal are available<br />
at www.ovariancancer.net.au<br />
A bouquet of stitches from<br />
SA embroiderers<br />
As part of the Adelaide Fringe<br />
Festival, The Embroiderer’s Guild<br />
of South Australia is presenting an<br />
exhibition of members’ work entitled<br />
‘A Bouquet of Medieval Stitches’. The<br />
Guild is situated at 16 Hughes Street<br />
Mile End, South Australia. The Guild’s<br />
museum will also present the opulence<br />
Above: Patron Nicole<br />
Livingstone was Master of<br />
Ceremonies at the launch.<br />
Below left: Julia Gillard and<br />
members of Parliament<br />
wear the teal ribbon.<br />
of the period with items from its<br />
collection. See daily demonstrations<br />
of different embroidery techniques or<br />
purchase hand embroidered gifts.<br />
• Takes place 2 – 17 March and<br />
admission is $5.<br />
• Contact the Guild via phone on<br />
(08) 8234 1104, via email contact@<br />
embguildsa.org.au or on the web<br />
www.embguildsa.org.au<br />
New book to inspire<br />
creative Aussie women<br />
Inspired by an innovative networking<br />
group in Melbourne called Creative<br />
Women’s Circle, a new book has<br />
arrived called Conversations with<br />
Creative Women by Tess McCabe.<br />
It is a compilation of interviews with<br />
some of Australia’s most talented<br />
female creatives, from industries as<br />
varied as millinery, textile design,<br />
blogging, architecture, retail, writing,<br />
weaving and fashion design. All<br />
the interviewees are at different<br />
stages in their careers, with varying<br />
responsibilities at home, as an<br />
employee, as a self-employed<br />
freelancer or as a business owner.<br />
These interviewees describe the<br />
varied paths that have led them to<br />
their current achievements and include<br />
tips for entering or sustaining a career<br />
in their field and insights into the<br />
real-life struggles, challenges, and<br />
the minutiae of creative practice. The<br />
book cost AU$44.00 and you can<br />
buy online at http://goo.gl/DTeq3 or<br />
email cwc@tessmccabe.com.au for<br />
stockists in Victoria, South Australia<br />
and Western Australia.<br />
Calendar quickies<br />
* L’Oréal Melbourne Fashion<br />
Festival (LMFF) is an annual<br />
celebration of fashion, design,<br />
business and creative endeavour. It<br />
takes place 8 – 15 March and you can<br />
find out more at www.lmff.com.au.<br />
* The Melbourne Food and Wine<br />
Festival sees visitors indulge in more<br />
than 300 events that fill Melbourne’s<br />
restaurants, laneways, basements<br />
and rooftops and spill out into regional<br />
Victoria. It takes place 2 – 21 March<br />
and you can find out more at www.<br />
melbournefoodandwine.com.au<br />
Statewide craft shows<br />
Sydney Craft and Sewing Show: 8 – 11<br />
March, Rosehill Gardens Racecourse.<br />
Brisbane Craft and Sewing Show: 22<br />
– 25 March, Brisbane Convention &<br />
Exhibition Centre, South Bank.<br />
For more information go to<br />
www.craftandsew.com.au<br />
Australasian Quilt Convention: April 12<br />
– 15, Royal Exhibition Building, Carlton<br />
Gardens. Visit its website at<br />
www.aqc.com.au<br />
Tasmania Craft & Quilt Fair: April 27 –<br />
29, Launceston Silverdome, Tasmania.<br />
Find out more at www.craftfair.com.au.<br />
*The Stanthorpe Art Festival opens<br />
Friday 24 February at the Stanthorpe<br />
Regional Art Gallery in Queensland.<br />
All details are at www.srag.org.au •<br />
Get Creative Quarterly Autumn 2012 135
• creative people<br />
Have a FREE recipe<br />
from Emily<br />
Baked treats with a delicious, healthy edge<br />
Meet Emily Rose<br />
Australian mother of four, Emily<br />
Rose, has experimented for years in<br />
her kitchen to create the delicious<br />
and healthy recipes in Have Your<br />
Cake. All the recipes are made<br />
without butter, white flour or added<br />
sugar but Emily has crafted them<br />
to still taste and look like ‘normal’<br />
biscuits, cakes and desserts.<br />
Raspberry friAnds<br />
There are 60 recipes covering<br />
Ingredients<br />
biscuits, cakes, muffins, tarts and<br />
4 egg whites<br />
friands. They are full of healthy, less<br />
1⁄2 cup (125ml) rice bran oil<br />
processed ingredients and are higher<br />
1⁄2 cup (150g) honey<br />
in fibre, lower in sugars and lower in<br />
saturated fats than traditional baked<br />
1 tablespoon lemon juice<br />
treats.<br />
1 cup (110g) almond meal<br />
1⁄2 cup (80g) wholemeal self-raising<br />
“My book isn’t about weight loss or<br />
flour<br />
for any specific health problem, it is<br />
32 raspberries (4 for each friand,<br />
about putting healthy ingredients into<br />
our bodies, feeling good about what<br />
fresh or frozen)<br />
we are eating and still being able to<br />
enjoy delicious foods, even sweets,” Instructions<br />
she explains. “The recipes are also Preheat the oven to 160° fan- forced.<br />
easy and simple to make. Most<br />
recipes take 10 minutes to prepare. Whisk egg whites until fluffy and<br />
There’s no sifting of flour or difficult bubbles have formed on the top. In<br />
methods, most can be made with just a separate bowl, mix oil and honey<br />
a bowl and a whisk.”<br />
until honey is dissolved. Add to<br />
Have Your Cake retails for $19.95 egg whites. Mix in lemon juice and<br />
and is available from bookshops,<br />
almond meal. Add flour and whisk<br />
or you can order online at www.<br />
for a few minutes until the mixture<br />
emilyroserecipes.com.au • thickens (it will still be a little runny).<br />
Grease a friand tin well with oil and<br />
cut oval shapes out of baking paper<br />
to place on the base of each case<br />
to prevent sticking. Pour in mixture,<br />
filling each case two-thirds full. Press<br />
two raspberries into each friand, and<br />
leave two raspberries resting on the<br />
top.<br />
Bake for 30 minutes or until golden;<br />
they should feel springy to touch.<br />
Leave to cool completely in the tin.<br />
Run a knife carefully around the edge<br />
of each friand to help lift them out.<br />
Makes 8<br />
Hint: If using frozen raspberries,<br />
don’t leave them to thaw before using<br />
them. •<br />
136 spotlight.com.au www.facebook.com/gcqmag
Embrace Autumn with<br />
moody mauves,<br />
passionate pinks<br />
and a sprinkle of sequins.<br />
loganandmason.com.au<br />
Eternity Lilac available as queen and king bed quilt cover sets, standard pillowcases, european pillowcases and reversible long cushion.<br />
Co-ordinate with Zoe Silver european pillowcase, Izzy Silver square cushion and Zoe White brunch cushion.<br />
Autumn/Winter 2012
• stitch in time<br />
Stitch in Time<br />
in Vietnam<br />
A Melbourne woman<br />
inspires <strong>Spotlight</strong> and<br />
countless others to help<br />
with her work in Vietnam<br />
Karen Leonard’s Lifestart<br />
Foundation in Hoi An, Vietnam, is an<br />
inspiring reminder of how powerful<br />
the human will can be and is a worthy<br />
partner for <strong>Spotlight</strong>’s Stitch in Time<br />
programme.<br />
A resident of the Melbourne suburb<br />
of Essendon, Karen Leonard has, for<br />
30 years, run a successful business<br />
called The Karen Leonard Music<br />
School. A few years back, however, a<br />
backpacking trip to Vietnam changed<br />
Karen’s life. After meeting some of the<br />
street kids in Hoi An, a picturesque<br />
city on Vietnam’s South Central Coast,<br />
Karen decided to financially support<br />
several of them and help them return<br />
to school by paying their education<br />
costs.<br />
Today this altruistic act has<br />
blossomed into Lifestart Foundation,<br />
a Hoi An-based, non-profit charity<br />
helping disadvantaged Vietnamese<br />
become self-sufficient. In June 2011<br />
Lifestart Foundation became one of<br />
the growing number of organisations<br />
to receive funding and support from<br />
<strong>Spotlight</strong>’s Stitch in Time programme<br />
(SIT).<br />
Karen’s Foundation sponsors street<br />
kids via apprenticeships, runs the<br />
‘Support a Family’ programme, helps<br />
children to complete their education<br />
and helps people with disabilities to<br />
earn a sustainable income. Karen still<br />
interviews all would-be recipients of<br />
aid and says, “Even after 10 years<br />
these interviews often leave me<br />
feeling emotional after I find out the<br />
situations that some of these amazing<br />
students are living in.”<br />
Prior to that first fateful trip<br />
to Vietnam, Karen had probably<br />
envisaged being semi-retired by now.<br />
Instead, she says, she has never<br />
worked harder. “However I have never<br />
felt happier and more fulfilled with the<br />
direction that my life has taken,” she<br />
adds. “I am constantly inspired by the<br />
women that I work with in Vietnam.”<br />
138 spotlight.com.au www.facebook.com/gcqmag
This bag is hand-made<br />
and fair labour item lovingly<br />
created by women in the<br />
Stitch In Time<br />
program in Cambodia.<br />
stitch in time •<br />
Mirroring the philosophy behind<br />
SIT, the focus for Lifestart Foundation<br />
is one of self-sufficiency. “In<br />
everything we do we try to give people<br />
opportunities to help themselves<br />
rather than building cycles of<br />
dependency on aid,” Karen explains. It<br />
was the Lifestart Foundation Workshop<br />
in Hoi An that first came to the<br />
attention of <strong>Spotlight</strong>. The company’s<br />
general manager of marketing, Jono<br />
Gelfand, heard about it, knew Karen<br />
was a <strong>Spotlight</strong> Essendon customer,<br />
and asked to meet her.<br />
The gift shop and workshop sells<br />
unique handcrafted products made<br />
by women in the area living with<br />
disabilities. These make great gifts<br />
and souvenirs and the shop is listed<br />
on many tour itineraries. At the gift<br />
shop you can purchase a variety of<br />
items including original jewellery,<br />
reversible denim handbags, vases<br />
made from chopsticks, knitted<br />
scarves, hand painted t-shirts and<br />
must-have Lifestart Foundation sock<br />
creatures.<br />
Visitors also get to meet people<br />
supported by the Workshop and sees<br />
the care that goes into making each<br />
and every product.<br />
As Karen explains, “The SIT<br />
collaboration with <strong>Spotlight</strong> is<br />
providing disabled and disadvantaged<br />
women in central Vietnam with a<br />
sustainable income stream so they are<br />
able to support themselves and their<br />
families financially. The other benefits<br />
are that these women have increased<br />
self-esteem, confidence and dignity.”<br />
A long time customer of <strong>Spotlight</strong><br />
Essendon, Karen does not describe<br />
herself as a “crafter” but thinks<br />
that everyone has a hidden desire<br />
to create. The use of wool brought<br />
over from <strong>Spotlight</strong> allows workshop<br />
participants to produce knitted<br />
products “quite unique and difficult to<br />
copy”. “Anyone who has gone shopping<br />
in Vietnam knows that there is often<br />
a lot of copying of products going on<br />
so this allows us to keep our products<br />
unique,” she explains.<br />
<strong>Spotlight</strong> donated eight Brother<br />
sewing machines and an overlocker<br />
to the Foundation and entered into a<br />
commercial and fair trade agreement<br />
where women at the Hoi An workshop<br />
make 200 bags per month to be sold<br />
in <strong>Spotlight</strong> stores for $7.95.<br />
“The work these women do is<br />
gorgeous and the work Karen and her<br />
supporters do is amazing,” says Jono.<br />
“Karen is what I consider the epitome<br />
of so many <strong>Spotlight</strong> customers,<br />
someone concerned about others and<br />
willing to make a difference through<br />
their own energy and imagination. We<br />
admire her greatly and are very proud<br />
to add Hoi An to our growing list of SIT<br />
projects.”<br />
This year Karen would love to see<br />
Lifestart Foundation support more<br />
students through its educational<br />
scholarship program. Supporters are<br />
often surprised to hear that school is<br />
not free in Vietnam meaning education<br />
is often out of reach of children from<br />
poorer families. •<br />
Want to get involved?<br />
• Buy a Stitch in Time shopping bag<br />
at your local <strong>Spotlight</strong> store.<br />
• The Lifestart Foundation<br />
Workshop has an online store where<br />
you can buy truly distinctive gifts.<br />
You can also make a cash donation<br />
online or simply find out more. Visit<br />
www.lifestartfoundation.org.au.<br />
You can also contact Karen<br />
and her helpers through the<br />
online contact form.<br />
• Travellers to Hoi An,<br />
Vietnam, are welcome at<br />
the Lifestart Foundation<br />
Workshop at 77 Phan Chu<br />
Trinh, Hoi An. Take part<br />
in lantern making and<br />
traditional painting classes.<br />
@ www.lifestartfoundation.<br />
org.au<br />
Changing lives<br />
one stitch at a time<br />
Next issue<br />
FITZROY CROSSING<br />
Meet the amazing stitchers<br />
from Marninwarntikura Women’s<br />
Resource Centre in Fitzroy<br />
Crossing, in the Kimberley region of<br />
Western Australia, the next group<br />
to be assisted by <strong>Spotlight</strong>’s Stitch<br />
in Time programme. At the end of<br />
last year <strong>Spotlight</strong> provided the<br />
Centre with eight Brother sewing<br />
machines and one overlocker, and<br />
sent two team members from<br />
its Geraldton store to spend<br />
a week teaching everyone<br />
how to get the most out of<br />
the machines. In issue<br />
seven of Get Creative<br />
Quarterly we’ll show<br />
you photographs of<br />
the machines in use,<br />
meet some of the<br />
people involved with<br />
the centre and, best<br />
of all, see a few of<br />
the wonderful items<br />
the women are now<br />
producing and hear<br />
what impact SIT is<br />
having on these<br />
lives. •<br />
Get Creative Quarterly Autumn 2012 139
• store news<br />
<strong>Spotlight</strong> on<br />
Find out what’s happening at a store near you<br />
Barbara takes her sewing<br />
skills to the slums of Kenya<br />
<strong>Spotlight</strong> is privileged to have,<br />
amongst its store teams, many<br />
talented and creative individuals but<br />
it is their generosity of spirit and<br />
kindness that is often most striking.<br />
These same qualities are also<br />
reflected in <strong>Spotlight</strong>’s customers.<br />
Barbara Travis from <strong>Spotlight</strong><br />
Cockburn, in Western Australia, is a<br />
stellar example of this spirit. She is<br />
one of those incredible individuals<br />
willing to share their time and talents<br />
with some of the poorest people in<br />
the world. We salute her!<br />
Barbara responded to an<br />
advertisement about volunteering<br />
in Kenya and, last year, found<br />
herself spending three weeks at The<br />
Gabriel Learning Centre, located in<br />
Kaptembwa, one of the largest slum<br />
areas in Nakuru, Kenya.<br />
A political uprising four or so years<br />
ago left this area devastated. There<br />
was much murder and destruction,<br />
resulting in widows, orphaned children<br />
and thousands of homeless struggling<br />
to survive. Famine is now also<br />
contributing to the horrific problems<br />
in the region; the slums continue to<br />
swell.<br />
Another WA woman, Susan<br />
Saleeba, founded the Centre with<br />
the aim of providing education to<br />
the destitute. The philosophy: assist<br />
those who, through lack of education,<br />
have no voice, no food and no selfrespect.<br />
Supporters of the project are<br />
encouraged to visit Kenya and provide<br />
hands on support.<br />
Barbara’s role while in Kenya was<br />
to help the sewing teacher and she<br />
arrived armed with bags of tailor’s<br />
chalk, pins, needles, thread and<br />
scissors supplied by her <strong>Spotlight</strong><br />
store. Aware that Nakuru is often<br />
referred to as “the dust bowl of<br />
140 spotlight.com.au www.facebook.com/gcqmag
store news •<br />
On her<br />
bike<br />
Above: Hales Lawrence with her bike.<br />
Kenya” she got the students making<br />
covers for their sewing machines and<br />
a bag for them to carry their items to<br />
class in.<br />
“The day went smoothly and though<br />
language can be a barrier this is not<br />
so because of the practical nature of<br />
sewing,” says Barbara. “The ladies<br />
were over the moon leaving class with<br />
a simple bag, proud that they had<br />
made it.<br />
“As a teacher it is a thrill to see<br />
students gain a sense of achievement<br />
and to see the glow on their faces.<br />
Most of the students had spent less<br />
than a month at the Learning Centre<br />
for the dressmaking certificate. One<br />
woman, aged 24, had three children,<br />
the oldest was 10-years-old. There<br />
was no man of the house and she<br />
struggled to pay the rent of 500<br />
Kenyan shillings (between five and six<br />
Australian dollars) per month for a four<br />
by four metre space but was a true<br />
quiet achiever. After only two weeks in<br />
the class, and with hardly any English,<br />
she picked up the techniques easily. I<br />
was very proud of her.”<br />
Barbara said it was very sad to<br />
leave her students in Kenya behind<br />
but, she adds, “I feel as though I have<br />
made a difference to the lives of many<br />
and had a most rewarding experience<br />
in giving.” •<br />
<strong>Spotlight</strong> Cockburn<br />
Unit 14, 87 Armadale Road,<br />
Jandakot, Western Australia<br />
Tel: 08 9412 3600<br />
FIND OUT MORE, DONATE OR<br />
VISIT THE CENTRE:<br />
The Gabriel Learning Centre<br />
www.kenya.net.au<br />
Hales Lawrence from<br />
<strong>Spotlight</strong>’s Whangarei store in<br />
New Zealand recently organised<br />
a raffle to raise money for the<br />
SPCA by doing a 90km cycle<br />
ride. The event was the R4<br />
from Rotorua to Whakatane<br />
and <strong>Spotlight</strong> supplier, Caprice,<br />
kindly donated a boy’s and girl’s<br />
duvet cover to help raise funds.<br />
“I also did a half day at the<br />
front of the store selling raffle<br />
tickets,” says Hales. “The ride,<br />
which I completed in four hours,<br />
was getting harder during the<br />
last 40 kilometres as it was all<br />
flat and your legs don’t really get<br />
a rest. Cycling is a hobby of mine<br />
and this is the third big event<br />
I have done to raise money for<br />
this worthwhile charity. All in all<br />
I have collected just over $500<br />
so a big thanks to all those that<br />
have donated!” •<br />
Get Creative Quarterly Autumn 2012 141
• creative living<br />
How to run a successful<br />
Mother’s Day stall<br />
Mother’s Day is a day for<br />
celebrating and honouring mothers<br />
and their vital contribution to families<br />
and society and a Mother’s Day<br />
stall is a great way to raise funds by<br />
providing affordable gifts for children<br />
to purchase for their mums.<br />
The Mother’s Day stall is a staple<br />
at some schools, but for others it<br />
can be a bit of a burden because<br />
parents can be too busy to create gifts<br />
for donation. However, with a little<br />
planning it’s possible to set up, stock<br />
and run a stall that offers quality gifts<br />
without straining your team.<br />
Busy P&C committees can easily<br />
set up a stall using one of three<br />
approaches; they can create their own<br />
gifts, purchase gift products from<br />
suppliers, or use a combination of the<br />
two.<br />
If the decision is to create<br />
your own gifts for the stall, then a<br />
straightforward approach involves<br />
the committee organising a tea-party<br />
style event or workshop for parents to<br />
attend where they can help to create a<br />
range of handmade craft gifts for the<br />
stall.<br />
To get this up and running, the<br />
committee simply needs to decide on<br />
what gifts to create, then estimate<br />
the amount of raw materials required.<br />
At this point one person is tasked<br />
with sourcing the raw materials and<br />
another sets up the workshop and<br />
sends out invitations to parents.<br />
However, if resources are scarce,<br />
then the other option is to get in<br />
contact with the wide range of small<br />
businesses that offer a range of<br />
affordable products to replace the<br />
handmade gifts parents used to<br />
supply. All the organiser then needs to<br />
do is decide on what products to offer<br />
and estimate the quantity to order.<br />
Here are five tips to get the most<br />
out of your Mother’s Day stall;<br />
• Order your stock so it arrives at<br />
least a week ahead of schedule,<br />
preferably two. Be careful not to over<br />
order, as many places will not accept<br />
returns.<br />
• Promote the day well ahead of time<br />
– get up at assembly, send a note<br />
home and also put it in the newsletter.<br />
• Think about holding the stall at<br />
lunchtime, but consider bringing the<br />
littlies down earlier during class time<br />
to avoid the stampede.<br />
• Get the older kids to hold a giftwrapping<br />
stall, then donate the<br />
proceeds to a charity (or add it to your<br />
fundraising total). Go to a florist or gift<br />
wholesaler to purchase bulk quantities<br />
of wrapping paper. You may wish to<br />
offer free gift-wrapping, but ask for a<br />
donation of, say, 50 cents.<br />
• Set up a stall with gifts ranging<br />
in price from $2 to $10. Each class<br />
will be given a chance to visit the<br />
stall throughout the day. A number<br />
of parents will be serving on the stall<br />
so they can help the younger children<br />
through the ‘money’ dilemma.<br />
When it’s all over, prepare a report<br />
card on the activity, so you can have<br />
a better idea of how to run it next<br />
year. This will be particularly important<br />
with gift quantities. The Fundraising<br />
Directory has a free report card<br />
template that will make your handover<br />
much easier. You can download it by<br />
visiting FundraisingDirectory.com.au/<br />
report-card •<br />
About our columnist<br />
Mandy Stevens, known to friends as Miss<br />
Fundraising, heads up a great website<br />
called FetesandFestivals.com.au where<br />
she and her team present a FREE guide<br />
to organising fetes, offering up checklists,<br />
templates and downloads! Visit the site or<br />
follow Mandy on Twitter - Mandy Stevens<br />
‘Miss Fundraising’.<br />
Order stock early & don’t over order<br />
Promote the day ahead of time<br />
Hold the stall at lunchtime<br />
Have a gift wrapping stall<br />
Set up a stall with gifts ranging in<br />
price from $2 to $10.<br />
142 spotlight.com.au www.facebook.com/gcqmag
coupons •<br />
SHOP&SAVE MONTHLY<br />
COUPONS<br />
EXCLUSIVE VIP COUPON<br />
Wednesday 1st February until Monday 30th April 2012<br />
Coupon Terms & Conditions:<br />
• Valid Wednesday 1st February until Monday 30th April 2012 • Coupon is for single use<br />
only on any single full priced item, one per customer. VIP Card must be presented<br />
• Discount does not apply to Gift card purchases, existing lay-by payments & Custom Made<br />
Curtain & Blinds orders or payments • Not available in conjunction with any other offer or<br />
<strong>Spotlight</strong> Team Member discounts • Offer valid at <strong>Spotlight</strong> stores only<br />
TEAM MEMBER COUPON PROCESSING INSTRUCTIONS:<br />
• Enter Sale as Normal • Press Supervisor<br />
• Select Item Discount • Select Discount %<br />
• Enter Discount Amount 10 (20%)<br />
• Select Reason “Promotion”<br />
• Item will now represent a Discount<br />
9341222468690<br />
20 % off<br />
ANY SINGLE<br />
Full priced<br />
ITEM!<br />
EXCLUSIVE VIP COUPON<br />
Wednesday 1st February until Monday 30th April 2012<br />
Coupon Terms & Conditions:<br />
• Valid Wednesday 1st February until Monday 30th April 2012 • Coupon is for single use<br />
only on any single full priced item, one per customer. VIP Card must be presented<br />
• Discount does not apply to Gift card purchases, existing lay-by payments & Custom Made<br />
Curtain & Blinds orders or payments • Not available in conjunction with any other offer or<br />
<strong>Spotlight</strong> Team Member discounts • Offer valid at <strong>Spotlight</strong> stores only<br />
TEAM MEMBER COUPON PROCESSING INSTRUCTIONS:<br />
• Enter Sale as Normal • Press Supervisor<br />
• Select Item Discount • Select Discount %<br />
• Enter Discount Amount 10 (20%)<br />
• Select Reason “Promotion”<br />
• Item will now represent a Discount<br />
9341222468683<br />
20 % off<br />
ANY SINGLE<br />
Full priced<br />
ITEM!<br />
EXCLUSIVE VIP COUPON<br />
Wednesday 1st February until Monday 30th April 2012<br />
Coupon Terms & Conditions:<br />
• Valid Wednesday 1st February until Monday 30th April 2012 • Coupon is for single use<br />
only on any single full priced item, one per customer. VIP Card must be presented<br />
• Discount does not apply to Gift card purchases, existing lay-by payments & Custom Made<br />
Curtain & Blinds orders or payments • Not available in conjunction with any other offer or<br />
<strong>Spotlight</strong> Team Member discounts • Offer valid at <strong>Spotlight</strong> stores only<br />
TEAM MEMBER COUPON PROCESSING INSTRUCTIONS:<br />
• Enter Sale as Normal • Press Supervisor<br />
• Select Item Discount • Select Discount %<br />
• Enter Discount Amount 10 (20%)<br />
• Select Reason “Promotion”<br />
• Item will now represent a Discount<br />
9341222468706<br />
20 % off<br />
ANY SINGLE<br />
Full priced<br />
ITEM!<br />
Get Creative Quarterly Autumn 2012 143
• next issue<br />
Patons Book 1309 Inca<br />
Family and Homewares<br />
You said it!<br />
Readers’ feedback and news<br />
Barbara, NSW<br />
“I received my first issue of Get Creative - the<br />
winter one - a few months ago and really enjoyed<br />
reading it … I made the kitchen apron and entered<br />
it in our local show and won first prize so, naturally,<br />
I was very thrilled. This was only the second time I<br />
have entered anything. My first effort last year was<br />
a quilt I made for the local Men’s Shed to raffle for<br />
funds and I was lucky enough to win second prize<br />
with that. Thank you <strong>Spotlight</strong> for the many hours of<br />
enjoyment I get from my sewing.” •<br />
Next issue<br />
WINTER<br />
Cuddle up with our next issue and be inspired to<br />
make, decorate, create and celebrate.<br />
Long weekend of craft Choose from five big<br />
impact, low effort ideas for soft furnishings, wall art,<br />
sewing, papercraft & quilting projects.<br />
A good yarn Knit, crochet & love garments, toys<br />
and homewares - projects & profiles galore!<br />
Winter warmers Home insulation ideas, winter<br />
warming recipes, projects for cosy kids & more.<br />
Special events Make a project to celebrate<br />
World Environment Day.<br />
Leonie, WA<br />
“I love GCQ, it has something for everyone; I<br />
made the gorgeous petal pillow, turning it into a<br />
pyjama pillow for my step-grand-daughter, Lacey.<br />
I’m sure she will love it. I’ve ransacked my (old)<br />
dress making patterns to find a pyjama pattern for<br />
her. Once finished they will be enclosed in her petal<br />
pillow wrapped for Santa to deliver.” •<br />
If we publish your letter we’ll<br />
send you a $25 <strong>Spotlight</strong><br />
gift card in the mail! Email<br />
info@getcreative.com.au<br />
Competition Win a book pack from the Cupcake<br />
Diary Series<br />
In stores May 2012<br />
Information: Get Creative expressly grants you the<br />
right to copy the patterns, designs, and written<br />
instructions, and to construct the projects for<br />
personal use only. Please always take the time to<br />
read all manufacturer’s instructions and warnings<br />
before using any product. Please keep all harmful<br />
or dangerous products out of reach of children at all<br />
times. Copyright – all rights reserved. No part of this<br />
magazine may be reproduced by any means without<br />
prior permission in writing of the publisher.<br />
144 spotlight.com.au www.facebook.com/gcqmag
Like us<br />
on Facebook<br />
Download<br />
projects<br />
Direct from the<br />
project button<br />
SEE BEHIND<br />
THE SCENES<br />
From daily or weekly updates on activities<br />
within the Get Creative studio to news<br />
on store activities, updates on articles<br />
and projects, plus event information, our<br />
Facebook page is a great place to land<br />
every day. Keep an eye out for exclusive<br />
competitions and offers.<br />
Share the creative BUZZ!<br />
LIKE us at Facebook today<br />
photographs &<br />
information from<br />
inside the Get<br />
Creative studio<br />
SHARE YOUR<br />
PROJECTS<br />
& creative updates<br />
with fellow readers
ABIGAIL<br />
Just Landed...<br />
New kids’ coordinated<br />
bedroom ranges are now at<br />
your local <strong>Spotlight</strong> store.<br />
Choose from quilt covers,<br />
sheeting, cushions, throws<br />
and more.<br />
Plus see in store for a great<br />
range of kids’ plain dye<br />
sheeting and towels.<br />
<strong>Spotlight</strong> is the destination<br />
for kids.<br />
SHEET SETS & PILLOWCASES<br />
CONSTRUCTION SITE<br />
For your nearest store and for product details visit<br />
spotlight.com.au or call 1300 305 405