e - Spotlight Promotions
e - Spotlight Promotions
e - Spotlight Promotions

Create successful ePaper yourself
Turn your PDF publications into a flip-book with our unique Google optimized e-Paper software.
• make it<br />
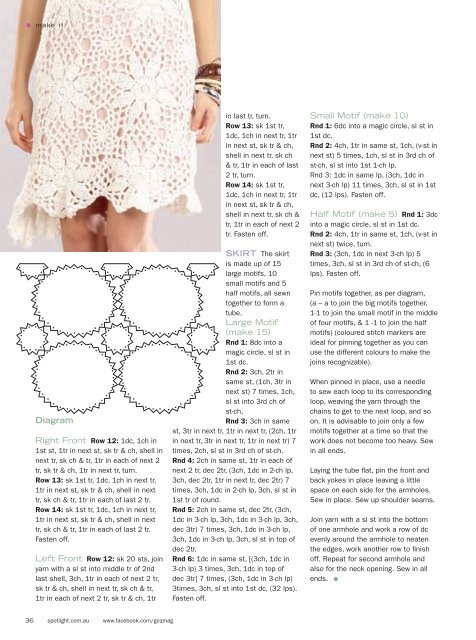
Diagram<br />
Right Front Row 12: 1dc, 1ch in<br />
1st st, 1tr in next st, sk tr & ch, shell in<br />
next tr, sk ch & tr, 1tr in each of next 2<br />
tr, sk tr & ch, 1tr in next tr, turn.<br />
Row 13: sk 1st tr, 1dc, 1ch in next tr,<br />
1tr in next st, sk tr & ch, shell in next<br />
tr, sk ch & tr, 1tr in each of last 2 tr.<br />
Row 14: sk 1st tr, 1dc, 1ch in next tr,<br />
1tr in next st, sk tr & ch, shell in next<br />
tr, sk ch & tr, 1tr in each of last 2 tr.<br />
Fasten off.<br />
Left Front Row 12: sk 20 sts, join<br />
yarn with a sl st into middle tr of 2nd<br />
last shell, 3ch, 1tr in each of next 2 tr,<br />
sk tr & ch, shell in next tr, sk ch & tr,<br />
1tr in each of next 2 tr, sk tr & ch, 1tr<br />
in last tr, turn.<br />
Row 13: sk 1st tr,<br />
1dc, 1ch in next tr, 1tr<br />
in next st, sk tr & ch,<br />
shell in next tr, sk ch<br />
& tr, 1tr in each of last<br />
2 tr, turn.<br />
Row 14: sk 1st tr,<br />
1dc, 1ch in next tr, 1tr<br />
in next st, sk tr & ch,<br />
shell in next tr, sk ch &<br />
tr, 1tr in each of next 2<br />
tr. Fasten off.<br />
SKIRT The skirt<br />
is made up of 15<br />
large motifs, 10<br />
small motifs and 5<br />
half motifs, all sewn<br />
together to form a<br />
tube.<br />
Large Motif<br />
(make 15)<br />
Rnd 1: 8dc into a<br />
magic circle, sl st in<br />
1st dc.<br />
Rnd 2: 3ch, 2tr in<br />
same st, (1ch, 3tr in<br />
next st) 7 times, 1ch,<br />
sl st into 3rd ch of<br />
st-ch,<br />
Rnd 3: 3ch in same<br />
st, 3tr in next tr, 1tr in next tr, (2ch, 1tr<br />
in next tr, 3tr in next tr, 1tr in next tr) 7<br />
times, 2ch, sl st in 3rd ch of st-ch.<br />
Rnd 4: 2ch in same st, 1tr in each of<br />
next 2 tr, dec 2tr, (3ch, 1dc in 2-ch lp,<br />
3ch, dec 2tr, 1tr in next tr, dec 2tr) 7<br />
times, 3ch, 1dc in 2-ch lp, 3ch, sl st in<br />
1st tr of round.<br />
Rnd 5: 2ch in same st, dec 2tr, (3ch,<br />
1dc in 3-ch lp, 3ch, 1dc in 3-ch lp, 3ch,<br />
dec 3tr) 7 times, 3ch, 1dc in 3-ch lp,<br />
3ch, 1dc in 3-ch lp, 3ch, sl st in top of<br />
dec 2tr.<br />
Rnd 6: 1dc in same st, [(3ch, 1dc in<br />
3-ch lp) 3 times, 3ch, 1dc in top of<br />
dec 3tr] 7 times, (3ch, 1dc in 3-ch lp)<br />
3times, 3ch, sl st into 1st dc, (32 lps).<br />
Fasten off.<br />
Small Motif (make 10)<br />
Rnd 1: 6dc into a magic circle, sl st in<br />
1st dc.<br />
Rnd 2: 4ch, 1tr in same st, 1ch, (v-st in<br />
next st) 5 times, 1ch, sl st in 3rd ch of<br />
st-ch, sl st into 1st 1-ch lp.<br />
Rnd 3: 1dc in same lp, (3ch, 1dc in<br />
next 3-ch lp) 11 times, 3ch, sl st in 1st<br />
dc, (12 lps). Fasten off.<br />
Half Motif (make 5) Rnd 1: 3dc<br />
into a magic circle, sl st in 1st dc.<br />
Rnd 2: 4ch, 1tr in same st, 1ch, (v-st in<br />
next st) twice, turn.<br />
Rnd 3: (3ch, 1dc in next 3-ch lp) 5<br />
times, 3ch, sl st in 3rd ch of st-ch, (6<br />
lps). Fasten off.<br />
Pin motifs together, as per diagram,<br />
(a – a to join the big motifs together,<br />
1-1 to join the small motif in the middle<br />
of four motifs, & 1 -1 to join the half<br />
motifs) (coloured stitch markers are<br />
ideal for pinning together as you can<br />
use the different colours to make the<br />
joins recognizable).<br />
When pinned in place, use a needle<br />
to sew each loop to its corresponding<br />
loop, weaving the yarn through the<br />
chains to get to the next loop, and so<br />
on. It is advisable to join only a few<br />
motifs together at a time so that the<br />
work does not become too heavy. Sew<br />
in all ends.<br />
Laying the tube flat, pin the front and<br />
back yokes in place leaving a little<br />
space on each side for the armholes.<br />
Sew in place. Sew up shoulder seams.<br />
Join yarn with a sl st into the bottom<br />
of one armhole and work a row of dc<br />
evenly around the armhole to neaten<br />
the edges, work another row to finish<br />
off. Repeat for second armhole and<br />
also for the neck opening. Sew in all<br />
ends. •<br />
36 spotlight.com.au www.facebook.com/gcqmag