e - Spotlight Promotions
e - Spotlight Promotions
e - Spotlight Promotions

You also want an ePaper? Increase the reach of your titles
YUMPU automatically turns print PDFs into web optimized ePapers that Google loves.
• make it<br />
the quilting is finished. Use the quilting<br />
guide to help maintain even lines of<br />
stitching. Change the thread colour for<br />
the different silks. Thread the tails onto<br />
a needle then sew through to the back<br />
and tie ends together, or gently pull<br />
through to the back then tie together.<br />
Materials<br />
2m silk dupion – red<br />
2m silk dupion – pink<br />
2m silk dupion – purple<br />
2m red homespun (plus extra for backs<br />
of cushion covers if desired)<br />
2m purple homespun<br />
2.4m x 250cm wide unbleached<br />
quilters muslin<br />
2.4m Sew Easy cotton/bamboo wadding<br />
Elna 664 overlocker<br />
Sewing machine with walking foot &<br />
quilting guide<br />
4 reels red thread for overlocker<br />
Gütermann sulky rayon 30 thread<br />
– purple, red, pink<br />
Rotary cutter, ruler & cutting mat<br />
Basting spray<br />
Quilters safety pins<br />
Scissors<br />
Hand sewing needle<br />
Note: This quilt is not made in the<br />
traditional way as it is made on an<br />
overlocker due to the fraying nature<br />
of the silk. Therefore the seam<br />
allowance is approximately ½”, not<br />
the usual ¼” found in most quilt<br />
patterns.<br />
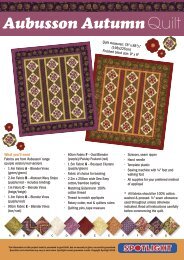
QUILT Step 1 Cut two 35cm<br />
(15”) x 2m strips from each of the<br />
three colours of silk dupion. Set aside<br />
the remaining fabric to create pieced<br />
cushion covers to match the quilt.<br />
Step 2 Stitch the strips together<br />
alternating the colours using the<br />
overlocker, removing approximately<br />
¼” as you stitch and cut. After all the<br />
strips have been stitched together,<br />
overlock around the outside edges to<br />
prevent fraying.<br />
Step 3 Lay the muslin out flat then<br />
lay the batting on top, smooth out any<br />
creases then spray with the basting<br />
spray. Lay the pieced quilt top on top of<br />
the batting smoothing out any creases<br />
then pin around the outer edges only<br />
as the basting spray will hold the quilt<br />
top in place.<br />
Step 4 Quilting the top<br />
Using the matching sulky thread quilt<br />
the top in even long lines of straight<br />
stitch lengthways down the quilt,<br />
starting in the centre and working out<br />
towards the edges. Leave long tails of<br />
thread to sew through to the back once<br />
Step 5 Remove the selvedges<br />
from the red and purple homespun<br />
and stitch together lengthways (down<br />
the 2m length) for the backing. Trim<br />
the excess wadding and muslin from<br />
the quilt top and remove the quilting<br />
pins. Lay the homespun backing on<br />
top of the quilt top right sides together<br />
matching the centre points at the top<br />
and bottom. Stitch around the quilt<br />
top approximately ½” (1.5cm) from<br />
the raw edges leaving a 60cm opening<br />
along the bottom edge to turn the quilt<br />
through. Carefully trim excess from<br />
the corners then turn quilt through.<br />
Turn seam allowance in along edge of<br />
opening and topstitch all around the<br />
outer edges of the quilt securing the<br />
opening closed. Change thread and<br />
bobbin colour to match the fabric if<br />
desired.<br />
Tip<br />
More quilting can be added in the<br />
ditch at this stage, if desired, by<br />
machine. Some oversized straight<br />
stitches across the quilt using<br />
contrasting embroidery threads can<br />
be added by hand.<br />
Cushion covers Piece<br />
together strips of the left over fabrics<br />
to create different cushion covers to<br />
complement the quilt. Create the top<br />
only in the silk fabric then back with<br />
red or purple homespun. Create covers<br />
in different sizes for added interest.<br />
Use the cushion instructions on page<br />
80 to complete the covers. •<br />
84 spotlight.com.au www.facebook.com/gcqmag