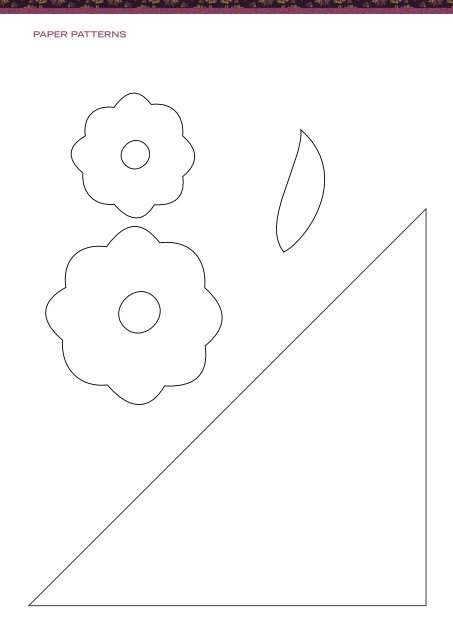
CUTTING All strips are cut across the width of fabric unless otherwise stated. • From Fabric A cut 34 x 1¼” strips, crosscut 15 strips into 60 x 10½” strips; crosscut 12 strips into 60 x 7 ½” strips; crosscut 7 strips into 60 x 4½” strips. • From Fabric B cut 9 x 2¼” strips for the binding and set aside. Refold the fabric to cut the following strips lengthways, parallel to the selvedge: two 5” wide x length of fabric. Refold remaining fabric to cut the following strips across the width: 38, 1¼” x 30” strips, crosscut 20 strips into 60 x 9” strips; 12 strips into 60 x 6” strips, 6 strips into 60 x 3” strips. • From Fabric C cut 4 x 9½” strips, crosscut into 15 x 9½”squares. • From Fabric D cut 9 x 3½” strips for the outer border. • From Fabric E cut 13 x 2” strips. • From Fabric F cut 7 x 2½” strips for the inner border. • From Fabric G cut 8 x 6 ½” strips for the middle border. • Reserve all remaining fabric for appliqué. APPLIQUÉ 1. Using the paper patterns provided and template plastic, make templates for the large flower, small flower, leaf, large flower centre, and small flower centre shapes. Please note that the patterns are not reversed and do not include seam allowances. Repeat this procedure to make a template for the trimming triangle making sure that the triangle measures 7¼” on each short side. 2. Prepare the following motifs as necessary for your preferred method of appliqué: 15 x Fabric D large flowers, 45 x Fabric D small flowers, 45 x Fabric B small flowers, 60 x Fabric A leaves, 15 x Fabric E large flower centres, 90 x Fabric E small flower centres. 3. Appliqué a large flower centre to the centre of each large flower and a small flower centre to the centre of each small flower. 4. Using the quilts pictured as a guide, arrange 1 x large flower unit, 3 x Fabric D small flower units, 3 x Fabric B small flower units, and 4 x Fabric A leaves onto a 9½” Fabric C square, with the appliqué contents centered in the square. Appliqué motifs to background square using method of choice. Repeat to make a total of 15 x appliqué blocks. BLOCKS 5. Fold each 1¼” Fabric A and Fabric B strip in half crosswise to mark the centre point. Matching centre points, stitch a 1¼” x 9” Fabric B strip to a 1¼” x 10½” Fabric A strip. Repeat this procedure to add one each of the following strips to the top of this unit in order: 1¼” x 7½” Fabric A strip, 1¼” x 6” Fabric B strip, 1¼” x 4½” Fabric A strip, 1¼” x 3” Fabric B strip 6. Lay the trimming triangle template even with the bottom edge of the strip set making sure to line up the centre points. Cut one corner triangle as shown. Repeat to make a total of 4 corner triangles. To prevent stretching, stitch 1 / 8 ” in from the outer edge all the way around each triangle. 7. Matching the centre points of the triangles to the centre points of the background square, sew triangle units from step 2 to opposite sides of an appliqué square. Sew the remaining triangle units to the remaining sides of the square to complete one block. 8. Repeat steps 5-7 to make a total of 15 blocks. QUILT TOP 9. Arrange the blocks into 3 vertical rows with 5 blocks in each row. Stitch the blocks into rows. If necessary, adjust the seams so that all three block rows are the same length. 10. Trim selvedges from 2” Fabric E strips. Sew strips together end to end to make a long 2” strip. From this long strip, cut 6 x 64¼” and 2 x 56½” lengths (if your measurements are different, cut to fit your quilt top). Sew the longer strips to the left and right sides of each of the 3 block rows. Matching centre points, stitch block row units and 5” wide Fabric B lengthwise cut strips together, alternating the two types of units. Trim the ends of Fabric B strips even with the block row units. Stitch the 2” x 56½” Fabric E strips to top and bottom of quilt top. BORDERS 11. Trim selvedges from 2½” Fabric F strips and sew the strips together end to end to make a long 2½” strip. From this long strip, cut 2 x 67¼” and 2 x 60½” lengths (if your measurements are different, cut to fit your quilt top). Sew the longer strips to the left and right sides of the quilt top and the shorter strips to the top and bottom. 12. Trim selvedges from 6½” Fabric G strips and sew the strips together end to end to make a long 6½” strip. From this long strip, cut 2 x 72½” and 2 x 71¼” lengths (if your measurements are different, cut to fit your quilt top). Sew shorter strips to left and right sides of the quilt top. Sew longer strips to the top and bottom. 13. Trim selvedges from 3½” Fabric D strips and sew the strips together end to end to make a long 3½” strip. From this long strip, cut 2 x 83¼” and 2 x 78½” lengths (if your measurements are different, cut to fit your quilt top). Sew longer pieces to left and right sides of the quilt top. Sew shorter strips to the top and bottom. TO FINISH 14. Layer backing, batting and quilt top, baste together. Quilt as desired. Join the 9 x 2¼” binding strips to make one long strip. Press in half lengthwise and bind mitering corners. Attach a label or sign and date your quilt. AUSTRALIA spotlight.com.au or call 1300 305 405 NEW ZEALAND spotlight.co.nz or call 0800 276 222 SINGAPORE spotlight.com.sg or call 6733 9808
PAPER PATTERNS