using the ked
using the ked
using the ked

Create successful ePaper yourself
Turn your PDF publications into a flip-book with our unique Google optimized e-Paper software.
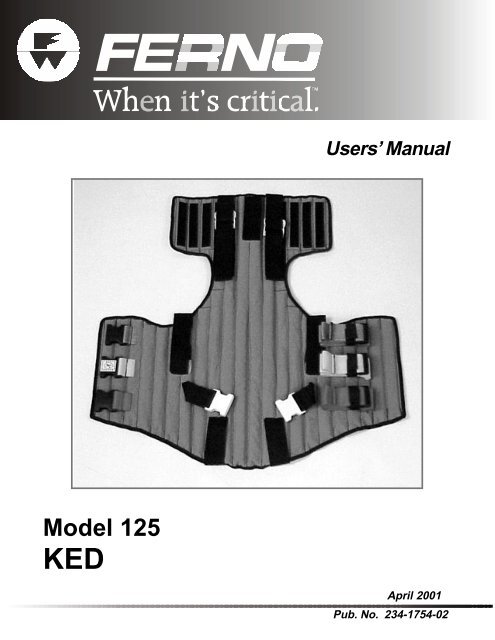
Users’ Manual<br />
Model 125<br />
KED<br />
April 2001<br />
Pub. No. 234-1754-02
Model 125 KED<br />
Disclaimer<br />
This manual contains general instructions for <strong>the</strong> use, operation and<br />
care of this product. The instructions are not all-inclusive. Safe and<br />
proper use of this product is solely at <strong>the</strong> discretion of <strong>the</strong> user. Safety<br />
information is included as a service to <strong>the</strong> user. All o<strong>the</strong>r safety<br />
measures taken by <strong>the</strong> user should be within and under consideration<br />
of applicable regulations. It is recommended that training on <strong>the</strong> proper<br />
use of this product be provided before <strong>using</strong> this product in an actual<br />
situation.<br />
Retain this manual for future reference. Include it with <strong>the</strong> product in<br />
<strong>the</strong> event of transfer to new users. Additional free copies are available<br />
upon request from Customer Service.<br />
Proprietary Notice<br />
The information disclosed in this manual is <strong>the</strong> property of Ferno-<br />
Washington, Inc., Wilmington, Ohio, USA. Ferno-Washington, Inc.<br />
reserves all patent rights, proprietary design rights, manufacturing<br />
rights, reproduction use rights, and sales use rights <strong>the</strong>reto, and to any<br />
article disclosed <strong>the</strong>rein except to <strong>the</strong> extent those rights are expressly<br />
granted to o<strong>the</strong>rs or where not applicable to vendor proprietary parts.<br />
Instructional Material Provided with <strong>the</strong> KED:<br />
Model 125 KED Users’ Manual 234-1754<br />
© Copyright Ferno-Washington, Inc. All Rights Reserved.<br />
Ferno-Washington, Inc.<br />
70 Weil Way<br />
Wilmington, OH 45177-9371<br />
U.S.A.<br />
Telephone (U.S.A. and Canada) ........... 800.733.3766<br />
Telephone (Worldwide) ....................... 937-382-1451<br />
Fax (United States) ............................... 937.382.1191<br />
Fax (Outside U.S.A.) ........................... 937-382-6569<br />
Internet.............................................. www.ferno.com<br />
2 © Ferno-Washington, Inc. 234-1754-02 April 2001
Model 125 KED<br />
Contents<br />
TABLE OF CONTENTS<br />
Section<br />
Page Section<br />
Page<br />
1 - Safety Information .................................................... 5<br />
1.1 Warning ............................................................. 5<br />
1.2 Important .......................................................... 5<br />
1.3 Be Aware .......................................................... 5<br />
1.4 Bloodborne Disease Notice ............................. 5<br />
6 - Adapting <strong>the</strong> KED in Special Situations ......... 25-27<br />
6.1 General Guidelines......................................... 25<br />
6.2 Adapting <strong>the</strong> KED for a Pregnant Patient ...... 25<br />
6.3 Adapting <strong>the</strong> KED for a Pediatric Patient ...... 26<br />
6.4 Adapting <strong>the</strong> KED for an Angulated Neck .... 26<br />
6.5 Adapting <strong>the</strong> KED for Use With<br />
2 - Operator Skills and Training ................................... 6<br />
2.1 Skills ................................................................. 6<br />
2.2 Training ............................................................ 6<br />
Monitoring Systems ....................................... 26<br />
6.6 Adapting <strong>the</strong> KED for Use as a Splint ........... 27<br />
6.7 Using <strong>the</strong> KED with an<br />
Anti-Shock Garment ..................................... 27<br />
3 - About <strong>the</strong> KED ...................................................... 7-8<br />
3.1 Model KED Description .................................. 7<br />
3.2 General Specifications ..................................... 7<br />
7 - Storing <strong>the</strong> KED ................................................ 28-31<br />
7.1 Storing <strong>the</strong> KED Properly .............................. 28<br />
3.3 Components ..................................................... 8<br />
8 - Maintaining <strong>the</strong> KED ............................................. 31<br />
4 - About <strong>the</strong> KED Features .................................... 9-14<br />
4.1 Quick-Release Buckle ...................................... 9<br />
4.2 Shortening <strong>the</strong> Securing Straps ........................ 9<br />
8.1 Maintenance Schedule ................................... 31<br />
8.2 Cleaning and Disinfecting <strong>the</strong> KED .............. 31<br />
8.3 Inspecting <strong>the</strong> KED ........................................ 31<br />
4.3 Leng<strong>the</strong>ning <strong>the</strong> Securing Straps ................... 10<br />
4.4 Releasing <strong>the</strong> Securing Straps ....................... 10 9 - Limited Warranty ................................................... 32<br />
4.5 Torso Straps .................................................... 11<br />
4.6 Leg Straps....................................................... 12 10 - Customer Service .................................................. 32<br />
4.7 Adjusta-Pad .................................................... 13<br />
4.8 Lifting Handles .............................................. 13 Training Record ............................................................ 33<br />
4.9 Head Straps .................................................... 14<br />
Maintenance Record .................................................... 34<br />
5 - Using <strong>the</strong> KED ................................................... 15-24<br />
5.1 Before Placing <strong>the</strong> KED in Service ............... 15 Notes .............................................................................. 35<br />
5.2 General Guidelines for Use............................ 15<br />
5.3 Applying <strong>the</strong> Cervical Collar ......................... 16<br />
5.4 Removing <strong>the</strong> KED from<br />
<strong>the</strong> Carrying Case .......................................... 16<br />
5.5 Placing <strong>the</strong> KED Behind <strong>the</strong> Patient .............. 17<br />
5.6 Wrapping and Positioning <strong>the</strong> KED .............. 18<br />
5.7 Fastening <strong>the</strong> Torso Straps ............................. 19<br />
5.8 Applying <strong>the</strong> Leg Straps................................. 20<br />
5.9 Securing <strong>the</strong> Patient’s Head ........................... 21<br />
5.10 Buckling <strong>the</strong> Top Strap and Making<br />
Final Strap Adjustments .............................. 22<br />
5.11 Transferring <strong>the</strong> Patient to<br />
<strong>the</strong> Long Spine Board ................................. 23<br />
© Ferno-Washington, Inc. 234-1754-02 April 2001 3
Contents<br />
Model 125 KED<br />
Illustrations<br />
Components ...................................................................... 8<br />
Figure 1 - Fastening <strong>the</strong> Buckle ....................................... 9<br />
Figure 2 - Unfastening <strong>the</strong> Buckle ................................... 9<br />
Figure 3 - Removing Excess Slack from Strap................ 9<br />
Figure 4 - Feed and Pull Tightening Technique .............. 9<br />
Figure 5 - Loosening a Buckled Strap ........................... 10<br />
Figure 6 - Leng<strong>the</strong>ning a Free Strap .............................. 10<br />
Figure 7 - Releasing a Torso Strap from Its Fastener .... 10<br />
Figure 8 - Torso Straps (As Folded for Storage) ........... 11<br />
Figure 9 - Middle Strap Fastened .................................. 11<br />
Figure 10 - Middle and Bottom Straps Fastened ........... 11<br />
Figure 11 - Leg Strap Applied in Criss-Cross<br />
Configuration ............................................. 12<br />
Figure 12 - Back View of Leg Straps Correctly Positioned<br />
Close to <strong>the</strong> Body Midline ......................... 12<br />
Figure 13 - Positioning <strong>the</strong> Adjusta-Pad ........................ 13<br />
Figure 14 - KED Lifting Handles .................................. 13<br />
Figure 15-A and 15-B - Exposing Center Pad Rubber .. 14<br />
Figure 16 - Head Straps in Place ................................... 14<br />
Figure 17 - Applying <strong>the</strong> WizLoc Cervical Collar..... 16<br />
Figure 18 - Removing <strong>the</strong> KED From<br />
Its Carrying Case ...................................... 16<br />
Figure 19 - Sliding <strong>the</strong> KED at an Angle ....................... 17<br />
Figure 20 - Centering <strong>the</strong> KED ...................................... 17<br />
Figure 21-A and 21-B - Releasing a Leg Strap ............. 17<br />
Figure 22- Wrapping <strong>the</strong> Torso Flaps<br />
Around <strong>the</strong> Patient ..................................... 18<br />
Figure 23 - Moving <strong>the</strong> Patient Back into <strong>the</strong> KED ...... 18<br />
Figure 24 - Releasing a Torso Strap ............................... 19<br />
Figure 25 - Middle Strap Fastened ................................ 19<br />
Figure 26 - Middle and Bottom Straps Fastened ........... 19<br />
Figure 27 - Passing a Leg Strap Beneath<br />
<strong>the</strong> Patient’s Leg ........................................ 20<br />
Figure 28 - Back View of Leg Straps When<br />
Properly Positioned .................................... 20<br />
Figure 29 - Leg Straps in Criss-Cross Configuration .... 20<br />
Figure 30 - Placing <strong>the</strong> Padding ..................................... 21<br />
Figure 31 - Wrapping <strong>the</strong> Head Flaps with<br />
Padding in Place........................................ 21<br />
Figure 32 - Head Straps Applied.................................... 21<br />
Figure 33 - The KED, Applied ....................................... 22<br />
Figure 34 - Patient Pivoted with Back<br />
Toward Inside of Vehicle .......................... 23<br />
Figure 35 - Lifting <strong>the</strong> Patient to Position<br />
<strong>the</strong> Long Spine Board ............................... 23<br />
Figure 36 - Placing Patient and Long Spine Board<br />
on Ambulance Cot .................................... 24<br />
Figure 37- Loosening Top (Green) Torso Strap for<br />
Patient Comfort .......................................... 24<br />
Figure 38 - Positioning Torso Straps<br />
Beneath Breasts/Above Abdomen ............ 25<br />
Figure 39 - Two-Strap Configuration ............................ 25<br />
Figure 40 - Three-Strap Configuration .......................... 25<br />
Figure 41 - Applying <strong>the</strong> KED to a Child ...................... 26<br />
Figure 42 - Applying <strong>the</strong> KED to an Angulated Neck .. 26<br />
Figure 43 - Adapting <strong>the</strong> KED for Use with a<br />
Monitoring System ................................... 26<br />
Figure 44 - Stabilizing <strong>the</strong> Hip and/or Femur ............... 27<br />
Figure 45 - Stabilizing <strong>the</strong> Pelvis ................................... 27<br />
Figure 46 - Using <strong>the</strong> KED with an<br />
Anti-Shock Garment ................................ 27<br />
Figure 47 - Turning <strong>the</strong> Buckle Under........................... 28<br />
Figure 48 - Making <strong>the</strong> First Fold .................................. 28<br />
Figure 49 - Folding Accordion Style ............................. 28<br />
Figure 50 - Securing <strong>the</strong> Strap ....................................... 28<br />
Figure 51 - Wrapping <strong>the</strong> Leg Straps ............................. 29<br />
Figure 52 - Securing <strong>the</strong> Folded Strap<br />
in <strong>the</strong> Fastener ........................................... 29<br />
Figure 53 - Positioning <strong>the</strong> Adjusta-Pad<br />
and Head Straps ........................................ 30<br />
Figure 54 - Folding <strong>the</strong> Torso Flap ................................ 30<br />
Figure 55 - Rolling <strong>the</strong> KED .......................................... 30<br />
Figure 56 - Ready for <strong>the</strong> Carrying Case ....................... 30<br />
Maintenance Schedule ................................................... 31<br />
Lot Number Location ..................................................... 32<br />
4 © Ferno-Washington, Inc. 234-1754-02 April 2001
Model 125 KED<br />
Safety Information<br />
1 - SAFETY INFORMATION<br />
1.1 Warning<br />
The following warnings appear in this manual.<br />
!<br />
WARNING<br />
Untrained operators can cause injury or be<br />
injured. Permit only trained personnel to<br />
apply <strong>the</strong> KED.<br />
Improper use of <strong>the</strong> KED can cause injury.<br />
Use <strong>the</strong> KED only for <strong>the</strong> purpose described<br />
in this manual.<br />
Improper application of <strong>the</strong> KED can cause<br />
injury. Apply <strong>the</strong> KED only as described in<br />
this manual.<br />
An unattended patient can be injured. Stay<br />
with <strong>the</strong> patient at all times.<br />
An unrestrained patient can fall off <strong>the</strong> spine<br />
board or cot and be injured. Use restraints<br />
to secure <strong>the</strong> patient on <strong>the</strong> spine board and<br />
cot.<br />
Attaching o<strong>the</strong>r equipment or items to <strong>the</strong><br />
KED can cause injury. Do not attach<br />
equipment or items of any kind to <strong>the</strong> KED.<br />
Improper maintenance can cause injury.<br />
Maintain <strong>the</strong> KED only as described in this<br />
manual.<br />
1.2 Important<br />
Boxes like <strong>the</strong> one below emphasize important<br />
information.<br />
1.3 Be Aware<br />
Important<br />
To prevent pressure on <strong>the</strong> groin when <strong>using</strong><br />
<strong>the</strong> same-side configuration, correctly position<br />
<strong>the</strong> leg straps to lay straight down from <strong>the</strong>ir<br />
anchoring points on <strong>the</strong> KED.<br />
Boxes like <strong>the</strong> one below serve as reminders.<br />
Be Aware<br />
Positioning <strong>the</strong> patient as fully as possible against<br />
<strong>the</strong> KED minimizes <strong>the</strong> need for padding between<br />
<strong>the</strong> patient’s head and <strong>the</strong> KED. But be aware that<br />
some patients may not be able to sit fully back<br />
into <strong>the</strong> KED.<br />
1.4 Bloodborne Disease Notice<br />
OSHA (Occupational Safety and Health<br />
Administration) requires employers to protect workers<br />
from workplace exposure to bloodborne diseases such<br />
as HIV-1 and hepatitis. To reduce <strong>the</strong> risk of exposure<br />
when <strong>using</strong> <strong>the</strong> KED, follow <strong>the</strong> disinfecting and<br />
cleaning instructions in this manual.<br />
For more information, visit www.osha.gov on <strong>the</strong><br />
Internet or write to:<br />
U.S. Department of Labor, OSHA<br />
Office of Public Affairs, Room N-3647<br />
200 Constitution Ave., NW<br />
Washington, DC 20210<br />
© Ferno-Washington, Inc. 234-1754-02 April 2001 5
Operator Skills and Training<br />
2 - OPERATOR SKILLS AND TRAINING<br />
Model 125 KED<br />
2.1 Skills<br />
Operators <strong>using</strong> <strong>the</strong> KED need:<br />
a working knowledge of emergency patienthandling<br />
procedures.<br />
<strong>the</strong> ability to assist <strong>the</strong> patient.<br />
a complete understanding of <strong>the</strong> procedures<br />
described in this manual.<br />
2.2 Training<br />
Trainees need to:<br />
follow a training program designed by <strong>the</strong>ir<br />
training officer.<br />
read this manual.<br />
practice with <strong>the</strong> KED before <strong>using</strong> it in regular<br />
service.<br />
be tested on <strong>the</strong>ir understanding of <strong>the</strong> KED.<br />
record <strong>the</strong>ir training information.<br />
!<br />
WARNING<br />
Untrained operators can cause injury or be<br />
injured. Permit only trained personnel to<br />
apply <strong>the</strong> KED.<br />
6 © Ferno-Washington, Inc. 234-1754-02 April 2001
Model 125 KED<br />
About <strong>the</strong> KED<br />
3 - ABOUT THE KED<br />
3.1 Model 125 KED Description<br />
The Model 125 KED (Kendrick Extrication Device,<br />
referred to as <strong>the</strong> KED in this manual) is an emergency<br />
patient-handling device designed to aid in <strong>the</strong><br />
immobilization and short transfer movement of patients<br />
with suspected spinal/cervical injuries or fracture.<br />
The KED is designed for use by a minimum of two<br />
trained operators. Additional help may be preferred or<br />
needed.<br />
KED features include:<br />
• Color-coded, sewn-in securing straps<br />
• Wraparound head flaps<br />
• Wraparound torso flaps<br />
• Head straps<br />
• Adjusta-Pad for padding<br />
• Integrated carrying handles<br />
• Carrying case<br />
• Radiographic translucence<br />
!<br />
WARNING<br />
Improper use of <strong>the</strong> KED can cause injury.<br />
Use <strong>the</strong> KED only for <strong>the</strong> purpose described<br />
in this manual.<br />
3.2 General Specifications<br />
Length<br />
Opened Flat ....................................... 33 in (83 cm)<br />
Rolled, in Case .................................. 35 in (90 cm)<br />
Width<br />
Opened Flat ....................................... 32 in (80 cm)<br />
Rolled, in Case .................................. 11 in (27 cm)<br />
Thickness<br />
Opened Flat ........................................... 1 in (3 cm)<br />
Rolled, in Case .................................... 6 in (14 cm)<br />
Weight* .......................................... 7 lb 11 oz (3 kg)<br />
Load Limit....................................... 500 lb (227 kg)<br />
* Weight includes restraints, pad, head straps, and carrying<br />
case.<br />
General specifications are rounded to <strong>the</strong> nearest whole<br />
number. Metric conversions are calculated before rounding<br />
<strong>the</strong> English measurements. For detailed specifications,<br />
contact Ferno Customer Service (page 32) or your Ferno<br />
distributor. Ferno reserves <strong>the</strong> right to change specifications<br />
without notice.<br />
LOAD LIMIT<br />
500 lb<br />
227 kg<br />
Inspect <strong>the</strong> KED if <strong>the</strong> Load Limit has been exceeded<br />
(see Inspecting <strong>the</strong> KED, Page 31).<br />
© Ferno-Washington, Inc. 234-1754-02 April 2001 7
About <strong>the</strong> KED<br />
Model 125 KED<br />
3.3 Components (Outside View with Straps in Storage Configuration)<br />
Center Lifting<br />
Handle (1)<br />
Leg Strap<br />
(2)<br />
Hook-and-Loop<br />
Fastening Strips<br />
(10)<br />
Head Flap<br />
(2)<br />
Torso Strap Buckle<br />
(3)<br />
Side Lifting Handle<br />
(2)<br />
Torso Straps (3)<br />
Torso Flap<br />
(2)<br />
Leg Strap<br />
Buckle (2)<br />
Head Strap<br />
(2)<br />
Adjusta-Pad<br />
Carrying Case<br />
(not to scale)<br />
8 © Ferno-Washington, Inc. 234-1754-02 April 2001
Model 125 KED<br />
About <strong>the</strong> KED Features<br />
4 - ABOUT THE KED FEATURES<br />
4.1 Quick-Release Buckles<br />
KED buckles are snap-lock and quick-release. Torsostrap<br />
buckles are black. Leg-strap buckles are white.<br />
FASTENING THE BUCKLES<br />
To fasten a buckle, push <strong>the</strong> slide into <strong>the</strong> receiver until<br />
it locks into place (Figure 1). A distinctive “click”<br />
signals that <strong>the</strong> slide is properly placed in <strong>the</strong> receiver.<br />
To unfasten a buckle, press <strong>the</strong> slide tabs to release <strong>the</strong><br />
slide, <strong>the</strong>n pull <strong>the</strong> slide out of <strong>the</strong> receiver slot (Figure<br />
2).<br />
4.2 Shortening <strong>the</strong> Securing<br />
Straps<br />
Buckled torso and leg straps are shortened in two stages,<br />
first removing excess slack and <strong>the</strong>n snugging or<br />
tightening <strong>the</strong> straps. Use <strong>the</strong> techniques described<br />
below to shorten <strong>the</strong> straps.<br />
REMOVING EXCESS SLACK<br />
When a torso strap is released from its storage position<br />
<strong>the</strong>re is a large amount of slack. After fastening <strong>the</strong><br />
buckle, quickly remove most of <strong>the</strong> slack by turning<br />
<strong>the</strong> buckle up, away from <strong>the</strong> KED, with one hand while<br />
you pull <strong>the</strong> hemmed end of <strong>the</strong> strap with <strong>the</strong> o<strong>the</strong>r<br />
hand (Figure 3). Shorten <strong>the</strong> strap only until you feel<br />
<strong>the</strong> slightest tension.<br />
Figure 1 -<br />
Fastening<br />
<strong>the</strong> Buckle<br />
Figure 2 -<br />
Unfastening<br />
<strong>the</strong> Buckle<br />
Figure 3 -<br />
Removing<br />
Excess Slack<br />
from <strong>the</strong> Strap<br />
Slide<br />
Receiver<br />
SNUGGING OR TIGHTENING THE STRAP<br />
To prevent twisting or jostling <strong>the</strong> patient’s torso when<br />
snugging or tightening <strong>the</strong> strap, use <strong>the</strong> feed-and-pull<br />
tightening technique below:<br />
1. Grasp <strong>the</strong> portion of <strong>the</strong> strap that lays across <strong>the</strong><br />
patient’s torso and create a little slack in <strong>the</strong> strap<br />
(Figure 4).<br />
2. Feed <strong>the</strong> slack into <strong>the</strong> buckle with one hand and<br />
pull it through <strong>the</strong> buckle with <strong>the</strong> o<strong>the</strong>r hand<br />
(Figure 4). Repeat until <strong>the</strong> strap is snug or tight.<br />
Figure 4 - Feed-and-Pull<br />
Tightening Technique<br />
© Ferno-Washington, Inc. 234-1754-02 April 2001 9
About <strong>the</strong> KED Features<br />
Model 125 KED<br />
4.3 Securing Straps - Leng<strong>the</strong>ning<br />
The technique used for leng<strong>the</strong>ning a strap depends on<br />
whe<strong>the</strong>r <strong>the</strong> strap has been buckled.<br />
LENGTHENING A BUCKLED STRAP<br />
To loosen or leng<strong>the</strong>n a buckled strap, feed excess strap<br />
into <strong>the</strong> buckle with one hand as you raise <strong>the</strong> buckle at<br />
an angle to <strong>the</strong> KED with <strong>the</strong> o<strong>the</strong>r hand (Figure 5).<br />
LENGTHENING A FREE STRAP<br />
To leng<strong>the</strong>n a free strap, hold <strong>the</strong> slide at an angle to<br />
<strong>the</strong> strap with one hand and pull <strong>the</strong> strap backward<br />
through <strong>the</strong> buckle slide with <strong>the</strong> o<strong>the</strong>r hand (Figure<br />
6).<br />
Figure 5 - Loosening a Buckled Strap<br />
4.4 Securing Straps - Releasing<br />
If torso and leg straps have been properly configured<br />
for storage, <strong>the</strong>y can be released quickly and without<br />
tangles when <strong>the</strong>y are needed. For instructions on<br />
configuring <strong>the</strong> straps for storage, see Storing <strong>the</strong> KED,<br />
pages 28 and 29 .<br />
TORSO STRAPS<br />
Simply grasp <strong>the</strong> sides of <strong>the</strong> buckle (Figure 7) and<br />
firmly pull it from <strong>the</strong> fastener.<br />
LEG STRAPS<br />
If you are going to use <strong>the</strong> leg straps, leave <strong>the</strong>m in <strong>the</strong><br />
storage configuration until <strong>the</strong> KED has been placed<br />
behind <strong>the</strong> patient but not wrapped and fastened.<br />
Free <strong>the</strong> straps from <strong>the</strong> hook-and-loop fastener, slide<br />
<strong>the</strong>m from behind <strong>the</strong> patient, and lay <strong>the</strong>m with <strong>the</strong><br />
buckles within your reach.<br />
Figure 6 - Leng<strong>the</strong>ning a Free Strap<br />
Hook-and-<br />
Loop<br />
Fastener<br />
If you are not going to use <strong>the</strong> leg straps, leave <strong>the</strong>m<br />
attached in <strong>the</strong> storage configuration, where <strong>the</strong>y will<br />
not interfere with applying <strong>the</strong> KED.<br />
Figure 7 - Releasing a Torso Strap<br />
From Its Fastener<br />
10 © Ferno-Washington, Inc. 234-1754-02 April 2001
Model 125 KED<br />
4.5 Torso Straps<br />
The KED is constructed with three torso straps: top,<br />
middle, and lower. The straps are color coded for easy<br />
matching of left and right pieces (Figure 8).<br />
About <strong>the</strong> KED Features<br />
Torso<br />
Straps<br />
When wrapping <strong>the</strong> KED torso flaps around <strong>the</strong> patient,<br />
fasten <strong>the</strong> middle (yellow) strap first, <strong>the</strong>n <strong>the</strong> bottom<br />
(red) strap. Do not fasten <strong>the</strong> top (green) strap until<br />
just before you are ready to transfer <strong>the</strong> patient to a<br />
long spine board.<br />
THE MIDDLE STRAP<br />
The middle (yellow) strap is <strong>the</strong> first strap to be fastened<br />
(Figure 9).<br />
When fastening <strong>the</strong> strap initially, snug it until <strong>the</strong>re is<br />
space for 2 or 3 fingers laid flat between <strong>the</strong> strap and<br />
<strong>the</strong> patient’s torso. You will tighten <strong>the</strong> strap just before<br />
transferring <strong>the</strong> patient to a spine board.<br />
Figure 8 -Torso Straps<br />
(As Folded for Storage)<br />
The middle strap evenly secures <strong>the</strong> greatest possible<br />
area of <strong>the</strong> KED, providing <strong>the</strong> greatest patient stability<br />
while you finish applying <strong>the</strong> KED.<br />
If <strong>the</strong> rescue situation or <strong>the</strong> patient’s condition requires<br />
that you remove <strong>the</strong> patient from <strong>the</strong> vehicle sooner<br />
than anticipated, <strong>the</strong> stability provided by <strong>the</strong> KED with<br />
only <strong>the</strong> middle strap fastened, and properly tightened,<br />
may be preferable to <strong>using</strong> no supporting equipment.<br />
Follow your medical advisor’s guidelines on this issue.<br />
THE BOTTOM STRAP<br />
Figure 9 - Middle Strap Fastened<br />
The bottom (red) strap is <strong>the</strong> second strap fastened<br />
(Figure 10).<br />
When fastening <strong>the</strong> strap initially, snug it until <strong>the</strong>re is<br />
space for 2 or 3 fingers laid flat between <strong>the</strong> strap and<br />
<strong>the</strong> patient’s torso. You will tighten <strong>the</strong> strap just before<br />
transferring <strong>the</strong> patient to a spine board.<br />
THE TOP STRAP<br />
Do not fasten <strong>the</strong> top (green) strap at this time.<br />
Leave <strong>the</strong> top strap unfastened until you are ready to<br />
transfer <strong>the</strong> patient to <strong>the</strong> long spine board. This allows<br />
<strong>the</strong> patient to brea<strong>the</strong> more freely while you finish<br />
applying <strong>the</strong> KED.<br />
Figure 10 - Middle and Bottom Straps<br />
Fastened<br />
© Ferno-Washington, Inc. 234-1754-02 April 2001 11
About <strong>the</strong> KED Features<br />
Model 125 KED<br />
4.6 Leg Straps<br />
The leg straps secure <strong>the</strong> pelvis to <strong>the</strong> lower portion of<br />
<strong>the</strong> KED to stabilize <strong>the</strong> lower lumbar area.<br />
Follow your medical advisor’s guidelines concerning<br />
<strong>the</strong> use of leg straps.<br />
The KED leg straps can be fastened in a “criss-cross”<br />
configuration or a “same-side” configuration,<br />
depending on <strong>the</strong> patient’s condition.<br />
The leg straps are most commonly used “criss-cross”<br />
style (Figure 11). For this configuration, pass <strong>the</strong> straps<br />
under <strong>the</strong> patient’s legs and buckle <strong>the</strong> left strap at <strong>the</strong><br />
right side of <strong>the</strong> KED and <strong>the</strong> right strap at <strong>the</strong> left side<br />
of <strong>the</strong> KED (see Applying <strong>the</strong> Leg Straps, Page 20, for<br />
complete instructions).<br />
Figure 11 - Leg Strap Applied<br />
In “Criss-Cross” Configuration<br />
If groin injury is suspected, you can use <strong>the</strong> straps in<br />
<strong>the</strong> “same-side” configuration to reduce pressure on<br />
<strong>the</strong> groin area. Pass <strong>the</strong> straps under <strong>the</strong> legs and buckle<br />
<strong>the</strong> left strap at <strong>the</strong> left side of <strong>the</strong> KED and <strong>the</strong> right<br />
strap at <strong>the</strong> right side of <strong>the</strong> KED.<br />
Whe<strong>the</strong>r <strong>using</strong> <strong>the</strong> “criss-cross” or “same-side”<br />
configuration, you must position <strong>the</strong> straps as close as<br />
possible to <strong>the</strong> body’s midline. When buckled straps<br />
are correctly positioned, <strong>the</strong>y run straight down from<br />
<strong>the</strong>ir anchoring points on back of <strong>the</strong> KED (Figure 12)<br />
before passing beneath <strong>the</strong> buttocks.<br />
Note: Positioning <strong>the</strong> straps correctly for <strong>the</strong> “sameside”<br />
configuration requires a more focused effort<br />
because <strong>the</strong> tendency during this application is to place<br />
<strong>the</strong> straps away from <strong>the</strong> midline.<br />
Leg Strap<br />
Anchoring Points<br />
Midline<br />
Figure 12 - Back View of Leg Straps When<br />
Correctly Positioned Close to <strong>the</strong> Body<br />
Midline<br />
Important<br />
To prevent pressure on <strong>the</strong> groin when <strong>using</strong><br />
<strong>the</strong> same-side configuration, take care to<br />
correctly position <strong>the</strong> leg straps close to <strong>the</strong><br />
body midline.<br />
12 © Ferno-Washington, Inc. 234-1754-02 April 2001
Model 125 KED<br />
About <strong>the</strong> KED Features<br />
4.7 Adjusta-Pad<br />
The foam-filled Adjusta-Pad can be used to fill <strong>the</strong> gap<br />
that may exist between <strong>the</strong> KED and any of <strong>the</strong>se areas:<br />
head, cervical collar (or neck, if no collar is used),<br />
shoulders.<br />
The patient’s medical condition, body structure, and<br />
head shape determine <strong>the</strong> need for padding. Most<br />
patients, when properly positioned in <strong>the</strong> KED, will<br />
not need padding but when you do use it, follow your<br />
medical advisor’s guidelines.<br />
If you need to apply <strong>the</strong> Adjusta-Pad:<br />
1. Determine whe<strong>the</strong>r to use <strong>the</strong> pad single thickness<br />
or folded.<br />
2. Slide <strong>the</strong> pad between <strong>the</strong> KED and <strong>the</strong> patient<br />
(Figure 13). Depending on <strong>the</strong> patient’s injuries,<br />
body structure, and head shape, <strong>the</strong> pad may be<br />
positioned behind <strong>the</strong> head only, behind <strong>the</strong> head<br />
and neck area, or behind head, neck area, and <strong>the</strong><br />
tops of <strong>the</strong> shoulders.<br />
Figure 13 - Positioning <strong>the</strong><br />
Adjusta-Pad<br />
Always take care to pad without hyperextending<br />
or flexing <strong>the</strong> patient’s neck.<br />
3. Secure <strong>the</strong> patient’s head with <strong>the</strong> head straps (see<br />
Head Straps, page 14).<br />
Note: The Adjusta-Pad may also be used as a splint<br />
pad.<br />
Lifting<br />
Handles<br />
4.8 Lifting Handles<br />
The KED is constructed with three lifting handles<br />
(Figure 14). Use <strong>the</strong> handles when adjusting <strong>the</strong> KED’s<br />
vertical position on <strong>the</strong> patient and during extrication.<br />
The top lift handle serves as an extension of <strong>the</strong> leg<br />
straps and offers a firm hold for vertical lift or horizontal<br />
pull to get <strong>the</strong> patient in position to extricate.<br />
Figure 14 - KED Lifting Handles<br />
During extrication, <strong>the</strong> handles provide a firm hold on<br />
<strong>the</strong> patient/KED as a single unit, minimizing chances<br />
of losing control or dropping <strong>the</strong> patient during<br />
extrication.<br />
The two side handles provide <strong>the</strong> firmest holds for<br />
extrication.<br />
© Ferno-Washington, Inc. 234-1754-02 April 2001 13
About <strong>the</strong> KED Features<br />
4.9 Head Straps<br />
Two identical head straps are provided to secure <strong>the</strong><br />
KED head flaps in place. They can also be used to<br />
secure <strong>the</strong> KED when <strong>using</strong> it as a splint.<br />
15-A<br />
Model 125 KED<br />
APPLYING THE UPPER STRAP<br />
1. Grasp <strong>the</strong> strap with both hands (Figure 15-A)<br />
and turn <strong>the</strong> center pad fully inside-out, exposing<br />
<strong>the</strong> rubber (Figure 15-B).<br />
2. Center <strong>the</strong> pad at <strong>the</strong> patient’s eyebrows with <strong>the</strong><br />
rubber against <strong>the</strong> skin. Position <strong>the</strong> strap ends at<br />
a downward angle and secure <strong>the</strong>m to <strong>the</strong><br />
fastening strips on <strong>the</strong> KED head flaps (Figure<br />
16).<br />
Note: Placing <strong>the</strong> strap ends at a downward angle<br />
minimizes <strong>the</strong> chance that <strong>the</strong> strap can slip upward on<br />
<strong>the</strong> forehead.<br />
APPLYING THE LOWER STRAP<br />
Two methods for applying <strong>the</strong> lower strap are provided<br />
below. There are alternate methods. Use and secure <strong>the</strong><br />
strap according to your medical director’s guidelines.<br />
15-B<br />
Figures 15-A and 15-B - Exposing <strong>the</strong><br />
Center Pad Rubber<br />
One method for applying <strong>the</strong> lower strap when <strong>using</strong> a<br />
rigid cervical collar is shown in Figure 16:<br />
1. Place <strong>the</strong> strap against a rigid area beneath <strong>the</strong><br />
“chin” of <strong>the</strong> cervical collar.<br />
2. Position <strong>the</strong> strap ends horizontally, or just above<br />
<strong>the</strong> horizontal, and secure <strong>the</strong>m to <strong>the</strong> fastening<br />
strips on <strong>the</strong> head flaps.<br />
A method for applying <strong>the</strong> lower strap to <strong>the</strong> patient’s<br />
chin area, with or without a cervical collar, would be:<br />
1. Grasp <strong>the</strong> strap with both hands and turn <strong>the</strong> center<br />
pad fully inside-out, exposing <strong>the</strong> rubber.<br />
2. Place <strong>the</strong> strap over <strong>the</strong> patient’s chin or over <strong>the</strong><br />
cervical collar chin area.<br />
Figure 16 - Head Straps in Place<br />
3. Position <strong>the</strong> strap ends horizontally and secure<br />
<strong>the</strong>m to <strong>the</strong> fastening strips on <strong>the</strong> head flaps.<br />
Make sure <strong>the</strong> strap placement does not prevent<br />
<strong>the</strong> patient from opening his/her mouth.<br />
14 © Ferno-Washington, Inc. 234-1754-02 April 2001
Model 125 KED<br />
Using <strong>the</strong> KED<br />
5 - USING THE KED<br />
5.1 Before Placing <strong>the</strong> KED<br />
in Service<br />
Personnel who will work with <strong>the</strong> KED need to<br />
read this manual and practice <strong>using</strong> <strong>the</strong> KED<br />
before placing it in service.<br />
Confirm that <strong>the</strong> KED operates properly. Carry<br />
out an inspection, following instructions in<br />
Inspecting <strong>the</strong> KED, page 31.<br />
5.2 General Guidelines for Use<br />
• This manual illustrates use of <strong>the</strong> KED in an ideal<br />
setting. O<strong>the</strong>r, and sometimes unusual, settings<br />
and circumstances will occur in <strong>the</strong> field and <strong>the</strong><br />
KED can be adapted to many of <strong>the</strong>m. It is <strong>the</strong><br />
responsibility of qualified Emergency Medical<br />
Service personnel to assess <strong>the</strong> patient’s condition<br />
and determine <strong>the</strong> proper equipment and<br />
procedures to use.<br />
!<br />
!<br />
WARNING<br />
Improper application of <strong>the</strong> KED can cause<br />
injury. Apply <strong>the</strong> KED only as described in<br />
this manual.<br />
WARNING<br />
An unattended patient can be injured. Stay<br />
with <strong>the</strong> patient at all times.<br />
• Follow your medical director’s guidelines when<br />
<strong>using</strong> <strong>the</strong> KED.<br />
• Optimum use of <strong>the</strong> KED includes one operator<br />
manually stabilizing <strong>the</strong> patient’s head and neck,<br />
two operators applying <strong>the</strong> KED, and a fourth<br />
operator managing <strong>the</strong> long spine board.<br />
In situations where <strong>the</strong>re are only two or three<br />
trained operators available, one operator manually<br />
stabilizes <strong>the</strong> head and neck while <strong>the</strong> o<strong>the</strong>r(s)<br />
applies <strong>the</strong> KED.<br />
• Follow standard emergency patient-handling<br />
procedures when <strong>using</strong> <strong>the</strong> KED.<br />
• Maintain manual stabilization of <strong>the</strong> patient’s<br />
head and neck until <strong>the</strong> patient is properly secured<br />
on a long spine board.<br />
• After applying <strong>the</strong> KED and transferring <strong>the</strong><br />
patient to <strong>the</strong> spine board, secure <strong>the</strong> patient to<br />
<strong>the</strong> spine board with restraints.<br />
• Stay with <strong>the</strong> patient at all times.<br />
© Ferno-Washington, Inc. 234-1754-02 April 2001 15
Using <strong>the</strong> KED<br />
Model 125 KED<br />
5.3 Applying <strong>the</strong> Cervical Collar<br />
Apply <strong>the</strong> cervical collar according to local protocols<br />
and <strong>the</strong> manufacturer’s instructions.<br />
Maintain manual stabilization of <strong>the</strong> patient’s head and<br />
neck until <strong>the</strong> patient is properly secured on a long spine<br />
board.<br />
In Figure 17, one operator holds <strong>the</strong> patient’s head and<br />
neck in neutral alignment while <strong>the</strong> o<strong>the</strong>r operator<br />
applies Ferno’s WizLoc cervical collar.<br />
5.4 Removing <strong>the</strong> KED from <strong>the</strong><br />
Carrying Case<br />
The KED carrying case is designed for quick removal<br />
of <strong>the</strong> KED, as follows:<br />
Figure 17 - Applying <strong>the</strong> WizLoc®<br />
Cervical Collar<br />
1. Stand <strong>the</strong> carrying case containing <strong>the</strong> KED on<br />
end with <strong>the</strong> open end of <strong>the</strong> case facing upward.<br />
Where <strong>the</strong> case meets <strong>the</strong> ground, <strong>the</strong>re will be a<br />
left and right “dog ear” (Figure 18).<br />
2. Place your foot on one of <strong>the</strong> “dog ears” to hold<br />
<strong>the</strong> case in place while you pull <strong>the</strong> KED out of<br />
<strong>the</strong> case (Figure 18)<br />
3. Unroll <strong>the</strong> KED and lay <strong>the</strong> Adjusta-Pad and head<br />
straps aside.<br />
“Dog Ear”<br />
Figure 18 - Removing <strong>the</strong> KED From Its<br />
Carrying Case<br />
16 © Ferno-Washington, Inc. 234-1754-02 April 2001
Model 125 KED<br />
Using <strong>the</strong> KED<br />
5.5 Placing <strong>the</strong> KED Behind<br />
<strong>the</strong> Patient<br />
The instructions below allow operators to use <strong>the</strong> KED<br />
design features to <strong>the</strong>ir best advantage.<br />
1. Check behind <strong>the</strong> patient for articles (wallet, belt,<br />
etc.) that could interfere with sliding <strong>the</strong> KED<br />
between <strong>the</strong> patient and <strong>the</strong> vehicle seat.<br />
2. With <strong>the</strong> buckles toward <strong>the</strong> seat, grasp <strong>the</strong> KED<br />
at <strong>the</strong> top of <strong>the</strong> head flap and <strong>the</strong> top corner of<br />
<strong>the</strong> torso flap closest to <strong>the</strong> patient.<br />
3. Tilt <strong>the</strong> KED at about a 45-degree angle and slide<br />
it behind <strong>the</strong> patient (Figure 19).<br />
Note: Use <strong>the</strong> KED’s vertical rigidity as an aid<br />
when sliding <strong>the</strong> KED behind <strong>the</strong> patient. Tilting<br />
<strong>the</strong> KED at a 45-degree angle provides a rigid<br />
leading edge to slip between <strong>the</strong> patient and seat,<br />
prevents <strong>the</strong> KED from rolling up, and allows <strong>the</strong><br />
KED to clear <strong>the</strong> vehicle roofline.<br />
Figure 19 - Sliding <strong>the</strong> KED at an Angle<br />
4. The operator and assisting operator(s) work <strong>the</strong><br />
KED down between <strong>the</strong> patient and <strong>the</strong> back of<br />
<strong>the</strong> seat and <strong>the</strong>n into <strong>the</strong> vertical position (Figure<br />
20). Work <strong>the</strong> KED far enough down to clear <strong>the</strong><br />
vehicle roofline and be positioned behind <strong>the</strong><br />
patient’s head when <strong>the</strong> KED is tipped to <strong>the</strong><br />
vertical.<br />
Note: The third operator may move <strong>the</strong> patient<br />
forward just enough (i.e., a hand’s thickness) to<br />
reduce friction so <strong>the</strong> KED slides smoothly<br />
between <strong>the</strong> patient and seat. To avoid jostling<br />
<strong>the</strong> patient’s head, coordinate this effort with <strong>the</strong><br />
operator stabilizing <strong>the</strong> head.<br />
Figure 20 - Centering <strong>the</strong> KED<br />
While <strong>the</strong> KED is moved to <strong>the</strong> vertical <strong>the</strong><br />
operator holding <strong>the</strong> patient’s head in alignment<br />
lifts his/her elbow slightly, providing clearance<br />
for <strong>the</strong> KED and taking care not to move <strong>the</strong><br />
patient’s head.<br />
5. Use <strong>the</strong> lift handles to center <strong>the</strong> KED behind <strong>the</strong><br />
patient.<br />
6. If you are going to use <strong>the</strong> leg straps, remove <strong>the</strong>m<br />
from <strong>the</strong> fastening strips at <strong>the</strong> top of <strong>the</strong> KED<br />
(Figure 21-A). Slide <strong>the</strong>m clear of <strong>the</strong> KED and<br />
lay <strong>the</strong>m within reach (Figure 21-B).<br />
Figure 21-A Figure 21-B<br />
Releasing a Leg Strap<br />
© Ferno-Washington, Inc. 234-1754-02 April 2001 17
Using <strong>the</strong> KED<br />
Model 125 KED<br />
5.6 Wrapping and Positioning <strong>the</strong><br />
KED<br />
1. Wrap both torso flaps around <strong>the</strong> patient’s torso,<br />
lifting <strong>the</strong> patient’s arms only as much as needed<br />
to slide <strong>the</strong> flaps beneath <strong>the</strong>m. The top of <strong>the</strong><br />
flaps should be just below <strong>the</strong> patient’s armpits<br />
(Figure 22).<br />
2. Use <strong>the</strong> lift handles to raise and adjust <strong>the</strong> KED<br />
until <strong>the</strong> top edges of <strong>the</strong> torso flaps press firmly<br />
into <strong>the</strong> armpit area. You can also use <strong>the</strong> lift<br />
handles to keep <strong>the</strong> KED in place until <strong>the</strong> straps<br />
can be buckled.<br />
If <strong>using</strong> three operators, <strong>the</strong> two side operators<br />
lift <strong>the</strong> KED with <strong>the</strong> side straps.<br />
Important<br />
It is important to pull <strong>the</strong> KED up snugly under<br />
<strong>the</strong> armpits to make sure <strong>the</strong> patient’s weight<br />
is suspended. This will reduce <strong>the</strong> possibility<br />
of <strong>the</strong> patient slipping downward later when he/<br />
she is lifted.<br />
Figure 22 -Wrapping <strong>the</strong> Torso Flaps<br />
Around <strong>the</strong> Patient<br />
3. Before beginning to fasten <strong>the</strong> straps, make sure<br />
<strong>the</strong> patient is sitting back against <strong>the</strong> KED as fully<br />
as his/her body structure and condition allow.<br />
To check and adjust <strong>the</strong> patient’s position, <strong>the</strong><br />
operator behind <strong>the</strong> patient holds <strong>the</strong> patient’s<br />
head in alignment while a side operator gently<br />
presses on <strong>the</strong> patient’s chest area just below <strong>the</strong><br />
cervical collar (Figure 23).<br />
Be Aware<br />
Positioning <strong>the</strong> patient as fully as possible against<br />
<strong>the</strong> KED minimizes <strong>the</strong> need for padding between<br />
<strong>the</strong> patient’s head and <strong>the</strong> KED. But be aware that<br />
some patients may not be able to sit fully back<br />
into <strong>the</strong> KED.<br />
Figure 23 - Moving <strong>the</strong> Patient Back<br />
Into <strong>the</strong> KED<br />
18 © Ferno-Washington, Inc. 234-1754-02 April 2001
Model 125 KED<br />
Using <strong>the</strong> KED<br />
5.7 Fastening <strong>the</strong> Torso Straps<br />
After <strong>the</strong> KED is wrapped and properly positioned<br />
under <strong>the</strong> armpits, fasten <strong>the</strong> middle strap and <strong>the</strong>n <strong>the</strong><br />
bottom strap. Do not fasten <strong>the</strong> top (green) strap at this<br />
time.<br />
Hook-and-<br />
Loop<br />
Fastener<br />
To fasten <strong>the</strong> torso straps:<br />
1. Remove <strong>the</strong> middle (yellow) strap from its holder<br />
by grasping <strong>the</strong> sides of <strong>the</strong> buckle and pulling<br />
<strong>the</strong> strap out of <strong>the</strong> holder (Figure 24).<br />
2. Fasten <strong>the</strong> middle strap buckle (Figure 25).<br />
3. Remove <strong>the</strong> bottom (red) strap from its holder<br />
and fasten <strong>the</strong> buckle (Figure 26).<br />
Figure 24 - Releasing a Torso Strap<br />
4. Use <strong>the</strong> feed-and-pull tightening technique to<br />
snug both straps, leaving space for two or three<br />
fingers laid flat between <strong>the</strong> strap and <strong>the</strong> patient’s<br />
chest.<br />
You will fasten <strong>the</strong> top strap and tighten all o<strong>the</strong>r<br />
straps just before transferring <strong>the</strong> patient to a long<br />
spine board and <strong>the</strong> ambulance cot.<br />
A MEMORY AID<br />
Many EMTs remember <strong>the</strong> order for<br />
fastening straps by repeating this phrase:<br />
“Money Buys Lots of Hot Toys.”<br />
Figure 25 - Middle Strap Fastened<br />
Money= Middle Strap<br />
Buys = Bottom Strap<br />
Lots of = Leg Straps<br />
Hot = Head Straps<br />
Toys = Top Strap<br />
Figure 26 - Middle and Bottom Straps<br />
Fastened<br />
© Ferno-Washington, Inc. 234-1754-02 April 2001 19
Using <strong>the</strong> KED<br />
Model 125 KED<br />
5.8 Applying <strong>the</strong> Leg Straps<br />
To apply <strong>the</strong> leg straps:<br />
1. Pass <strong>the</strong> leg straps between <strong>the</strong> leg and car seat<br />
(make use of a gap if <strong>the</strong>re is one).<br />
2. Using both hands, “see-saw” one strap into<br />
position under <strong>the</strong> patient’s leg and buttock<br />
(Figure 27).<br />
Reach behind <strong>the</strong> patient and make sure <strong>the</strong> strap<br />
lays straight downward from its anchor point on<br />
<strong>the</strong> KED, as close as possible to <strong>the</strong> body midline<br />
(Figure 28).<br />
3. Repeat steps 1 and 2 with <strong>the</strong> o<strong>the</strong>r leg strap.<br />
4. If you are <strong>using</strong> <strong>the</strong> “criss-cross” configuration,<br />
cross <strong>the</strong> straps at <strong>the</strong> groin and buckle <strong>the</strong> straps<br />
opposite <strong>the</strong>ir sides of origin (Figure 29).<br />
If you are <strong>using</strong> <strong>the</strong> “same-side” configuration,<br />
do not cross <strong>the</strong> straps at <strong>the</strong> groin. Buckle <strong>the</strong>m<br />
on <strong>the</strong>ir sides of origin.<br />
5. Snug both straps <strong>using</strong> <strong>the</strong> feed-and-pull<br />
tightening method (see Snugging or Tightening<br />
<strong>the</strong> Strap, page 9). Leave space for two or three<br />
fingers laid flat between <strong>the</strong> strap and <strong>the</strong> patient’s<br />
leg.<br />
You will tighten <strong>the</strong> leg straps just before<br />
transferring <strong>the</strong> patient to <strong>the</strong> long spine board.<br />
Figure 27 - Placing a Leg Strap Beneath<br />
<strong>the</strong> Patient’s Leg<br />
Leg Strap<br />
Anchoring Points<br />
Midline<br />
Figure 28 - Back View of Leg Straps<br />
When Properly Positioned<br />
Be Aware<br />
For suspected groin injury, <strong>the</strong> leg straps can be<br />
used in <strong>the</strong> “same-side” configuration or not used<br />
at all. Always follow your medical advisor’s<br />
recommendations for <strong>the</strong> use of leg straps.<br />
Figure 29 - Leg Straps in <strong>the</strong> “Criss-Cross”<br />
Configuration<br />
20 © Ferno-Washington, Inc. 234-1754-02 April 2001
Model 125 KED<br />
Using <strong>the</strong> KED<br />
5.9 Securing <strong>the</strong> Patient’s Head<br />
APPLYING PADDING<br />
Be Aware<br />
The patient’s medical condition, body structure,<br />
and head shape determine <strong>the</strong> need for padding.<br />
Follow your medical advisor’s guidelines for <strong>the</strong><br />
use of padding.<br />
1. Make sure <strong>the</strong> patient is still properly positioned<br />
against <strong>the</strong> KED. Adjust if necessary.<br />
2. If <strong>the</strong>re is a gap between <strong>the</strong> KED and <strong>the</strong> patient’s<br />
head, <strong>the</strong> cervical collar, or <strong>the</strong> patient’s shoulders,<br />
fill <strong>the</strong> gap with <strong>the</strong> Adjusta-Pad or rolled towels<br />
(Figure 30) taking care not to hyperextend or flex<br />
<strong>the</strong> patient’s neck. (The Adjusta-Pad can be folded<br />
if additional thickness is needed.)<br />
Figure 30 - Placing <strong>the</strong> Padding<br />
APPLYING THE HEAD FLAPS<br />
One operator will hold <strong>the</strong> head and head flaps in place<br />
while ano<strong>the</strong>r operator applies <strong>the</strong> head straps to secure<br />
and hold <strong>the</strong> patient’s head against <strong>the</strong> KED and/or<br />
padding.<br />
1. Wrap <strong>the</strong> head flaps around <strong>the</strong> patient’s head<br />
(Figure 31).<br />
2. Grasp a head strap with both hands and turn <strong>the</strong><br />
center pad fully inside-out so <strong>the</strong> rubber will be<br />
against <strong>the</strong> patient’s forehead (see Head Straps,<br />
page 14).<br />
Figure 31 - Wrapping <strong>the</strong> Head Flaps with<br />
Padding in Place<br />
3. Position <strong>the</strong> strap at <strong>the</strong> patient’s eyebrows and<br />
secure <strong>the</strong> strap to <strong>the</strong> head flap fastening strips<br />
at a downward angle (Figure 32). The angled<br />
placement minimizes <strong>the</strong> chance that <strong>the</strong> strap can<br />
slide upward on <strong>the</strong> forehead.<br />
4. Place <strong>the</strong> second strap under or on <strong>the</strong> chin area<br />
of <strong>the</strong> cervical collar and position <strong>the</strong> strap ends<br />
as horizontally as possible. Secure <strong>the</strong> strap ends<br />
to <strong>the</strong> fastening strips on <strong>the</strong> head flaps (Figure<br />
32). Take care not to apply <strong>the</strong> strap so snugly<br />
that <strong>the</strong> patient cannot open his/her mouth. For<br />
additional information, see Head Straps, page 14.<br />
Figure 32 - Head Straps Applied<br />
© Ferno-Washington, Inc. 234-1754-02 April 2001 21
Using <strong>the</strong> KED<br />
Model 125 KED<br />
5.10 Buckling <strong>the</strong> Top Strap and<br />
Making Final Strap<br />
Adjustments<br />
When <strong>the</strong> long spine board and ambulance cot are<br />
prepared and waiting, it is time to buckle <strong>the</strong> top strap<br />
and make final adjustments to <strong>the</strong> o<strong>the</strong>r straps.<br />
The purpose of <strong>the</strong> adjustments is to make sure <strong>the</strong> KED<br />
is firmly in place from <strong>the</strong> lower spine to <strong>the</strong> head, and<br />
is positioned high up under <strong>the</strong> armpits to prevent<br />
movement during extrication.<br />
Finish applying <strong>the</strong> KED as follows:<br />
1. Remove <strong>the</strong> top (green) strap from its holder and<br />
buckle it. Tighten <strong>the</strong> strap to <strong>the</strong> chest <strong>using</strong> <strong>the</strong><br />
feed-and-pull technique (see Snugging or<br />
Tightening <strong>the</strong> Strap, page 9).<br />
2. Check and tighten <strong>the</strong> middle (yellow) strap.<br />
3. Check and tighten <strong>the</strong> bottom (red) strap.<br />
4. Check and tighten <strong>the</strong> leg straps.<br />
Figure 33 - The KED, Applied<br />
The properly applied KED will look as illustrated in<br />
Figure 33.<br />
22 © Ferno-Washington, Inc. 234-1754-02 April 2001
Model 125 KED<br />
Using <strong>the</strong> KED<br />
5.11 Transferring <strong>the</strong> Patient to <strong>the</strong><br />
Long Spine Board<br />
The technique described below for transferring <strong>the</strong><br />
patient to <strong>the</strong> long spine board involves pivoting <strong>the</strong><br />
patient with his/her back toward <strong>the</strong> midline of <strong>the</strong><br />
vehicle. In many situations, this may be <strong>the</strong> most<br />
effective technique for preventing lower spine torque.<br />
Alternative techniques have been developed and are in<br />
use. Follow your medical director’s guidelines when<br />
choosing a technique.<br />
GENERAL GUIDELINES<br />
• The two operators pivoting and lifting <strong>the</strong> patient<br />
work from <strong>the</strong> same side of <strong>the</strong> vehicle.<br />
• Pivot <strong>the</strong> patient so his/her back is toward <strong>the</strong><br />
midline (inside) of <strong>the</strong> vehicle.<br />
Be Aware<br />
Make sure to maintain <strong>the</strong> patient’s body angle<br />
and a straight midline as you pivot <strong>the</strong> patient to<br />
position his/her back toward <strong>the</strong> inside of <strong>the</strong><br />
vehicle.<br />
Figure 34- Patient Pivoted with Back<br />
Toward Inside of Vehicle<br />
TRANSFERRING THE PATIENT<br />
TO THE LONG SPINE BOARD<br />
1. Two operators grasp <strong>the</strong> side lift handles of <strong>the</strong><br />
KED and pivot/tilt/lift <strong>the</strong> patient until his/her<br />
back is toward <strong>the</strong> inside of <strong>the</strong> vehicle (Figure<br />
34).<br />
2. Grasping <strong>the</strong> side handles of <strong>the</strong> KED and holding<br />
<strong>the</strong> patient under <strong>the</strong> knees, lift <strong>the</strong> knees enough<br />
to allow a third operator to slide <strong>the</strong> long spine<br />
board between <strong>the</strong> patient and <strong>the</strong> seat (Figure<br />
35). Then lower <strong>the</strong> patient onto <strong>the</strong> spine board.<br />
Note: Slide <strong>the</strong> head-end edge of <strong>the</strong> spine board<br />
as close as possible to <strong>the</strong> far side of <strong>the</strong> seat so<br />
<strong>the</strong> patient will become properly positioned on<br />
<strong>the</strong> board when you lift <strong>the</strong> knees.<br />
Continued on Next Page<br />
Figure 35 - Lifting <strong>the</strong> Patient<br />
To Position <strong>the</strong> Long Spine Board<br />
© Ferno-Washington, Inc. 234-1754-02 April 2001 23
Model 125 KED<br />
Using <strong>the</strong> KED<br />
3. Lift <strong>the</strong> spine board and patient out of <strong>the</strong> vehicle<br />
and place <strong>the</strong>m on <strong>the</strong> ambulance cot (Figure 36).<br />
4. Immediately loosen <strong>the</strong> top (green) torso strap<br />
(Figure 37) to allow <strong>the</strong> patient more chest<br />
expansion.<br />
Note: Keeping <strong>the</strong> remaining straps tightened<br />
provides stability for <strong>the</strong> patient during <strong>the</strong> starts,<br />
stops, and corners of <strong>the</strong> ambulance ride to <strong>the</strong><br />
hospital.<br />
5. Tighten leg straps if necessary. Properly applied<br />
leg straps will loosen when <strong>the</strong> patient is placed<br />
supine on <strong>the</strong> spine board.<br />
6. Apply a head immobilizer such as <strong>the</strong> Ferno<br />
Model 445.<br />
7. Secure <strong>the</strong> patient on <strong>the</strong> spine board with <strong>the</strong><br />
spine board restraints.<br />
8. Secure <strong>the</strong> spine board on <strong>the</strong> cot with <strong>the</strong> cot<br />
restraints.<br />
!<br />
WARNING<br />
An unrestrained patient can fall off <strong>the</strong> spine<br />
board or cot and be injured. Use restraints<br />
to secure <strong>the</strong> patient on <strong>the</strong> spine board and<br />
<strong>the</strong> cot.<br />
Figure 36 - Placing Patient and<br />
Long Spine Board on Ambulance Cot<br />
Figure 37 - Loosening Top (Green) Torso<br />
Strap for Patient Comfort<br />
24 © Ferno-Washington, Inc. 234-1754-02 April 2001
Model 125 KED<br />
Special Situations<br />
6 - ADAPTING THE KED IN SPECIAL SITUATIONS<br />
6.1 General Guidelines<br />
When necessary, <strong>the</strong> KED can be adapted for use in<br />
special situations and circumstances. Some possible<br />
adaptions are presented in this section. Follow your<br />
medical director’s guidelines for adapting <strong>the</strong> KED.<br />
!<br />
WARNING<br />
USING TWO STRAPS<br />
Fasten <strong>the</strong> bottom strap in <strong>the</strong> middle buckle and <strong>the</strong><br />
middle strap in <strong>the</strong> bottom buckle (Figure 39).<br />
Attaching o<strong>the</strong>r equipment or items to <strong>the</strong><br />
KED can cause injury. Do not attach<br />
equipment or items of any kind to <strong>the</strong> KED.<br />
6.2 Adapting <strong>the</strong> KED for a<br />
Pregnant Patient<br />
When applying <strong>the</strong> KED to a pregnant patient, fold two<br />
slats inward on each torso flap to leave <strong>the</strong> abdomen<br />
exposed.<br />
Strap configuration will depend on <strong>the</strong> patient’s<br />
abdomen and breast size. Generally, straps can be<br />
positioned to lay beneath <strong>the</strong> breasts but above <strong>the</strong><br />
abdomen (Figure 38). Two possible configurations are<br />
described in this subsection.<br />
Figure 39 - Two-Strap Configuration<br />
USING ALL THREE STRAPS<br />
Fasten <strong>the</strong> middle strap in its own buckle. Fasten <strong>the</strong><br />
bottom strap in <strong>the</strong> top buckle. Fasten <strong>the</strong> top strap in<br />
<strong>the</strong> bottom buckle (Figure 40).<br />
Figure 38 - Positioning Torso Straps<br />
Beneath Breasts/Above Abdomen<br />
Figure 40 - Three-Strap Configuration<br />
© Ferno-Washington, Inc. 234-1754-02 April 2001 25
Special Situations<br />
Model 125 KED<br />
6.3 Adapting <strong>the</strong> KED for a<br />
Pediatric Patient<br />
The patient’s size and condition determine how <strong>the</strong><br />
KED can be adapted for a child.<br />
In this example of one possible method, <strong>the</strong> child’s legs<br />
are longer than <strong>the</strong> KED so <strong>the</strong> KED and child are<br />
placed on a long spine board.<br />
A folded blanket is placed on <strong>the</strong> child so <strong>the</strong> torso<br />
flaps can be wrapped and fastened normally (Figure<br />
41).<br />
Figure 41 - Applying <strong>the</strong> KED to a Child<br />
6.4 Adapting KED for an<br />
Angulated Neck<br />
When it is not desirable to straighten <strong>the</strong> patient’s neck,<br />
fold <strong>the</strong> head flaps inward. Position a rolled towel as<br />
needed, <strong>the</strong>n place a head strap across <strong>the</strong> patient’s<br />
forehead and secure <strong>the</strong> strap to <strong>the</strong> KED fastening<br />
strips (Figure 42).<br />
Figure 42 - Applying <strong>the</strong> KED to an<br />
Angulated Neck<br />
6.5 Adapting <strong>the</strong> KED for Use With<br />
Monitoring Systems<br />
Folding two slats of each torso flap inward provides<br />
more chest exposure when needed. Loosening two of<br />
<strong>the</strong> three chest straps allows defibrillation without<br />
losing immobility (Figure 43).<br />
Figure 43- Adapting <strong>the</strong> KED for Use with a<br />
Monitoring System<br />
26 © Ferno-Washington, Inc. 234-1754-02 April 2001
Model 125 KED<br />
Special Situations<br />
6.6 Adapting <strong>the</strong> KED for Use<br />
As a Splint<br />
The KED can be used as a splint for pelvic stabilization<br />
and hip and/or femur stabilization. Two possible<br />
methods of adaptation are shown here.<br />
HIP AND/OR FEMUR STABILIZATION<br />
The KED and patient are placed on a long spine board<br />
with <strong>the</strong> head portion of <strong>the</strong> KED toward <strong>the</strong> foot end<br />
of <strong>the</strong> board.<br />
The torso portion of <strong>the</strong> is KED positioned a little above<br />
<strong>the</strong> waist and centered (Figure 44). The torso flaps are<br />
secured around <strong>the</strong> patient and <strong>the</strong> head flaps are<br />
wrapped around <strong>the</strong> patient’s injured leg and secured<br />
with <strong>the</strong> KED head straps (Figure 44).<br />
Figure 44 - Stabilizing <strong>the</strong><br />
Hip and/or Femur<br />
PELVIC STABILIZATION<br />
The KED and patient are placed on a long spine board<br />
with <strong>the</strong> head portion of <strong>the</strong> KED toward <strong>the</strong> foot end<br />
of <strong>the</strong> board.<br />
The torso portion of <strong>the</strong> is KED positioned a little above<br />
<strong>the</strong> waist and centered. The torso flaps are secured<br />
around <strong>the</strong> patient’s pelvic area and <strong>the</strong> head flaps are<br />
wrapped around both <strong>the</strong> patient’s legs and secured with<br />
<strong>the</strong> KED head straps (Figure 45).<br />
Figure 45 - Stabilizing <strong>the</strong> Pelvis<br />
6.7 Using <strong>the</strong> KED With an<br />
Anti-Shock Garment<br />
The KED will not interfere with, or limit <strong>the</strong> use of, a<br />
pneumatic anti-shock garment (Figure 46).<br />
Figure 46 - Using <strong>the</strong> KED with an<br />
Anti-Shock Garment<br />
© Ferno-Washington, Inc. 234-1754-02 April 2001 27
Storing <strong>the</strong> KED<br />
Model 125 KED<br />
7.1 Storing <strong>the</strong> KED<br />
If you properly prepare <strong>the</strong> KED before placing it in<br />
its carrying case you will be able to unpack and use it<br />
quickly and smoothly.<br />
TORSO STRAPS<br />
7 - STORING THE KED<br />
Fold each torso strap accordion fashion and secure it<br />
in its hook-and-loop fastener as follows:<br />
1. Leng<strong>the</strong>n <strong>the</strong> strap until only three or four fingerwidths<br />
of webbing have not passed backward<br />
through <strong>the</strong> buckle slide.<br />
Figure 47 - Turning <strong>the</strong> Buckle Under<br />
2. Turn <strong>the</strong> buckle under, flush against <strong>the</strong> webbing<br />
(Figure 47)<br />
3. Make <strong>the</strong> first fold beneath <strong>the</strong> buckle (Figure<br />
48) and continue folding <strong>the</strong> strap accordion<br />
fashion (Figure 49).<br />
4. When all <strong>the</strong> webbing is folded, secure it in <strong>the</strong><br />
hook-and-loop fastener (Figure 50).<br />
Figure 48 - Making <strong>the</strong> First Fold<br />
Make sure to position <strong>the</strong> folded strap so <strong>the</strong><br />
fastening strips wrap around it at <strong>the</strong> location of<br />
<strong>the</strong> buckle release tabs. This will enable you to<br />
pull <strong>the</strong> strap free without tangles, and have <strong>the</strong><br />
buckle in your hand, in a single motion.<br />
Figure 49 - Folding Accordion Style<br />
Figure 50 - Securing <strong>the</strong> Strap<br />
28 © Ferno-Washington, Inc. 234-1754-02 April 2001
Model 125 KED<br />
Storing <strong>the</strong> KED<br />
LEG STRAPS<br />
Storing <strong>the</strong> leg straps as described here will keep <strong>the</strong>m<br />
out of <strong>the</strong> way while sliding <strong>the</strong> KED between <strong>the</strong><br />
patient and <strong>the</strong> vehicle seat, yet readily available when<br />
you want to use <strong>the</strong>m.<br />
Leave <strong>the</strong> leg straps in <strong>the</strong>ir stored position in situations<br />
where you choose not to use <strong>the</strong>m.<br />
Store both leg straps as follows:<br />
1. Leng<strong>the</strong>n <strong>the</strong> leg strap until about six inches of<br />
webbing have not passed backward through <strong>the</strong><br />
buckle slide.<br />
2. Beginning at <strong>the</strong> point where <strong>the</strong> strap is attached<br />
to <strong>the</strong> KED, fold <strong>the</strong> strap down around <strong>the</strong> bottom<br />
edge of <strong>the</strong> KED <strong>the</strong>n up and around <strong>the</strong> inside of<br />
<strong>the</strong> KED (Figure 51).<br />
3. Turn <strong>the</strong> buckle under to rest flush against <strong>the</strong><br />
webbing and secure <strong>the</strong> strap in place by pressing<br />
its hook-and-loop fastening strip against a<br />
fastening strip on <strong>the</strong> outside of <strong>the</strong> KED (Figure<br />
52)<br />
Figure 51 - Wrapping <strong>the</strong> Leg Straps<br />
Figure 52 - Securing <strong>the</strong> Folded Strap in <strong>the</strong><br />
Fastener<br />
© Ferno-Washington, Inc. 234-1754-02 April 2001 29
Storing <strong>the</strong> KED<br />
Model 125 KED<br />
ADJUSTA-PAD<br />
Lay <strong>the</strong> KED flat with <strong>the</strong> buckles facing upward. Place<br />
<strong>the</strong> Adjusta-Pad on <strong>the</strong> center of <strong>the</strong> KED, with one<br />
end of <strong>the</strong> pad at <strong>the</strong> bottom edge of <strong>the</strong> KED (Figure<br />
53).<br />
HEAD STRAPS<br />
Press one end of each strap against <strong>the</strong> hook-and-loop<br />
fastening strips on <strong>the</strong> head area of <strong>the</strong> KED and lay<br />
<strong>the</strong> straps parallel with <strong>the</strong> Adjusta-Pad.<br />
Figure 54 - Folding <strong>the</strong> Torso Flap<br />
Figure 55 - Rolling <strong>the</strong> KED<br />
Figure 53 - Positioning <strong>the</strong> Adjusta-Pad<br />
And Head Straps<br />
TORSO FLAPS<br />
1. Fold <strong>the</strong> torso flap over <strong>the</strong> Adjusta-Pad, tucking<br />
<strong>the</strong> edge of <strong>the</strong> flap over <strong>the</strong> edge of <strong>the</strong> pad<br />
(Figure 54).<br />
2. Roll <strong>the</strong> folded portion of <strong>the</strong> KED over <strong>the</strong><br />
remaining torso flap (Figure 55) until <strong>the</strong> center<br />
portion of <strong>the</strong> inside of <strong>the</strong> KED is upward (Figure<br />
56).<br />
Figure 56 - Ready for <strong>the</strong> Carrying Case<br />
3. Grasp <strong>the</strong> KED to keep it rolled and slide it into<br />
<strong>the</strong> carrying case.<br />
30 © Ferno-Washington, Inc. 234-1754-02 April 2001
Model 125 KED<br />
Maintaining <strong>the</strong> KED<br />
8 - MAINTAINING THE KED<br />
8.1 Maintenance Schedule<br />
The KED requires regular maintenance. Set up and<br />
follow a maintenance schedule. The following chart<br />
represents minimum maintenance.<br />
Disinfecting (this page)<br />
Cleaning (this page)<br />
Inspecting (this page)<br />
When <strong>using</strong> maintenance products, follow <strong>the</strong><br />
manufacturers’ directions and read <strong>the</strong> manufacturers’<br />
material safety data sheets.<br />
Contact Ferno Customer Service to order Ferno<br />
disinfectants and cleaners (page 32).<br />
!<br />
Each Use<br />
WARNING<br />
•<br />
As Needed<br />
8.2 Cleaning and Disinfecting <strong>the</strong><br />
KED<br />
Each Month<br />
•<br />
• •<br />
Improper maintenance can cause injury.<br />
Maintain <strong>the</strong> KED only as described in this<br />
manual.<br />
1. Lay all pieces of <strong>the</strong> KED on a clean surface and<br />
rinse off with warm water.<br />
2. Lightly scrub <strong>the</strong> KED and Adjusta-Pad with a<br />
mild soap solution and a medium bristle brush.<br />
Wash <strong>the</strong> head straps with <strong>the</strong> soap solution and<br />
a clean sponge.<br />
4. To disinfect, apply a solution of 2% to 5% chlorine<br />
bleach and water.<br />
5. Rinse all pieces with warm water.<br />
6. Allow all pieces to dry completely before<br />
returning <strong>the</strong>m to <strong>the</strong> carrying case.<br />
Note: Drying time for <strong>the</strong> KED can vary from 2<br />
to 36 hours, depending on temperature, humidity,<br />
and on how long <strong>the</strong> KED was exposed to water<br />
during use or during disinfecting and cleaning.<br />
(Moisture can be absorbed through <strong>the</strong> sewing<br />
holes, wetting <strong>the</strong> battens inside <strong>the</strong> KED).<br />
Important<br />
Storing a damp or wet KED in its carrying case<br />
will encourage <strong>the</strong> growth of mold. Do not return<br />
<strong>the</strong> KED to its carrying case until it is thoroughly<br />
dry.<br />
8.3 Inspecting <strong>the</strong> KED<br />
Are all components present<br />
Is all stitching secure<br />
Are vertical battens (inside KED) solid and<br />
unbroken<br />
Are torso and leg straps and lifting handles in<br />
good condition<br />
Are all buckles free of visible damage and do <strong>the</strong>y<br />
operate properly<br />
Are head straps free of excessive wear and is <strong>the</strong>ir<br />
stitching secure<br />
Is Adjusta-Pad in good condition<br />
3. Rinse all pieces with warm water.<br />
© Ferno-Washington, Inc. 234-1754-02 April 2001 31
Limited Warranty and Customer Service<br />
Model 125 KED<br />
Limited Warranty Summary<br />
9 - LIMITED WARRANTY<br />
Ferno-Washington, Inc. (Ferno), warrants <strong>the</strong> products we manufacture to be free from defects in material and<br />
workmanship for one year except as follows:<br />
(A) Soft goods (webbing, vinyl, fabric, foam, etc.) are warranted for 90 days.<br />
This limited warranty applies when you use and care for <strong>the</strong> product properly. If <strong>the</strong> product is not used and cared<br />
for properly, <strong>the</strong> warranty is void. The warranty period begins <strong>the</strong> day <strong>the</strong> product is shipped from Ferno or <strong>the</strong> day<br />
you receive it if you have proof of <strong>the</strong> delivery date. Shipping charges are not covered by <strong>the</strong> limited warranty. We<br />
are not liable for shipping damages or damages sustained through <strong>using</strong> <strong>the</strong> product.<br />
Limited Warranty Obligation<br />
If a product or part is proven to be defective, Ferno will repair or replace it. At our option, we will refund <strong>the</strong><br />
product’s purchase price. The purchaser accepts <strong>the</strong>se terms in lieu of all damages.<br />
This is a summary of <strong>the</strong> limited warranty. The actual terms and conditions of <strong>the</strong> limited warranty, and<br />
<strong>the</strong> limitations of liability and disclaimers, are available upon request by calling 800.733.3766 or<br />
937.382.1451.<br />
10 - CUSTOMER SERVICE<br />
Customer service and product support are important<br />
aspects of each Ferno product.<br />
Lot Number ________________________<br />
For assistance with <strong>the</strong> KED, contact Ferno Customer<br />
Service or your Ferno distributor.<br />
Please have <strong>the</strong> lot number of your KED available when<br />
calling, and include it in all written communications.<br />
For additional free Users’ Manuals call Ferno Customer<br />
Service at <strong>the</strong> numbers below, or contact your Ferno<br />
distributor.<br />
Ferno-Washington, Inc.<br />
70 Weil Way<br />
Wilmington, OH 45177-9371<br />
U.S.A.<br />
Telephone (U.S.A. and Canada) ........... 800.733.3766<br />
Telephone (Worldwide) ....................... 937-382-1451<br />
Fax (United States) ............................... 937.382.1191<br />
Fax (Outside U.S.A.) ........................... 937-382-6569<br />
Internet.............................................. www.ferno.com<br />
32 © Ferno-Washington, Inc. 234-1754-02 April 2001
Model 125 KED<br />
Date<br />
TRAINING RECORD<br />
Name<br />
Training Method<br />
Training Record<br />
© Ferno-Washington, Inc. 234-1754-02 April 2001 33
Maintenance Record<br />
Date<br />
MAINTENANCE RECORD<br />
Maintenance Performed<br />
Model 125 KED<br />
By<br />
34 © Ferno-Washington, Inc. 234-1754-02 April 2001
Model 125 KED<br />
Notes<br />
NOTES<br />
© Ferno-Washington, Inc. 234-1754-02 April 2001 35

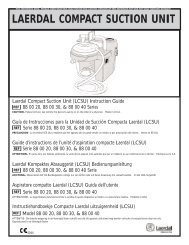


![EKG Basics.ppt [Read-Only] - Grand County EMS](https://img.yumpu.com/34986415/1/190x146/ekg-basicsppt-read-only-grand-county-ems.jpg?quality=85)