
You also want an ePaper? Increase the reach of your titles
YUMPU automatically turns print PDFs into web optimized ePapers that Google loves.
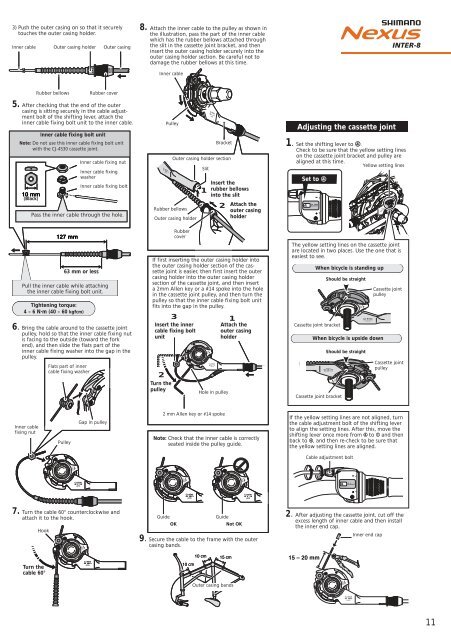
3) Push the outer casing on so that it securely<br />
touches the outer casing holder.<br />
Inner cable Outer casing holder<br />
Rubber bellows Rubber cover<br />
5. After checking that the end of the outer<br />
casing is sitting securely in the cable adjustment<br />
bolt of the shifting lever, attach the<br />
inner cable fixing bolt unit to the inner cable.<br />
10 mm<br />
(Black)<br />
Turn the<br />
cable 60°<br />
Inner cable fixing bolt unit<br />
127 mm<br />
LOCK LOCK<br />
CJ-8S40<br />
JAPAN<br />
LOCK LOCK<br />
CJ-8S40<br />
JAPAN<br />
Outer casing<br />
Note: Do not use this inner cable fixing bolt unit<br />
with the CJ-4S30 cassette joint.<br />
Pass the inner cable through the hole.<br />
Tightening torque:<br />
4 – 6 N·m (40 – 60 kgfcm)<br />
6. Bring the cable around to the cassette joint<br />
pulley, hold so that the inner cable fixing nut<br />
is facing to the outside (toward the fork<br />
end), and then slide the flats part of the<br />
inner cable fixing washer into the gap in the<br />
pulley.<br />
Inner cable<br />
fixing nut<br />
7. Turn the cable 60° counterclockwise and<br />
attach it to the hook.<br />
Hook<br />
Flats part of inner<br />
cable fixing washer<br />
Pulley<br />
Inner cable fixing nut<br />
Inner cable fixing<br />
washer<br />
Inner cable fixing bolt<br />
63 mm or less<br />
Pull the inner cable while attaching<br />
the inner cable fixing bolt unit.<br />
Gap in pulley<br />
8. Attach the inner cable to the pulley as shown in<br />
the illustration, pass the part of the inner cable<br />
which has the rubber bellows attached through<br />
the slit in the cassette joint bracket, and then<br />
insert the outer casing holder securely into the<br />
outer casing holder section. Be careful not to<br />
damage the rubber bellows at this time.<br />
Inner cable<br />
CJ-8S40 CJ-8S40<br />
JAPAN JAPAN<br />
Pulley<br />
Insert the inner<br />
cable fixing bolt<br />
unit<br />
LOCK LOCK<br />
CJ-8S40<br />
JAPAN<br />
10 cm<br />
LOCK LOCK<br />
LOCK LOCK<br />
CJ-8S40 CJ-8S40<br />
JAPAN JAPAN<br />
Outer casing holder section<br />
Slit<br />
Rubber bellows<br />
Outer casing holder<br />
Rubber<br />
cover<br />
CJ-8S40<br />
JAPAN<br />
Bracket<br />
If first inserting the outer casing holder into<br />
the outer casing holder section of the cassette<br />
joint is easier, then first insert the outer<br />
casing holder into the outer casing holder<br />
section of the cassette joint, and then insert<br />
a 2mm Allen key or a #14 spoke into the hole<br />
in the cassette joint pulley, and then turn the<br />
pulley so that the inner cable fixing bolt unit<br />
fits into the gap in the pulley.<br />
2<br />
Turn the<br />
pulley<br />
Hole in pulley<br />
2 mm Allen key or #14 spoke<br />
Insert the<br />
1<br />
rubber bellows<br />
into the slit<br />
2 Attach the<br />
outer casing<br />
holder<br />
3 1<br />
10 cm 15 cm<br />
Attach the<br />
outer casing<br />
holder<br />
Note: Check that the inner cable is correctly<br />
seated inside the pulley guide.<br />
Guide Guide<br />
OK<br />
Not OK<br />
Outer casing bands<br />
LOCK LOCK<br />
CJ-8S40<br />
JAPAN<br />
9. Secure the cable to the frame with the outer<br />
casing bands.<br />
Adjusting the cassette joint<br />
1. Set the shifting lever to ➃.<br />
Check to be sure that the yellow setting lines<br />
on the cassette joint bracket and pulley are<br />
aligned at this time.<br />
Yellow setting lines<br />
Set to ➃<br />
The yellow setting lines on the cassette joint<br />
are located in two places. Use the one that is<br />
easiest to see.<br />
Cassette joint bracket<br />
15 – 20 mm<br />
When bicycle is standing up<br />
JAPAN<br />
LOCK CJ-8S40<br />
Cassette joint bracket<br />
Should be straight<br />
LOCK CJ-8S40<br />
JAPAN<br />
LOCK<br />
CJ-8S40<br />
If the yellow setting lines are not aligned, turn<br />
the cable adjustment bolt of the shifting lever<br />
to align the setting lines. After this, move the<br />
shifting lever once more from ➃ to ➀ and then<br />
back to ➃, and then re-check to be sure that<br />
the yellow setting lines are aligned.<br />
2. After adjusting the cassette joint, cut off the<br />
excess length of inner cable and then install<br />
the inner end cap.<br />
JAPAN<br />
When bicycle is upside down<br />
Should be straight<br />
Cable adjustment bolt<br />
Inner end cap<br />
CJ-8S40<br />
JAPAN<br />
LOCK<br />
Cassette joint<br />
pulley<br />
Cassette joint<br />
pulley<br />
11