
Create successful ePaper yourself
Turn your PDF publications into a flip-book with our unique Google optimized e-Paper software.
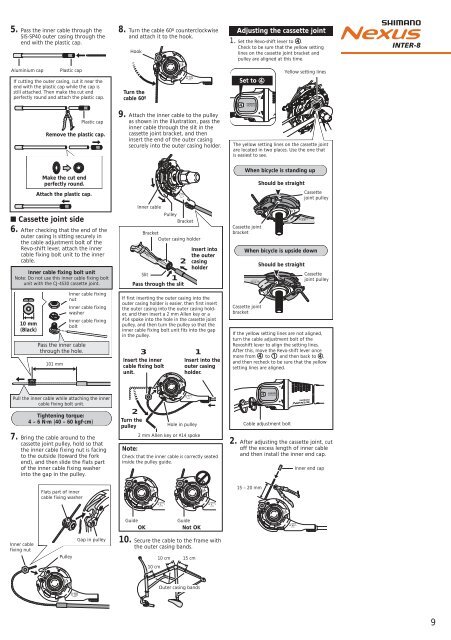
5. Pass the inner cable through the<br />
SIS-SP40 outer casing through the<br />
end with the plastic cap.<br />
Aluminium cap<br />
Plastic cap<br />
If cutting the outer casing, cut it near the<br />
end with the plastic cap while the cap is<br />
still attached. Then make the cut end<br />
perfectly round and attach the plastic cap.<br />
■ Cassette joint side<br />
6. After checking that the end of the<br />
outer casing is sitting securely in<br />
the cable adjustment bolt of the<br />
Revo-shift lever, attach the inner<br />
cable fixing bolt unit to the inner<br />
cable.<br />
Inner cable fixing bolt unit<br />
Note: Do not use this inner cable fixing bolt<br />
unit with the CJ-4S30 cassette joint.<br />
10 mm<br />
(Black)<br />
7. Bring the cable around to the<br />
cassette joint pulley, hold so that<br />
the inner cable fixing nut is facing<br />
to the outside (toward the fork<br />
end), and then slide the flats part<br />
of the inner cable fixing washer<br />
into the gap in the pulley.<br />
Inner cable<br />
fixing nut<br />
Remove the plastic cap.<br />
Make the cut end<br />
perfectly round.<br />
Attach the plastic cap.<br />
Pass the inner cable<br />
through the hole.<br />
101 mm<br />
LOCK<br />
Inner cable fixing<br />
nut<br />
Inner cable fixing<br />
washer<br />
Inner cable fixing<br />
bolt<br />
Pulley<br />
CJ-8S20<br />
JAPAN<br />
Plastic cap<br />
Pull the inner cable while attaching the inner<br />
cable fixing bolt unit.<br />
Tightening torque:<br />
4 – 6 N·m {40 – 60 kgf·cm}<br />
Flats part of inner<br />
cable fixing washer<br />
8. Turn the cable 60º counterclockwise<br />
and attach it to the hook.<br />
Hook<br />
Turn the<br />
cable 60º<br />
CJ-8S20<br />
JAPAN<br />
LOCK<br />
10 cm<br />
CJ-8S20<br />
JAPAN<br />
LOCK<br />
CJ-8S20<br />
JAPAN<br />
LOCK<br />
LOCK<br />
CJ-8S20<br />
9. Attach the inner cable to the pulley<br />
as shown in the illustration, pass the<br />
inner cable through the slit in the<br />
cassette joint bracket, and then<br />
insert the end of the outer casing<br />
securely into the outer casing holder.<br />
Inner cable<br />
JAPAN<br />
Pulley<br />
Bracket<br />
Bracket<br />
Outer casing holder<br />
Insert into<br />
the outer<br />
2 casing<br />
holder<br />
Slit<br />
1<br />
Pass through the slit<br />
If first inserting the outer casing into the<br />
outer casing holder is easier, then first insert<br />
the outer casing into the outer casing holder,<br />
and then insert a 2 mm Allen key or a<br />
#14 spoke into the hole in the cassette joint<br />
pulley, and then turn the pulley so that the<br />
inner cable fixing bolt unit fits into the gap<br />
in the pulley.<br />
Insert the inner<br />
cable fixing bolt<br />
unit.<br />
2<br />
Turn the<br />
pulley<br />
3 1<br />
CJ-8S20<br />
JAPAN<br />
Hole in pulley<br />
2 mm Allen key or #14 spoke<br />
Note:<br />
Check that the inner cable is correctly seated<br />
inside the pulley guide.<br />
Guide Guide<br />
OK Not OK<br />
Gap in pulley 10. Secure the cable to the frame with<br />
the outer casing bands.<br />
10 cm 15 cm<br />
Outer casing bands<br />
Insert into the<br />
outer casing<br />
holder.<br />
LOCK<br />
CJ-8S20<br />
JAPAN<br />
Adjusting the cassette joint<br />
1. Set the Revo-shift lever to ➃.<br />
Check to be sure that the yellow setting<br />
lines on the cassette joint bracket and<br />
pulley are aligned at this time.<br />
Set to ➃<br />
JAPAN<br />
CJ-8S20<br />
CK<br />
O<br />
L<br />
LOCK<br />
LOCK<br />
CJ-8S20<br />
JAPAN<br />
CJ-8S20<br />
If the yellow setting lines are not aligned,<br />
turn the cable adjustment bolt of the<br />
Revoshift lever to align the setting lines.<br />
After this, move the Revo-shift lever once<br />
more from ➃ to ➀ and then back to ➃,<br />
and then recheck to be sure that the yellow<br />
setting lines are aligned.<br />
Cable adjustment bolt<br />
Yellow setting lines<br />
The yellow setting lines on the cassette joint<br />
are located in two places. Use the one that<br />
is easiest to see.<br />
When bicycle is standing up<br />
Cassette joint<br />
bracket<br />
2. After adjusting the cassette joint, cut<br />
off the excess length of inner cable<br />
and then install the inner end cap.<br />
JAPAN<br />
When bicycle is upside down<br />
Cassette joint<br />
bracket<br />
15 – 20 mm<br />
Should be straight<br />
Should be straight<br />
CJ-8S20<br />
JAPAN<br />
CK<br />
LO<br />
Cassette<br />
joint pulley<br />
Cassette<br />
joint pulley<br />
Inner end cap<br />
9