
You also want an ePaper? Increase the reach of your titles
YUMPU automatically turns print PDFs into web optimized ePapers that Google loves.
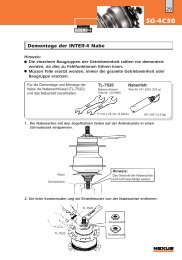
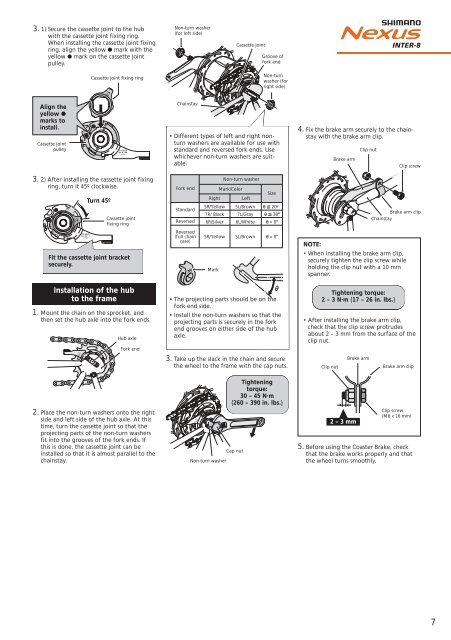
3. 1) Secure the cassette joint to the hub<br />
with the cassette joint fixing ring.<br />
When installing the cassette joint fixing<br />
ring, align the yellow ● mark with the<br />
yellow ● mark on the cassette joint<br />
pulley.<br />
Align the<br />
yellow ●<br />
marks to<br />
install.<br />
Cassette joint<br />
pulley<br />
LOCK<br />
JAPAN<br />
CJ-8S20<br />
CJ-8S20<br />
JAPAN<br />
CK<br />
O<br />
L<br />
Cassette joint fixing ring<br />
LOCK<br />
CJ-8S20<br />
3. 2) After installing the cassette joint fixing<br />
ring, turn it 45º clockwise.<br />
Turn 45º<br />
JAPAN<br />
Cassette joint<br />
fixing ring<br />
Fit the cassette joint bracket<br />
securely.<br />
Installation of the hub<br />
to the frame<br />
1. Mount the chain on the sprocket, and<br />
then set the hub axle into the fork ends.<br />
Hub axle<br />
Fork end<br />
2. Place the non-turn washers onto the right<br />
side and left side of the hub axle. At this<br />
time, turn the cassette joint so that the<br />
projecting parts of the non-turn washers<br />
fit into the grooves of the fork ends. If<br />
this is done, the cassette joint can be<br />
installed so that it is almost parallel to the<br />
chainstay.<br />
Non-turn washer<br />
(for left side)<br />
Chainstay<br />
7R<br />
J-8S20<br />
JAPAN<br />
C<br />
CK<br />
LO<br />
7R<br />
J-8S20<br />
JAPAN<br />
C<br />
CK<br />
Cap nut<br />
Non-turn washer<br />
Cassette joint<br />
LO<br />
Groove of<br />
fork end<br />
Non-turn<br />
washer (for<br />
right side)<br />
� Different types of left and right nonturn<br />
washers are available for use with<br />
standard and reversed fork ends. Use<br />
whichever non-turn washers are suitable.<br />
Fork end<br />
Standard<br />
Reversed<br />
Reversed<br />
(full chain<br />
case)<br />
Right<br />
5R/Yellow<br />
7R/ Black<br />
6R/Silver<br />
5R/Yellow<br />
Mark<br />
Non-turn washer<br />
Mark/<strong>Co</strong>lor<br />
Left<br />
5L/Brown<br />
7L/Gray<br />
6L/White<br />
5L/Brown<br />
� The projecting parts should be on the<br />
fork end side.<br />
� Install the non-turn washers so that the<br />
projecting parts is securely in the fork<br />
end grooves on either side of the hub<br />
axle.<br />
3. Take up the slack in the chain and secure<br />
the wheel to the frame with the cap nuts.<br />
R<br />
7<br />
Size<br />
θ �� 20ºº®<br />
θ �� 38��<br />
θ = 0��<br />
θ = 0��<br />
Tightening<br />
torque:<br />
30 – 45 N·m<br />
{260 – 390 in. lbs.}<br />
4. Fix the brake arm securely to the chainstay<br />
with the brake arm clip.<br />
Brake arm<br />
Clip nut<br />
Clip screw<br />
Brake arm clip<br />
Chainstay<br />
NOTE:<br />
• When installing the brake arm clip,<br />
securely tighten the clip screw while<br />
holding the clip nut with a 10 mm<br />
spanner.<br />
Tightening torque:<br />
2 – 3 N·m {17 – 26 in. lbs.}<br />
• After installing the brake arm clip,<br />
check that the clip screw protrudes<br />
about 2 – 3 mm from the surface of the<br />
clip nut.<br />
Clip nut<br />
2 – 3 mm<br />
Brake arm<br />
Brake arm clip<br />
Clip screw<br />
(M6 x 16 mm)<br />
5. Before using the <strong>Co</strong>aster Brake, check<br />
that the brake works properly and that<br />
the wheel turns smoothly.<br />
7