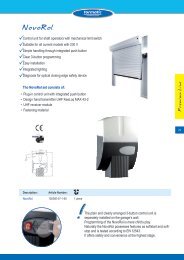
M - tormatic
M - tormatic
M - tormatic

Create successful ePaper yourself
Turn your PDF publications into a flip-book with our unique Google optimized e-Paper software.
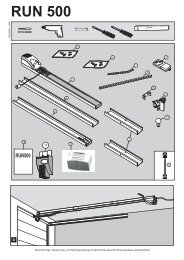
The tubular geared motor has intergral electromechanical<br />
limit switches that cut off the power at<br />
a position corresponding to the Fully Open &<br />
Closed position of the door.<br />
Both the upper and lower limit settings for the<br />
curtain travel are pre-set in the factory to suit the<br />
opening height of each individual door, however<br />
fine tuning will be required, using the following<br />
proceedure.<br />
Whilst toggling between the upward/downward<br />
control buttons on the control box, make<br />
adjustments to the limit travel settings as follows:<br />
50Nm MOTOR SETTINGS (Octagonal Head)<br />
LEFT HAND MOTOR<br />
14a. Adjust WHITE limit CLOCKWISE to increase<br />
the travel of bottom limit.<br />
14b. Adjust RED limit CLOCKWISE to increase the<br />
travel of top limit.<br />
RIGHT HAND MOTOR<br />
14c. Adjust WHITE limit ANTI CLOCKWISE to<br />
increase the travel of the top limit<br />
14d. Adjust RED limit ANTI CLOCKWISE to<br />
increase the travel of the bottom limit.<br />
100Nm MOTOR SETTINGS (Square Head)<br />
LEFT HAND MOTOR<br />
14e. Adjust WHITE limit ANTI CLOCKWISE to<br />
increase the travel of bottom limit.<br />
14f. Adjust RED limit ANTI CLOCKWISE to<br />
increase the travel of top limit.<br />
RIGHT HAND MOTOR<br />
14g. Adjust WHITE limit CLOCKWISE to increase<br />
the travel of the top limit.<br />
14h. Adjust RED limit CLOCKWISE to increase the<br />
travel of the bottom limit.<br />
NOTE!<br />
WHEN SETTING THE LIMIT TRAVEL, DO NOT<br />
OVER ADJUST THE DOWNWARD LIMIT<br />
SCREW AS THIS COULD CAUSE SERIOUS<br />
DAMAGE TO THE ANTI LIFT HINGES.<br />
WHEN ADJUSTING THE UPWARD TRAVEL<br />
LIMIT REMEMBER THAT THE SAFETY EDGE<br />
RELAY BOX MOUNTED ON THE BOTTOM RAIL<br />
SHOULD PROJECT BELOW THE NOVOSHIELD<br />
CANOPY.<br />
15 Re-fit the Novoshield<br />
•Operating Instructions<br />
Information regarding the operating<br />
instructions<br />
These operating instructions describe how to use<br />
the product properly and safely. The safety advice<br />
and instructions as well as the local health and<br />
safety regulations and general safety regulations<br />
for the range of use must be observed.<br />
All persons using the door system must<br />
be shown how to operate it properly and<br />
safely.<br />
1. In the interest of your safety and others, this<br />
door must be operated by users familiar with its<br />
operation.<br />
2. When operating the door do not place fingers<br />
near or in guides or another moving part at any<br />
time.<br />
3. The person operating the door must have it in<br />
sight at any times during this operation<br />
particularity if is automatic operation.<br />
4. Do not permit children to play with the garage<br />
door or electrical controls.<br />
5. Do not attach any objects to, or make any<br />
modifications to the door as this may cause<br />
damage and/or physical injury.<br />
6. Operate the door only when adjusted and free<br />
from obstruction.<br />
7. Should the door become difficult to operate or<br />
completely inoperable, call an authorized<br />
Novoferm dealer. Repairs and adjustments<br />
should only be undertaken by qualified person.<br />
8. Every 6 months check a tighten and loose<br />
fixings.<br />
9. Periodically clean your door with warm water,<br />
allow dry naturally. Do not use abrasive or<br />
caustic based cleaners. Bird droppings are<br />
caustic please remove upon detection.<br />
10.Your new garage door needs an annual service<br />
by an authorized Novoferm dealer to maintain<br />
the CE mark and warranty.<br />
16 Internal impulse generators<br />
The cover on the control unit is used as an impulse<br />
generator for opening and closing from inside the<br />
garage. Briefly press the cover and the operator<br />
starts up<br />
Functional sequence<br />
The garage door operator can be actuated by<br />
push-button on the control unit (figure 16) or by<br />
other impulse generators, such as hand<br />
transmitters, key switches etc. It is only necessary<br />
to generate a short, sharp impulse.<br />
- Initial impulse:<br />
Operator starts up and causes the door to travel<br />
to the set OPEN or CLOSE end-of-travel<br />
positions.<br />
- Impulse generated whilst the door is in motion:<br />
Door stops<br />
- A new impulse:<br />
Door continues to move but in the opposite<br />
direction.<br />
Optical safety edge<br />
If the closing door encounters an obstruction, the<br />
operator stops and causes the reverses direction<br />
for approx. 2 second in order to clear the<br />
obstruction.<br />
The door can be closed again by generating a new<br />
impulse.<br />
Photocell defective<br />
If the photocell is interrupted whilst the door is<br />
closing, the door stops and reopens to its top endof-travel<br />
position.<br />
An interruption whilst the door is opening has no<br />
effect.<br />
Lighting<br />
The lighting switches on automatically whenever a<br />
start impulse is generated and switches off again<br />
after the set time phase (factory setting approx. 90<br />
seconds).<br />
Changing the light bulb<br />
Pull out the mains plug and open the lamp shade<br />
using a Phillips screwdriver size 2 x 100. Replace<br />
the light shade (230 V, 40 W, cap E27) and screw<br />
the lamp cover back on again.<br />
Signal light<br />
If a signal light for signalling the opening and<br />
closing phases is installed, this flashes together<br />
with the lamp in the operator as soon as a start<br />
impulse is generated. The operator starts with a<br />
time delay in accordance with the set early warning<br />
phase (see Special Settings).<br />
Hand transmitters<br />
- Programming further hand transmitters:<br />
(figures 12a and 12b).<br />
- Changing the battery: slide back the battery<br />
compartment cover on the hand transmitter.<br />
Take out the battery.<br />
- Insert a new battery. Be sure to pole correctly!<br />
Slide the cover back on.<br />
Empty batteries must be disposed of<br />
separately (toxic waste)!<br />
19 Hand crank<br />
In case of a power faifure use the hand crank to<br />
open and close the door manually (figure 19).<br />
Do not overwind, this can cause damage<br />
! to auto locks.<br />
• Maintenance / Checks<br />
For your own safety we recommend<br />
that the door system be checked by a<br />
specialist after initial installation and<br />
then regularly at intervals of 1 year<br />
minimum.<br />
17 Checking the force limit facility<br />
- Place an obstruction (e. g. operator's cardboard<br />
box) underneath the door's cosing edge.<br />
- Starting from the OPEN end-of-travel position,<br />
actuate the door to close.<br />
- The door travels towards the obstruction, stops<br />
and travels back for approx. 2 seconds in order<br />
to clear the obstruction.<br />
The door system must be checked before initial<br />
operation and at least once a year thereafter. In<br />
the process, the force limiting device (figure 17)<br />
must be tested!<br />
CAUTION! If the closing force is set too<br />
high, this can result in injury to persons and<br />
damage to property.<br />
The opening force can be re-adjusted in menu<br />
stage 5, the closing force in menu stage 6.<br />
These Installation, Operating and Maintanance Instructions must be retained and kept safe throughout the product`s entire service life.