
You also want an ePaper? Increase the reach of your titles
YUMPU automatically turns print PDFs into web optimized ePapers that Google loves.
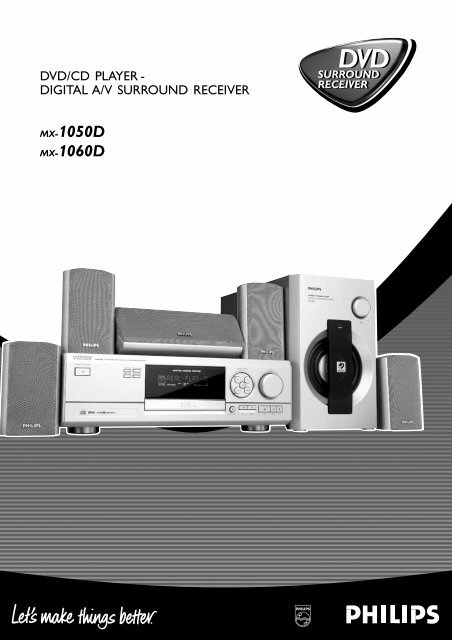
<strong>DVD</strong>/CD PLAYER -<br />
DIGITAL A/V SURROUND RECEIVER<br />
MX-1050D<br />
MX-1060D<br />
<strong>DVD</strong><br />
SURROUND<br />
RECEIVER<br />
1
Important Note<br />
Important notes for users in the U.K.<br />
Mains plug<br />
This apparatus is fitted with an approved 13 Amp plug.<br />
To change a fuse in this type of plug proceed as follows:<br />
1 Remove fuse cover and fuse.<br />
2 Fix new fuse which should be a BS1362 5 Amp, A.S.T.A.<br />
or BSI approved type.<br />
3 Refit the fuse cover.<br />
If the fitted plug is not suitable for your socket outlets, it<br />
should be cut off and an appropriate plug fitted in its<br />
place.<br />
If the mains plug contains a fuse, this should have a value<br />
of 5 Amp. If a plug without a fuse is used, the fuse at the<br />
distribution board should not be greater than 5 Amp.<br />
Note: The severed plug must be disposed of to avoid a<br />
possible shock hazard should it be inserted into a 13 Amp<br />
socket elsewhere.<br />
How to connect a plug<br />
The wires in the mains lead are coloured with the<br />
following code: blue = neutral (N),<br />
brown = live (L).<br />
¶ As these colours may not correspond with the colour<br />
markings identifying the terminals in your plug, proceed<br />
as follows:<br />
–Connect the blue wire to the terminal marked N or<br />
coloured black.<br />
–Connect the brown wire to the terminal<br />
marked L or coloured red.<br />
–Do not connect either wire to the earth terminal in the<br />
plug, marked E (or e) or coloured green (or green and<br />
yellow).<br />
Before replacing the plug cover, make certain that the<br />
cord grip is clamped over the sheath of the lead - not<br />
simply over the two wires.<br />
Copyright in the U.K.<br />
Recording and playback of material may require consent.<br />
See Copyright Act 1956 and The Performer’s Protection<br />
Acts 1958 to 1972.<br />
2 IMPORTANT NOTE<br />
Italia<br />
DICHIARAZIONE DI CONFORMITA’<br />
Si dichiara che l’apparecchio MX-1050D, MX-1060D<br />
<strong>Philips</strong> risponde alle prescrizioni dell’art. 2 comma 1 del<br />
D.M. 28 Agosto 1995 n. 548.<br />
Fatto a Eindhoven<br />
<strong>Philips</strong> Consumer Electronics<br />
<strong>Philips</strong>, Glaslaan 2<br />
5616 JB Eindhoven, The Netherlands<br />
Norge<br />
Typeskilt finnes på apparatens underside.<br />
Observer: Nettbryteren er sekundert innkoplet.<br />
Den innebygde netdelen er derfor ikke frakoplet<br />
nettet så lenge apparatet er tilsluttet<br />
nettkontakten.<br />
For å redusere faren for brann eller elektrisk støt, skal<br />
apparatet ikke utsettes for regn eller fuktighet.
Index<br />
English -------------------------------------------------------- 5<br />
Français ------------------------------------------------------ 30<br />
Español ------------------------------------------------------ 56<br />
Deutsch ----------------------------------------------------- 82<br />
Nederlands ----------------------------------------------- 108<br />
Italiano ----------------------------------------------------- 134<br />
Svenska ---------------------------------------------------- 160<br />
Dansk ------------------------------------------------------ 186<br />
Suomi ------------------------------------------------------ 212<br />
Português ------------------------------------------------- 238<br />
∂ÏÏËÓÈο -------------------------------------------------- 264<br />
Polski------------------------------------------------------- 290<br />
INDEX<br />
3<br />
English<br />
Italiano Nederlands Deutsch Español Français<br />
∂ÏÏËÓÈο Português Suomi Dansk Svenska<br />
Polski
General Information<br />
4<br />
DK<br />
Advarsel: Usynlig laserstråling ved åbning når<br />
sikkerhedsafbrydere er ude af funktion. Undgå<br />
utsættelse for stråling.<br />
Bemærk: Netafbryderen er sekundært indkoblet og<br />
ofbryder ikke strømmen fra nettet. Den indbyggede<br />
netdel er derfor tilsluttet til lysnettet så længe<br />
netstikket sidder i stikkontakten.<br />
S<br />
Klass 1 laseraparat<br />
Varning! Om apparaten används på annat sätt än i<br />
denna bruksanvisning specificerats, kan användaren<br />
utsättas för osynlig laserstrålning, som överskrider<br />
gränsen för laserklass 1.<br />
Observera! Stömbrytaren är sekundärt kopplad och<br />
bryter inte strömmen från nätet. Den inbyggda<br />
nätdelen är därför ansluten till elnätet så länge<br />
stickproppen sitter i vägguttaget.<br />
CAUTION<br />
VISIBLE AND INVISIBLE LASER RADIATION WHEN<br />
OPEN AVOID EXPOSURE TO BEAM<br />
ADVARSEL<br />
SYNLIG OG USYNLIG LASERSTRÅLING VED ÅBNING<br />
UNDGÅ UDSÆTTELSE FOR STRÅLING<br />
VARNING<br />
SYNLIG OCH OSYNLIG LASERSTRÅLNING NÄR<br />
DENNA DEL ÄR ÖPPNAD BETRAKTA EJ STRÅLEN<br />
VARO!<br />
AVATTAESSA OLET ALTTIINA NÄKYVÄLLE JA<br />
NÄKYMÄTTÖMÄLLE LASER SÄTEILYLLE. ÄLÄ KATSO<br />
SÄTEESEEN<br />
VORSICHT<br />
SICHTBARE UND UNSICHTBARE LASERSTRAHLUNG<br />
WENN ABDECKUNG GEÖFFNET NICHT DEM<br />
STRAHL AUSSETSEN<br />
ATTENTION<br />
RAYONNEMENT LASER VISIBLE ET INVISIBLE EN CAS<br />
D’OUVERTURE EXPOSITION DANGEREUSE AU<br />
FAISCEAU<br />
Manufactured under license from Dolby Laboratories.<br />
“Dolby” and the double-D symbol are trademarks of Dolby<br />
Laboratories. Confidential Unpublished Works. ©1992-<br />
1997 Dolby Laboratories, Inc. All rights reserved.<br />
This product incorporates copyright protection technology<br />
that is protected by method claims of certain U.S. patents<br />
and other intellectual property rights owned by Macrovision<br />
Corporation and other rights owners. Use of this copyright<br />
protection technology must be authorised by Macrovision<br />
Corporation, and is intended for home and other limited<br />
viewing uses only unless otherwise authorised by<br />
Macrovision Corporation. Reverse engineering or<br />
disassembly is prohibited.<br />
GENERAL INFORMATION<br />
SF<br />
Luokan 1 laserlaite<br />
Varoitus! Laitteen käyttäminen muulla kuin<br />
tässä käyttöohjeessa mainitulla tavalla saattaa<br />
altistaa käyttäjän turvallisuusluokan 1 ylittävälle<br />
näkymättömälle lasersäteilylle.<br />
Oikeus muutoksiin varataan. Laite ei saa olla<br />
alttiina tippu-ja roiskevedelle.<br />
Huom. Toiminnanvalitsin on kytketty<br />
toisiopuolelle, eikä se kytke laitetta irti<br />
sähköverkosta. Sisäänrakennettu verkko-osa on<br />
kytkettynä sähköverkkoon aina silloin, kun pistoke<br />
on pistorasiassa.<br />
The <strong>DVD</strong> VIDEO player is in conformity with<br />
the EMC directive and low-voltage directive.<br />
This product complies with the radio<br />
interference requirements of the European<br />
Community.<br />
CAUTION<br />
Use of controls or adjustments or performance<br />
of procedures other than herein may result in<br />
hazardous radiation exposure or other unsafe<br />
operation.<br />
NOTE:<br />
PICTURES SHOWN MAY BE DIFFERENT BETWEEN<br />
COUNTRIES.<br />
NEVER MAKE OR CHANGE CONNECTIONS WITH THE<br />
POWER SWITCHED ON.<br />
Laser<br />
Type Semiconductor laser GaAIAs<br />
Wave length 650nm<br />
Output Power 7mW<br />
Beam divergence 60 degree
Introduction<br />
Package contents .......................................................6<br />
<strong>DVD</strong> discs ...................................................................6<br />
Player Zones ...............................................................6<br />
General Information .................................................6<br />
Environmental Information......................................6<br />
Installation ...................................................................6<br />
Cleaning Discs ............................................................6<br />
Functional Overview<br />
Front Panel ..................................................................7<br />
Remote Control ........................................................8<br />
Connections<br />
Rear Panel ............................................................ 9–10<br />
Analogue Audio Connections .............................. 10<br />
Video Connections ................................................ 11<br />
Digital/Optical Audio Connections .................... 11<br />
System Setup<br />
Setting up the Digital Cinema system ................ 12<br />
Speakers Placement ............................................... 12<br />
Speakers Setup ................................................. 12–13<br />
Subwoofer Setup .................................................... 13<br />
Basic Functions<br />
Selecting the source ............................................... 14<br />
Adjusting the master volume ............................... 14<br />
Adjusting the tone .................................................. 14<br />
Muting the sound.................................................... 14<br />
Dimming the display screen ................................. 14<br />
Selecting output modes - surround<br />
sound & sound effects .................................... 14–15<br />
Tuner<br />
Manual tuning .......................................................... 16<br />
Automatic tuning .................................................... 16<br />
Tuning to a weak FM station ................................ 16<br />
Preset Radio Stations............................................. 16<br />
RDS ..................................................................... 16–17<br />
Clock/Timer<br />
Setting the Clock .................................................... 18<br />
Setting the On/Off Timer...................................... 18<br />
Activating/Deactivating On/Off Timer ............... 18<br />
Setting the Sleep Timer ......................................... 18<br />
Contents<br />
<strong>DVD</strong>/CD Operation<br />
Loading Discs .......................................................... 19<br />
When the <strong>DVD</strong> is playing ..................................... 19<br />
Active Navigation Menu (<strong>DVD</strong>) ................... 19–20<br />
Playing a music CD ................................................. 20<br />
When the music CD is playing ............................ 20<br />
Active Navigation Menu (music CD) ................. 21<br />
On screen messages .............................................. 22<br />
Disc Setup Menu<br />
Language ............................................................... 23<br />
Subtitle .................................................................. 23<br />
TV Aspect............................................................. 24<br />
Audio Set ...................................................... 24–25<br />
Digital Out ........................................................... 26<br />
Parental Control ................................................. 26<br />
Panel Keys Lock .................................................. 27<br />
On Screen ............................................................ 27<br />
Programme-music CD........................................... 28<br />
Index (<strong>DVD</strong>) ............................................................ 28<br />
Specifications ............................................ 29<br />
CONTENTS<br />
5<br />
English
English<br />
Introduction<br />
6<br />
Package contents<br />
This <strong>DVD</strong>/CD player-AV Surround Receiver is<br />
supplied with the following items :<br />
– a remote control with two AAA batteries<br />
– an AM loop antenna and an FM wire antenna<br />
– an audio and video cable for connection with<br />
your TV<br />
– a scart cable<br />
– five speakers and including five speaker cables<br />
– an active subwoofer, including a connection cable<br />
and a power cable<br />
– this instruction booklet<br />
If any item is damaged or missing, contact your retailer or<br />
<strong>Philips</strong>.<br />
<strong>DVD</strong> discs<br />
Your <strong>Philips</strong> <strong>DVD</strong> Receiver player will play digital video discs<br />
conforming to the universal <strong>DVD</strong> Video standard. In<br />
addition to <strong>DVD</strong> Video discs, you will be able to play audio<br />
CDs.<br />
<strong>DVD</strong> Video discs have “Titles” and “Chapters”. There can<br />
be several Titles on one disc and each Title can contain<br />
several Chapters. Titles and Chapters are numbered (e.g.<br />
Title 1, Title 2, etc., and Chapter 1, 2, 3, etc.).<br />
Usually one Title will show the disc publisher and studio<br />
logos. Under another Title is the featue film itself. Other<br />
Titles can contain trailers for other films also available, or<br />
introduction notes from the film, or alternative endings for<br />
the film. There are many possibilities with Digital Versatile<br />
Discs.<br />
Chapters within the main Title allow you to search quickly<br />
for a specific point on the disc. Many discs have a “Chapter<br />
Menu”, sometimes called “Scene Index” or “Scene Menu”,<br />
that displays the first shot from each Chapter and allows<br />
you to select a shot and play the disc from that point<br />
onwards. <strong>DVD</strong> discs can be PAL or NTSC. This player can<br />
play both types (as long as the zone is correct formatted).<br />
<strong>DVD</strong> discs allow up to eight languages and 32 subtitles on a<br />
single disc. You can select and change the language and<br />
subtitle to suit yourself. You can play the whole disc or just<br />
part of it and view it from different angles. However,<br />
availability of these features varies among discs. Check the<br />
disc menu or outer case to see if such features (for<br />
example, subtitles, angles) are available on the disc.<br />
INTRODUCTION<br />
Player Zones<br />
There are six world zones for the distribution of <strong>DVD</strong><br />
Discs. The zone your player is intended for is indicated on<br />
the “Zone Label”. This should be the same as the label on<br />
discs available in your region. If you have any difficulty<br />
playing a disc, make sure the disc is the same zone as your<br />
player.<br />
1<br />
Region 1<br />
2<br />
Region 2<br />
3<br />
Region 3<br />
4<br />
Region 4<br />
General Information<br />
5<br />
Region 5<br />
6<br />
Region 6<br />
Anti-copy disc protection<br />
Some <strong>DVD</strong> discs have anti-copying devices. When playing<br />
these discs through a television will give the highest quality<br />
picture. However, you will not be able to record the disc<br />
through a VCR.<br />
Environmental Information<br />
All unnecessary packaging has been omitted. We have tried<br />
to make the packaging easy to separate into three materials:<br />
cardboard (box), polystyrene foam (buffer) and<br />
polyethylene (bags, protective foam sheet).<br />
Your system consists of materials which can be recycled<br />
and reused if disassembled by a specialised company. Please<br />
observe the local regulations regarding the disposal of<br />
packaging materials, exhausted batteries and old equipment.<br />
Installation<br />
● Place the player on a flat, hard and stable surface.<br />
● There must be sufficient room in front of the player for the<br />
drawer to open.<br />
● In a cabinet, allow about 10cm (4 inch) of free space all<br />
around the player for adequate ventilation.<br />
● Do not expose your player to extreme temperatures or<br />
humidity.<br />
Cleaning Discs<br />
● When a disc becomes dirty, clean it with a cleaning cloth.<br />
Wipe the disc from the centre out, in a straight line.<br />
● Do not use solvents such as benzene, thinner, commercially<br />
available cleaners, or anti-static spray intended for analogue<br />
discs.
Front Panel<br />
POWER/STANDBY<br />
<strong>DVD</strong>/CD PLAYER- DIGITAL AV SURROUND RECEIVER<br />
PRESETS FREQUENCY▲<br />
SURR. MODE FREQUENCY ▲<br />
Functional Overview<br />
1 2 3 4 5 6 7 8 9 0! @<br />
1 POWER / STANDBY y<br />
– to switch between Power On and Standby modes.<br />
2 Standby LED indicator<br />
– to indicate Standby mode.<br />
3 SURR. MODE<br />
– to select various surround modes or soundfield<br />
modes.<br />
4 PRESETS (Tuner mode only)<br />
– to select preset function.<br />
5 FREQUENCY 4 3 (Tuner mode only)<br />
– to tune the radio frequency down or up.<br />
6 Display screen<br />
– to display details for user’s information.<br />
7 VCR<br />
– to select the VCR as the input source.<br />
8 <strong>DVD</strong><br />
– to select the <strong>DVD</strong>/CD mode.<br />
9 CDR<br />
– to select the CDR as the input source.<br />
0 TV<br />
– to select the TV as the input source.<br />
! TUNER<br />
– to select the Tuner mode. It can also switch between<br />
MW and FM band.<br />
@ VOLUME<br />
– to adjust the master volume. Turn clockwise to<br />
increase and anti-clockwise to decrease.<br />
DIGITAL CINEMA CENTER<br />
* &<br />
SOURCE SELECT<br />
CDR<br />
<strong>DVD</strong><br />
TV<br />
VCR TUNER<br />
VOLUME<br />
OPEN / CLOSE PREV NEXT PLAY PAUSE STOP<br />
^<br />
%<br />
$<br />
#<br />
# STOP Ç (<strong>DVD</strong>/CD mode only)<br />
– to stop playing the disc.<br />
$ PAUSE Å (<strong>DVD</strong>/CD mode only)<br />
– to freeze the picture and sound.<br />
% PLAY £ (<strong>DVD</strong>/CD mode only)<br />
– to play the disc.<br />
^ PREV S / NEXT T (<strong>DVD</strong>/CD mode only)<br />
– to skip to the previous or next chapter/track.<br />
& OPEN/CLOSE 0 (<strong>DVD</strong>/CD mode only)<br />
– to open or close the disc tray.<br />
* Disc Tray<br />
FUNCTIONAL OVERVIEW<br />
7<br />
English
English<br />
8<br />
Remote Control<br />
§<br />
1<br />
2<br />
3<br />
4<br />
5<br />
6<br />
7<br />
8<br />
9<br />
0<br />
!<br />
9<br />
@<br />
#<br />
VCR<br />
FUNCTIONAL OVERVIEW<br />
TV<br />
CDR<br />
TUNER<br />
<strong>DVD</strong><br />
DISPLAY OPEN/CLOSE<br />
MUTE<br />
1 2 3<br />
4 5 6<br />
7 8 9<br />
TITLE<br />
0<br />
SLEEP<br />
SYSTEM DISC EXIT<br />
MENU<br />
MENU<br />
TONE MODE<br />
VOL<br />
RDS RDS<br />
FM MODE SEARCH DISPLAY<br />
∞<br />
≤<br />
£<br />
<br />
¡<br />
)<br />
(<br />
*<br />
&<br />
^<br />
0<br />
%<br />
$<br />
Notes for remote control:<br />
– First, select the source you wish to control by<br />
pressing one of the source select keys on the remote<br />
control (<strong>DVD</strong> or TUNER, for example).<br />
– Then select the desired function (É, Q , R<br />
for example).<br />
1 y<br />
– to switch between Power On and Standby modes.<br />
2 VCR<br />
– to select VCR as the input source.<br />
3 TV<br />
– to select TV as the input source.<br />
4 CDR<br />
– to select CDR as the input source.<br />
5 TUNER<br />
– to select Tuner mode. It can also switch between<br />
MW and FM band.<br />
6 <strong>DVD</strong><br />
– to select the <strong>DVD</strong>/CD mode.<br />
7 SYSTEM MENU<br />
– in <strong>DVD</strong>/CD mode, to enter the Disc Setup Menu or<br />
Disc Contents Menu.<br />
– in all other modes, to enter System Setup : SPEAKER,<br />
CLOCK or TIMER.<br />
8 S / T (<strong>DVD</strong>/CD mode only)<br />
– to skip to the previous or next chapter/track.<br />
9 à / á<br />
– in <strong>DVD</strong>/CD mode, to fast reverse or fast forward the<br />
disc.<br />
– in Tuner mode, to tune down or up.<br />
– in Tone mode, to adjust the treble/bass tone level.<br />
– use during menu and setup navigation.<br />
– to select movement direction in Disc Setup /Disc<br />
Contents /Active Navigation menus.<br />
0 ( / )<br />
– in <strong>DVD</strong>/CD mode, to slow reverse or slow forward<br />
the disc.<br />
– in Tuner mode, to select a preset channel number.<br />
– to select movement direction in Disc Setup /Disc<br />
Contents /Active Navigation menus.<br />
! £<br />
– in <strong>DVD</strong>/CD mode, to start disc playback.<br />
– in Tuner mode, to enter preset programming mode or<br />
to confirm a preset.<br />
– to enter or confirm menu and setup navigation.<br />
@ Ç FM Mode<br />
– in <strong>DVD</strong>/CD mode, to stop disc playback.<br />
– in Tuner mode, to select Mono/Stereo.<br />
# Å<br />
– to freeze the picture and sound.<br />
$ RDS SEARCH<br />
– in <strong>DVD</strong> mode, press to display the Index Menu.<br />
– in Tuner mode, press to search RDS station.<br />
% RDS DISPLAY<br />
– in <strong>DVD</strong>/CD mode, to set the limits for section repeat.<br />
– in CD mode, press to display the CD Programme<br />
Menu.<br />
– in Tuner mode, to display RDS information.<br />
^ VOL +/-<br />
– to increase or decrease the volume.<br />
& TONE<br />
– to select Bass/Treble adjustment mode.<br />
* MODE<br />
– to select various surround modes or soundfield<br />
modes.<br />
( DISC MENU (<strong>DVD</strong>/CD mode only)<br />
– to enter or exit Active Navigation Menu.<br />
) EXIT<br />
– to leave the Disc Setup Menu or System Setup.<br />
¡ TITLE (<strong>DVD</strong> mode only)<br />
– to display the Title Menu if present on the disc.<br />
SLEEP<br />
– to set the sleep (auto-off) timer function.<br />
£ Numeric Keys (0-9)<br />
– for direct access of preset channels or for use in Disc<br />
Player menus.<br />
≤ MUTE<br />
– to mute or unmute the sound.<br />
∞ OPEN/CLOSE (<strong>DVD</strong>/CD mode only)<br />
– to open or close the disc tray.<br />
§ DISPLAY<br />
– to dim the display screen.
Rear Panel<br />
0<br />
1<br />
2 3 4 5<br />
9 8 7<br />
6<br />
IMPORTANT!<br />
– Before connecting the AC power cord to the wall<br />
outlet, ensure that all other connections have been<br />
made.<br />
– Never make or change any connections with the<br />
power switched on.<br />
– The type plate is located at the rear of the system.<br />
1 ANTENNA<br />
FM Antenna<br />
For FM reception, connect the FM antenna to the FM<br />
terminal. Move the antenna in various directions until<br />
the clearest signal is received.<br />
AM Loop Antenna<br />
For AM reception, connect the AM loop antenna to<br />
the AM terminal. Position the loop antenna to receive<br />
the clearest sound.<br />
1<br />
2<br />
● Fully insert the stripped portion of the antenna into the<br />
terminals as shown.<br />
Note:<br />
– Position the antenna as far as possible from a TV, VCR or<br />
other radiation source.<br />
Connections<br />
2 AUDIO IN<br />
For connecting analogue (Left/Right) audio signals<br />
from external sources to the unit.<br />
VCR – connect to Video Cassette Recorder AUDIO OUT<br />
terminal<br />
TV – connect to Television AUDIO OUT terminal<br />
CDR – connect to CD Recorder AUDIO OUT<br />
terminal<br />
3 VIDEO IN<br />
For connecting to the corresponding VIDEO OUT<br />
terminal on a VCR, TV or CDR.<br />
4 DIGITAL OUT (in <strong>DVD</strong>/CD mode only)<br />
Digital Coaxial Output RCA terminal<br />
For connecting to external equipment that has a<br />
digital COAXIAL IN terminal.<br />
Digital Optical Output terminal<br />
For connecting to external equipment that has a<br />
digital OPTICAL IN terminal.<br />
5 SCART OUT<br />
For connecting to the SCART IN terminal on the TV<br />
using the supplied scart cable.<br />
Audio Out on/off switch<br />
For switching on or off the audio signal from the AV<br />
CONNECTOR to your TV.<br />
6 VIDEO OUT<br />
For connecting to external equipment with VIDEO IN<br />
terminals for viewing or recording.<br />
REC – connect to VCR or other recording device<br />
MON– connect to TV or Monitor<br />
CONNECTIONS<br />
9<br />
English
English<br />
10<br />
7 AUDIO OUT<br />
For connecting analogue (Left/Right) audio signals to<br />
external recording devices such as VCR or Tape<br />
Recorder for recording.<br />
8 FRONT SPEAKERS<br />
Connect the left front speaker to the “L” terminals,<br />
the right front speaker to the “R” terminals and centre<br />
speaker to the “C” terminals. Connect the coloured<br />
(marked) wire to "+" and the black (unmarked) wire<br />
to "-".<br />
12 mm<br />
a b c<br />
9 SURROUND SPEAKERS<br />
Connect the left surround speaker to “SL” terminals<br />
and the right surround speaker to “SR” terminals.<br />
Connect the coloured (marked) wire to "+" and the<br />
black (unmarked) wire to "-".<br />
Analogue Audio Connections<br />
CONNECTIONS<br />
0 SUBWOOFER OUT<br />
Connect this terminal to the AUDIO INPUT terminal<br />
of the powered subwoofer.<br />
After completing all the connections, connect the AC<br />
power cord of the player and subwoofer to the wall<br />
outlet.<br />
Notes:<br />
– To prevent damage to circuits, never short-circuit the<br />
positive and negative speaker output terminals.<br />
– Do not connect more than one speaker to any one pair of<br />
+/- speaker terminals.<br />
– Do not connect speakers with an impedance lower than<br />
the speakers supplied. Please refer to the SPECIFICATIONS<br />
section of this manual.
Video Connections<br />
Digital/Optical Audio<br />
Connections<br />
Recording from the digital output<br />
The digital output can be used to record digitally a<br />
multichannel surround sound audio signal (Dolby Digital or<br />
DTS) to a CD-R. To convert the digital multichannel signal<br />
into a stereo signal, following settings have to be activated<br />
in the Disc Setup Menu :<br />
– In “Audio Set”, set to 2 audio channel (see page 25)<br />
– In “Digital Out”, set to PCM (see page 26)<br />
Note:<br />
– Digital recording is not possible when the digital source<br />
material is copy-protected.<br />
CONNECTIONS<br />
11<br />
English
English<br />
System Setup<br />
12<br />
Setting up the Digital<br />
Cinema system<br />
You must connect all the speakers and set up the system<br />
properly in order to enjoy the Digital Cinema experience<br />
at home. You will have the feeling of being in the middle of<br />
the action, because sound is coming from everywhere<br />
around you. The subwoofer can enhance the bass<br />
performance of your system dramatically. Look for discs<br />
with the marks which indicates the<br />
material is encoded for surround sound.<br />
The availability of the various surround sound modes<br />
depends on the number of speakers used and the incoming<br />
sound information available on the disc.<br />
Speakers Placement<br />
General hints for positioning<br />
● Avoid positioning the speakers in a corner or on the floor<br />
as this will boost the bass tones too much. Placing the<br />
speakers behind curtains, furniture, etc., will reduce the<br />
treble response.<br />
● The speakers should be visible from the listening area.<br />
● For the best surround effects, install all speakers. If a centre<br />
speaker or subwoofer is not connected, the sound from the<br />
unused channel will be distributed to the connected<br />
speakers in order to reproduce the best possible surround<br />
sound.<br />
● Each room has different acoustic characteristics and the<br />
positioning possibilities often are limited. You can find the<br />
best position for your speakers by experimenting or<br />
referring to the picture below.<br />
Positioning the front speakers<br />
The front speakers should be placed to the right and left at<br />
an angle of approximately 45 degrees from the listening<br />
position.<br />
SYSTEM SETUP<br />
Positioning the centre speaker<br />
The centre speaker should be placed in the centre between<br />
both front speakers and should always be placed in line<br />
with the television (e.g. underneath or on top of the TV).<br />
The best height for the centre speaker is the height of the<br />
listener’s ears (while seated).<br />
Positioning the surround speakers<br />
The surround speakers should face each other and be<br />
placed at normal listening ear level or mounted on the wall<br />
at the back of the room.<br />
Positioning the Subwoofer<br />
Place the subwoofer on a solid floor where resonance is<br />
unlikely to occur. The subwoofer can be positioned<br />
anywhere in the room because it is not possible to locate<br />
the source of deep tones. Nevertheless, you should not<br />
place it in the centre of a room, the bass could be<br />
extremely weakened. Do not place an object on the<br />
subwoofer.<br />
Note:<br />
– To avoid magnetic interference with the picture on your TV,<br />
do not position the front speakers too close to the TV.<br />
Speakers Setup<br />
Before operating your system in TV, VCR or CDR mode,<br />
you will need to set up the speaker configuration and the<br />
distance from the listening position to each speaker. For<br />
speaker setup in <strong>DVD</strong> mode, refer to “<strong>DVD</strong>/CD operation<br />
- Audio Set”.<br />
Note:<br />
– It is only necessary to set the parameters once unless you<br />
change the speaker configuration.<br />
Setting the speaker size<br />
1 Press SYSTEM MENU to enter System Setup mode.<br />
2 Press £ to select Speaker Setup.<br />
3 Press £ to select Speaker Size Setup mode.<br />
4 Use ( / ) to select a different speaker :<br />
“LR“ – front left/right, “LRG“– large, “SML“– small,<br />
“CEN“ – centre, “SUR“ – surround or “SUB“ – subwoofer.<br />
5 Use à / á to adjust the setting.<br />
6 Press £ to save these settings or press EXIT to leave<br />
setup mode.
Setting the speaker distance<br />
1 Press SYSTEM MENU to enter System Setup mode.<br />
2 Press £ to select Speaker Setup.<br />
3 Press ( / ) until Speaker Distance Setup is selected.<br />
4 Press £ to enter Speaker Distance Setup mode.<br />
5 Use ( / ) to select a different speaker.<br />
6 Use à / á to adjust the distance to match as close as<br />
possible to the actual distance.<br />
7 Press £ to save these settings or press EXIT to leave<br />
setup mode.<br />
Setting each speaker’s relative volume<br />
balance<br />
IMPORTANT!<br />
Please sit at your usual listening position to correctly<br />
set up the speaker balance to match each other.<br />
1 Press SYSTEM MENU to enter System Setup mode.<br />
2 Press £ to select Speaker Setup.<br />
3 Use ( / ) until Speaker Level Setup is selected.<br />
4 Press £ to enter Speaker Level Setup mode.<br />
5 Use ( / ) to select a different speaker channel :<br />
“Lch, Cch, Rch, LSUR, RSUR, SUB”.<br />
6 Use à / á to adjust the level of a particular speaker until<br />
it matches the other speakers.<br />
7 Press £ to save these settings or press EXIT to leave<br />
setup mode.<br />
Subwoofer Setup<br />
Before you operate the subwoofer, complete the<br />
subwoofer connections. Switch on your player and select<br />
the sound source.<br />
Switch on/off the subwoofer<br />
1 To activate the subwoofer, set the on/off switch at the<br />
rear of the subwoofer to ‘ON’ position.<br />
● If the subwoofer is not to be used for a longer period of<br />
time, it is advisable to set the on/off switch to ‘OFF’ position.<br />
2 Rotate the VOLUME knob at the front panel of<br />
subwoofer until you hear a click, clockwise to switch<br />
on and anti-clockwise to switch off.<br />
➜ The LED indicator will light up in green when the<br />
subwoofer is switched on.<br />
Volume Adjustment<br />
You can adjust the subwoofer to suit the sound level of<br />
your front speakers. Reinforcing the bass sound gives you a<br />
greater sense of atmosphere.<br />
1 Adjust the VOLUME on the player until the sound from<br />
the front speakers is not distorted. If it is distorted, the<br />
sound from the subwoofer also will be distorted.<br />
2 Play your favourite songs.<br />
● Male vocal tunes containing bass sounds are the most<br />
suitable samples for adjusting the subwoofer volume.<br />
3 Adjust the VOLUME on the subwoofer to determine the<br />
loudness of the bass sound from the subwoofer.<br />
Phase Selector<br />
Use PHASE SELECTOR located at the rear of the<br />
subwoofer to select the phase polarity. Selecting the<br />
polarity at either 0˚ or 180˚ may determine better bass<br />
reproduction effect in certain listening environments<br />
(depending on the type of front speakers and the position<br />
of the subwoofer). It also may change the expanse and<br />
tightness of the sound, and affect the feeling of the sound<br />
field. Select the setting that provides the sound you prefer<br />
when you are in your normal listening position.<br />
Repeat the adjustment for Volume and Phase Polarity to<br />
suit your preference. After you have adjusted the<br />
subwoofer to the settings you desire, use the VOLUME<br />
control on the player to adjust the volume of the<br />
subwoofer and the other speakers. You will not need to<br />
adjust the subwoofer settings again, even when you change<br />
the volume level of the player.<br />
SYSTEM SETUP<br />
13<br />
English
English<br />
Basic Functions<br />
14<br />
Selecting the source<br />
● Press one of the SOURCE SELECT buttons (VCR, TV,<br />
CDR, TUNER or <strong>DVD</strong>) to select the input source.<br />
➜ The selected source will be displayed.<br />
Adjusting the master volume<br />
The master volume adjusts all speaker channels at the same<br />
time.<br />
● Rotate the VOLUME knob on the front panel (or press<br />
VOL +/- on the remote control).<br />
Adjusting the tone<br />
The tone controls only affect the front left and right<br />
speakers.<br />
1 Press TONE once to select Bass adjustment.<br />
2 Press TONE again to select Treble adjustment.<br />
● While in Bass or Treble adjustment mode, press à / á to<br />
adjust the selected Bass or Treble level.<br />
3 Press TONE for the third time to exit.<br />
Note:<br />
– If no button is pressed within a few seconds, the player will<br />
exit the tone mode automatically.<br />
Muting the sound<br />
1 Press MUTE to mute the speaker output, the “MUTE”<br />
icon will appear on the display.<br />
2 To restore the volume, press MUTE again.<br />
Dimming the display screen<br />
1 Press DISPLAY will dim the display by a third.<br />
2 Press DISPLAY again will dim the display by another third.<br />
3 Press DISPLAY the third time will return the display to<br />
the original brightness.<br />
BASIC FUNCTIONS<br />
Selecting output modes -<br />
surround sound & sound effects<br />
The number of output modes varies according to the<br />
system setup and the input source. A list of all output<br />
modes is shown below.<br />
IMPORTANT!<br />
For proper surround sound, make sure you have<br />
followed the Connections and System Setup<br />
procedure fully.<br />
● Press SURR. MODE (or MODE on the remote control)<br />
to select the available output modes.<br />
Dolby Digital Surround<br />
The Dolby Digital Surround system requires connection of<br />
all five speakers (front left, centre, front right, surround right,<br />
surround left) for correct surround sound reproduction.<br />
This 5.1 channel digital surround format allows for five<br />
individual full-range (20Hz - 20kHz) channels plus an LFE<br />
(Low Frequency Effects) channel for the low-range (20Hz -<br />
120kHz) effects. It creates a realistic sound similar to<br />
theatre and cinema. A large number of <strong>DVD</strong> discs have<br />
recorded in Dolby Digital Surround.<br />
Dolby Pro Logic Surround<br />
The Dolby Pro Logic Surround system is a specially<br />
encoded two channel analogue format that will produce<br />
sound through four speaker channels (front left, centre,<br />
front right, mono surround) when a Dolby Pro Logic<br />
Decoder is used. It is also compatible with stereo systems<br />
but the user will only have two channels (Front Left &<br />
Right) of sound.<br />
Dolby 3 Stereo<br />
Dolby 3 Stereo produces sound through three speaker<br />
channels (front left, centre, front right) from a two channel<br />
analogue signal. It is not a surround format, so it does not<br />
require surround speakers.<br />
Stereo<br />
All sound is reproduced and played through the front left<br />
and right speakers. This enables standard stereo<br />
reproduction.
Soundfield Effects<br />
The digital Soundfield Effects can recreate the effects of<br />
sounds reflected from walls or ceilings to obtain the sound<br />
presence of real environments.<br />
STADIUM<br />
This mode recreates a large stadium effect using very long<br />
reverberation times.<br />
STAGE<br />
This effect recreates a stage environment, emphasizing<br />
sound from the front speakers.<br />
HALL<br />
The surround effect recreates a hall using lots of reflections.<br />
Suitable for orchestral music such as classical and opera.<br />
DISCO<br />
This surround effect generates a feeling of being in a disco<br />
or club. It is suitable for all types of music that are played in<br />
discos.<br />
LIVE<br />
This soundfield effect is suitable for all types of music.<br />
BASIC FUNCTIONS<br />
15<br />
English
English<br />
Tuner<br />
16<br />
Manual tuning<br />
1 Press TUNER to select tuner mode.<br />
➜ After 2 seconds, the display will show the current<br />
waveband and frequency.<br />
2 To switch between FM and MW waveband, press TUNER<br />
again.<br />
3 Press FREQUENCY 4 or 3 (or à / á on the remote<br />
control) repeatedly to change the frequency. The frequency<br />
changes in 50kHz steps in FM and 9kHz steps in MW<br />
waveband.<br />
Automatic tuning<br />
1 Press TUNER to select tuner mode.<br />
2 To switch between FM and MW waveband, press TUNER<br />
again.<br />
3 Press and hold FREQUENCY 4 or 3 for more than one<br />
second to activate auto tuning mode.<br />
➜ When a station is reached, auto tuning stops.<br />
● Repeat steps 2–3 to search for other radio stations.<br />
Tuning to a weak FM station<br />
1 Press FREQUENCY 4 or 3 repeatedly to tune in the<br />
weak FM station manually.<br />
2 Press FM MODE (Ç) to switch to mono mode. This<br />
should reduce the noise and make the station easier to<br />
hear.<br />
Preset Radio Stations<br />
When a preset station is selected, the preset number will<br />
appear shortly and the display will show the waveband and<br />
frequency.<br />
Storing Preset Radio Stations<br />
You can store up to 20 stations in the FM waveband and 20<br />
stations in the MW waveband in the memory.<br />
1 In tuner mode, press TUNER to switch between FM and<br />
MW waveband.<br />
2 Press FREQUENCY 4 or 3 to tune in the desired<br />
station.<br />
3 Press and hold PRESETS until “PRESET” icon flashes.<br />
TUNER<br />
4 Press ( / ) (or numeric keys 0-9 on the remote control)<br />
to select the desired preset channel number to store.<br />
5 Press PRESETS again to store the radio station.<br />
● Repeat steps 2–5 to store other preset radio stations.<br />
Selecting Preset Radio Stations<br />
1 In tuner mode, press TUNER to switch between FM and<br />
MW waveband.<br />
2 Press PRESETS and followed by FREQUENCY 4 or 3<br />
(or ( / ) on the remote control) to select the desired<br />
preset station.<br />
● You can also use the remote control’s direct access numeric<br />
keys.<br />
RDS<br />
IMPORTANT!<br />
RDS functions are only available in areas that use the<br />
RDS system.<br />
RDS (Radio Data System) is a broadcasting service that<br />
allows FM stations to send additional information along<br />
with the regular FM radio signal. This additional information<br />
can contain the following :<br />
– Station Name<br />
– Radio Text<br />
– Programme Type<br />
– Frequency<br />
Displaying RDS data<br />
When an RDS radio station is received, the RDS icon ( Ç )<br />
and station name (if available) will appear on the display.<br />
While receiving an RDS radio station, you can change the<br />
display information by pressing RDS DISPLAY on the<br />
remote control repeatedly.<br />
Note:<br />
– If the tuned station is not transmitting an RDS signal or not<br />
an RDS station, “NO PS” will be displayed.
Searching for RDS radio stations using<br />
Programme Type<br />
The following programme types exist and can be received<br />
by your Radio Tuner :<br />
NEWS, AFFAIRS, INFO, SPORTS, EDUCATE, DRAMA,<br />
CULTURE, SCIENCE, VARIED, POP M, ROCK M,<br />
MOR M, LIGHT M, CLASSICS, OTHERS M, etc..<br />
1 To automatically search for an RDS programme type, first<br />
select FM radio mode.<br />
2 Press the RDS SEARCH repeatedly until the required<br />
programme type appears on the display.<br />
3 Press and hold FREQUENCY 4 or 3 until auto-search is<br />
activated.<br />
➜ The search will stop when a radio station with the same<br />
programme type is detected.<br />
➜ After a few seconds, the station name will appear on the<br />
display.<br />
● To continue searching for another RDS station within the<br />
same programme type, repeat step 3.<br />
RDS Clock<br />
Some RDS stations may transmit the time. If the clock has<br />
not been set manually (“AM 12:00” will flash); the<br />
current RDS clock time will be stored automatically when<br />
the RDS station transmits the time.<br />
Note:<br />
– If you have set the clock, the set time will not be replaced<br />
when the RDS clock time is received.<br />
TUNER<br />
17<br />
English
English<br />
Clock/Timer<br />
18<br />
IMPORTANT!<br />
When in <strong>DVD</strong>/CD mode, it is not possible to operate<br />
clock or timer function.<br />
Setting the Clock<br />
1 Press SYSTEM MENU to enter System Setup mode.<br />
2 Press ( / ) to select the Clock Setup mode and press<br />
£ to confirm.<br />
3 Press à / á to change between 12 and 24 hour mode.<br />
4 Press £ to enter clock adjustment mode.<br />
➜ The clock digits for the hours flash.<br />
5 Press à / á to set the hour.<br />
6 Press ( / ) to change the minute field.<br />
➜ The clock digits for the minutes flash.<br />
7 Press à / á to set the minute.<br />
8 Press £ to confirm the setting and return to normal<br />
mode.<br />
Setting the On/Off Timer<br />
1 Press SYSTEM MENU to enter System Setup mode.<br />
2 Press ( / ) to select the Timer Setup mode and press<br />
£ to confirm.<br />
3 Press ( / ) to select set on timer or set off timer :<br />
“ON TIME” or “OFF TIME”.<br />
4 Press £ to enter set time mode.<br />
5 Set time (refer to point 5-7 of “Setting the Clock”) and<br />
press £ to confirm the setting.<br />
6 Press à / á to select activating or deactivating the timer :<br />
“SET ON” or “SET OFF”.<br />
CLOCK/TIMER<br />
7 Press £ to confirm and return to the last selected source.<br />
● Repeat steps 1-5 again to set the Off Time.<br />
Note:<br />
– When the “on time” is reached, the player will switch on to<br />
the last selected source.<br />
Activating/Deactivating<br />
On/Off Timer<br />
1 Press SYSTEM MENU to enter System Setup mode.<br />
2 Press ( / ) to select the Timer Setup mode and press<br />
£ to confirm.<br />
3 Press £ twice and press à / á to select “SET ON” or<br />
“SET OFF” mode.<br />
4 Press £ to confirm the setting and return to the last<br />
selected source.<br />
Setting the Sleep Timer<br />
This feature allows you to select a preset amount of time<br />
after which the player will switch to standby mode<br />
automatically.<br />
● Press SLEEP repeatedly to select a preset amount of time.<br />
➜ The selections are as follows (time in minutes):<br />
90 60 30 15 OFF 90 …<br />
➜ When the Sleep Timer is activated, the “SLEEP” icon will<br />
appear on the display.<br />
Checking the remaining Sleep Time<br />
When the Sleep Timer is switched on, you can check the<br />
remaining time before the player switches to standby<br />
mode.<br />
● Press SLEEP once.<br />
➜ The remaining time will be displayed.<br />
Cancelling the Sleep Timer<br />
To switch off the Sleep Timer after it has been activated.<br />
● Press SLEEP repeatedly until “OFF” is displayed.
Loading Discs<br />
1 Press OPEN/CLOSE 0 to open the disc tray.<br />
2 Load your chosen disc in the tray, label side up.<br />
3 Press OPEN/CLOSE 0 again to close the tray.<br />
➜ There will be a short delay while the player identifies the<br />
disc and reads the menu from the disc.<br />
● Some discs will start playing automatically, others will display<br />
the Disc Contents Menu. If the menu is presented,<br />
use à / á or ( / ) to select a play option, then press £<br />
to confirm the selection.<br />
When the <strong>DVD</strong> is playing<br />
Skip<br />
● Press S or T to skip backward or forward by a<br />
Chapter. Each press will take the disc to the beginning of<br />
the previous or next chapter.<br />
Fast Search<br />
1 Press à or á to reverse or fast forward. There are four<br />
speeds; each press will increase the speed.<br />
➜ The sound will be muted.<br />
61 = 62 = 63 = 64 = 61 ...<br />
OR 51 = 52 = 53 = 54 = 51 ...<br />
2 To resume normal play, press £ .<br />
Slow Motion<br />
1 Press( or ) to play slow motion picture backward or<br />
forward. There are four speeds; each press will reduce the<br />
speed.<br />
➜ The sound will be muted.<br />
⁄1 = ⁄2 = ⁄3 = ⁄4 = ⁄1 ...<br />
OR !1 = !2 = !3 = !4 = !1 ...<br />
2 To resume normal play, press £ .<br />
Disc Contents Menu<br />
1 While playing a disc, press SYSTEM MENU.<br />
➜ The “Disc Contents Menu” will be displayed.<br />
2 Press à / á or ( / ) to select a desired feature and press<br />
£ to confirm the selection.<br />
Pause<br />
1 Press Å to temporarily stop playing the disc.<br />
➜ The picture freezes and the sound will be muted.<br />
● Press Å again will show the next frame of picture.<br />
2 To resume normal play, press £ .<br />
<strong>DVD</strong>/CD Operation<br />
Stop/Resume Stop<br />
1 While playing a disc, press Ç once will select “Resume<br />
Stop” mode. The disc can resume playback from the point<br />
at which it stopped when you press £ .<br />
➜ In resume stop mode, you can display the Setup Menu.<br />
2 While resume stop mode, pressÇ again to enter stop<br />
mode. The disc will start playback from the beginning when<br />
you press £ .<br />
Active Navigation Menu (<strong>DVD</strong>)<br />
A number of operations can be done with the Active<br />
Navigation Menu without interrupting disc playback.<br />
1 Press DISC MENU.<br />
➜ The Active Navigation Menu will be displayed across the<br />
top of the TV screen.<br />
2 Press ( or ) to move through the Active Navigation Menu.<br />
● Press T to go directly to the second part of the Active<br />
Navigation Menu.<br />
3 Press DISC MENU or EXIT to exit.<br />
Title<br />
● Press à or á to select a title from a multititle<br />
<strong>DVD</strong> disc and press £ to confirm the<br />
selection.<br />
➜ The selected title will be displayed.<br />
Chapter<br />
● Press à or á to select a chapter from a<br />
multi-chapter <strong>DVD</strong> disc and press £ to<br />
confirm the selection.<br />
➜ The selected chapter will be displayed.<br />
Time Search<br />
This function enables you to select and play the<br />
disc from any point.<br />
1 Select TIME SEARCH in the Active Navigation Menu.<br />
➜ The figure appears on the screen is the elapsed time for<br />
the current playing title.<br />
2 Use the numeric keys to enter the time, then press £<br />
to confirm.<br />
➜ The disc will play from the time you selected.<br />
➜ The associated chapter and elapsed playing time will be<br />
displayed.<br />
<strong>DVD</strong>/CD OPERATION<br />
19<br />
English
English<br />
Language/Sound<br />
There could be alternative language<br />
tracks or 2 channel and 5.1 channel<br />
audio available on a disc. All discs are different in this<br />
respect.<br />
● Press à or á to cycle through the sound tracks available<br />
on the disc, then press £ to confirm.<br />
Subtitle<br />
● Press à or á to select the available subtitle<br />
languages or to turn off the subtitle, then press<br />
£ to confirm.<br />
Angle<br />
If the disc contains sequences recorded from<br />
different camera angles, this allows you to view<br />
the picture from different angles.<br />
● Press à or á to select an angle.<br />
➜ After a while, playback changes to the selected angle.<br />
OSD (on screen display)<br />
If the OSD is switched on, it will serve as an<br />
additional display for messages on the top<br />
corner of the screen, e.g. STOP, PLAY, which will appear<br />
momentarily when you press a remote control button.<br />
● Press £ repeatedly to set On Screen Display to “ON” or<br />
“OFF”.<br />
Repeat A-B<br />
Repeat A-B allows a passage to play repeatedly.<br />
1 Press £ at the start of the desired passage.<br />
2 Press £ again at the end of the passage.<br />
➜ The passage will now repeat continuously.<br />
3 To resume normal play, press £ again.<br />
● You can also press RDS DISPLAY on the remote<br />
control to direct access to Repeat A-B mode.<br />
Zoom<br />
The zoom function allows you to enlarge or<br />
reduce the video image.<br />
● Press £ repeatedly to select the zoom factor : 1.0x, 2.0x<br />
and 0.5x.<br />
➜ The picture will change accordingly.<br />
20<br />
<strong>DVD</strong>/CD OPERATION<br />
Playing a music CD<br />
1 Load a music CD in the disc tray.<br />
2 Press £ to start playback.<br />
● You can use the numeric keys on the remote control to<br />
directly select a desired track, then press £ to confirm.<br />
When the music CD is playing<br />
Skip<br />
● Press S or T to skip backward or forward. Each<br />
press will take the disc to the beginning of the previous or<br />
next track.<br />
● If the RANDOM mode is switched on, skip will jump a<br />
RANDOM number of tracks.<br />
Fast Search<br />
1 Press à or á to reverse or fast forward the disc. There<br />
are three speeds; each press will increase the speed until<br />
the maximum speed is reached.<br />
2 Press £ to revert to normal speed playback.<br />
Pause<br />
1 Press Å to temporarily stop playing the disc.<br />
➜ The sound will be muted.<br />
2 To resume normal play, pressÅ again or £ .
Active Navigation Menu<br />
(music CD)<br />
A number of operations can be done with the Active<br />
Navigation Menu without interrupting disc playback.<br />
1 Press DISC MENU.<br />
➜ The Active Navigation Menu will be displayed across the<br />
top of the TV screen.<br />
2 Press ( or ) to move through the Active Navigation Menu.<br />
3 Press DISC MENU or EXIT to exit.<br />
Track<br />
● Press à or á to select a track and press<br />
£ to confirm the selection.<br />
➜ The track number and elapsed playing time of the<br />
current track will appear on the display.<br />
Time Search<br />
This function enables you to select and play the<br />
disc from any point.<br />
● Use the numeric keys on the remote control to enter<br />
the time, then press £ to confirm.<br />
➜ The disc will play from the time you entered.<br />
Repeat A-B<br />
Repeat A-B allows a passage to play repeatedly.<br />
1 Press £ at the start of the required passage.<br />
2 Press £ again at the end of the passage.<br />
➜ The passage will now repeat continuously.<br />
3 To resume normal play, press £ again.<br />
Repeat<br />
This function is to repeat playback a track or<br />
the whole disc.<br />
● Press £ repeatedly to select “1” or “ALL”.<br />
➜ If “1” is selected, the current track will play repeatedly.<br />
➜ If “ALL” is selected, the whole disc will play repeatedly.<br />
Random<br />
All the tracks will play in random order.<br />
● Press £ repeatedly to select random “ON”<br />
or “OFF”.<br />
OSD (on screen display)<br />
If the OSD is switched on, it will serve as an<br />
additional display for messages on the top<br />
corner of the screen, e.g. STOP, PLAY, which will appear<br />
momentarily when you press a remote control button.<br />
● Press £ repeatedly to select On Screen Display “ON” or<br />
“OFF”.<br />
<strong>DVD</strong>/CD OPERATION<br />
21<br />
English
English<br />
22<br />
On-screen messages<br />
During play, various messages will be shown on the screen<br />
for a few seconds to confirm that a function has been<br />
selected. You can switch on or off these messages in the<br />
“On Screen” setup mode of the System Setup menu.<br />
The possible messages may appear are listed below :<br />
PLEASE WAIT .................... The system is initialising.<br />
READING ............................ Reading the disc.<br />
OPEN ( é ) ...................... The tray is about to open.<br />
CLOSE ( ) ...................... The tray is about to close.<br />
<strong>DVD</strong> ................................. <strong>DVD</strong> disc is loaded.<br />
MUSIC CD ..................... Music CD is loaded.<br />
NO VALID DISC.............. Wrong disc format or damaged<br />
disc cannot play; disc is loaded<br />
upside down or no disc is in the<br />
disc tray.<br />
INVALID REGION DISC…The disc cannot play because<br />
the regional code is different than<br />
the player.<br />
PARENTAL LEVEL TOO LOW TO PLAY<br />
.................................................... The parental control has been set<br />
and the disc cannot play.<br />
PLAY (É ) ............................ Start playback.<br />
PAUSE (Å ) ........................ Pause the disc.<br />
STEP FWD ( ) ........... One frame forward in pause<br />
mode.<br />
STEP BWD ( ) .......... One frame backward in pause<br />
mode.<br />
CONTINUE (É ) ........... Continue playing after pause.<br />
RESUME STOP ( )…Stop the disc but allow the disc<br />
to be resumed from the same<br />
place later.<br />
RESUME ( ) ........... Playback is resumed.<br />
STOP (Ç) ........................... The disc is completely stopped.<br />
( ) ........................................ This function is not available.<br />
NEXT CHAPTER ( )…Playback from beginning of next<br />
chapter.<br />
PREV CHAPTER ( ) …Playback from beginning of<br />
previous chapter.<br />
FAST FWD ( ) .......... Fast forward speed 1 (for <strong>DVD</strong> up<br />
to speed 4, for CD up to speed 3).<br />
FAST BWD ( ) ......... Fast backward speed 1 (for <strong>DVD</strong><br />
up to speed 4, for CD up to speed<br />
3).<br />
<strong>DVD</strong>/CD OPERATION<br />
SLOW FWD ( ) ...... Slow forward speed 1 (for <strong>DVD</strong><br />
up to speed 4).<br />
SLOW BWD ( ) .... Slow backward speed 1 (for <strong>DVD</strong><br />
up to speed 4).<br />
MUTE ( ) ........................ The sound is muted.<br />
UNMUTE ( ) ................. Sound mute is cancelled.<br />
SKIPPING BAD DISC AREA …There is a damaged<br />
section of the disc that the player<br />
can skip over.<br />
TRACK: 1 ............................. Track selection with a number key<br />
(Music CD).<br />
SKIP NEXT ( ) ......... Skip to the start of the next track<br />
(Music CD).<br />
SKIP PREV ( ) ........... Skip to the start of the previous<br />
track (Music CD).<br />
STAND BY .......................... Entering standby mode.<br />
POWER ON ...................... Switched on from stand by.<br />
BUTTON: 2......................... Indicates a menu selection using<br />
the number keys.
Disc Setup Menu<br />
The selections from the Disc Setup Menu are the preferred<br />
options that will be chosen if they are available on a disc. If<br />
the disc inserted does not have the preferred option, then<br />
the disc’s own preference will be used.<br />
IMPORTANT!<br />
To access the Disc Setup Menu, playback must be<br />
stopped.<br />
Language Example showing how to change the audio language from ENGLISH to FRENCH<br />
[ Language ] [ Audio ]<br />
[ Return ] X 4<br />
[ Francais ]<br />
Subtitle Example showing how to turn off the subtitle<br />
1 Press SYSTEM MENU.<br />
➜ The Disc Setup Menu will be displayed across the top of<br />
the TV screen.<br />
2 Press à / á or ( / ) to move through the Disc Setup<br />
Menu.<br />
3 Press £ to confirm the selection.<br />
[ Subtitle ] [ OFF ]<br />
X 1<br />
X 2<br />
X 1 [Return]<br />
<strong>DVD</strong>/CD OPERATION<br />
23<br />
English
English<br />
24<br />
TV Aspect [L-Box] means "Letter Box". The picture will be displayed as with black bars at the top and<br />
bottom of the screen. (For disc which support letter box feature)<br />
[P-Scan] means "Pan and Scan". The picture fills the whole screen however some parts to left and right<br />
may not be visible. The picture will automatically Pan and Scan to left and right to centre the most<br />
important part of the picture. Not all discs support Pan and Scan, so the Letter Box display may remain<br />
even though [P-Scan] is selected.<br />
Example shows setting of Letter Box display on a normal TV.<br />
[ TV Aspect ] X 1<br />
[ TV Aspect ]<br />
[ Return ] X 1<br />
[ L-Box ]<br />
Audio Set Example shows setting of Dynamic Range Compression (DRC) to night time listening.<br />
[ Audio Set ] X 3<br />
[ DRC ]<br />
[ Exit ]<br />
<strong>DVD</strong>/CD OPERATION<br />
X 1 X 4
Audio Set Example shows setting of 2 audio channel to 5.1 audio channel (only available on 5.1 Channel models).<br />
[ Audio Set ]<br />
or<br />
or<br />
➤ [ Exit ] ➤<br />
➤ Exit ➤<br />
➤ ➤<br />
➤ ➤ or ➤ ➤<br />
Rear<br />
or ➤ Speakers ➤<br />
or<br />
Center<br />
➤ Speaker ➤<br />
or ➤ ➤<br />
or ➤ Subwoofer ➤<br />
or ➤ ➤<br />
<strong>DVD</strong>/CD OPERATION<br />
25<br />
English
English<br />
26<br />
Digital Out<br />
Set up the Digital Audio output for a 5.1 Receiver/Decoder. This menu enables you to set the type<br />
of 5.1 output according to your Decoder/Amplifier. The form of each type of Data (Dolby Digital, MPEG<br />
or DTS) can be set as a Bitstream or PCM format to suit your Dolby & DTS decoders.<br />
[ Digital out ]<br />
Parental Control<br />
Some <strong>DVD</strong> discs have a parental level assigned to the disc.<br />
The range of parental controls is from 1 to 8. The meaning<br />
of the levels 1 to 8 varies depending upon the country and<br />
the type of content on the disc.<br />
The player can be set in a similar way. If the player’s<br />
parental level is set to 8, it will play all discs. If the player’s<br />
parental level is set below 8, only discs with a lower or<br />
equal level will play. For example, if the player is set to 5,<br />
only discs with parental control ratings of 5, 4, 3, 2 & 1 will<br />
play. To play a higher rated disc, you must change the<br />
player’s rating to a higher number.<br />
Alternative scenes with a lower rating might be included.<br />
The player plays the highest rated scene that the parental<br />
setting allows. For example, consider a disc that generally is<br />
suitable for most audiences, and it is rated as level 2 for the<br />
most part. However, in the middle, there are also scenes<br />
rated at 5 (not suitable for children).<br />
Parental Control<br />
[ Parental ]<br />
Example showing how to set parental level to 3.<br />
[ Level ]<br />
< 3 ><br />
[ Return ] X 4 [4 digits password ]<br />
<strong>DVD</strong>/CD OPERATION<br />
The player is delivered without a password. When you set<br />
the parental level for the first time, you are invited to enter<br />
your own password (e.g. 1, 2, 3, 4). This becomes the<br />
password for the player. You must know this password<br />
in order to change it. Some films do not have<br />
parental control, the disc will play regardless of<br />
the player setting.<br />
Parental Lock password erase<br />
1 Press and hold FREQUENCY 3 on the front panel<br />
while unplug and plug-in the power cord.<br />
➜ “PAS ERASE” will be displayed.<br />
2 Wait until “PASSWORD ERASE OK” appear on the TV<br />
display, the player will then switch to standby mode 20<br />
seconds later.<br />
or
Panel Keys Lock<br />
[ Parental ] X 3 [ Panel keys ]<br />
[ Off ]<br />
On Screen<br />
A second method of parental control is also available in the PANEL KEYS option.<br />
Set panel keys to OFF and the player can only be operated by the remote control.<br />
[ Exit ]<br />
If the On Screen Display is on, various icons and messages will show on the screen for a few seconds<br />
to confirm that a function has been selected.<br />
Example showing how to turn off the On Screen Display.<br />
[ On Screen ] [ Off ]<br />
X 1 [ Return ]<br />
<strong>DVD</strong>/CD OPERATION<br />
27<br />
English
English<br />
28<br />
Programme music CD<br />
To display the CD programme menu, the player must be in<br />
CD mode and playback must be stopped.<br />
1 Insert a music CD and close the disc tray.<br />
➜ The player will go into CD mode when it identifies the<br />
disc.<br />
2 Press RDS DISPLAY.<br />
➜ CD Programme Menu will appear.<br />
Programme Music CD<br />
RDS<br />
DISPLAY<br />
Index (<strong>DVD</strong>)<br />
Index <strong>DVD</strong><br />
Example showing how to programme favourite tracks from a music CD.<br />
➤ or or ➤ ➤ ➤<br />
To display the <strong>DVD</strong> Index Menu, <strong>DVD</strong> must be playing.<br />
1 While playing a disc, press RDS SEARCH.<br />
➜ The film will pause and the Index Menu will appear.<br />
2 Press ( / ) to select the desired index marker.<br />
RDS<br />
SEARCH<br />
RDS<br />
SEARCH<br />
Example showing how to set an Index marker.<br />
(INDEX)<br />
X 2<br />
Example showing how to play from an indexed point.<br />
(INDEX)<br />
<strong>DVD</strong>/CD OPERATION<br />
X 2 ➤<br />
3 Press à / á to select a desired track.<br />
4 Press ) to store the track in the programme.<br />
● Repeat steps 3–4 to store other tracks.<br />
5 Press £ to save the programme.<br />
➤<br />
SAVE<br />
3 Press à / á to display the information of the selected<br />
index marker.<br />
4 Press £ to confirm the selection.
AMPLIFIER SECTION<br />
Power Output<br />
- Output power, stereo mode (DIN) ...................................................2 x 70 W<br />
- Output power, surround mode (1 kHz) ................ 70 W RMS / channel<br />
Total Harmonic Distortion .............................. 0.7% at rated power (1 kHz)<br />
Frequency Response .....................................................20 Hz – 20 kHz / ±1 dB<br />
Signal-to-Noise Ratio ....................................................................... > 65dB (CCIR)<br />
Input Sensitivity..................................................................................................... 460 mV<br />
Tone Control .......................................................................................................... ±12 dB<br />
TUNER SECTION<br />
Tuning Range .................................. FM 87.50 – 108.00 MHz (50 kHz steps)<br />
.......................................................................... MW 531 – 1602 kHz (9 kHz steps)<br />
26 dB Quieting Sensitivity .......................................................................... FM 20 dB<br />
26 dB Quieting Sensitivity ............................................................ MW 3162uV/m<br />
Image Rejection Ratio................................................................................... FM 75 dB<br />
................................................................................................................................ MW 28 dB<br />
IF Rejection Ratio ............................................................................................ FM 90 dB<br />
................................................................................................................................ MW 38 dB<br />
Signal-to-Noise Ratio .................................................................................... FM 60 dB<br />
................................................................................................................................ MW 40 dB<br />
Selectivity ............................................................................................................. FM 20 dB<br />
AM Suppression Ratio ................................................................................. FM 30 dB<br />
Harmonic Distortion ............................................................................FM Mono 3%<br />
.................................................................................................................................. Stereo 3%<br />
...................................................................................................................................... MW 5%<br />
Frequency Response ............................................... FM 63Hz – 10kHz / ±6 dB<br />
Stereo Separation ......................................................................... FM 26 dB (1 kHz)<br />
Stereo threshold .............................................................................................. FM 28 dB<br />
<strong>DVD</strong> SECTION<br />
Laser Type ................................................................................................ Semiconductor<br />
Disc Diameter .............................................................................................. 12cm / 8cm<br />
Playing Time (12cm) Single Layer ........................................................ 2.12h<br />
Dual Layer .......................................................... 4.01h<br />
Two Sides, Single Layer ............................... 4.26h<br />
Two Sides, Dual Layer .................................. 8.02h<br />
Video Decoding .................................................................................................. MPEG-2<br />
Video DAC ................................................................................................................ 10 Bits<br />
Signal System ............................................................................................... PAL / NTSC<br />
Video Format ..................................................................................................... 4:3 / 16:9<br />
Video S/N ...........................................................................................56 dB (minimum)<br />
Composite Video Output ................................................................ 1.0 Vp-p, 75 Ω<br />
S-Video Output ............................................................................. Y - 1.0 Vp-p, 75 Ω<br />
................................................................................................................ C - 0.3 Vp-p, 75 Ω<br />
Audio DAC........................................................................................... 24 Bits / 96 kHz<br />
Frequency Response ................................................. 4 Hz – 20 kHz (44.1 kHz)<br />
................................................................................................... 4 Hz – 22 kHz (48 kHz)<br />
................................................................................................... 4 Hz – 44 kHz (96 kHz)<br />
Digital Output .................................................................. SPDIF Coaxial & Optical<br />
MISCELLANEOUS<br />
Power Supply Rating............................................................................. 230 V / 50 Hz<br />
Power Consumption (DFR1500, DFR1600) ......................................... 216 W<br />
Dimensions (w x h x d) ................................ 435 mm x 140 mm x 430 mm<br />
Weight ............................................................................................................................. 13 kg<br />
IR REMOTE CONTROL<br />
Effective Range.................................................................................................> 8 Metre<br />
Number of Keys .............................................................................................................. 39<br />
Battery (1.5V) ..................................................................................................... AAA x 2<br />
Specifications subject to change without prior notice<br />
Specifications<br />
SPEAKERS<br />
Front Speakers<br />
System ........................................................................................................ 2-way shielded<br />
Impedance ........................................................................................................................ 8 Ω<br />
Speaker drivers ........................................................................ 3” full range, 1” piezo<br />
Dimensions (w x h x d) ..................................... 94 mm x 155 mm x 88 mm<br />
Weight ......................................................................................................................... 0.45 kg<br />
Centre Speaker<br />
System ........................................................................................................ 2-way shielded<br />
Impedance ........................................................................................................................ 8 Ω<br />
Speaker drivers ............................................................... 2 x 3” full range, 1” piezo<br />
Dimensions (w x h x d) ..................................... 250 mm x 94 mm x 88 mm<br />
Weight ......................................................................................................................... 0.92 kg<br />
Surround Speakers<br />
System .......................................................................................................... 2-way satelite<br />
Impedance ........................................................................................................................ 8 Ω<br />
Speaker drivers ........................................................................ 3” full range, 1” piezo<br />
Dimensions (w x h x d) ..................................... 94 mm x 155 mm x 88 mm<br />
Weight ......................................................................................................................... 0.45 kg<br />
SUBWOOFER<br />
Subwoofer (not magnetically shielded design).....................................................<br />
.......................................................................................... 6.5” with wOOx technology<br />
Output power .................................................................................. 50 W (4 Ω, DIN)<br />
THD .............................................................................................................. 10% at 55 Hz<br />
Reproduction frequency response.......................................... 30 Hz – 110 Hz<br />
Phase switch ............................................................................................................0 O , 180 O<br />
Input sensitivity (Subwoofer In) ..........................................................200 mVrms<br />
AC power .................................................................................... 220 – 230 V / 50 Hz<br />
Power Consumption ........................................... 38.5 W (at 1/8 Rated Power)<br />
Dimensions (w x h x d) ................................ 200 mm x 310 mm x 370 mm<br />
Weight ............................................................................................................................ 7.2 kg<br />
SPECIFICATIONS<br />
29<br />
English


![03_[DE] - Philips](https://img.yumpu.com/25100096/1/184x260/03-de-philips.jpg?quality=85)