ER-A220 Operation-Manual GB - Sharp
ER-A220 Operation-Manual GB - Sharp
ER-A220 Operation-Manual GB - Sharp

You also want an ePaper? Increase the reach of your titles
YUMPU automatically turns print PDFs into web optimized ePapers that Google loves.
5<br />
Removing a paper jam<br />
Precaution: Be very careful for the manual cutter mounted on the printer cover when removing and<br />
replacing the cover, so as not to hurt yourself. Never touch the print head immediately<br />
after printing, because the head may still be hot.<br />
1. Remove the printer cover.<br />
2. Pull the print head release lever toward you (to the head-up position). (Refer to the drawing on page 54.)<br />
3. Remove the paper jam. Check for and remove any shreds of paper that may remain in the printer.<br />
4. Return the print head release lever to its original position.<br />
5. Reset the paper roll correctly by following the steps in “Installing the paper roll”.<br />
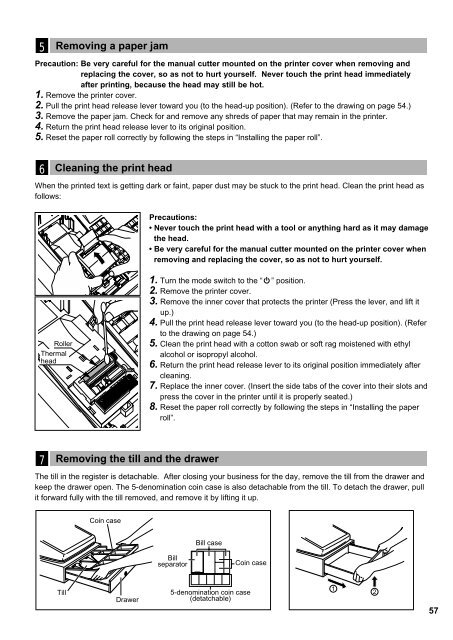
6<br />
Cleaning the print head<br />
When the printed text is getting dark or faint, paper dust may be stuck to the print head. Clean the print head as<br />
follows:<br />
Precautions:<br />
• Never touch the print head with a tool or anything hard as it may damage<br />
the head.<br />
• Be very careful for the manual cutter mounted on the printer cover when<br />
removing and replacing the cover, so as not to hurt yourself.<br />
Roller<br />
Thermal<br />
head<br />
1. Turn the mode switch to the “ ” position.<br />
2. Remove the printer cover.<br />
3. Remove the inner cover that protects the printer (Press the lever, and lift it<br />
up.)<br />
4. Pull the print head release lever toward you (to the head-up position). (Refer<br />
to the drawing on page 54.)<br />
5. Clean the print head with a cotton swab or soft rag moistened with ethyl<br />
alcohol or isopropyl alcohol.<br />
6. Return the print head release lever to its original position immediately after<br />
cleaning.<br />
7. Replace the inner cover. (Insert the side tabs of the cover into their slots and<br />
press the cover in the printer until it is properly seated.)<br />
8. Reset the paper roll correctly by following the steps in “Installing the paper<br />
roll”.<br />
7<br />
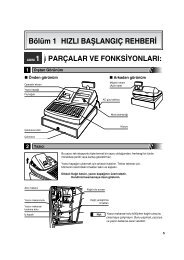
Removing the till and the drawer<br />
The till in the register is detachable. After closing your business for the day, remove the till from the drawer and<br />
keep the drawer open. The 5-denomination coin case is also detachable from the till. To detach the drawer, pull<br />
it forward fully with the till removed, and remove it by lifting it up.<br />
Coin case<br />
Bill case<br />
Bill<br />
separator<br />
Coin case<br />
Till<br />
Drawer<br />
5-denomination coin case<br />
(detatchable)<br />
1<br />
2<br />
57