Owners Manual - Roland
Owners Manual - Roland
Owners Manual - Roland

Create successful ePaper yourself
Turn your PDF publications into a flip-book with our unique Google optimized e-Paper software.
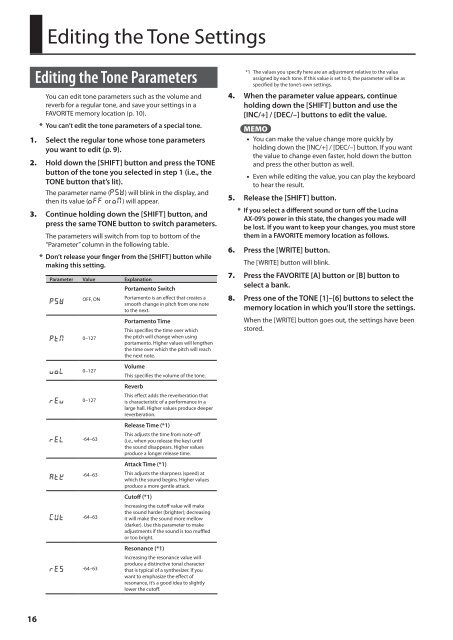
Editing the Tone Settings<br />
Editing the Tone Parameters<br />
You can edit tone parameters such as the volume and<br />
reverb for a regular tone, and save your settings in a<br />
FAVORITE memory location (p. 10).<br />
* You can’t edit the tone parameters of a special tone.<br />
1. Select the regular tone whose tone parameters<br />
you want to edit (p. 9).<br />
2. Hold down the [SHIFT] button and press the TONE<br />
button of the tone you selected in step 1 (i.e., the<br />
TONE button that’s lit).<br />
The parameter name (PS ) will blink in the display, and<br />
then its value (oFF or oN) will appear.<br />
3. Continue holding down the [SHIFT] button, and<br />
press the same TONE button to switch parameters.<br />
The parameters will switch from top to bottom of the<br />
“Parameter” column in the following table.<br />
* Don’t release your finger from the [SHIFT] button while<br />
making this setting.<br />
Parameter Value Explanation<br />
Portamento Switch<br />
OFF, ON<br />
Portamento is an effect that creates a<br />
PS<br />
smooth change in pitch from one note<br />
to the next.<br />
PtN 0–127<br />
uoL 0–127<br />
rEu 0–127<br />
rEL -64–63<br />
At<br />
-64–63<br />
CUt -64–63<br />
rES -64–63<br />
Portamento Time<br />
This specifies the time over which<br />
the pitch will change when using<br />
portamento. Higher values will lengthen<br />
the time over which the pitch will reach<br />
the next note.<br />
Volume<br />
This specifies the volume of the tone.<br />
Reverb<br />
This effect adds the reverberation that<br />
is characteristic of a performance in a<br />
large hall. Higher values produce deeper<br />
reverberation.<br />
Release Time (*1)<br />
This adjusts the time from note-off<br />
(i.e., when you release the key) until<br />
the sound disappears. Higher values<br />
produce a longer release time.<br />
Attack Time (*1)<br />
This adjusts the sharpness (speed) at<br />
which the sound begins. Higher values<br />
produce a more gentle attack.<br />
Cutoff (*1)<br />
Increasing the cutoff value will make<br />
the sound harder (brighter); decreasing<br />
it will make the sound more mellow<br />
(darker). Use this parameter to make<br />
adjustments if the sound is too muffled<br />
or too bright.<br />
Resonance (*1)<br />
Increasing the resonance value will<br />
produce a distinctive tonal character<br />
that is typical of a synthesizer. If you<br />
want to emphasize the effect of<br />
resonance, it’s a good idea to slightly<br />
lower the cutoff.<br />
*1 The values you specify here are an adjustment relative to the value<br />
assigned by each tone. If this value is set to 0, the parameter will be as<br />
specified by the tone’s own settings.<br />
4. When the parameter value appears, continue<br />
holding down the [SHIFT] button and use the<br />
[INC/+] / [DEC/–] buttons to edit the value.<br />
MEMO<br />
• You can make the value change more quickly by<br />
holding down the [INC/+] / [DEC/–] button. If you want<br />
the value to change even faster, hold down the button<br />
and press the other button as well.<br />
• Even while editing the value, you can play the keyboard<br />
to hear the result.<br />
5. Release the [SHIFT] button.<br />
* If you select a different sound or turn off the Lucina<br />
AX-09’s power in this state, the changes you made will<br />
be lost. If you want to keep your changes, you must store<br />
them in a FAVORITE memory location as follows.<br />
6. Press the [WRITE] button.<br />
The [WRITE] button will blink.<br />
7. Press the FAVORITE [A] button or [B] button to<br />
select a bank.<br />
8. Press one of the TONE [1]–[6] buttons to select the<br />
memory location in which you’ll store the settings.<br />
When the [WRITE] button goes out, the settings have been<br />
stored.<br />
16