deep sky imaging with powermate - Leif and Vera Svalgaard's
deep sky imaging with powermate - Leif and Vera Svalgaard's
deep sky imaging with powermate - Leif and Vera Svalgaard's

You also want an ePaper? Increase the reach of your titles
YUMPU automatically turns print PDFs into web optimized ePapers that Google loves.
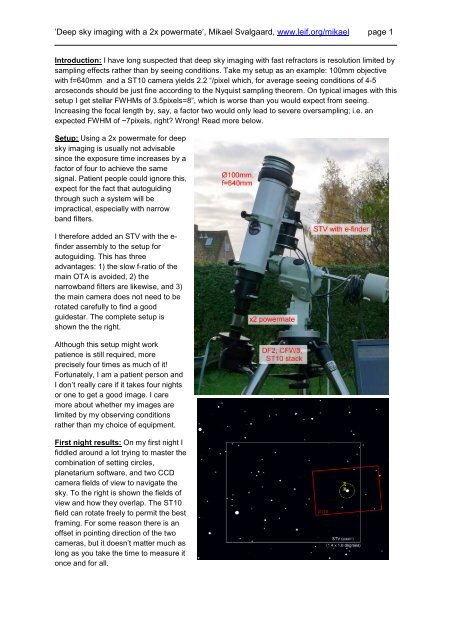
’Deep <strong>sky</strong> <strong>imaging</strong> <strong>with</strong> a 2x <strong>powermate</strong>’, Mikael Svalgaard, www.leif.org/mikael page 1<br />
Introduction: I have long suspected that <strong>deep</strong> <strong>sky</strong> <strong>imaging</strong> <strong>with</strong> fast refractors is resolution limited by<br />
sampling effects rather than by seeing conditions. Take my setup as an example: 100mm objective<br />
<strong>with</strong> f=640mm <strong>and</strong> a ST10 camera yields 2.2 “/pixel which, for average seeing conditions of 4-5<br />
arcseconds should be just fine according to the Nyquist sampling theorem. On typical images <strong>with</strong> this<br />
setup I get stellar FWHMs of 3.5pixels=8”, which is worse than you would expect from seeing.<br />
Increasing the focal length by, say, a factor two would only lead to severe oversampling; i.e. an<br />
expected FWHM of ~7pixels, right Wrong! Read more below.<br />
Setup: Using a 2x <strong>powermate</strong> for <strong>deep</strong><br />
<strong>sky</strong> <strong>imaging</strong> is usually not advisable<br />
since the exposure time increases by a<br />
factor of four to achieve the same<br />
signal. Patient people could ignore this,<br />
expect for the fact that autoguiding<br />
through such a system will be<br />
impractical, especially <strong>with</strong> narrow<br />
b<strong>and</strong> filters.<br />
I therefore added an STV <strong>with</strong> the e-<br />
finder assembly to the setup for<br />
autoguiding. This has three<br />
advantages: 1) the slow f-ratio of the<br />
main OTA is avoided, 2) the<br />
narrowb<strong>and</strong> filters are likewise, <strong>and</strong> 3)<br />
the main camera does not need to be<br />
rotated carefully to find a good<br />
guidestar. The complete setup is<br />
shown the the right.<br />
Although this setup might work<br />
patience is still required, more<br />
precisely four times as much of it!<br />
Fortunately, I am a patient person <strong>and</strong><br />
I don’t really care if it takes four nights<br />
or one to get a good image. I care<br />
more about whether my images are<br />
limited by my observing conditions<br />
rather than my choice of equipment.<br />
First night results: On my first night I<br />
fiddled around a lot trying to master the<br />
combination of setting circles,<br />
planetarium software, <strong>and</strong> two CCD<br />
camera fields of view to navigate the<br />
<strong>sky</strong>. To the right is shown the fields of<br />
view <strong>and</strong> how they overlap. The ST10<br />
field can rotate freely to permit the best<br />
framing. For some reason there is an<br />
offset in pointing direction of the two<br />
cameras, but it doesn’t matter much as<br />
long as you take the time to measure it<br />
once <strong>and</strong> for all.
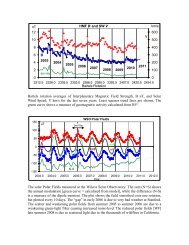
’Deep <strong>sky</strong> <strong>imaging</strong> <strong>with</strong> a 2x <strong>powermate</strong>’, Mikael Svalgaard, www.leif.org/mikael page 2<br />
I finally managed to get some images of M74 through an IRreject filter while the STV was guiding.<br />
First I tried various exposure times to see how the tracking worked:<br />
4.5<br />
4.0<br />
3.5<br />
3.0<br />
FWHM, pixels<br />
2.5<br />
2.0<br />
1.5<br />
star1<br />
star2<br />
star3<br />
1.0<br />
0.5<br />
0.0<br />
1 10 100<br />
Exposure time, sec<br />
The stars appeared nice <strong>and</strong> round for all exposure times. The FWHM increased during the first<br />
minute, then levels off. Note that the FWHM values measured in pixels are similar to that seen when<br />
no <strong>powermate</strong> is used, i.e. I am getting roughly a factor two improvement in resolution when<br />
measured in arcseconds!<br />
Current tracking problems: On later nights I noticed that the tracking performance was poor; both<br />
as seen on the STV tracking graphs <strong>and</strong> on the ST10 image:<br />
The stellar elongation present in the ST10 image corresponds to the equatorial direction which is also<br />
the axis displaying the greatest deviations on the STV tracking graphs. Currently, I have not solved<br />
this problem. Why didn’t I notice it on the first night I don’t know. I believe it is caused by a<br />
combination of balance issues <strong>and</strong> imprecise polar alignment. I am baffled by this since I have use<br />
this setup – sans <strong>powermate</strong> <strong>and</strong> STV – for many years <strong>and</strong> not noticed such problems.
’Deep <strong>sky</strong> <strong>imaging</strong> <strong>with</strong> a 2x <strong>powermate</strong>’, Mikael Svalgaard, www.leif.org/mikael page 3<br />
Measurements of stellar diameters:<br />
The Nyquist sampling theorem is commonly quoted when stating that ideal pixel scale for <strong>deep</strong> <strong>sky</strong><br />
<strong>imaging</strong> is half the stellar FWHM. This will ensure a maximal field of view, fastest detection capability<br />
<strong>and</strong> minimal loss of resolution. The image scale is given by (pixel size in microns)*206/(focal length in<br />
millimeters). For a seeing of 4-5” my old setup (f=640mm, 6.8 micron pixels ⇒ image scale =2.2”/pixel)<br />
should therefore be ideal. Increasing the focal length should not lead to any significant resolution<br />
improvment. Measurements of the stellar diameter using this setup are shown below. They span three<br />
continents <strong>and</strong> three years, thus sampling a wide range of local circumstances.<br />
5<br />
United States (UT, NM)<br />
f=640mm, 6.8um pixels, 2.2 "/pixel<br />
4<br />
Australia (NSW)<br />
Denmark<br />
1/2 flux dia., pixels<br />
3<br />
2<br />
1<br />
0<br />
0 20 40 60<br />
Measurement #<br />
(exposure time < 5 seconds)<br />
The median diameter is 2.9 pixels, corresponding to 6.4”. All measurements were made <strong>with</strong> less than<br />
5 seconds exposure time, hence the values cannot be influenced by tracking errors. It looks like I<br />
have nothing to gain from using a longer focal length for this particular camera. However, I had<br />
noticed from the work of others that bigger scopes ‘always’ seemed to produce a sharper image than<br />
mine. The fact that bigger scopes have proportionally larger optical resolution capability is irrelevant<br />
because <strong>deep</strong> <strong>sky</strong> images are usually limited by seeing. The only other factor I could think of was<br />
focal length. Bigger scopes usually have larger focal lengths. I therefore tried using a 2x <strong>powermate</strong><br />
on my setup, yielding 1.1 “/pixel. Eight measurements are shown below, along <strong>with</strong> two made <strong>with</strong> a<br />
f=1260mm SCT. If I was actually sampling the seeing properly before the stellar diameter should now<br />
be ~6pixels – grossly oversampled. Instead I find that the stellar diameter averages 3.8 pixels = 4.2”.<br />
This improvement – from 6.4” to 4.2” – is substantial <strong>and</strong> merits further investigation. Now I just need<br />
to get the tracking/balancing problems fixed!
’Deep <strong>sky</strong> <strong>imaging</strong> <strong>with</strong> a 2x <strong>powermate</strong>’, Mikael Svalgaard, www.leif.org/mikael page 4<br />
6<br />
5<br />
f=1280mm, 6.8um pixels, 1.1"/pixel<br />
4” refractor (f=1280mm)<br />
1/2 flux dia., pixels<br />
4<br />
3<br />
2<br />
8" SCT (f=1260mm)<br />
1<br />
0<br />
0 2 4 6 8 10<br />
Measurement #<br />
(exposure time < 5 seconds)<br />
Note: During this work I learned that measuring a stellar diameter using the FWHM value from a<br />
Gaussian fit can be subject to significant uncertainties from seeing <strong>and</strong> noise. A more robust<br />
measurement is the half flux diameter (http://www.cyanogen.com/help/maximdl/Half-Flux.htm) which<br />
gives very nearly the same value as FWHM for focussed star images.
’Deep <strong>sky</strong> <strong>imaging</strong> <strong>with</strong> a 2x <strong>powermate</strong>’, Mikael Svalgaard, www.leif.org/mikael page 5<br />
Analysis of resolution vs. focal length: Inspired by the preliminary results above I went through all<br />
my autofocus images for various focal lengths. All data were aquired from Denmark <strong>with</strong> the ST10XE<br />
camera just after automatic focussing <strong>with</strong> a DF-2 <strong>and</strong> had exposure times less than 5 seconds. I<br />
have used four optical setups: 50mm f/2.8 Nikkor lens, 180mm f/4 Nikkor lens, 640mm f/6.4 objective<br />
<strong>and</strong> finally the same objective <strong>with</strong> a 2x <strong>powermate</strong> yielding 1280mm f/13.<br />
6.8um pixels<br />
Half flux diameter (arcseconds)<br />
10<br />
pixel resolution<br />
seeing limit<br />
1<br />
100 1000<br />
Focal length (mm)<br />
(exposure time < 5 seconds)<br />
Two lines are plotted as well: the seeing limit (chosen arbitrarily to be 3.3”) <strong>and</strong> the pixel scale vs.<br />
focal length. The former represents the ultimate resolution limit while the latter represents the<br />
resolution limit in the extremely undersampled regime. The data clearly shows how a transition occurs<br />
between these two regimes <strong>and</strong> puts into a broader context my initial <strong>powermate</strong> vs. no-<strong>powermate</strong><br />
investigation. The data also hints that going beyond f=1260mm (1.1 “/pixel in my case) may yield<br />
slight resolution improvements, however limits in tracking accuracy will quicly prevent much from<br />
being gained in practice for long exposures.<br />
I would love to get more data from other users to plot! It doesn’t matter what setup you are using as<br />
long as I am told what the focal length <strong>and</strong> pixel size are. Ideally, the ½ flux diameter measurement<br />
method should be used (I use CCDware’s CCDInspector, available for free evaluation at<br />
http://www.ccdware.com/products/ccdinspector/). Exposure times should be kept short so that<br />
tracking errors are avoided. If you provide raw images for download I will do the measurements <strong>and</strong><br />
plot your data.<br />
Note: I am not the first person to state that seeing limited <strong>imaging</strong> requires ~1”/pixel image scale, see<br />
for instance this great online presentation: http://www.ewellobservatory.com/bestpractices/index.cfm<br />
by Richard A. Bennion.<br />
Any <strong>and</strong> all comments are very welcome!!<br />
Mikael Svalgaard, www.leif.org/mikael
![When the Heliospheric Current Sheet [Figure 1] - Leif and Vera ...](https://img.yumpu.com/51383897/1/190x245/when-the-heliospheric-current-sheet-figure-1-leif-and-vera-.jpg?quality=85)


![The sum of two COSine waves is equal to [twice] the product of two ...](https://img.yumpu.com/32653111/1/190x245/the-sum-of-two-cosine-waves-is-equal-to-twice-the-product-of-two-.jpg?quality=85)