Operation Manual for Demo Kit DAD02 V1.01 - Dorji
Operation Manual for Demo Kit DAD02 V1.01 - Dorji
Operation Manual for Demo Kit DAD02 V1.01 - Dorji

Create successful ePaper yourself
Turn your PDF publications into a flip-book with our unique Google optimized e-Paper software.
<strong>DAD02</strong><br />
<strong>Operation</strong> <strong>Manual</strong> <strong>for</strong> <strong>Demo</strong> <strong>Kit</strong> <strong>DAD02</strong> <strong>V1.01</strong><br />
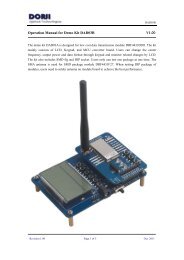
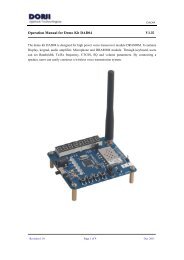
The demo kit <strong>DAD02</strong> is designed <strong>for</strong> measuring pressure, temperature, altitude and direction<br />
parameters of sensor module DSPC01. The kit mainly includes: fig area, LED array, button array<br />
and display area.<br />
Revision 1.01 Page 1 of 4 Oct. 2011
<strong>DAD02</strong><br />
J6<br />
RA4<br />
RA5<br />
RE0<br />
RE1<br />
RE2<br />
NC<br />
NC<br />
VDD<br />
GND<br />
GND<br />
RC0<br />
RC1<br />
RC2<br />
RC3<br />
RD0<br />
RD1<br />
RD2<br />
RD3<br />
RC4<br />
RC5<br />
RC6<br />
GND<br />
J7<br />
D6<br />
D7<br />
J1<br />
pedo<br />
S1<br />
DSPC01<br />
temp<br />
pres<br />
Alti<br />
LEDs<br />
PIC16F<br />
ON<br />
K6<br />
comp<br />
OFF<br />
weat<br />
MODE StartCal ExitCal Wakeup Sleep<br />
K1 K2 K3 K4 K5<br />
+<br />
J2<br />
-<br />
J5<br />
RC7<br />
RD5<br />
RD4<br />
RD6<br />
RD7<br />
RB0<br />
VDD<br />
GND<br />
RB1<br />
RB2<br />
NC<br />
RB4<br />
RB3<br />
GND<br />
RB5<br />
RB6<br />
RB7<br />
RA1<br />
RA0<br />
RE3<br />
RA2<br />
RA3<br />
1. LEDs<br />
Part Name Part Type Function<br />
Pedo Led Reserved; no function<br />
Temp Led Temperature indication<br />
Pres Led Pressure indication<br />
Alti Led Altitude indication<br />
Comp Led Direction indication<br />
Weat Led Weather trend indication<br />
2. BUTTONs<br />
1) MODE: This button is used to switch measured parameters in different mode.<br />
2) Startcal: At each powering-on, the compass sensor needs to be recalculated. After pressing<br />
it, the DISPLAY area will show “---“, which means calibration is going on. Users<br />
need to rotate the demo kit horizontally at least two times and each circle should<br />
last at least 3 seconds.<br />
3) Exitcal: Reserved; without function.<br />
4) Wakeup: It is used to wake up the module from sleep mode.<br />
5) Sleep: When it is pushed, the module will enter sleep mode.<br />
Revision 1.01 Page 2 of 4 Oct. 2011
<strong>DAD02</strong><br />
3. SWITCH & SOCKET<br />
Part Name Part Type Function<br />
J1 Fig To fix sensor module on board<br />
J2 Header Pin header <strong>for</strong> battery supply<br />
K6 Switch Power switch<br />
S1 Socket Power socket <strong>for</strong> DC input<br />
D6,D7 Display Display measured parameters<br />
J5,J6 Pin holes For monitoring command and time sequence<br />
J7 Jumper Current measurement; Shorted in normal use<br />
4. POWPER SUPPLY<br />
The kit works at 2.7~3.6V. There are two groups of power inputs: J2 (battery) and S1<br />
(DC socket). Users only can choose one of them in use.<br />
5. FUNCTION DISCRIPTION<br />
When powering-on, the DISPLAY will show pressure value and the Pres LED is lighted.<br />
Users can push the Mode button to check different parameters. At each power-on, the<br />
compass sensor needs to be recalculated or else the measured value is inaccurate. After<br />
pressing Startcal button, the DISPLAY will show ‘---‘ and the compass sensor will start<br />
self-calculation and last about 10 seconds. In this period users need to rotate the demo kit<br />
horizontally at least two times and each circle should last at least 3 seconds. After<br />
self-calibration the DISPLAY will show the accurate compass value.<br />
6. APPLIATION NOTES<br />
1) DSPC01 module should be kept away from the outlet of wind in measuring pressure value.<br />
Dust or other <strong>for</strong>eign substance should not block or cover the measuring hole of pressure<br />
sensor or else the pressure value will be inaccurate or be postponed in reading.<br />
2) In measuring direction the module should be kept in horizontal level in order to get the<br />
correct value and should avoid to be used in strong magnetic environment such as large<br />
electromechanical equipment, iron mine, magnet, etc. If the product is equipped with speaker,<br />
the speaker should be turned off in case the magnetic field will interfere the compass.<br />
3) If the sensor module is put or pass in strong magnetic environment, the compass should be<br />
calibrated after leaving such environment. The users also need to calibrate the compass <strong>for</strong><br />
the first use when the finished products are sold on market<br />
Revision 1.01 Page 3 of 4 Oct. 2011
<strong>DAD02</strong><br />
<strong>Dorji</strong> Applied Technologies<br />
A division of <strong>Dorji</strong> Industrial Group Co., Ltd<br />
Add.: Xinchenhuayuan 2, Dalangnanlu, Longhua,<br />
Baoan district, Shenzhen, China 518109<br />
Tel: 0086-755-28156122<br />
Fax.: 0086-755-28156133<br />
Email: sales@dorji.com<br />
Web: http://www.dorji.com<br />
<strong>Dorji</strong> Industrial Group Co., Ltd reserves the right to<br />
make corrections, modifications, improvements and<br />
other changes to its products and services at any time<br />
and to discontinue any product or service without<br />
notice. Customers are expected to visit websites <strong>for</strong><br />
getting newest product in<strong>for</strong>mation be<strong>for</strong>e placing<br />
orders.<br />
These products are not designed <strong>for</strong> use in life support<br />
appliances, devices or other products where<br />
malfunction of these products might result in personal<br />
injury. Customers using these products in such<br />
applications do so at their own risk and agree to fully<br />
indemnify <strong>Dorji</strong> Industrial Group <strong>for</strong> any damages<br />
resulting from improper use.<br />
Revision 1.01 Page 4 of 4 Oct. 2011