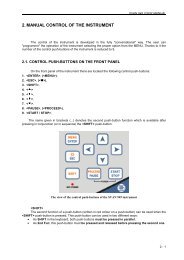
2 MANUAL CONTROL OF THE INSTRUMENT 2.1 Control ... - Svantek
2 MANUAL CONTROL OF THE INSTRUMENT 2.1 Control ... - Svantek
2 MANUAL CONTROL OF THE INSTRUMENT 2.1 Control ... - Svantek

You also want an ePaper? Increase the reach of your titles
YUMPU automatically turns print PDFs into web optimized ePapers that Google loves.
SVAN 958 USER <strong>MANUAL</strong> .<br />
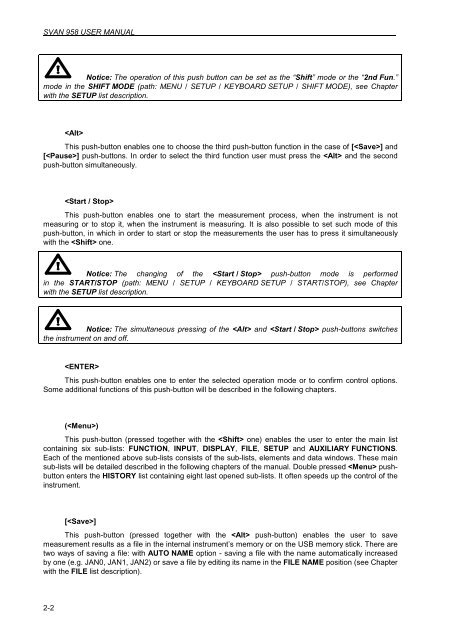
Notice: The operation of this push button can be set as the “Shift” mode or the “2nd Fun.”<br />
mode in the SHIFT MODE (path: MENU / SETUP / KEYBOARD SETUP / SHIFT MODE), see Chapter<br />
with the SETUP list description.<br />
2-2<br />
<br />
This push-button enables one to choose the third push-button function in the case of [] and<br />
[] push-buttons. In order to select the third function user must press the and the second<br />
push-button simultaneously.<br />
<br />
This push-button enables one to start the measurement process, when the instrument is not<br />
measuring or to stop it, when the instrument is measuring. It is also possible to set such mode of this<br />
push-button, in which in order to start or stop the measurements the user has to press it simultaneously<br />
with the one.<br />
Notice: The changing of the push-button mode is performed<br />
in the START/STOP (path: MENU / SETUP / KEYBOARD SETUP / START/STOP), see Chapter<br />
with the SETUP list description.<br />
Notice: The simultaneous pressing of the and push-buttons switches<br />
the instrument on and off.<br />
<br />
This push-button enables one to enter the selected operation mode or to confirm control options.<br />
Some additional functions of this push-button will be described in the following chapters.<br />
()<br />
This push-button (pressed together with the one) enables the user to enter the main list<br />
containing six sub-lists: FUNCTION, INPUT, DISPLAY, FILE, SETUP and AUXILIARY FUNCTIONS.<br />
Each of the mentioned above sub-lists consists of the sub-lists, elements and data windows. These main<br />
sub-lists will be detailed described in the following chapters of the manual. Double pressed pushbutton<br />
enters the HISTORY list containing eight last opened sub-lists. It often speeds up the control of the<br />
instrument.<br />
[]<br />
This push-button (pressed together with the push-button) enables the user to save<br />
measurement results as a file in the internal instrument’s memory or on the USB memory stick. There are<br />
two ways of saving a file: with AUTO NAME option - saving a file with the name automatically increased<br />
by one (e.g. JAN0, JAN1, JAN2) or save a file by editing its name in the FILE NAME position (see Chapter<br />
with the FILE list description).