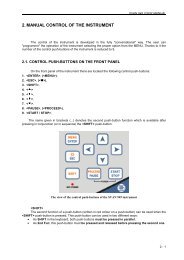
2 MANUAL CONTROL OF THE INSTRUMENT 2.1 Control ... - Svantek
2 MANUAL CONTROL OF THE INSTRUMENT 2.1 Control ... - Svantek
2 MANUAL CONTROL OF THE INSTRUMENT 2.1 Control ... - Svantek

Create successful ePaper yourself
Turn your PDF publications into a flip-book with our unique Google optimized e-Paper software.
SVAN 958 USER <strong>MANUAL</strong> .<br />
2-4<br />
(, )<br />
The , push-buttons pressed in conjunction (or in sequence) with the enable one,<br />
in particular, to:<br />
• change the relation between the Y-axis and X-axis of all plots presented on the screen<br />
• switch the channels and profiles in one-channel and STATISTICS modes of result’s presentation<br />
• switch the active channel in multi-channels mode of result’s presentation<br />
Some other possible reactions of the instrument on the pressing of these push-buttons<br />
will be described in details in the following chapters.<br />
[Markers]<br />
The Markers enable the user to mark the special events, which occurred during the performed<br />
measurements (i.e. the airplane flight, the dog’s barking, the train’s drive etc.). In order to enter<br />
the markers the logger has to be switched on (path: MENU / INPUT / LOGGER SETUP /<br />
LOGGER MODE: ON) and one or more logger options (PEAK, MAX, MIN, RMS in the case of sound<br />
measurements and PEAK, P–P, MAX, RMS, VDV in the case of vibration measurements) in channels<br />
have to be chosen (path: MENU / INPUT / LOGGER SETUP / CHANNEL x). In order to enter the marker<br />
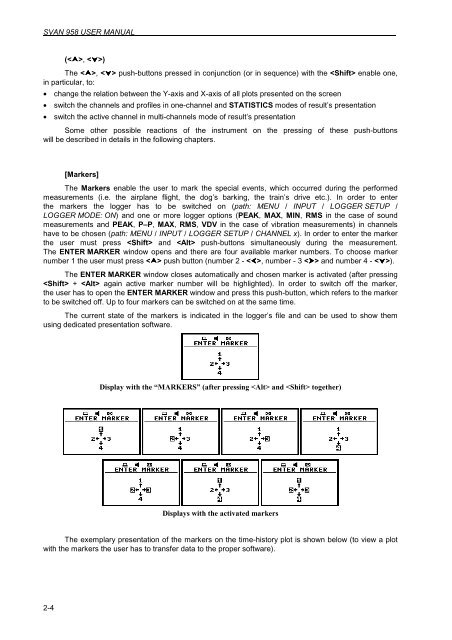
the user must press and push-buttons simultaneously during the measurement.<br />
The ENTER MARKER window opens and there are four available marker numbers. To choose marker<br />
number 1 the user must press push button (number 2 - , number - 3 and number 4 - ).<br />
The ENTER MARKER window closes automatically and chosen marker is activated (after pressing<br />
+ again active marker number will be highlighted). In order to switch off the marker,<br />
the user has to open the ENTER MARKER window and press this push-button, which refers to the marker<br />
to be switched off. Up to four markers can be switched on at the same time.<br />
The current state of the markers is indicated in the logger’s file and can be used to show them<br />
using dedicated presentation software.<br />
Display with the “MARKERS” (after pressing and together)<br />
Displays with the activated markers<br />
The exemplary presentation of the markers on the time-history plot is shown below (to view a plot<br />
with the markers the user has to transfer data to the proper software).